使用TensorFlow和DLTK进行生物医学图像分析的介绍
DLTK是用于医学图像的深度学习工具包,它扩展了TensorFlow, 以实现生物医学图像的深度学习。它为经典的应用程序提供特殊的操作和功能、模型的实现、教程(如本文中所使用的)和代码示例。
这篇文章是对生物医学图像深度学习的简单介绍,我们将在这里展示当前工程问题中的一些问题和解决方案,并向你展示如何为你的问题的建模。

什么是生物医学图像分析?为什么需要它?
生物医学图像是在不同尺度上(即微观,宏观等)对人体的测量。它们具有多种成像模式(例如CT扫描仪,超声检查等)并且测量人体的物理特性(例如,放射密度,X射线的不透明度)。这些图像由领域专家(例如放射科医师)用于临床任务(例如诊断)的解释,并且对医生的决策具有很大影响。
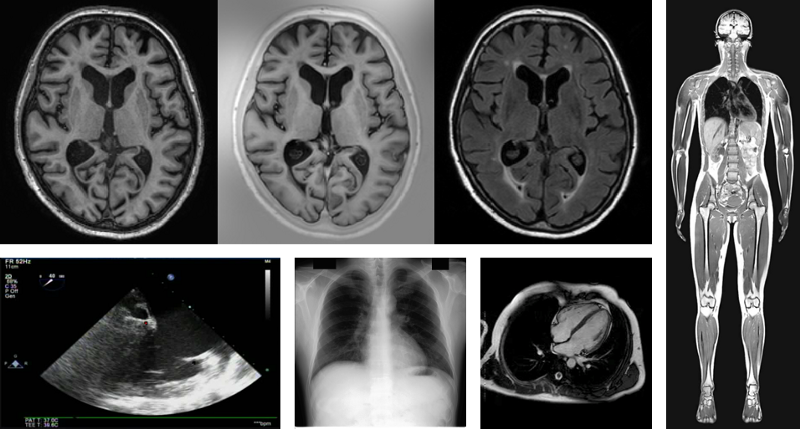
医学图像的例子(从左上到右下):多序列大脑核磁共振(Multi-sequence brain MRI),T1加权像(T1-weighted),T1反转恢复(T1 inversion recovery)和T2 FLAIR通道(T2 FLAIR channels);缝合全身核磁共振(Stitched whole-body MRI); 平面心脏超声(planar cardiac ultrasound); 胸部X光片(chest X-ray); 心脏电影磁共振成像(cardiac cine MRI)。
生物医学图像通常是体积图像(3D),并且有时具有额外的时间维度(4D)和/或多个通道(4-5D)(例如,多序列MR图像)。生物医学图像的变化与自然图像(例如照片)的变化完全不同,因为临床方案旨在对图像的获得性进行分层(例如,患者仰卧时,头部没有倾斜等)。在他们的分析中,我们的目的是检测细微的差异(即一些表示异常发现的小区域)。
为什么使用计算机视觉和机器学习?
计算机视觉方法一直被用来自动分析生物医学图像。最近深度学习的出现取代了许多其他机器学习方法,因为它避免了手工工程特征的创建,从而从过程中消除了一个关键的错误来源。此外,GPU加速的完整网络的快速推理速度允许我们对空前数量的数据进行尺度分析。
我们可以随时使用深度学习库进行生物医学成像吗?为什么要创建DLTK?
创建DLTK的主要原因是为该这个领域提供开箱即用的专业工具。许多深度学习库向开发人员展示了底层操作(例如张量乘法等),许多高级的专业操作在体积图像上的使用都是缺失的(例如,可区分的3D上采样层等),并且由于图像的额外空间维度,我们可能会遇到内存问题(例如,存储1千张CT图像的数据集的副本,其中图像尺寸为325x512x256像素,在float32中为268GB)。由于采集的性质不同,一些图像需要特殊的预处理(例如,灰度归一化,偏场校正,降噪,空间归一化或配准等)。
文件格式,标题和阅读图像
虽然许多成像模式供应商以DICOM标准格式生成图像,以二维切片的方式保存卷,但许多分析库依赖于更适合计算和与医学图像接口的格式。我们使用最初为脑成像开发的NifTI(或.nii格式),但广泛用于DLTK和本教程中的大多数其他卷图像。这种格式和其他格式保存的是重建图像容器并将其定位在物理空间中所必需的信息。
为此,它需要专业标题信息,我们通过一些属性来考虑使用深度学习:
- 存储有关如何重建图像信息的规格和大小(例如,使用size向量将卷分解为三维)。
- 数据类型
- 三维像素间距(也是三维像素的物理尺寸,通常以mm为单位)
- 物理坐标系原点
- 方位
为什么这些属性很重要?
网络将在三维像素空间中进行训练,这意味着我们将创建形状和尺寸张量[batch_size,dx,dy,dz,channels / features]并将其提供给网络。网络将在该三维像素空间中进行训练并假设所有图像(同样是未见过的测试图像)都是标准化的,或者可能存在需要推广的问题。在这个三维像素空间中,特征提取器(例如卷积层)将假设三维像素尺寸是各向同性的(即,在每个维度中相同)并且所有图像以相同的方式定位。
但是,由于大多数图像都描绘了物理空间,我们需要从该物理空间转换为常见的三维像素空间:
如果所有图像都以相同的方式定位(有时我们需要配准以对图像进行空间标准化),我们可以计算从物理空间到三维像素空间的缩放变换,通过:
phys_coords = origin + voxel_spacing * voxel_coord
其中所有这些信息都是存储在.nii头文件中的向量。
读取.nii图像:有几个库可以读取.nii文件并访问头信息并解析它以获得重建的图像集合作为numpy数组。我们选择了SimpleITK,一个围绕ITK库的python包装器,它允许我们导入额外的图像过滤器以进行预处理和其他任务:
import SimpleITK as sitk

import numpy as np


# A path to a T1-weighted brain .nii image:

t1_fn = './brain_t1_0001.nii'


# Read the .nii image containing the volume with SimpleITK:

sitk_t1 = sitk.ReadImage(t1_fn)


# and access the numpy array:

t1 = sitk.GetArrayFromImage(sitk_t1)
数据I/O的注意事项
根据训练数据库的大小,有几种方法可以将.nii图像数据提供给网络图。这些方法中的每一种都在速度方面具有特定的权衡,并且在训练期间可能成为瓶颈。我们将介绍并解释三个选项:
在记忆和馈送词典中:我们可以为网络图创建一个tf.placeholder,并在训练期间通过feed_dict馈送它。我们从磁盘读取所有.nii文件,使用python中处理它们(cf load_data())并将所有训练示例存储在内存中:
# Load all data into memory

data = load_data(all_filenames, tf.estimator.ModeKeys.TRAIN, reader_params)


# Create placeholder variables and define their shapes (here,

# we input a volume image of size [128, 224, 244] and a single

# channel (i.e. greyscale):

x = tf.placeholder(reader_example_dtypes['features']['x'],

                   [None, 128, 224, 224, 1])

y = tf.placeholder(reader_example_dtypes['labels']['y'],

                   [None, 1])


# Create a tf.data.Dataset

dataset = tf.data.Dataset.from_tensor_slices((x, y))

dataset = dataset.repeat(None)

dataset = dataset.batch(batch_size)

dataset = dataset.prefetch(1)


# Create an iterator

iterator = dataset.make_initializable_iterator()

nx = iterator.get_next()


with tf.train.MonitoredTrainingSession() as sess_dict:


    sess_dict.run(iterator.initializer,

               feed_dict={x: data['features'], y: data['labels']})


    for i in range(iterations):

        # Get next features/labels pair

        dict_batch_feat, dict_batch_lbl = sess_dict.run(nx)
注:这种直接方法通常是最快且最容易实现的,因为它避免了从磁盘连续读取数据,但需要将整个数据库中的训练示例(和验证示例)保存在内存中,这对于大型数据库或大型图像文件是不可行的。
使用TFRecords数据库:对于图像卷上大多数深度学习问题来说,训练示例的数据库往往很大,无法装入内存中。该TFRecords格式可以让训练样本连续,并使用快速读写存储在磁盘中(如,并行数据读取):
def _int64_feature(value):

    return tf.train.Feature(int64_list=tf.train.Int64List(value=[value]))


def _float_feature(value):

    return tf.train.Feature(float_list=tf.train.FloatList(value=value))


# path to save the TFRecords file

train_filename = 'train.tfrecords'


# open the file

writer = tf.python_io.TFRecordWriter(train_filename)


# iterate through all .nii files:

for meta_data in all_filenames:


    # Load the image and label

    img, label = load_img(meta_data, reader_params)


    # Create a feature

    feature = {'train/label': _int64_feature(label),

               'train/image': _float_feature(img.ravel())}


    # Create an example protocol buffer

    example = tf.train.Example(features=tf.train.Features(feature=feature))


    # Serialize to string and write on the file

    writer.write(example.SerializeToString())


writer.close()
格式可以直接与TensorFlow连接,也可以直接集成到tf.graph的训练循环中:
def decode(serialized_example):

    # Decode examples stored in TFRecord

    # NOTE: make sure to specify the correct dimensions for the images

    features = tf.parse_single_example(

        serialized_example,

        features={'train/image': tf.FixedLenFeature([128, 224, 224, 1], tf.float32),

                  'train/label': tf.FixedLenFeature([], tf.int64)})


    # NOTE: No need to cast these features, as they are already `tf.float32` values.

    return features['train/image'], features['train/label']


dataset = tf.data.TFRecordDataset(train_filename).map(decode)

dataset = dataset.repeat(None)

dataset = dataset.batch(batch_size)

dataset = dataset.prefetch(1)


iterator = dataset.make_initializable_iterator()

features, labels = iterator.get_next()

nx = iterator.get_next()


with tf.train.MonitoredTrainingSession() as sess_rec:

    sess_rec.run(iterator.initializer)


    for i in range(iterations):

        try:

            # Get next features-labels pair

            rec_batch_feat, rec_batch_lbl = sess_rec.run([features, labels])


        except tf.errors.OutOfRangeError:

            pass
注: TFRecords是从磁盘访问文件的快速方法,但需要存储整个训练数据库的另一个副本。如果我们的目标几TB大小的数据库,可能会很麻烦。
使用本地的python生成器:最后,我们可以使用python生成器,创建一个read_fn()来直接加载图像数据......
def read_fn(file_references, mode, params=None):


    # We define a `read_fn` and iterate through the `file_references`, which

    # can contain information about the data to be read (e.g. a file path):

    for meta_data in file_references:


        # Here, we parse the `subject_id` to construct a file path to read

        # an image from.

        subject_id = meta_data[0]

        data_path = '../../data/IXI_HH/1mm'

        t1_fn = os.path.join(data_path, '{}/T1_1mm.nii.gz'.format(subject_id))


        # Read the .nii image containing a brain volume with SimpleITK and get

        # the numpy array:

        sitk_t1 = sitk.ReadImage(t1_fn)

        t1 = sitk.GetArrayFromImage(sitk_t1)


        # Normalise the image to zero mean/unit std dev:

        t1 = whitening(t1)


        # Create a 4D Tensor with a dummy dimension for channels

        t1 = t1[..., np.newaxis]


        # If in PREDICT mode, yield the image (because there will be no label

        # present). Additionally, yield the sitk.Image pointer (including all

        # the header information) and some metadata (e.g. the subject id),

        # to facilitate post-processing (e.g. reslicing) and saving.

        # This can be useful when you want to use the same read function as

        # python generator for deployment.

        if mode == tf.estimator.ModeKeys.PREDICT:

            yield {'features': {'x': t1}}


        # Labels: Here, we parse the class *sex* from the file_references

        # \in [1,2] and shift them to \in [0,1] for training:

        sex = np.int32(meta_data[1]) - 1

        y = sex


        # If training should be done on image patches for improved mixing,

        # memory limitations or class balancing, call a patch extractor

        if params['extract_examples']:

            images = extract_random_example_array(

                t1,

                example_size=params['example_size'],

                n_examples=params['n_examples'])


            # Loop the extracted image patches and yield

            for e in range(params['n_examples']):

                yield {'features': {'x': images[e].astype(np.float32)},

                       'labels': {'y': y.astype(np.int32)}}


        # If desired (i.e. for evaluation, etc.), return the full images

        else:

            yield {'features': {'x': images},

                   'labels': {'y': y.astype(np.int32)}}


    return
并使用tf.data.Dataset.from_generator()对实例进行排队:
# Generator function

def f():

    fn = read_fn(file_references=all_filenames,

                 mode=tf.estimator.ModeKeys.TRAIN,

                 params=reader_params)


    ex = next(fn)

    # Yield the next image

    yield ex


# Timed example with generator io

dataset = tf.data.Dataset.from_generator(

    f, reader_example_dtypes, reader_example_shapes)

dataset = dataset.repeat(None)

dataset = dataset.batch(batch_size)

dataset = dataset.prefetch(1)


iterator = dataset.make_initializable_iterator()

next_dict = iterator.get_next()


with tf.train.MonitoredTrainingSession() as sess_gen:

    # Initialize generator

    sess_gen.run(iterator.initializer)


    with Timer('Generator'):

        for i in range(iterations):

            # Fetch the next batch of images

            gen_batch_feat, gen_batch_lbl = sess_gen.run([next_dict['features'], next_dict['labels']])
注 :它避免创建图像数据库的其他副本,但是比TFRecords慢多了,因为生成器无法并行读取和映射函数。
速度基准和方法选择:我们运行这三种方法来读取.nii文件到TensorFlow,并比较加载并馈送固定大小的实例数据库所需的时间。
最快的方法是在5.6秒内通过占位符从内存中馈送,然后是31.1秒的TFRecords,而使用python发生器从磁盘中未优化的读取时间为123.5秒。但是,只要训练期间的正向/反向传播通过是计算瓶颈,数据I / O的速度就可以忽略不计。
数据标准化
与自然图像一样,我们可以对生物医学图像数据进行标准化,但方法可能略有不同。标准化的目的是消除已知的数据中的一些“差异”(例如,不同的主体姿势或图像对比度的差异等),从而简化对我们感兴趣的细微差异的检测(例如,存在病理学) 。在这里,我们将介绍最常见的标准化形式:
三维像素强度的标准化:这种形式高度依赖于获取数据的显像模式。典型的方法如,零均值,单位方差标准化是定性图像的标准(例如,weighted brain MR images,其中对比度高度依赖于采集参数,通常由专家设定)。如果我们采用这种统计方法,我们使用完整单一卷的统计数据,而不是整个数据库。
与此相反,定量成像测量物理量(例如CT成像中的无线电密度,其中强度在不同扫描仪之间是可比较的)并且受益于裁剪和/或重新缩放,作为简单范围标准化(例如,[-1] ,1])。

空间标准化:对图像方位进行标准化,使模型避免必须学习所有可能的方向,这大大减少了所需的训练图像的数量。我们还考虑了三维像素距离,即使从同一扫描仪获取,图像之间也可能有差异。这可以通过重新采样到各向同性分辨率来解决:
def resample_img(itk_image, out_spacing=[2.0, 2.0, 2.0], is_label=False):


    # Resample images to 2mm spacing with SimpleITK

    original_spacing = itk_image.GetSpacing()

    original_size = itk_image.GetSize()


    out_size = [

        int(np.round(original_size[0] * (original_spacing[0] / out_spacing[0]))),

        int(np.round(original_size[1] * (original_spacing[1] / out_spacing[1]))),

        int(np.round(original_size[2] * (original_spacing[2] / out_spacing[2])))]


    resample = sitk.ResampleImageFilter()

    resample.SetOutputSpacing(out_spacing)

    resample.SetSize(out_size)

    resample.SetOutputDirection(itk_image.GetDirection())

    resample.SetOutputOrigin(itk_image.GetOrigin())

    resample.SetTransform(sitk.Transform())

    resample.SetDefaultPixelValue(itk_image.GetPixelIDValue())


    if is_label:

        resample.SetInterpolator(sitk.sitkNearestNeighbor)

    else:

        resample.SetInterpolator(sitk.sitkBSpline)


    return resample.Execute(itk_image)


# Assume to have some sitk image (itk_image) and label (itk_label)

resampled_sitk_img = resample_img(itk_image, out_spacing=[2.0, 2.0, 2.0], is_label=False)

resampled_sitk_lbl = resample_img(itk_label, out_spacing=[2.0, 2.0, 2.0], is_label=True)
如果需要进一步标准化,我们可以使用医学图像配准包(如MIRTK等)并将图像配准到相同的空间中,使得图像之间的三维像素位置彼此对应。分析结构脑MR图像(例如,T1-weighted MR images)的典型步骤是将训练数据库中的所有图像配准到参考标准,如平均图集(例如MNI 305图集)。根据配准方法的自由度,也可以标准化尺寸(仿射配准)或形状(可变形配准)。这两种变体很少使用,因为它们删除了图像中的一些信息(即尺寸信息或形状信息),这些信息可能对分析很重要(例如,大心脏可能是心脏病的前兆)。
数据增加
通常情况下,可用的数据量有限,并且未涵盖某些变化。一些例子包括:
- 软组织器官,存在各种各样的正常形状
- 病变,例如癌症病变,其形状和位置可以在很大程度上变化
- 自由超声图像,可能有很多可能的视图
为了适当地归纳到看不见的测试用例,我们通过模拟数据的变化来增加训练图像,目的是增加鲁棒性。与标准化方法类似,我们将之分为强度增强和空间增强:
强度增强的例子:
- 向训练图像添加噪声概括噪声图像
- 添加随机偏移或对比度以处理图像之间的差异
空间增强的例子:
- 在预期对称的方向上翻转图像张量(例如,在脑部扫描时左/右翻转)
- 随机变形,(例如,模仿器官形状的差异)
- 沿轴的旋转(例如,用于模拟不同的超声视角)
- 对补丁进行随机裁剪和训练
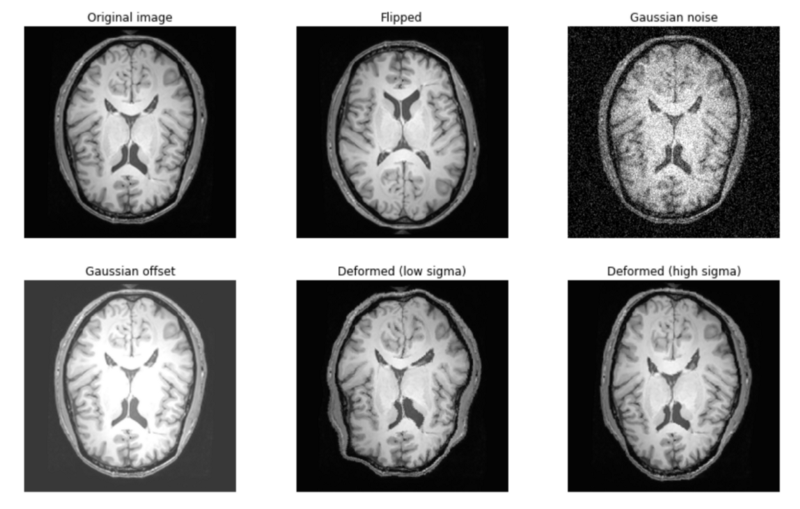
强度和空间增强技术的例子
关于扩充和数据I / O的重要说明:根据需要或有用的扩充,某些操作仅在python中可用(例如随机变形),这意味着如果使用使用原始TensorFlow的读取方法(即TFRecords或tf.placeholder),它们需要预先计算并存储到磁盘,从而大大增加了训练数据库的大小。
类平衡
领域专家级的解释(例如,手动分割或疾病分类)是在医学图像的监督学习期间的要求。通常,图像级(例如疾病的类)或三维像素级(即分段)标签不能以相同的比率获得,这意味着网络在训练期间将不会从每个类看到相同数量的实例。如果类比率相似(例如对于二元分类情况为30/70),则这对准确性没有很大影响。但是,由于大多数损失是整个批次的平均成本,因此网络将首先学会正确预测最常见的类。
训练期间的类不平衡将对罕见现象(例如图像分割中的小病变)产生更大的影响,并且在很大程度上影响测试准确性。
为了避免它,我们使用以下两种方法达成类平衡:
- 通过采样进行类平衡:在此,我们的目标是在采样期间校正所见实例的频率。通过以下方式来完成:a)从每个类中抽取相等的量,b)欠采样过度表示的类,或c)过采样的低频类。
- 通过损失函数进行类平衡:与经典的三维像素平均损失(例如分类交叉熵,L2等)相比,我们可以a)使用固有平衡的损失函数(例如smooth Dice loss,平均所有类的Dice系数),或b)根据类别频率重新加权每个预测的损失(例如,median-frequency re-weighted cross-entropy)。
示例应用
通过本文中提供的基本知识,我们现在可以研究使用TensorFlow构建用于医学图像深度学习的完整应用程序。我们已经使用深度神经网络实现了几个应用程序,现在介绍其中的一些应用程序,让你可以深入了解自己现在可以尝试解决的问题。
注意:这些示例应用程序学到了一些有意义的东西,但它们是为了演示而构建的,不是高性能的实现!
示例数据集
我们为以下所有示例提供下载和预处理脚本。对于大多数情况(包括上面的演示),我们使用了IXI脑数据库。对于图像分割,我们使用MRBrainS13挑战数据库,需要先注册才能下载。
下载和预处理脚本:https://github.com/DLTK/DLTK/tree/master/data
IXI:http://brain-development.org/ixi-dataset/
MRBrainS13:http://mrbrains13.isi.uu.nl/
多通道脑MR图像的图像分割
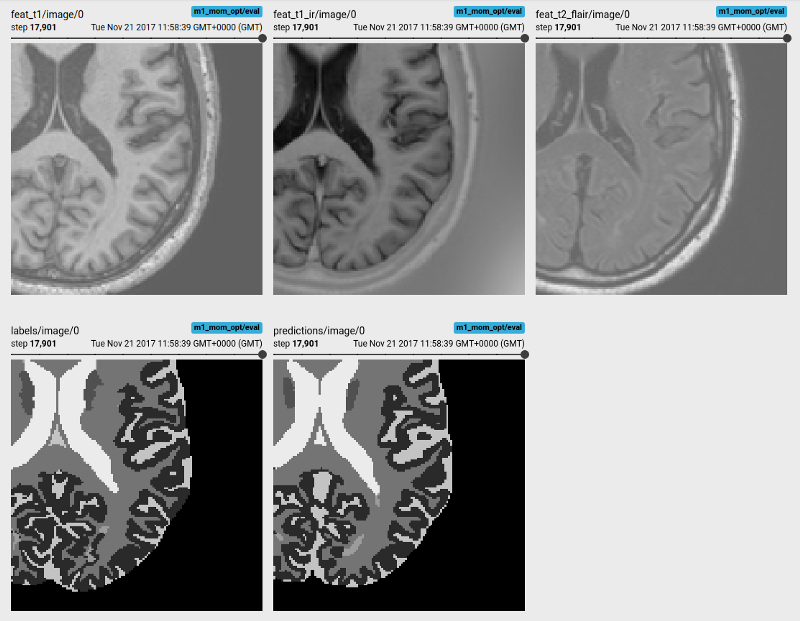
多序列图像输入,目标标签和预测的Tensorboard可视化
该图像分割应用程序学习在小的(N = 5)MRBrainS挑战数据集上预测多序列MR图像(T1加权,T1反转恢复和T2 FLAIR)中的脑组织和白质病变。它使用具有残余单元(residual units)的3D U-Net网络作为特征提取器,并跟踪TensorBoard中每个标签的Dice系数精度。
代码和说明:https://github.com/DLTK/DLTK/tree/master/examples/applications/MRBrainS13_tissue_segmentation
T1加权脑MR图像的年龄回归和性别分类
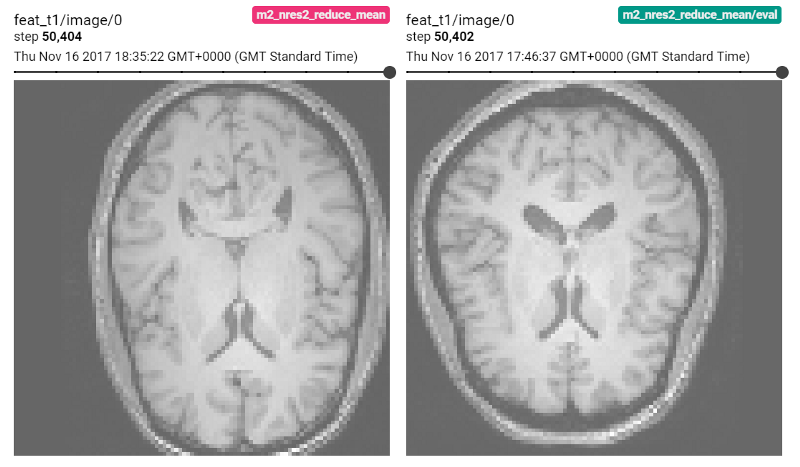
输入T1加权脑MR图像用于回归和分类
采用可扩展3D ResNet架构的两个类似的应用程序,学习从IXI数据库的T1加权脑MR图像中预测受试者的年龄(回归)或性别(分类)。这些应用程序之间的主要区别在于损失函数:我们训练回归网络以将年龄预测为具有L2损失的连续变量(预测年龄与实际年龄之间的均方差),我们使用分类交叉熵损失预测性别。
分类:https://github.com/DLTK/DLTK/tree/master/examples/applications/IXI_HH_sex_classification_resnet
回归:https://github.com/DLTK/DLTK/tree/master/examples/applications/IXI_HH_age_regression_resnet
3T多通道脑MR图像的表示学习
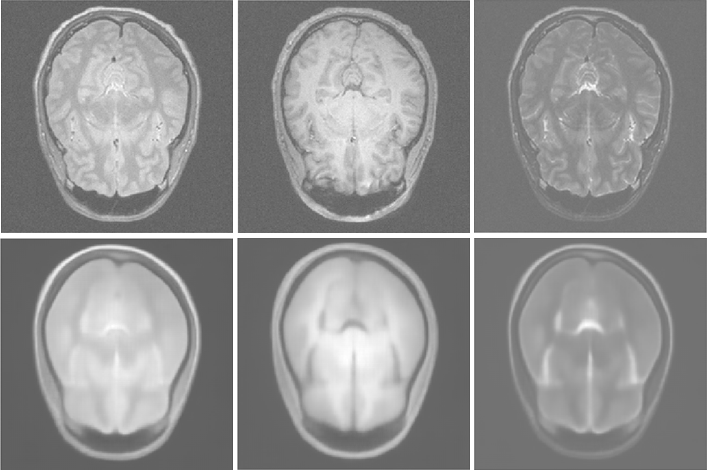
使用深度卷积自动编码器网络测试图像和重建
在这里,我们演示了深度卷积自动编码器架构的使用,这是一种强大的表示学习工具:网络将多序列MR图像作为输入,旨在重构它们。通过这种方法将整个训练数据库的信息压缩到它的潜在变量中。训练的权重也可用于迁移学习或信息压缩。请注意,重构的图像非常平滑:这可能是由于此应用程序使用L2损失函数或网络较小难以正确编码详细信息。
代码和说明:https://github.com/DLTK/DLTK/tree/master/examples/applications/IXI_HH_representation_learning_cae
T1w脑MR图像上的简单图像超分辨率

图像超分辨率(super-resolution):原始目标图像,下采样输入图像,线性上采样图像,预测超分辨率
单图像超分辨率旨在学习如何从低分辨率输入上采样和重构高分辨率图像。这种简单的实现创建了图像的低分辨率版本,超分辨率网络学会将图像上采样到其原始分辨率(此处上采样系数为[4,4,4])。此外,我们计算线性上采样版本以展示它与重构图像的差异。
代码和说明:https://github.com/DLTK/DLTK/tree/master/examples/applications/IXI_HH_superresolution


