从实验到部署:MLflow 的入门指南
第1部分:基础知识
什么是MLOps?
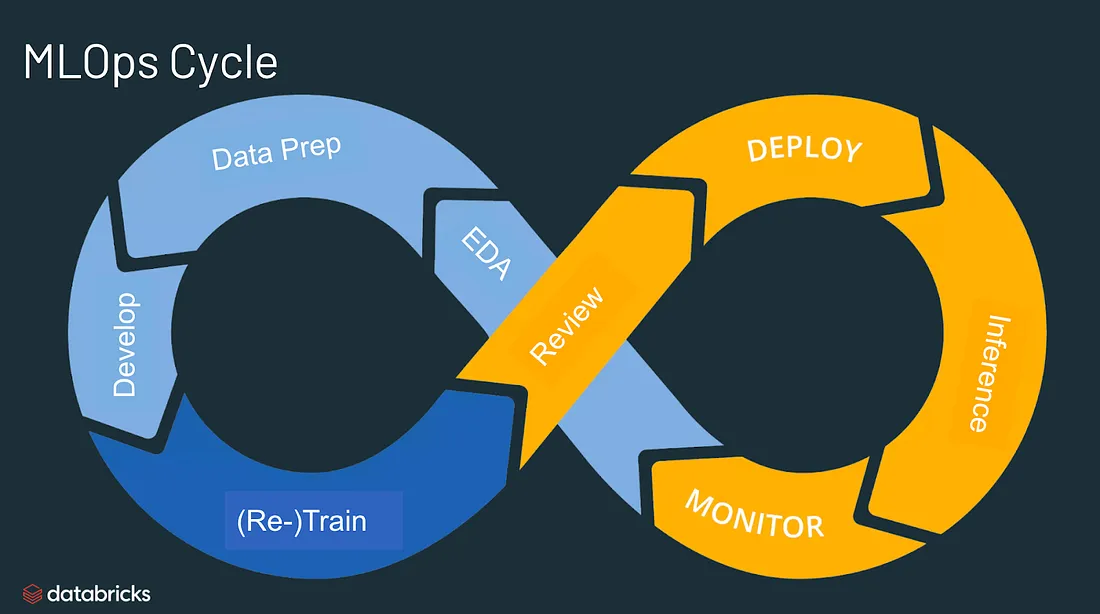
MLOps是一系列方法和行业最佳实践的集合,旨在帮助数据科学家简化和自动化在大规模生产环境中的整个模型训练、部署和管理生命周期。

MLOps正在逐渐成为一种独立的、独特的方法,用于管理整个机器学习生命周期。MLOps过程中的关键阶段包括以下内容:
1. 数据收集:从多个来源收集相关数据进行分析。
2. 数据分析:探索和检查收集的数据以获得见解。
3. 数据转换/准备:清洗、转换和准备数据用于模型训练。
4. 模型训练和开发:使用准备好的数据设计和开发机器学习模型。
5. 模型验证:评估模型的性能并确保其准确性。
6. 模型服务:部署经过训练的模型以提供现实世界的预测。
7. 模型监控:持续监测模型在生产中的性能,以保持其有效性。
8. 模型重新训练:定期使用新数据对模型进行重新训练,使其保持最新和准确。
我们将如何实施MLOps呢?虽然有多种选择,比如Neptune、Comet和Kubeflow等,但我们将选择使用MLflow。因此,让我们熟悉一下MLflow并深入了解其原理。
MLflow介绍
MLflow就像机器学习中的瑞士军刀一样,它非常灵活和开源,帮助你像一名专业人士一样管理整个,ML之旅。它与所有知名的ML库(如TensorFlow、PyTorch、Scikit-learn、spaCy、Fastai、Statsmodels等)兼容。此外,你还可以将其与任何其他你喜欢的库、算法或部署工具一起使用。此外,它被设计为非常可定制的——你可以轻松地使用自定义插件添加新的工作流、库和工具。

MLflow遵循模块化和基于API的设计理念,将其功能分为四个独立的部分。

四个部分如下:
1. MLflow Tracking: 这是一个API和用户界面,可以在ML运行过程中记录参数、代码版本、指标和产品,并在以后可视化结果。它适应于任何环境,允许你记录到本地文件或服务器,并比较多个运行。团队还可以使用它来比较来自不同用户的结果。
2. MLflow Projects: 这是一种简化打包和重用数据科学代码的方式。每个项目是一个包含代码或Git仓库的目录,还有一个描述文件用于指定依赖关系和执行指令。当你使用Tracking API时,MLflow会自动跟踪项目的版本和参数,使得可以轻松地从GitHub或你的Git仓库运行项目,并将它们链接到多步骤的工作流中。
3. MLflow Models: 它允许你以不同的格式打包ML模型,并提供各种部署工具。每个模型保存为一个目录,其中包含一个描述文件列出其支持的格式。MLflow提供了将常见模型类型部署到各种平台的工具,包括基于Docker的REST服务器、Azure ML、AWS SageMaker和Apache Spark用于批处理和流媒体推理。当你使用Tracking API输出MLflow模型时,MLflow会自动跟踪其来源,包括项目和运行它们的来源。
4. MLflow Registry: 这是一个集中式模型存储,具有API和用户界面,用于协作管理MLflow模型的整个生命周期。它包括模型血统、版本控制、阶段转换和注释,以实现有效的模型管理。
第2部分:实验与观察
首先,我们将使用随机森林分类器来创建一个垃圾邮件分类器。起初,我们故意让它不太好,只是为了增加一点刺激感。然后,我们将释放创造力,跟踪各种运行,微调超参数,并尝试一些酷炫的东西,比如Bag of Words和Tfidf。我们将像专业人士一样使用MLflow UI来进行所有这些追踪操作,并为下一部分做好准备。
与数据相融合
我们将使用Kaggle上可用的Spam Collection数据集。该数据集包含5,574条用英文编写的短信消息,已经标记为ham(合法)或spam(垃圾邮件)。然而,数据集存在着一个不均衡问题,其中大约有4,825个ham标签。为了避免偏差和保持简洁,我决定删除掉一些ham样本,将它们减少到约3,000个,并将结果保存为CSV文件以供我们的模型和文本预处理进一步使用。这里是展示我是如何实现的代码片段。
import pandas as pd
# define function
def load_save_data(load_file_path, save_file_path):
    # read csv
    df = pd.read_csv(load_file_path)
    # select target columns
    df = df[['message','label']]
    # dropping ham rows
    idxs = df[df.label=='ham'].index[:1825]
    df.drop(idxs, inplace=True)
    # shuffle the DataFrame rows
    df = df.sample(frac = 1)
    df.reset_index(inplace=True, drop=True)
    # save csv
    df.to_csv(save_file_path, index=False)
    print(f"File saved as: {save_file_path}")
# load the csv file & save it as data.csv
load_save_data(load_file_path="smscollection.csv", save_file_path="data.csv")
>>> File saved as: data.csv
# load saved csv & look at class balance
df = pd.read_csv("data.csv")
df.label.value_counts()
>>>
label
ham     3000
spam     747
Name: count, dtype: int64
# lets take a look at data
df.head()
>>>
                                           message label
0 URGENT! Your Mobile No 07808726822 was awarded... spam
1 Married local women looking for discreet actio... spam
2 Hi Chikku, send some nice msgs ham
3 FREE for 1st week! No1 Nokia tone 4 ur mobile ... spam
4 Hottest pics straight to your phone!! See me g... spam
构建基本的垃圾邮件分类器
现在我们已经准备好数据了,让我们迅速构建一个基本的分类器。我们将加载数据,并对消息进行预处理,以去除停用词、标点符号等。我们甚至会做词干化或词性还原来增加准确性。然后,将数据向量化,以获得一些令人惊叹的特征。接下来,我们将将数据拆分为训练集和测试集,将其放入随机森林分类器中,并对测试集进行预测。最后,我们看看模型怎么样了!
# import deps
import pandas as pd
import nltk
from nltk.corpus import stopwords
from nltk.tokenize import word_tokenize
from nltk.stem import PorterStemmer
from nltk.stem import WordNetLemmatizer
from sklearn.feature_extraction.text import CountVectorizer
from sklearn.feature_extraction.text import TfidfVectorizer
from sklearn.model_selection import train_test_split
from sklearn.ensemble import RandomForestClassifier
from sklearn.metrics import accuracy_score, precision_score, recall_score, f1_score
# initialize objects
stop_words = set(stopwords.words('english'))
stemmer = PorterStemmer()
lemmatizer = WordNetLemmatizer()
# A bsic text processing function with variations in preprocessing like stemming / lemmatization
def preprocess_text(text):
    words = word_tokenize(text.lower())
    filtered_words = [word for word in words if word.isalpha()]
    # filtered_words = [word for word in words if word.isalpha() and word not in stop_words]
    # filtered_words = [stemmer.stem(word) for word in words if word.isalpha() and word not in stop_words]
    # filtered_words = [lemmatizer.lemmatize(word) for word in words if word.isalpha() and word not in stop_words]
    return ' '.join(filtered_words)
# basic trainin model func with variations for vectorizing
def train_model(x_train, y_train, n, c, d):
    # Create a Vectorizer to convert text data to numerical features
    # vectorizer = CountVectorizer()
    vectorizer = TfidfVectorizer()
    x_train_vectorized = vectorizer.fit_transform(x_train)
    # Initialize the Random Forest classifier
    rf_classifier = RandomForestClassifier(n_estimators=n, criterion=c, max_depth=d)
    # Train the classifier on the training data
    rf_classifier.fit(x_train_vectorized, y_train)
    pred = rf_classifier.predict(x_train_vectorized)
    acc = accuracy_score(pred, y_train)
    return vectorizer, rf_classifier, acc
# evaluation function
def eval_met(actual, pred):
    acc = accuracy_score(actual, pred)
    prc = precision_score(actual, pred, pos_label='spam')
    rec = recall_score(actual, pred, pos_label='spam')
    f1 = f1_score(actual, pred, pos_label='spam')
    return acc, prc, rec, f1
在这段代码中,我提供了一些注释,给出了几个实验选项,例如使用或不使用停用词进行预处理,词形还原,词干提取等。同样地,在向量化方面,你可以选择词袋模型、TF-IDF或嵌入等方法。我们将按顺序调用这些函数并传递超参数来训练我们的第一个模型。
# Apply text preprocessing on the message column
df['processed_message'] = df.message.apply(preprocess_text)
# Split the data into features (x) and labels (y)
x = df['processed_message']
y = df['label']
# Split the data into training and testing sets
x_train, x_test, y_train, y_test = train_test_split(x, y, test_size=0.2, random_state=42)
# Train the model
vectorizer, model , train_acc = train_model(x_train, y_train, n=10, c='entropy', d=2)
# Evaluate the model
y_pred = model.predict(vectorizer.transform(x_test))
acc, prc, rec, f1 = eval_met(y_pred, y_test)
# Print the Results
print(f"Training Accuracy: {train_acc*100:.3f} %")
print(f"Validation Accuracy: {acc*100:.3f} %")
print(f"Precision Score: {prc*100:.3f} %")
print(f"Recall Score: {rec*100:.3f} %")
print(f"F1 Score: {f1*100:.3f} %")
# output
Training Accuracy: 80.380 %
Validation Accuracy: 79.333 %
Precision Score: 0.641 %
Recall Score: 100.000 %
F1 Score: 1.274 %
是的,这个模型几乎毫无用处。精确度接近于零,从而导致F1分数也接近于零。由于存在轻微的类别不平衡,F1分数比准确度更为重要,因为它提供了精确度和召回率的的总体衡量标准。
现在,让我们启动MLflow,并准备使用不同的选项和超参数进行实验。
首先,让我们启动MLflow。为了保持整洁,建议设置一个虚拟环境。你可以使用pip命令简单地安装MLflow pip install mlflow。
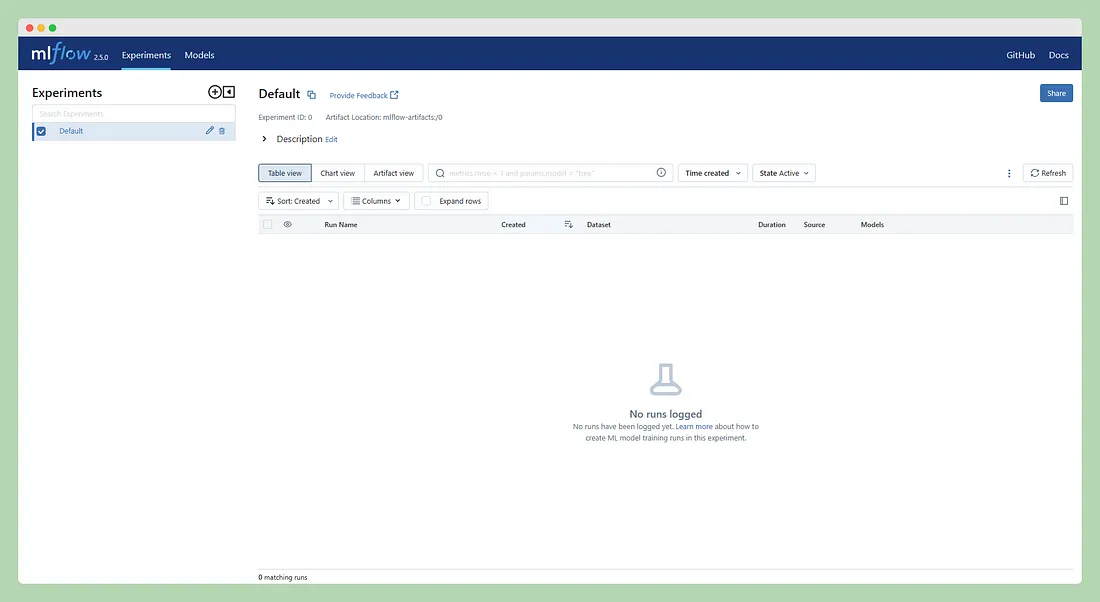
安装完成后,在终端中运行mlflow ui可以启动MLflow UI(确保该命令在你安装MLflow的虚拟环境中运行)。这将在你的本地浏览器上启动MLflow服务器,地址为http://localhost:5000。你将看到一个类似下方截图的页面:

由于我们还没有记录任何内容,因此在UI上就没有太多可以查看的东西。MLflow提供了多种跟踪选项,例如本地跟踪、带有数据库的本地跟踪、服务器上的跟踪,甚至云上的跟踪。对于这个项目,我们目前将坚持使用本地跟踪。一旦熟悉了本地设置,稍后可以传递跟踪服务器的URI并配置一些参数-底层原理保持不变。
现在,我们深入了解这些部分:存储指标、参数,甚至模型、可视化或其他对象,也称为artifacts(文档资料)。
在LLM开发的上下文中,可以将MLflow的跟踪功能视为传统日志记录的进化或替代。在传统的日志记录中,通常使用自定义的字符串格式来记录模型训练和评估过程中的超参数、指标和其他相关细节。这种日志记录方法可能变得繁琐且容易出错,特别是当处理大量实验或复杂的ML流程时。MLflow自动化了记录和组织这些信息的过程,使管理和比较实验更加容易,从而实现更高效和可复现的机器学习工作流程。
Mlflow跟踪
Mlflow的跟踪功能围绕着三个主要函数展开:log_param用于记录参数,log_metric用于记录指标,log_artifact用于记录文档资料(例如模型文件或可视化)。这些函数有助于在机器学习开发过程中组织和标准化跟踪实验相关数据。

当记录单个参数时,使用一个元组内的键值对来记录。另一方面,当处理多个参数时,可以使用包含键值对的字典。在记录指标时也适用相同的概念。以下是一个代码片段来说明这个过程。
# Log a parameter (key-value pair)
log_param("config_value", randint(0, 100))
# Log a dictionary of parameters
log_params({"param1": randint(0, 100), "param2": randint(0, 100)})
实验和运行之间的区别
一个实验是一个容器,代表一组相关的ML运行,为具有相同目标的运行提供逻辑上的分组。每个实验都有一个唯一的实验ID,并且你可以为其分配一个易于识别的用户友好的名称。
另一方面,运行对应于在实验中执行ML代码。你可以在单个实验中使用不同的配置运行多次,并为每个运行分配一个唯一的运行ID。跟踪信息,包括参数、指标和文档资料,存储在后端存储中,例如本地文件系统、数据库(如SQLite或MySQL)或远程云存储(如AWS S3或Azure Blob Storage)。
不论使用的是哪种后端存储,MLflow都提供了统一的API来记录和跟踪这些实验细节。这种简化的方法使得能够轻松检索和比较实验结果,提升了ML开发过程的透明度和可管理性。
首先,你可以使用mlflow.create_experiment()或更简单的方法mlflow.set_experiment("your_exp_name")来创建一个实验。如果提供了名称,它将使用现有的实验;否则,将创建一个新的实验来记录运行信息。
接下来,调用mlflow.start_run()来初始化当前活动的运行并开始记录。在记录必要的信息后,使用mlflow.end_run()来关闭运行。
以下是一个简单的代码片段,说明了这个过程:
import mlflow
# Create an experiment (or use existing)
mlflow.set_experiment("your_exp_name")
# Start the run and begin logging
with mlflow.start_run():
    # Log parameters, metrics, and artifacts here
    mlflow.log_param("param_name", param_value)
    mlflow.log_metric("metric_name", metric_value)
    mlflow.log_artifact("path_to_artifact")
# The run is automatically closed at the end of the 'with' block
使用Streamlit创建超参数调整的UI
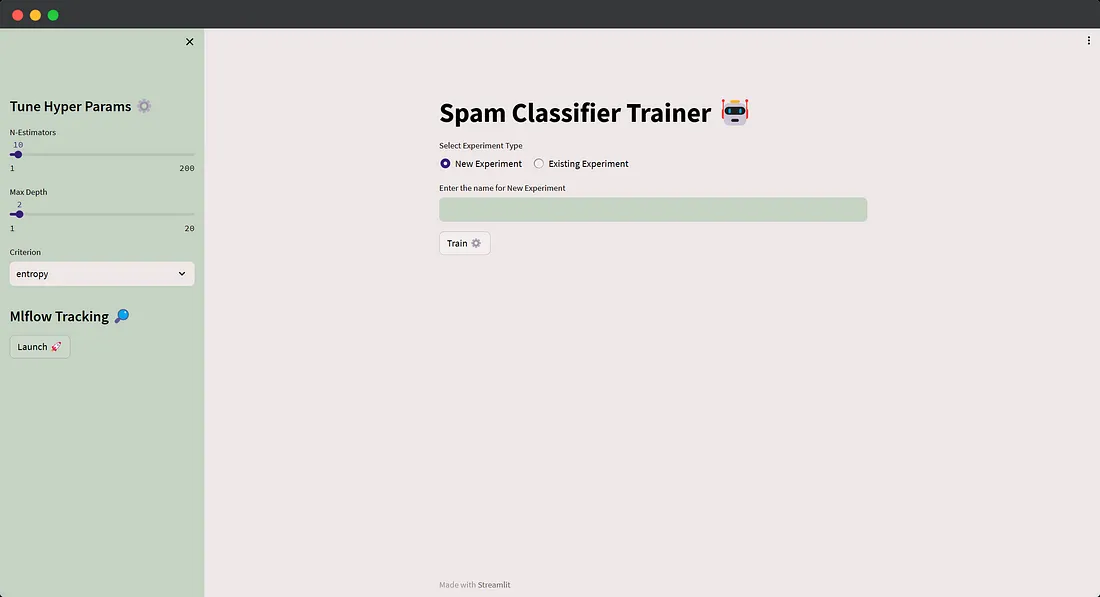
我们将采用一种用户友好的方法,而不是在shell中执行脚本并在那里提供参数。让我们构建一个基本的用户界面,允许用户输入实验名称或特定的超参数值。当点击训练按钮时,它将以指定的输入调用训练函数。此外,我们将探讨如何在保存了大量运行记录后查询实验和运行。
借助这个交互式用户界面,用户可以轻松地尝试不同的配置,并跟踪其运行结果,实现更流畅的机器学习开发。
在运行实验之前,用户会被提示选择是输入新的实验名称(然后在该实验中记录运行)还是从下拉菜单中选择已有的实验,该下拉菜单是使用mlflow.search_experiments()生成的。此外,用户可以根据需要轻松地微调超参数。以下是应用程序的代码:
# Import Libraries
import streamlit as st
import pandas as pd
from nltk.corpus import stopwords
from nltk.tokenize import word_tokenize
from nltk.stem import PorterStemmer
from nltk.stem import WordNetLemmatizer
from sklearn.model_selection import train_test_split
from sklearn.feature_extraction.text import TfidfVectorizer
from sklearn.ensemble import RandomForestClassifier
from sklearn.metrics import accuracy_score, precision_score, recall_score, f1_score
import mlflow
import subprocess
import os
import webbrowser
# Configure Page
st.set_page_config(
    page_title="Spam Filter",
    page_icon="",
    layout="centered",
    initial_sidebar_state="expanded")
# load feature extracted data
df = pd.read_csv("data.csv")
# HELPER FUNCTIONS
# A bsic text processing function with options for with/without stop words or
# stemming / lemmatizing
def preprocess_text(text):
    stop_words = set(stopwords.words('english'))
    stemmer = PorterStemmer()
    lemmatizer = WordNetLemmatizer()
    words = word_tokenize(text.lower())
    # filtered_words = [word for word in words if word.isalpha()]
    filtered_words = [word for word in words if word.isalpha() and word not in stop_words]
    # filtered_words = [stemmer.stem(word) for word in words if word.isalpha() and word not in stop_words]
    # filtered_words = [lemmatizer.lemmatize(word) for word in words if word.isalpha() and word not in stop_words]
    return ' '.join(filtered_words)
# Train the model
def train_model(exp_name, df, n, c, d):
    df['processed_message'] = df.message.apply(preprocess_text)
    # Split the data into features (X) and labels (y)
    x = df['processed_message']
    y = df['label']
    # Split the data into training and testing sets
    x_train, x_test, y_train, y_test = train_test_split(x, y, test_size=0.2, random_state=42)
    # Create or Select Experiment
    experiment = mlflow.set_experiment(exp_name)
    with mlflow.start_run(experiment_id=experiment.experiment_id):
        # Create a Vectorizer to convert text data to numerical features: BoW / TF-IDF
        # vectorizer = CountVectorizer()
        vectorizer = TfidfVectorizer()
        x_train_vectorized = vectorizer.fit_transform(x_train)
        x_test_vectorized = vectorizer.transform(x_test)
        rf_classifier = RandomForestClassifier(n_estimators=n, criterion=c, max_depth=d)
        rf_classifier.fit(x_train_vectorized, y_train)
        # Make predictions on the training & test set
        y_train_pred = rf_classifier.predict(x_train_vectorized)
        y_test_pred = rf_classifier.predict(x_test_vectorized)
        # Evaluate the model
        train_acc = accuracy_score(y_train, y_train_pred)
        test_acc = accuracy_score(y_test, y_test_pred)
        f1 = f1_score(y_test, y_test_pred, pos_label='spam')
        # Log Parameters & Metrics
        mlflow.log_params({"n_estimators":n, "Criterion": c, "Maximum Depth": d})
        mlflow.log_metrics({"Training Accuracy": train_acc, "Test Accuracy": test_acc, "F1 Score": f1})
        # Log Model & Vectorizer
        mlflow.sklearn.log_model(rf_classifier, "model")
        mlflow.sklearn.log_model(vectorizer, "vectorizer")
    return train_acc, test_acc
# Function for opening MLFlow UI directly from Streamlit
def open_mlflow_ui():
    # Start the MLflow tracking server as a subprocess
    cmd = "mlflow ui --port 5000"
    subprocess.Popen(cmd, shell=True)
def open_browser(url):
    webbrowser.open_new_tab(url)

# STREAMLIT UI
# Sidebar for hyperparameter tuning
st.sidebar.title("Tune Hyper Params")
n = st.sidebar.slider('N-Estimators',min_value=1, max_value=200, step=2, value=10)
d = st.sidebar.slider('Max Depth', min_value=1, max_value=20, step=2, value=2)
c = st.sidebar.selectbox('Criterion', ['gini', 'entropy', 'log_loss'], index=1)
# Launch Mlflow from Streamlit
st.sidebar.title("Mlflow Tracking")
if st.sidebar.button("Launch"):
    open_mlflow_ui()
    st.sidebar.success("MLflow Server is Live! http://localhost:5000")
    open_browser("http://localhost:5000")
# Main Page Content
st.title("Spam Classifier Trainer")
exp_type = st.radio("Select Experiment Type", ['New Experiment', 'Existing Experiment'], horizontal=True)
if exp_type == 'New Experiment':
    exp_name = st.text_input("Enter the name for New Experiment")
else:
    try:
        if os.path.exists('./mlruns'):
            exps = [i.name for i in mlflow.search_experiments()]
            exp_name = st.selectbox("Select Experiment", exps)
        else:
            st.warning("No Previous Experiments Found! Set New Experiment ⬆️")
    except:
        st.warning(" No Previous Experiments Found! Set New Experiment ")
# Training the model starts from here
if st.button("Train"):
    with st.spinner('Feeding the data--->'):
        tr_a, ts_a = train_model(exp_name, df, n, c, d)
    st.success('Trained!')
    st.write(f"Training Accuracy Achieved: {tr_a:.3f}")
下面是应用程序的样子:


