利用Lang-SAM和深度学习,计算图像中硬币的总价值
在计算机视觉领域的最新发展中,图像分割取得了令人瞩目的进展。一个突出的例子是“Segment Anything”模型(SAM),这是一个动态的深度学习工具,可以使用输入提示从图像中预测对象的掩模。由于其先进的编码和解码能力,SAM可以应对各种分割挑战,对于研究人员和开发人员来说具有重要价值。
Lang-SAM是基于SAM构建的项目。它能够通过文本提示提取我们所需图像中所有对象实例的掩模。它智能地结合了文本描述,弥补了自然语言处理和计算机视觉之间的差距。这种融合使得分割更具上下文感知性、精确性和详细性,扩大了传统能力之外的复杂成像挑战范围。
通过探索SAM模型的功能,我发现了一个典型的应用案例:估算包含多种其他对象的图像中硬币的总价值。让我们更深入地了解SAM的操作方式,并检查我如何将其应用于我的硬币求和项目,用于生成数据集和测试神经网络。
1. 细胞-任何内容
Facebook的研究团队FAIR在2022年推出了他们的分割模型SAM。SAM的令人惊奇之处在于它能够识别和分离图像的部分,即使它没有经过专门训练也可以实现。
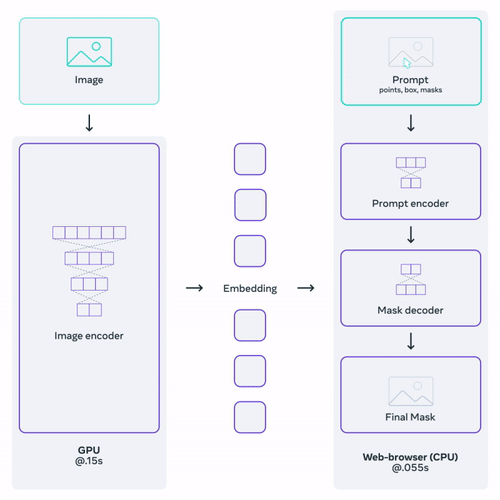
在其核心,SAM有三个主要部分:它能理解图像,接受提示或命令,然后根据该命令创建一个掩模。为了训练SAM,Facebook通过一个详细的三步过程创造了史上最大的图像数据集,名为SA-1B。从技术角度来说,SAM使用了类似于其他流行模型的系统,但又有其独特的特点。有时候,当给定一个模糊的命令时,它会进行多次猜测并选择最佳的答案。在测试中,SAM在23个不同的数据集上表现比其他模型更好。他们甚至将SAM与另一个工具结合起来,用于在图像中找到和突出显示特定对象等任务。
尽管SAM是使用文本编码器进行文本提示训练的,但Meta尚未发布带有文本编码器的权重。因此,当前公开模型只提供框或点提示。
2. 语言段任何内容(Lang-SAM)
为了克服SAM的文本提示限制,Luca Medeiras创建了一个名为Language-Segment-Anything (Lang-SAM) 的开源项目。Lang-SAM按顺序部署了GroundingDino和SAM。GroundingDino是一个文本到边界框模型,用户提供图像和文本提示,该模型根据文本提示找到这些对象的掩模。然后,这些边界框被用作SAM模型的输入提示,用于生成所识别对象的精确分段掩模。
以下是在Python中运行Lang-SAM的代码片段:
from  PIL  import  Image
from lang_sam import LangSAM
from lang_sam.utils import draw_image
# Initialize LangSAM model
model = LangSAM()
# Load the image and convert it to RGB
image_pil = Image.open('./assets/image.jpeg').convert("RGB")
# Set the text prompt for the segmentation
text_prompt = 'bicycle'
# Perform prediction to obtain masks, bounding boxes, labels, and logits
masks, boxes, labels, logits = model.predict(image_pil, text_prompt)
# Draw segmented image using the utility function
image = draw_image(image_pil, masks, boxes, labels)
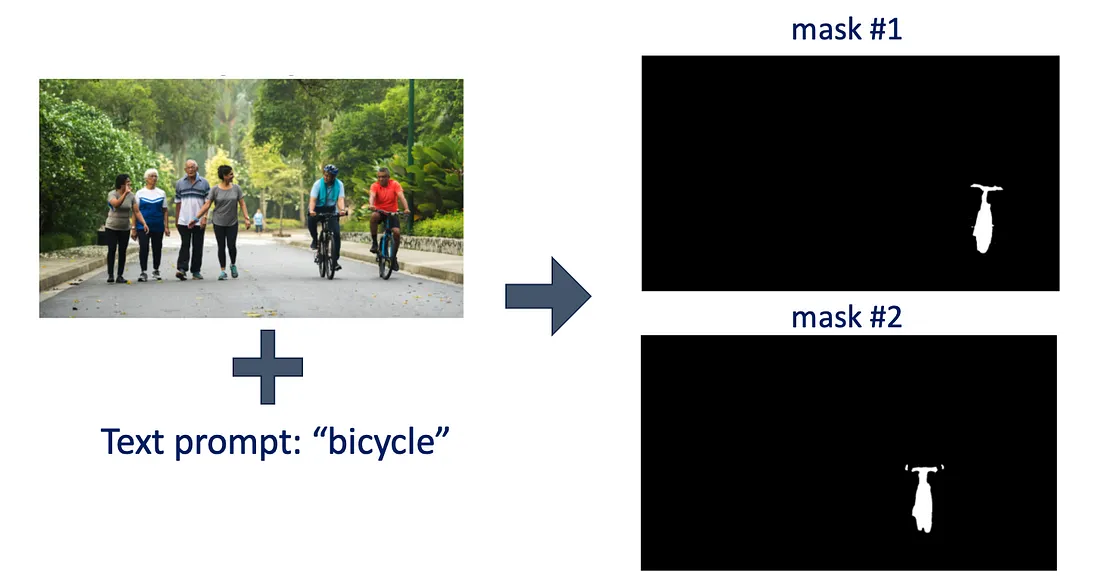
使用上述提供的代码,我对一张图片中的自行车进行了分割测试。结果在下面的图中进行了可视化。
Lang-SAM 的应用用例:计算硬币总数
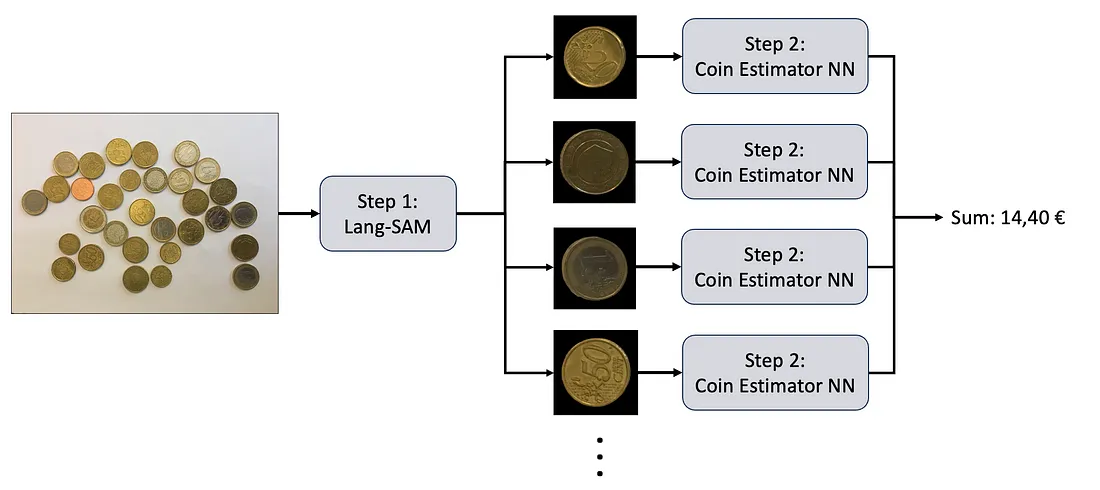
让我们首先确定硬币计数的工作流程。一般而言,我们会有包含不同硬币的图像。
在工作流程的第一步,我们可以通过使用Lang-SAM来将输入图像中的每个硬币进行分割。这一步可以通过简单地输入“coin”作为文本提示来完成。在获得硬币掩膜后,我们可以使用卷积神经网络来估计硬币的类别。我们可以使用Lang-SAM生成的数据集来训练这个自定义神经网络。有关体系结构和训练方法的详细信息将在下面的第2步中给出。在最后一步中,估计的类别将被简单地相加。
第一步:使用Lang-SAM
为了对图像中的硬币进行分割,我编写了以下函数,该函数接受图像作为输入,并通过使用Lang-SAM模型返回图像中每个硬币的掩膜和边框。各个硬币的边框仅在后续的可视化目的中使用,因此目前并不重要。
def find_coin_masks(image):
    # Suppress warning messages
    warnings.filterwarnings("ignore")
    text_prompt = "coin"
    try:
        model = LangSAM()
        masks, boxes, _, _ = model.predict(image, text_prompt)
        if len(masks) == 0:
            print(f"No objects of the '{text_prompt}' prompt detected in the image.")
        else:
            # Convert masks to numpy arrays
            masks_np = [mask.squeeze().cpu().numpy() for mask in masks]
            boxes_np = [box.squeeze().cpu().numpy() for box in boxes]
            return masks_np, boxes_np
    except (requests.exceptions.RequestException, IOError) as e:
        print(f"Error: {e}")
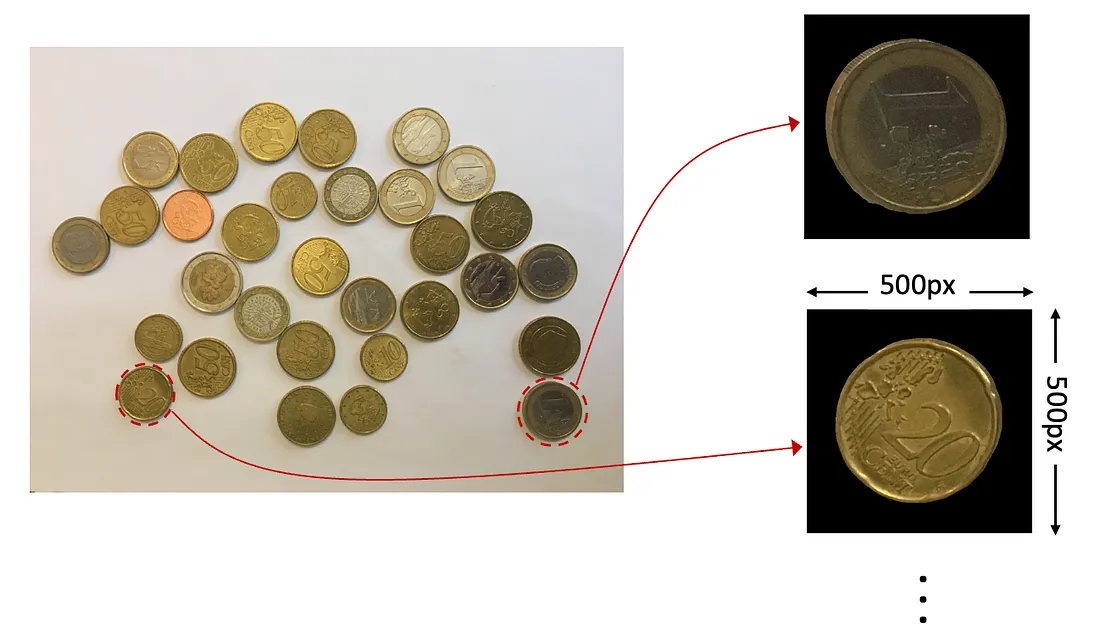
从包含多个硬币的输入图像中,上述提供的函数生成了分割掩模,在下面的图像中展示。然而,生成的分割掩模是图像的原始分辨率。考虑到分割图像约有95%的区域是空白部分,这可以被视为冗余信息。这么多的冗余数据会在输入神经网络进行后续训练阶段时造成计算上的挑战。为了解决这个问题,我将引入一个后续函数来裁剪并关注相关的分割区域,优化数据以便进行后续处理。
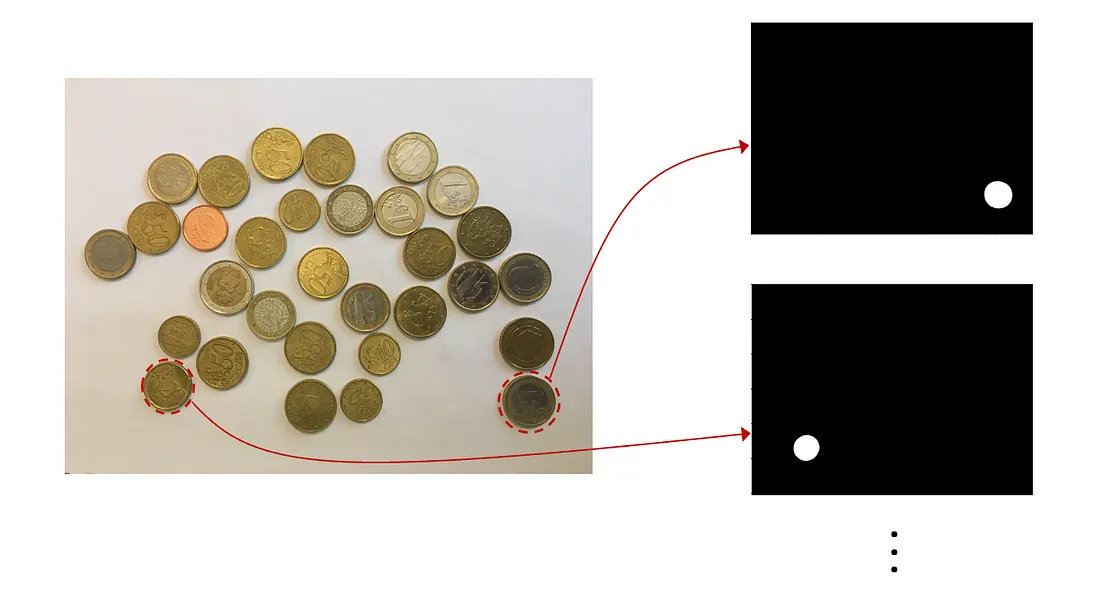
我已经创建了另一个名为generate_coin_images的函数。该函数首先使用find_coin_mask来获取原始大小的掩码。接下来,它裁剪掉掩码周围的黑色区域。最终的掩码被调整到标准的500x500像素大小。如果带有硬币的区域大于这个大小,它会调整大小以适应500x500的尺寸,确保我们在下一步中有一致的输入。
def generate_coin_images(image_dir):
    # Load the image and convert it to RGB format
    image = Image.open(image_dir).convert("RGB")
    # Use the previously defined function to obtain masks and bounding boxes
    masks, boxes = find_coin_masks(image)
    # Convert image to a numpy array for further processing
    image = np.array(image)
    # List to store final coin images
    coins = []
    for index in range(len(masks)):
        # Apply mask to image and obtain relevant segment
        mask = np.broadcast_to(np.expand_dims(masks[index],-1), image.shape)
        masked_image = mask * image
        # Find the bounding box coordinates for the non-zero pixels in the masked image
        nonzero_indices = np.nonzero(masked_image[:,:,0])
        nonzero_indices = np.array(nonzero_indices)
        y_min, y_max, x_min, x_max = find_boundary_of_coin(nonzero_indices)
        # Crop the masked image to the bounding box size
        masked_image = masked_image[y_min:y_max,x_min:x_max]
        # Creating a 500x500 mask
        if (y_max - y_min)<500 and (x_max - x_min)<500:
            difference_y = 500 - (y_max - y_min)
            difference_x = 500 - (x_max - x_min)
            if difference_y != 0:
                if difference_y % 2 == 0:
                    masked_image = np.pad(masked_image, [(difference_y//2, difference_y//2), (0, 0), (0, 0)])
                else:
                    masked_image = np.pad(masked_image, [((difference_y-1)//2, (difference_y-1)//2 + 1), (0, 0), (0, 0)])
            if difference_x != 0:
                if difference_x % 2 == 0:
                    masked_image = np.pad(masked_image, [(0, 0), (difference_x//2, difference_x//2), (0, 0)])
                else:
                    masked_image = np.pad(masked_image, [(0, 0), ((difference_x-1)//2, (difference_x-1)//2 + 1), (0, 0)])
            coins.append(masked_image)
        else:
            dim = (500, 500)
            resized_masked_image = cv2.resize(masked_image, dim, interpolation = cv2.INTER_AREA)
            coins.append(resized_masked_image)
    return coins, boxes
generate_coin_images函数生成硬币图像,示例如下。稍后,在我们创建用于训练神经网络的数据集以及我们的测试流水线中使用该函数。我们可以说这个函数是项目的核心。
第二步:创建一个硬币估值神经网络
步骤2.1:生成数据集
认识到欧洲硬币没有专门的数据集可用,我主动为我的项目创建了一个。我从这个GitHub页面获取了六种不同面额的欧洲硬币的照片:2欧元、1欧元、50欧分、20欧分、10欧分和5欧分。每张图片只包含一枚硬币,确保数据集的一致性。
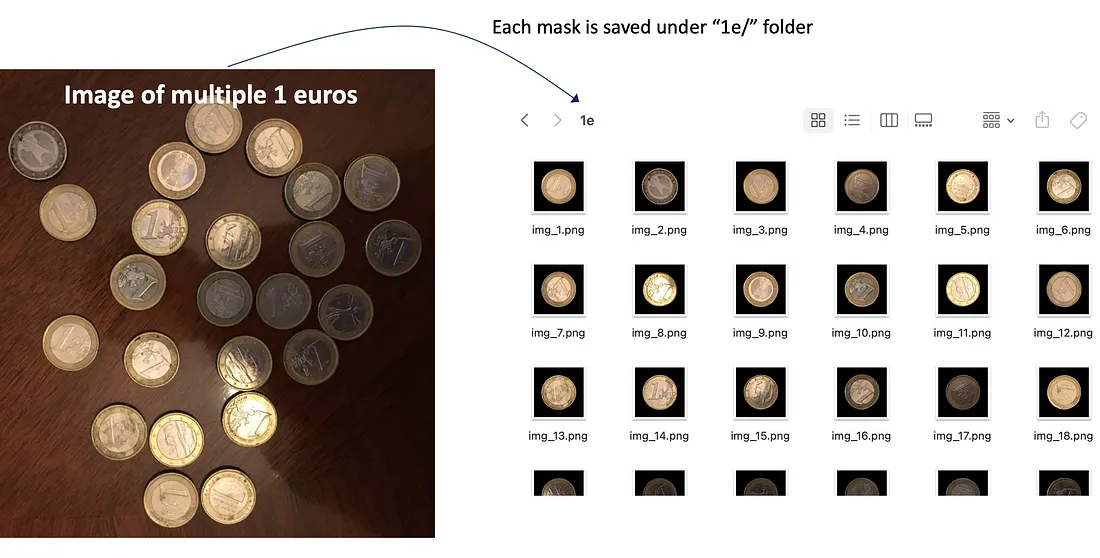
利用我之前描述的generate_coin_image函数,我提取并保存了每个硬币的掩码版本。然后,将这些图片按照它们各自的面额进行有组织地分类存储。
为了清晰起见,训练数据集包含2,739张图片,分布在以下六个类别中:
1. 2欧元:292张图片
2. 1欧元:301张图片
3. 50欧分:747张图片
4. 20欧分:444张图片
5. 10欧分:662张图片
6. 5欧分:293张图片
验证集包含73张图片,分布在以下六个类别中:
1. 2欧元:5张图片
2. 1欧元:12张图片
3. 50欧分:8张图片
4. 20欧分:17张图片
5. 10欧分:16张图片
6. 5欧分:15张图片
output_dir = "coin_dataset/training/""coin_dataset/training/"
dataset_dir = "coin_images/"
subfolders = os.listdir(dataset_dir)
for subfolder in subfolders:
    files = os.listdir(os.path.join(dataset_dir,subfolder))
    if '.DS_Store' in files:
        files.remove('.DS_Store')
    if '.git' in files:
        files.remove('.git')
    files = [file for file in files if file.endswith('.jpg') or file.endswith('.png')]

    for file in files:
        # Generate coin images with generate_coin_images function and loop through them
        padded_coins, boxes = generate_coin_images(os.path.join(dataset_dir,subfolder,file))

        for padded_coin in padded_coins:

            # Convert the numpy array image back to PIL Image object
            image = Image.fromarray((padded_coin).astype(np.uint8))
            if os._exists(os.path.join(output_dir, subfolder, '.DS_Store')):
                os.remove(os.path.join(output_dir, subfolder, '.DS_Store'))
            last_index = find_last_index(os.listdir(os.path.join(output_dir, subfolder)))
            image_name = f"img_{last_index+1}.png"
            subfolder_for_padded_coins = os.path.join(output_dir, subfolder, image_name)
            image.save(subfolder_for_padded_coins)
下面的图像提供了我们的分割过程的视觉表示,展示了处理1欧元硬币照片以创建数据集的过程。在分割完成后,个别的硬币图像会被储存在'1e/'目录中。
步骤2.2:训练
神经网络的架构包括两个主要组件:一些卷积层用于从输入图像中提取空间特征,以及两个全连接层用于最终分类。
具体而言,该网络首先接收一个500x500x3形状的RGB输入图像。随着卷积层的进行,通道数量增加,并且每个卷积层之后都会使用ReLU激活。在这些层中,通过步幅为2,特征图的空间维度在每个阶段都会减少,从而产生编码效果。
在卷积阶段之后,空间特征被展平并传递给两个全连接层。最后一层的输出通过softmax激活提供了类别的概率分布。
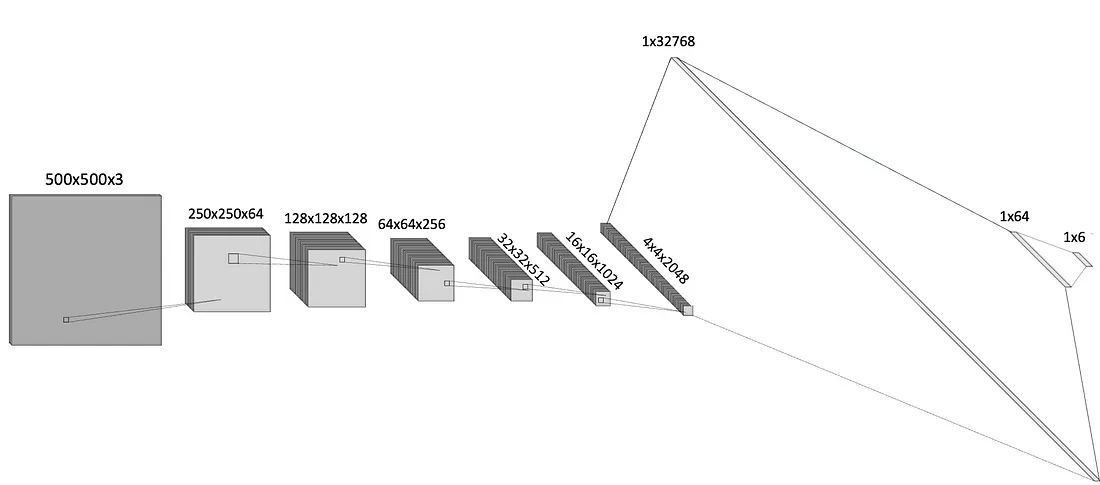
我使用Adam优化器和交叉熵损失函数来训练模型。训练一直持续到在验证损失中观察到饱和点,即在第15个epoch出现。
步骤2.3:性能基准
在训练结束后,我使用下面提供的脚本对最终epoch的检查点进行基准测试。我使用了下面给出的compute_accuracy函数,该函数接受模型和数据加载器作为参数,并计算给定数据集中准确预测的百分比。
def compute_accuracy(model, data_loader, device):
    correct_predictions = 0
    total_predictions = 0

    with torch.no_grad():
        for inputs, labels in data_loader:
            inputs, labels = inputs.to(device), labels.to(device)

            # Forward pass
            outputs = model(inputs)

            # Get the predicted class index by finding the max value in the output tensor along dimension 1
            _, predicted = torch.max(outputs.data, 1)
            total_predictions += labels.size(0)

            # Update correct predictions count:
            # Sum up all instances where the predicted class index equals the true class index
            correct_predictions += (predicted == labels).sum().item()

    return (correct_predictions / total_predictions) * 100
# Compute the accuracy on the training dataset and validation sets
train_accuracy = compute_accuracy(model, train_loader, device)
val_accuracy = compute_accuracy(model, val_loader, device)
print(f"Training set accuracy: {train_accuracy:.2f}%")
print(f"Validation set accuracy: {val_accuracy:.2f}%")
训练和验证数据集的平均准确率计算如下:
1. 训练集:87%
2. 验证集:95%
验证准确率超过训练准确率,可能是由于验证集相对较小。需要注意的是,这个项目的主要目的是展示新的分割模型的潜在应用,而不是构建一个高性能的硬币估算网络。因此,对这些观察结果进行更深入的分析将不会进行。
第三步:硬币计数的流程
经过对硬币估算网络的训练,图3中概述的工作流程的所有步骤现在已经完成。现在,让我们设计一个流程,从头到尾利用Lang-SAM和我们自定义的神经网络(NN),旨在计算图像中硬币的总价值。
我创建了一个名为coin_counter.ipynb的Python笔记本,指导了计数步骤。就像我们创建数据集的过程中使用的流程一样,首先使用generate_coin_images函数为图像中的每个硬币创建一个掩码。然后,将每个掩码分别输入到硬币估算网络中。最后,将预测的硬币价值相加,得到图像中的总金额。
测试结果
下图中显示的硬币图像被输入到硬币计数流程中。下面的图像显示了估计的类别叠加。虽然有一些错误的估算,但整体表现是可接受的。
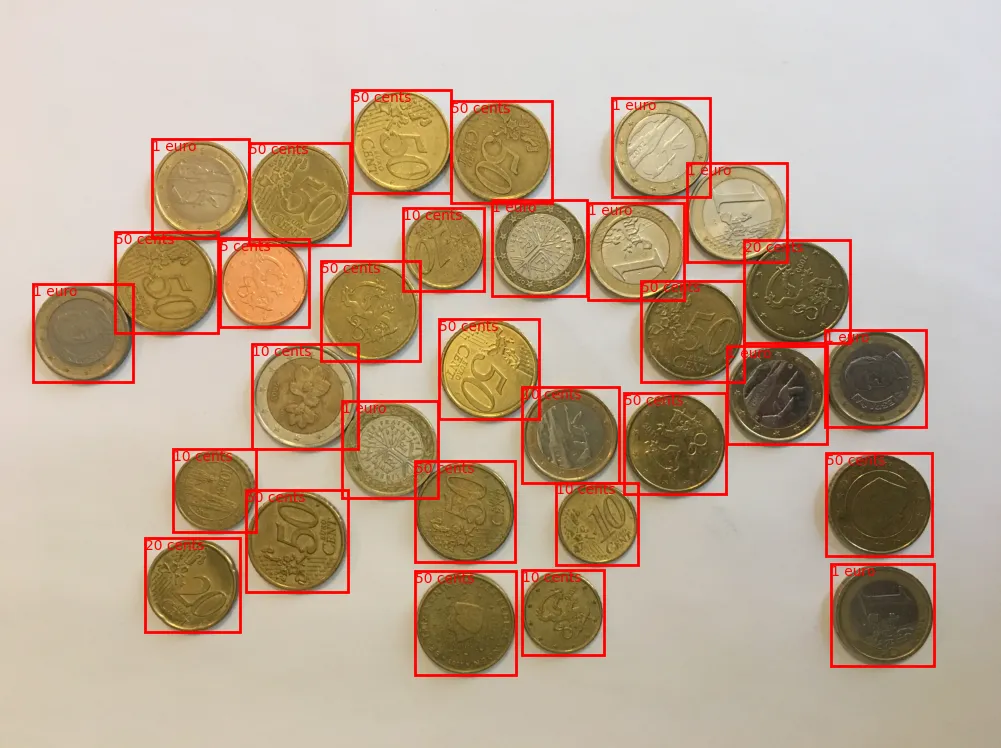
正如前面提到的,该项目的主要目标是展示一种新的分割模型的潜在应用,该模型可以接受文本输入,而不是构建一个高性能的硬币估计网络。


