在Python中利用CuPy发挥GPU的强大功能
2023年11月02日 由 camellia 发表
2061
0
无论是在进行机器学习、科学计算,还是处理大型数据集,CuPy都是绝对的游戏规则改变者。
什么是CuPy?
CuPy是一个与NumPy和SciPy数组兼容的Python库,专为GPU加速计算而设计。通过将NumPy替换为CuPy语法,你可以在NVIDIA CUDA或AMD ROCm平台上运行代码。这允许你使用GPU加速执行与阵列相关的任务,从而更快地处理更大的阵列。
只需换掉几行代码,你就可以利用GPU的大规模并行处理能力来显著加快索引、归一化和矩阵乘法等数组操作。
CuPy还允许访问低级CUDA功能。它允许使用RawKernels传递到现有的CUDA C/C++程序,使用Streams简化性能,并支持直接调用CUDA运行时API。ndarrays
安装CuPy
你可以使用pip安装CuPy,但在此之前,你必须使用以下命令找出正确的CUDA版本。
!nvcc --version
nvcc: NVIDIA (R) Cuda compiler driver

Copyright (c) 2005-2022 NVIDIA Corporation

Built on Wed_Sep_21_10:33:58_PDT_2022

Cuda compilation tools, release 11.8, V11.8.89

Build cuda_11.8.r11.8/compiler.31833905_0
似乎当前版本的Google Colab使用的是CUDA 11.8版。因此,我们将继续安装该版本。cupy-cuda11x
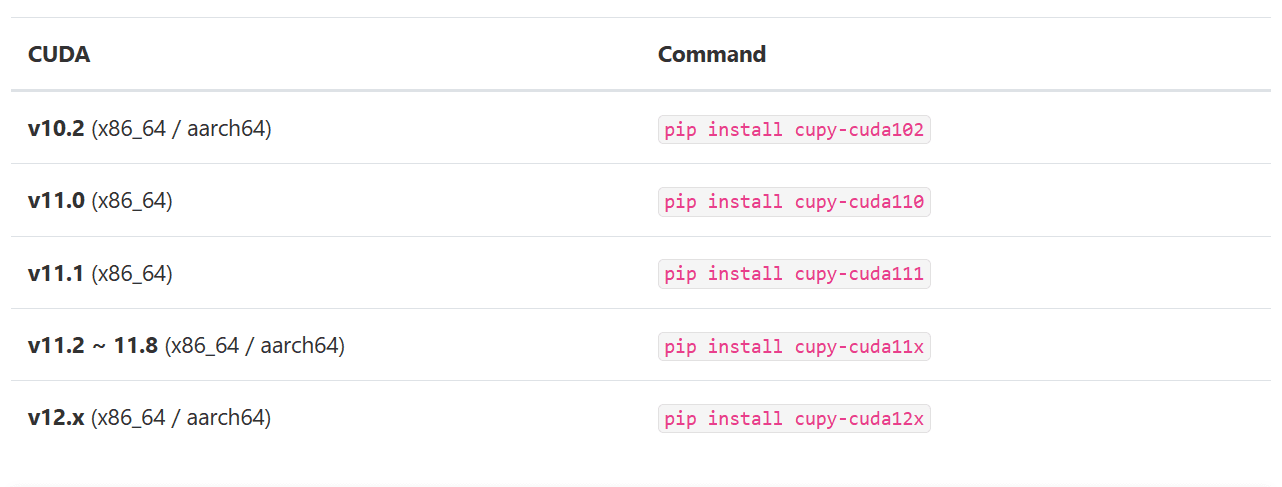
如果你在较旧的CUDA版本上运行,我提供了下表来帮助您确定要安装的适当CuPy包。

图片来源:CuPy 12.2.0
选择正确的版本后,我们将使用pip安装Python包。
pip install cupy-cuda11x
如果安装了Anaconda,还可以使用该命令自动检测并安装正确版本的CuPy包。conda
conda install -c conda-forge cupy
CuPy的基础知识
在本节中,我们将比较CuPy和Numpy的语法,它们有95%的相似度。你将将其替换为.npcp,而不是使用。
我们将首先使用Python列表创建一个NumPy和CuPy数组。之后,我们将计算向量的范数
import cupy as cp

import numpy as np


x = [3, 4, 5]


x_np = np.array(x)

x_cp = cp.array(x)


l2_np = np.linalg.norm(x_np)

l2_cp = cp.linalg.norm(x_cp)


print("Numpy: ", l2_np)

print("Cupy: ", l2_cp)
正如我们所看到的,我们得到了类似的结果。
Numpy:  7.0710678118654755

Cupy:  7.0710678118654755
要将NumPy转换为CuPy数组,你只需使用.cp.asarray(X)
x_array = np.array([10, 22, 30])

x_cp_array = cp.asarray(x_array)

type(x_cp_array)
cupy.ndarray
或者,使用将CuPy转换为Numpy数组。.get()
x_np_array = x_cp_array.get()

type(x_np_array)
numpy.ndarray
性能比较
在本节中,我们将比较NumPy和CuPy的性能。
我们将使用代码执行时间进行计时。然后,我们将创建一个3D NumPy数组并执行一些数学函数。time.time()
import time


# NumPy and CPU Runtime

s = time.time()

x_cpu = np.ones((1000, 100, 1000))

np_result = np.sqrt(np.sum(x_cpu**2, axis=-1))

e = time.time()

np_time = e - s

print("Time consumed by NumPy: ", np_time)
Time consumed by NumPy: 0.5474584102630615
同样,我们将创建一个3D CuPy数组,执行数学运算,并为其计时以提高性能。
# CuPy and GPU Runtime

s = time.time()

x_gpu = cp.ones((1000, 100, 1000))

cp_result = cp.sqrt(cp.sum(x_gpu**2, axis=-1))

e = time.time()

cp_time = e - s

print("\nTime consumed by CuPy: ", cp_time)
Time consumed by CuPy: 0.001028299331665039
为了计算差异,我们将NumPy时间除以CuPy 时间,似乎我们在使用 CuPy 时获得了超过500倍的性能提升。
diff = np_time/cp_time

print(f'\nCuPy is {diff: .2f} X time faster than NumPy')
CuPy is 532.39 X time faster than NumPy
注意:为了获得更好的结果,建议进行几次预热运行,以尽量减少时间波动。
除了速度优势外,CuPy还提供卓越的多GPU支持,能够利用多个GPU的集体力量。
结论
总之,CuPy提供了一种在NVIDIA GPU上加速NumPy代码的简单方法。只需进行一些修改,将 NumPy换成CuPy,你就可以体验到数组计算速度的提升。这种性能提升使你能够使用更大的数据集和模型,从而实现更高级的机器学习和科学计算。
文章来源:https://www.kdnuggets.com/leveraging-the-power-of-gpus-with-cupy-in-python

欢迎关注ATYUN官方公众号
商务合作及内容投稿请联系邮箱:bd@atyun.com
热门企业
热门职位
写评论取消
回复取消


