构建预测模型:Python中的逻辑回归
当你开始接触机器学习时,逻辑回归是你将要添加到工具箱中的首批算法之一。它是一个简单且健壮的算法,通常用于二元分类任务。
设想一个包含类别0和1的二元分类问题。逻辑回归将一个逻辑或S形函数拟合到输入数据并预测查询数据点属于类别1的概率。有趣吧?
在这个教程中,我们将从头学习逻辑回归,内容涵盖:
- 逻辑(或S形)函数
- 我们如何从线性回归过渡到逻辑回归
- 逻辑回归是如何工作的
最后,我们将构建一个简单的逻辑回归模型来分类电离层雷达回波。
逻辑函数
在我们进一步了解逻辑回归之前,让我们先回顾一下逻辑函数的工作原理。逻辑(或S形函数)定义如下:

当你绘制S形函数时,它看起来是这样的:
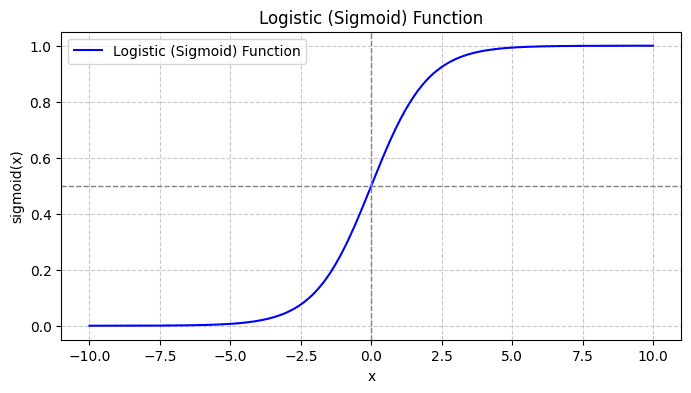
从图中我们可以看到:
- 当x = 0时,σ(x)取值为0.5。
- 当x趋近于+∞时,σ(x)趋近于1。
- 当x趋近于-∞时,σ(x)趋近于0。
因此,对于所有的实数输入,S形函数都将它们压缩使其取值范围在[0, 1]之间。
从线性回归到逻辑回归
首先讨论一下为什么我们不能在二元分类问题中使用线性回归。
在二元分类问题中,输出是类别标签(0或1)。由于线性回归预测的是连续值输出,这些输出可能小于0或大于1,因此对于当前问题来说并不合适。
此外,当输出标签属于两个类别之一时,一条直线可能并不是最佳拟合。
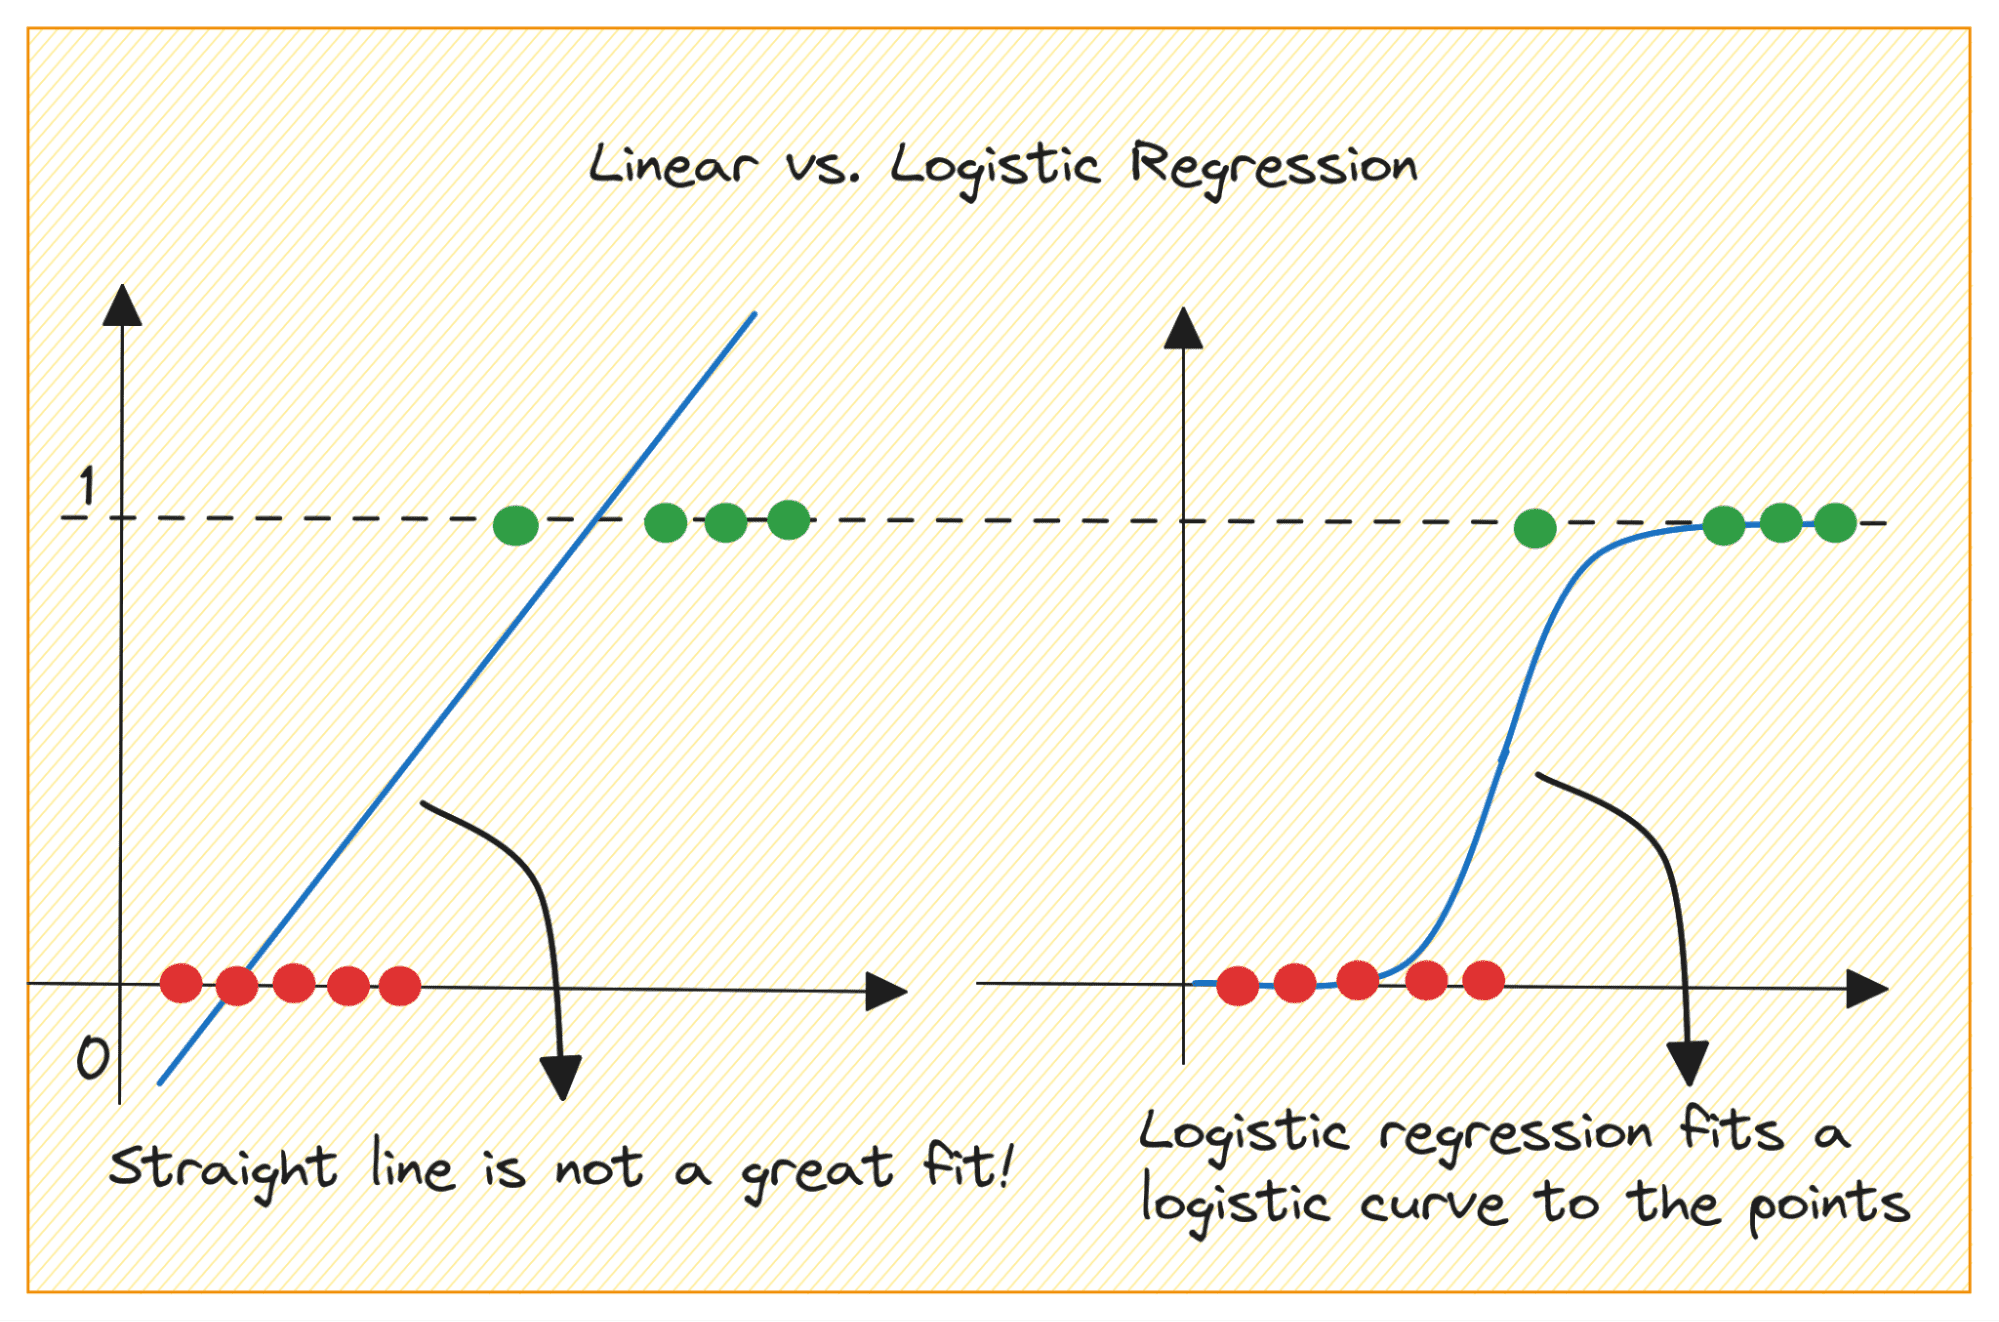
那么,我们如何从线性回归到逻辑回归呢?在线性回归中,预测输出由下式给出:

其中 β 是系数,X_is 是预测变量(或特征)。
在不损失一般性的情况下,我们假设 X_0 = 1:

所以我们可以有一个更简洁的表达:

逻辑回归的幕后
那么,我们如何为给定的数据集找到最佳拟合的逻辑曲线呢?为了回答这个问题,让我们了解MLE。
MLE(最大似然估计)用于通过最大化似然函数来估计逻辑回归模型的参数。让我们分解逻辑回归中 MLE 的过程,以及如何使用梯度下降来制定成本函数以进行优化。
分解MLE
如前所述,我们将二元结果发生的概率建模为一个或多个预测变量(或特征)的函数:

这里,β 是模型参数或系数。X_1,X_2,..., X_n是预测变量。
MLE 旨在找到β值,使观测数据的可能性最大化。似然函数表示为 L(β),表示在逻辑回归模型下观察给定预测变量值的给定结果的概率。
制定对数似然函数
为了简化优化过程,通常使用对数似然函数。因为它将概率乘积转换为对数概率的总和。
逻辑回归的对数似然函数由下式给出:

成本函数和梯度下降
现在我们知道了对数似然的本质,让我们继续制定逻辑回归的成本函数,然后制定梯度下降以找到最佳模型参数。
逻辑回归的成本函数
为了优化逻辑回归模型,我们需要最大化对数似然。因此,我们可以使用负对数似然作为成本函数,以在训练期间最小化。负对数似然,通常称为逻辑损失,定义为:

因此,学习算法的目标是找到的值?从而最小化此成本函数。梯度下降是一种常用的优化算法,用于查找此成本函数的最小值。
Logistic 回归中的梯度下降
梯度下降是一种迭代优化算法,它更新模型参数β与成本函数相对于β梯度的梯度方向相反。步骤 t+1使用梯度下降进行逻辑回归的更新规则如下:

其中 α 是学习率。
可以使用链式法则计算偏导数。梯度下降会迭代更新参数,直到收敛,以最大程度地减少逻辑损失。当它收敛时,它会找到β的最佳值,以最大限度地提高观测数据的可能性。
使用 Scikit-Learn 在 Python 中进行逻辑回归
现在,你已了解逻辑回归的工作原理,让我们使用 scikit-learn 库构建预测模型。
在本教程中,我们将使用 UCI 机器学习存储库中的电离层数据集。该数据集包含34个数值特征。输出是二进制的,是“好”或“坏”之一(用“g”或“b”表示)。输出标签“良好”是指在电离层中检测到某些结构的雷达回波。
第一步–加载数据集
首先,下载数据集并将其读入 pandas 数据帧:
import pandas as pd

import urllib


url = "https://archive.ics.uci.edu/ml/machine-learning-databases/ionosphere/iphere.data"

data = urllib.request.urlopen(url)

df = pd.read_csv(data, header=None)
第二步–探索数据集
让我们看一下 DataFrame 的前几行:
# Display the first few rows of the DataFrame

df.head()

让我们获取有关数据集的一些信息:非 null 值的数量和每列的数据类型:
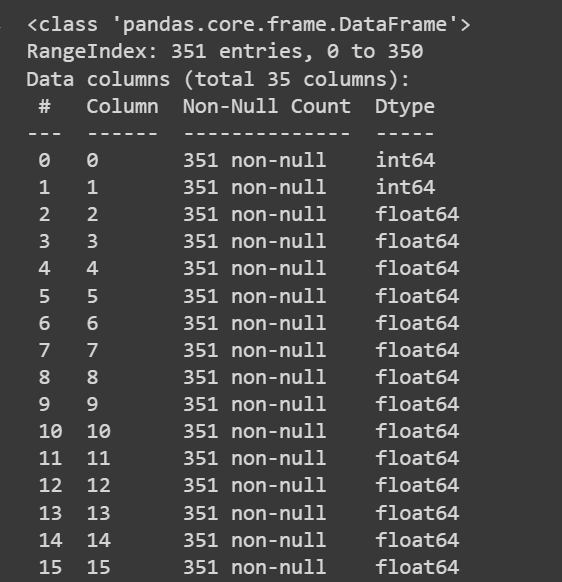
列名称当前为 0 到 34,包括标签。由于数据集不为列提供描述性名称,因此它只是将它们称为attribute_1,以便attribute_34如果您愿意重命名数据框的列,如下所示:
column_names = [

"attribute_1", "attribute_2", "attribute_3", "attribute_4", "attribute_5",

"attribute_6", "attribute_7", "attribute_8", "attribute_9", "attribute_10",

"attribute_11", "attribute_12", "attribute_13", "attribute_14", "attribute_15",

"attribute_16", "attribute_17", "attribute_18", "attribute_19", "attribute_20",

"attribute_21", "attribute_22", "attribute_23", "attribute_24", "attribute_25",

"attribute_26", "attribute_27", "attribute_28", "attribute_29", "attribute_30",

"attribute_31", "attribute_32", "attribute_33", "attribute_34", "class_label"

]

df.columns = column_names
注意:此步骤完全是可选的。如果你愿意,可以继续使用默认列名称。
# Display the first few rows of the DataFrame
df.head()

第三步–重命名类标签并可视化类分布
由于输出类标签是'g'和 'b',我们需要将它们分别映射到1和 0。您可以使用以下方法进行操作:map()replace()
# Convert the class labels from 'g' and 'b' to 1 and 0, respectively
df["class_label"] = df["class_label"].replace({'g': 1, 'b': 0})
让我们也可视化类标签的分布:
import matplotlib.pyplot as plt
# Count the number of data points in each class
class_counts = df['class_label'].value_counts()
# Create a bar plot to visualize the class distribution
plt.bar(class_counts.index, class_counts.values)
plt.xlabel('Class Label')
plt.ylabel('Count')
plt.xticks(class_counts.index)
plt.title('Class Distribution')
plt.show()
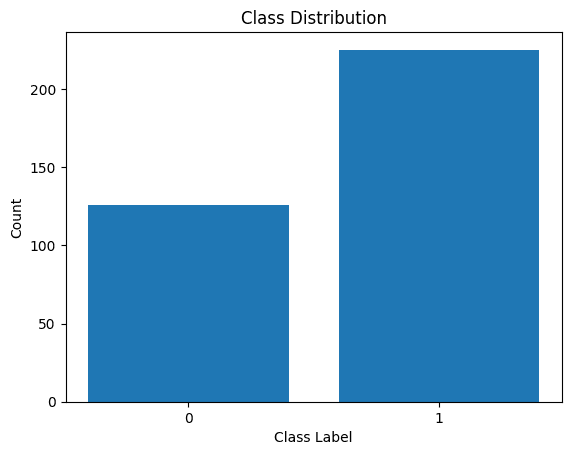
我们看到分布不平衡。属于类1的记录多于属于类0的记录。我们将在构建逻辑回归模型时处理这种类不平衡。
第四步–预处理数据集
让我们像这样收集特征和输出标签:
X = df.drop('class_label', axis=1)  # Input features
y = df['class_label']               # Target variable
将数据集拆分为训练集和测试集后,我们需要对数据集进行预处理。
当存在许多数值特征(每个数值特征的比例可能不同)时,我们需要对数值特征进行预处理。一种常见的方法是对它们进行变换,使它们服从均值和单位方差为零的分布。
来自 scikit-learn 的预处理模块帮助我们实现了这一点。StandardScaler
from sklearn.preprocessing import StandardScaler
from sklearn.model_selection import train_test_split
# Split the dataset into training and testing sets
X_train, X_test, y_train, y_test = train_test_split(X, y, test_size=0.2, random_state=42)
# Get the indices of the numerical features
numerical_feature_indices = list(range(34))  # Assuming the numerical features are in columns 0 to 33
# Initialize the StandardScaler
scaler = StandardScaler()
# Normalize the numerical features in the training set
X_train.iloc[:, numerical_feature_indices] = scaler.fit_transform(X_train.iloc[:, numerical_feature_indices])
# Normalize the numerical features in the test set using the trained scaler from the training set
X_test.iloc[:, numerical_feature_indices] = scaler.transform(X_test.iloc[:, numerical_feature_indices])
第五步–构建逻辑回归模型
现在我们可以实例化逻辑回归分类器了。
请注意,我们已将参数设置为“balanced”。这将有助于我们解释阶级不平衡。通过为每个类分配权重-与类中的记录数成反比。class_weight
实例化类后,我们可以将模型拟合到训练数据集:
from sklearn.linear_model import LogisticRegression
model = LogisticRegression(class_weight='balanced')
model.fit(X_train, y_train)
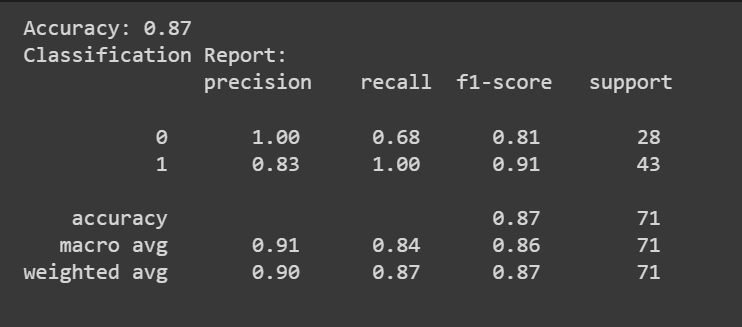
第六步–评估逻辑回归模型
可以调用该方法来获取模型的预测。predict()
除了准确率分数外,我们还可以获得包含精确率、召回率和 F1 分数等指标的分类报告。
from sklearn.metrics import accuracy_score, classification_report
y_pred = model.predict(X_test)
accuracy = accuracy_score(y_test, y_pred)
print(f"Accuracy: {accuracy:.2f}")
classification_rep = classification_report(y_test, y_pred)
print("Classification Report:\n", classification_rep)
