将自定义ML模型部署为SageMaker端点
开发机器学习(ML)模型涉及关键步骤,从数据收集到模型部署。本文涵盖了开发自定义ML模型作为SageMaker端点所需的基本步骤。此时,我假设你已经有了一个运行中的模型,并希望通过一个端点将其暴露给世界其它地方。本文将指导你部署一个基于PyTorch的模型,该模型旨在预测视频片段中的异常情况。该模型,也称为AI VAD,基于论文“Attribute-based Representations for Accurate and Interpretable Video Anomaly Detection”,并且可以在OpenVINO的anomalib GitHub库中找到。
编写Sagemaker模型服务脚本
Sagemaker模型服务脚本(inference.py)在创建Sagemaker模型时是重要的组成部分。它架起了机器学习模型与现实世界数据之间的桥梁。本质上,它处理传入请求,运行模型预测,并返回结果。因此,影响应用程序的决策过程。
inference.py脚本由几个关键方法组成,每个方法都具有独特的目的,共同促进模型服务过程。下面我列出了四个主要的方法。
- model_fn方法负责加载训练好的模型。它读取已保存的模型工件,并返回用于预测的模型对象。当SageMaker模型服务器启动时,此方法只被调用一次。
- input_fn方法方法获取请求数据,并将其格式化为适合进行预测的形式。例如,在下面的代码中,根据数据的来源(图像字节或一系列S3 URI)以及是否将帧列表视为一个视频剪辑,这个函数以不同的方式格式化数据。
- predict_fn方法获取格式化的请求数据,并对加载的模型进行推理。
- 最后,使用output_fn方法。它获取预测结果,并将其格式化为响应消息。例如,将其打包为一个JSON对象。
Sagemaker模型服务脚本的代码可以在下面找到。
import os
import json
import joblib
import torch
from PIL import Image
import numpy as np
import io
import boto3
from enum import Enum
from urllib.parse import urlsplit
from omegaconf import OmegaConf
from anomalib.data.utils import read_image, InputNormalizationMethod, get_transforms
from anomalib.models.ai_vad.torch_model import AiVadModel
device = "cuda"

class PredictMode(Enum):
    frame = 1
    batch = 2
    clip = 3

def model_fn(model_dir):
    """
    This function is the first to get executed upon a prediction request,
    it loads the model from the disk and returns the model object which will be used later for inference.
    """
    # Load the config file
    config = OmegaConf.load(os.path.join(model_dir, "ai_vad_config.yaml"))
    config_model = config.model
    # Load the model
    model = AiVadModel(
            box_score_thresh=config_model.box_score_thresh,
            persons_only=config_model.persons_only,
            min_bbox_area=config_model.min_bbox_area,
            max_bbox_overlap=config_model.max_bbox_overlap,
            enable_foreground_detections=config_model.enable_foreground_detections,
            foreground_kernel_size=config_model.foreground_kernel_size,
            foreground_binary_threshold=config_model.foreground_binary_threshold,
            n_velocity_bins=config_model.n_velocity_bins,
            use_velocity_features=config_model.use_velocity_features,
            use_pose_features=config_model.use_pose_features,
            use_deep_features=config_model.use_deep_features,
            n_components_velocity=config_model.n_components_velocity,
            n_neighbors_pose=config_model.n_neighbors_pose,
            n_neighbors_deep=config_model.n_neighbors_deep,
        )
    # Load the model weights
    model.load_state_dict(torch.load(os.path.join(model_dir, "ai_vad_weights.pth"), map_location=device), strict=False)
    # Load the memory banks
    velocity_estimator_memory_bank, pose_estimator_memory_bank, appearance_estimator_memory_bank = joblib.load(os.path.join(model_dir, "ai_vad_banks.joblib"))
    if velocity_estimator_memory_bank is not None:
        model.density_estimator.velocity_estimator.memory_bank = velocity_estimator_memory_bank
    if pose_estimator_memory_bank is not None:
        model.density_estimator.pose_estimator.memory_bank = pose_estimator_memory_bank
    if appearance_estimator_memory_bank is not None:
        model.density_estimator.appearance_estimator.memory_bank = appearance_estimator_memory_bank
    model.density_estimator.fit()
    # Move the entire model to device
    model = model.to(device)
    # get the transforms
    transform_config = config.dataset.transform_config.eval if "transform_config" in config.dataset.keys() else None
    image_size = (config.dataset.image_size[0], config.dataset.image_size[1])
    center_crop = config.dataset.get("center_crop")
    center_crop = tuple(center_crop) if center_crop is not None else None
    normalization = InputNormalizationMethod(config.dataset.normalization)
    transform = get_transforms(config=transform_config, image_size=image_size, center_crop=center_crop, normalization=normalization)
    return model, transform

def input_fn(request_body, request_content_type):
    """
    The request_body is passed in by SageMaker and the content type is passed in
    via an HTTP header by the client (or caller).
    """
    print("input_fn-----------------------")
    if request_content_type in ("application/x-image", "image/x-image"):
        image = Image.open(io.BytesIO(request_body)).convert("RGB")
        numpy_array = np.array(image)
        print("numpy_array.shape", numpy_array.shape)
        print("input_fn-----------------------")
        return [numpy_array], PredictMode.frame
    elif request_content_type == "application/json":
        request_body_json = json.loads(request_body)
        s3_uris = request_body_json.get("images", [])
        if len(s3_uris) == 0:
            raise ValueError(f"Images is a required key and should contain at least a list of one S3 URI")
        s3 = boto3.client("s3")
        frame_paths = []
        for s3_uri in s3_uris:
            parsed_url = urlsplit(s3_uri)
            bucket_name = parsed_url.netloc
            object_key = parsed_url.path.lstrip('/')
            local_frame_path = f"/tmp/{s3_uri.replace('/', '_')}"
            # Download the frame from S3
            s3.download_file(bucket_name, object_key, local_frame_path)
            frame_paths.append(local_frame_path)
        frames = np.stack([torch.Tensor(read_image(frame_path)) for frame_path in frame_paths], axis=0)

        predict_mode = PredictMode.clip if request_body_json.get("clip", False) else PredictMode.batch

        print("frames.shape", frames.shape)
        print("predict_mode", predict_mode)
        print("input_fn-----------------------")
        return frames, predict_mode
    # If the request_content_type is not as expected, raise an exception
    raise ValueError(f"Content type {request_content_type} is not supported")

def predict_fn(input_data, model):
    """
    This function takes in the input data and the model returned by the model_fn
    It gets executed after the model_fn and its output is returned as the API response.
    """
    print("predict_fn-----------------------")
    model, transform = model

    frames, predict_mode = input_data
    processed_data = {}
    processed_data["image"] = [transform(image=frame)["image"] for frame in frames]
    processed_data["image"] = torch.stack(processed_data["image"])
    image = processed_data["image"].to(device)

    # Add one more dimension for a batch size of one clip
    if predict_mode == PredictMode.clip:
        image = image.unsqueeze(0)
    print("image.shape", image.shape)
    model.eval()
    with torch.no_grad():
        boxes, anomaly_scores, image_scores = model(image)
    print("boxes_len", [len(b) for b in boxes])
    processed_data["pred_boxes"] = [box.int() for box in boxes]
    processed_data["box_scores"] = [score.to(device) for score in anomaly_scores]
    processed_data["pred_scores"] = torch.Tensor(image_scores).to(device)
    print("predict_fn-----------------------")
    return processed_data

def output_fn(prediction, accept):
    """
    Post-processing function for model predictions. It gets executed after the predict_fn.
    """
    print("output_fn-----------------------")
    # Check if accept type is JSON
    if accept != "application/json":
        raise ValueError(f"Accept type {accept} is not supported")
    # Convert PyTorch Tensors to lists so they can be JSON serializable
    for key in prediction:
        # If torch.Tensor convert it to list
        if isinstance(prediction[key], torch.Tensor):
            prediction[key] = prediction[key].tolist()
        # If list, convert every tensor in the list
        elif isinstance(prediction[key], list):
            prediction[key] = [tensor.tolist() if isinstance(tensor, torch.Tensor) else tensor for tensor in prediction[key]]
    print("output_fn-----------------------")
    return json.dumps(prediction), accept
建议在进行下一步之前测试模型服务脚本。这可以通过模拟下面代码所示的调用流程很容易地完成。
import json
from inference import model_fn, predict_fn, input_fn, output_fn
response, accept = output_fn(
    predict_fn(
        input_fn(payload, "application/x-image"),
        model_fn("../")
    ),
    "application/json"
)
json.loads(response).keys()
将模型上传至S3
为了创建一个能够以完全相同状态加载AI VAD PyTorch模型的SageMaker端点,我们需要以下文件:
- AI VAD PyTorch模型的权重(又称状态字典)
- 密度估计器的记忆库(它们不是模型权重的一部分)
- 包含PyTorch模型超参数的配置文件
- Sagemaker模型服务脚本(inference.py)
下面的代码演示了如何在一个目录中组织所有需要的文件。
import torch
import joblib
import shutil
checkpoint = "results/ai_vad/ucsd/run/weights/lightning/model.ckpt"
config_path = "results/ai_vad/ucsd/run/config.yaml"
model_weights = torch.load(checkpoint)
model_state_dict = model_weights["state_dict"]
torch.save(model_state_dict, "../ai_vad_weights.pth")
velocity_estimator_memory_bank = None
pose_estimator_memory_bank = None
appearance_estimator_memory_bank = None
if "velocity_estimator_memory_bank" in model_weights:
    velocity_estimator_memory_bank = model_weights["velocity_estimator_memory_bank"]
if "pose_estimator_memory_bank" in model_weights:
    pose_estimator_memory_bank = model_weights["pose_estimator_memory_bank"]
if "appearance_estimator_memory_bank" in model_weights:
    appearance_estimator_memory_bank = model_weights["appearance_estimator_memory_bank"]
banks = (velocity_estimator_memory_bank, pose_estimator_memory_bank, appearance_estimator_memory_bank)
joblib.dump(banks, "../ai_vad_banks.joblib")
shutil.copyfile(config_path, "../ai_vad_config.yaml")
然后,使用下面的命令将这四个文件压缩成一个tar.gz文件。
tar -czvf ../ai_vad_model.tar.gz -C ../ ai_vad_weights.pth ai_vad_banks.joblib ai_vad_config.yaml inference.py
最后,该文件使用boto3被上传到了S3。
import boto3
from datetime import datetime
current_datetime = datetime.now().strftime('%Y-%m-%d-%H-%M-%S')
s3 = boto3.resource('s3')
s3.meta.client.upload_file("../ai_vad_model.tar.gz", "ai-vad", f"{current_datetime}/ai_vad_model.tar.gz")
将自定义Docker镜像上传至AWS ECR
如上所述,因为我们有一个在预构建的PyTorch Sagemaker镜像中未包含的额外依赖(即anomalib包),我们为此创建了一个新的Docker镜像。在构建自定义Docker镜像之前,需要先对Amazon ECR仓库进行认证。
REGION=<my_aws_region>
ACCOUNT=<my_aws_account>

# Authenticate Docker to an Amazon ECR registry
aws ecr get-login-password --region $REGION | docker login --username AWS --password-stdin <docker_registry_url>.dkr.ecr.$REGION.amazonaws.com
# Loging to your private Amazon ECR registry
aws ecr get-login-password --region $REGION | docker login --username AWS --password-stdin $ACCOUNT.dkr.ecr.$REGION.amazonaws.com
确保根据模型的需求(CPU/GPU、Python版本等)及你的 AWS 区域,选择正确的注册表路径。例如,如果区域是 us-east-1,完整的 Docker 注册表路径应类似于此:
763104351884.dkr.ecr.us-east-1.amazonaws.com/pytorch-inference:2.0.0-gpu-py310
# Use the SageMaker PyTorch image as the base image
FROM <docker_registry_url>.dkr.ecr.<my_aws_region>.amazonaws.com/pytorch-inference:2.0.0-gpu-py310
# Install the additional dependency
RUN pip install "git+https://github.com/hairozen/anomalib.git@ai-vad-inference-improvements"
现在,我们可以运行经典的 Docker 构建命令来构建这个自定义镜像。
docker build -t ai-vad-image .
接下来的步骤是为我们构建的新镜像创建 AWS ECR 仓库,对其进行标记,并将镜像推送到 AWS ECR 仓库。
# Create the AWS ECR repository
aws ecr create-repository --repository-name ai-vad-image
# Tag the image
docker tag ai-vad-image:latest $ACCOUNT.dkr.ecr.$REGION.amazonaws.com/ai-vad-image:latest
# Push the tagged image to the AWS ECR repository
docker push $ACCOUNT.dkr.ecr.$REGION.amazonaws.com/ai-vad-image:latest
在 SageMaker 中创建模型
这个步骤相当直接。下面是代码。
import boto3
import sagemaker
sagemaker_client = boto3.client(service_name="sagemaker")
role = sagemaker.get_execution_role()
model_name = f"ai-vad-model-{current_datetime}"
primary_container = {
    "Image": f"{my_aws_account}.dkr.ecr.{my_aws_region}.amazonaws.com/ai-vad-image:latest",
    "ModelDataUrl": f"s3://ai-vad/{current_datetime}/ai_vad_model.tar.gz"
}
create_model_response = sagemaker_client.create_model(
    ModelName=model_name,
    ExecutionRoleArn=role,
    PrimaryContainer=primary_container)
创建端点配置
下一步是创建一个端点配置。下面你可以找到一个基本的配置。
endpoint_config_name = f"ai-vad-model-config-{current_datetime}"
sagemaker_client.create_endpoint_config(
    EndpointConfigName=endpoint_config_name,
    ProductionVariants=[{
        "InstanceType": "ml.g5.xlarge",
        "InitialVariantWeight": 1,
        "InitialInstanceCount": 1,
        "ModelName": model_name,
        "VariantName": "AllTraffic"}])
创建终端
现在我们准备好创建终端本身了。
endpoint_name = f"ai-vad-model-endpoint-{current_datetime}"
sagemaker_client.create_endpoint(
    EndpointName=endpoint_name,
    EndpointConfigName=endpoint_config_name)
请注意,端点的状态从“正在创建”变为“服务中”可能需要几分钟时间。可以按照下面所示方法检查当前状态。
response = sagemaker_client.describe_endpoint(EndpointName=endpoint_name)
response["EndpointStatus"]
调用终端点
现在是时候调用终端点来测试一切是否按预期工作了。
with open(file_name, "rb") as f:
    payload = f.read()
predictor = sagemaker.predictor.Predictor(endpoint_name=endpoint_name)
predictor.serializer = DataSerializer(content_type="image/x-image")
predictor.predict(payload)
所以,这是一个不错的检查,但是你应该考虑到 predictor.predict 函数并没有运行完整的来自 SageMaker 服务脚本的调用管道,包括:
output_fn(predict_fn(input_fn(input_data, model_fn(model_dir)), accept))
为了也测试它,我们使用 API 调用来调用模型。
with open(file_name, "rb") as f:
    payload = f.read()
sagemaker_runtime = boto3.client("runtime.sagemaker")
response = sagemaker_runtime.invoke_endpoint(
    EndpointName=endpoint_name,
    ContentType="image/x-image",
    Body=payload
)
response = json.loads(response["Body"].read().decode())
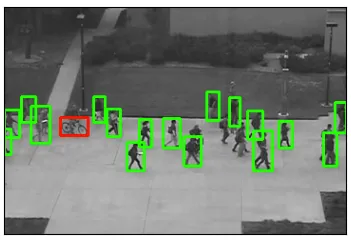
使用anomalib提供的出色可视化工具,我们可以为UCSDped2数据集中给定的帧绘制框及其标签。

结论
让我们快速总结一下我们在这里讨论的内容。部署SageMaker模型以进行服务需要一系列步骤。
首先,必须编写SageMaker模型服务脚本,以定义模型的功能和行为。
然后,模型被上传到亚马逊S3以便存储和检索。
此外,一个自定义的Docker镜像被上传到AWS弹性容器注册表(ECR),以便容器化模型及其依赖项。
下一步是在SageMaker中创建一个模型,它将存储在S3中的模型工件与存储在ECR中的Docker镜像关联起来。
随后创建一个端点配置,定义用于托管模型的实例的数量和类型。
最后,创建一个端点以建立部署模型和客户端应用程序之间的实时连接,允许它们调用端点并进行实时预测。
通过这些步骤,部署SageMaker模型变成了一个简化的过程,确保了模型服务的效率和可靠性。


