如何用Rust从头开始构建数据库?
本文将介绍我用Rust编写特征工程管道。
由于我们的目标是学习,我们可以采用一些简化,并迭代构建。因此,我为数据库的第一次迭代创建了这个路线图:
- 一个 REPL,可以漂亮地打印查询结果
- 支持 SELECT 子句的分词器和解析器
- 代码生成器(更准确地说,命令生成器)
- 解释生成的代码(或命令)的虚拟机
- 将数据作为向量的 HashMap 存储在内存中的表结构
- 用于测试的硬编码表
- 正确的错误传播/处理(没有恐慌,所有错误都被处理/显示回用户)
- 一种从文件写入/读取数据的序列化/反序列化方法
以下是我最终得到的架构的概述:
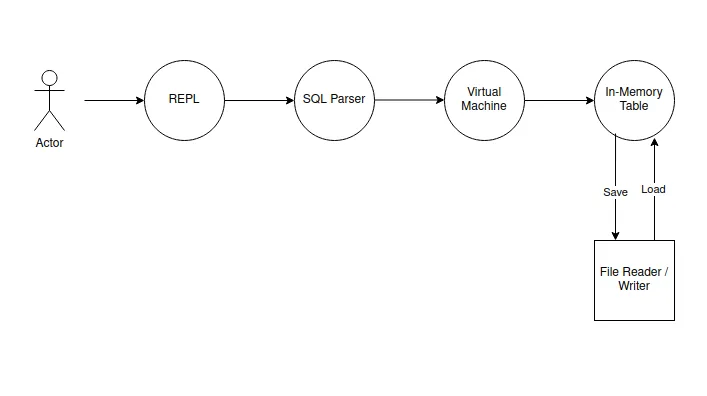
在本文的其余部分中,我将介绍该图中除文件读取器/写入器之外的每个组件。
我们将从内存表结构开始,因为它是数据库实现的核心。
内存表结构
我已经这样定义了我们的内存表:
#[derive(Debug, Clone)]
pub enum DataType {
    String(String),
    Integer32(i32),
    Float32(f32),
}
pub struct Table {
    pub name: String,
    pub fields: HashMap<String, DataType>,
    pub columns: HashMap<String, Vec<DataType>>,
    pub select_columns: Vec<String>,
}
字段负责跟踪表的“模式”(schema),而列包含实际列的数据。你可能已经从这段代码猜到,我们使用的是列式格式,而不是行式顺序。
你可能也注意到,我使用了很多‘String’类型。这主要是为了方便,这样我就不必处理生命周期注解了。
不管怎样,让我们来看看我们最重要的方法的签名,save和load:
pub fn save(
  &self,
  mode: SaveMode,
  format: FileFormat
) -> Result<(), TableErrors>
pub fn load(
  table_name: String,
  select_columns: Vec<String>,
  format: FileFormat,
) -> Result<Table, TableErrors>
让我们来看一下 save 方法中最重要的几行代码。你可以看到它相当简单,它会找到表格路径,并根据格式实例化适当的文件写入器。
let path = Path::new(&s);
// Pick up correct writer
let writer: Box<dyn Writer>;
match format {
    FileFormat::SimpleColumnar => {
        writer = ColumnarWriter::new();
    }
}
// Adapt to the given mode
match mode {
    SaveMode::Overwrite => {
        let f = OpenOptions::new().write(true).create_new(true).open(path);
        if f.is_err() {
            println!("{:?}", f.unwrap_err());
            return Err(TableErrors::TableAlreadyExists);
        }
        let write_result = writer.write(&self.fields, &self.columns, f.unwrap());
        if write_result.is_err() {
            let s = format!("{:?}", write_result.unwrap_err());
            return Err(TableErrors::WriteError(s));
        }
    }
使用 std::fs::OpenOptions 让我们在访问文件时更加灵活。通过这种方式,如果文件不存在,我们会创建一个新文件;如果文件已存在,则会产生一个错误。
注意:我们这里假设写入错误是因为表格已存在,这通常是情况,但也可能是由其他原因引起的。因此,现在我仅是简单地记录原始错误消息。
load 方法类似,但刚好相反。也许注意为什么我们有这个参数 select_columns: Vec<String> 是有趣的。它在函数的这一部分中被使用:
let result = reader.read(f, select_columns.clone());
// (...) check for error before unwrap
let (fields, columns) = result.unwrap();
for select_col in select_columns.iter() {
    if !fields.contains_key(select_col) {
        return Err(TableErrors::ColumnNotFound(select_col.clone()));
    }
}
请注意,我们将所选列传递给读取器,这样它就只能在内存中加载被请求的内容(而不是整个表格)。在加载之后,我们可以检查我们请求的所有内容是否都被找到了。
TABLE COLUMNAR FORMAT HEADER
Field name: final_grade; Type: f32; Number of elements: 3
4.0
3.2
5
Field name: name; Type: String; Number of elements: 3
John Man
Lenon
Mary
Field name: annual_salary; Type: i32; Number of elements: 3
60000
200000
3012000
在阅读这种格式时,代码必须处理几种情况,最终读起来相当繁琐。尤其是考虑到这是一种低效的格式——不值得深入研究。
REPL
让我们回过头来看看前端:
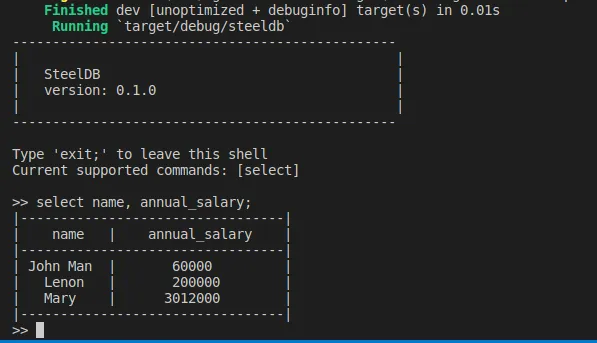
如你所见,表格会自动解析,因为目前还没有实现 From 子句。目前,我正在使用 cargo test 来运行一个测试,这个测试会为我创建表格。
如果我们删除或重命名测试表格,我们就会看到这样的情况:
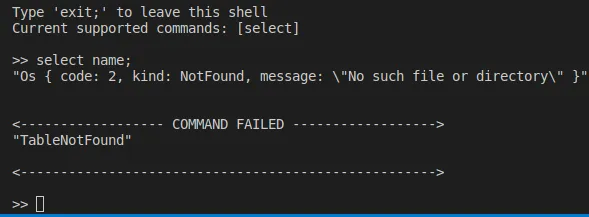
并且如果我们输入胡言乱语,我们会看到这个:

那么这是如何工作的呢?REPL基本上很简单:一个while true循环,它不断地将输入存储到缓冲区中,直到它看到一个分号;。我们分别存储每一行,这样用户就可以将命令分解成几行,例如:
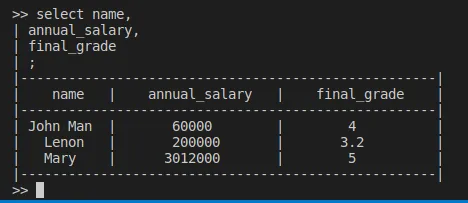
一旦找到分号(;),我们就简单地将其输入一个SteelDB结构体实例,并且对查询调用执行(execute)方法,这将给我们返回一个枚举(enum)类型的结果,这使得我们在REPL中需要处理的情况变得非常清晰:
if self.buffer.contains(";") {
    if self.buffer.contains("exit") {
        break;
    }
    self.is_in_multiline = false;
    let execution_result = self
        .database
        .execute(self.previous_lines.join(" ").to_lowercase());
    match execution_result {
        ExecutionResult::VoidOK() => {
            println!("OK!");
        }
        ExecutionResult::TableResult(table) => {
            self.print_table(&table);
        }
        ExecutionResult::ParseError(error) => {
            println!("");
            println!("");
            println!("<------------------- PARSE ERROR ------------------->");
            println!("{:?}", error);
            println!("");
            println!("Please check your input");
            println!("<--------------------------------------------------->");
            println!("");
        }
        ExecutionResult::CommandError(error) => {
            println!("");
            println!("");
            println!("<------------------ COMMAND FAILED ------------------>");
            println!("{:?}", error);
            println!("");
            println!("<---------------------------------------------------->");
            println!("");
        }
    }
打印表格实际上相当复杂,它会计算打印到终端中的列大小的长度。它还依赖于我们之前看到的内存中的 Table 结构体。这个 REPL 并不完美,并且无法处理大的列值,但对于测试数据库而言相当好用。
你可能注意到了REPL调用了database.execute,这个方法在REPL的new方法中定义:
pub fn new() -> Repl {
    return Repl {
        buffer: String::new(),
        previous_lines: Vec::<String>::new(),
        database: SteelDB::new(),
        is_in_multiline: false,
        padding: 4,
    };
}
这是我们的SteelDB,它是我们进入实际数据库代码的入口点。虽然它没有在图中表示,但它本质上将REPL、解析器和虚拟机粘合在了一起:
pub struct SteelDB {
    virtual_machine: VirtualMachine,
}
pub enum ExecutionResult {
    TableResult(Table),
    VoidOK(),
    ParseError(String),
    CommandError(String),
}
impl SteelDB {
    pub fn new() -> SteelDB {
        return SteelDB {
            virtual_machine: VirtualMachine::new(),
        };
    }
    pub fn execute(&mut self, user_input: String) -> ExecutionResult {
        let result = parse(user_input);
        match result {
            Ok(commands) => {
                let command_result = self.virtual_machine.execute(commands);
                // translate CommandResult into ExecutionResult
                // we do not want to make the outer layer import any enum except ExecutionResult
                match command_result {
                    CommandResult::RetrievedDataSuccess(table) => {
                        return ExecutionResult::TableResult(table);
                    }
                    CommandResult::VoidSuccess => return ExecutionResult::VoidOK(),
                    CommandResult::Error(error) => {
                        return ExecutionResult::CommandError(error);
                    }
                }
            }
            // translate ParseError into ExecutionResult
            Err(ParseError::Error(error)) => {
                return ExecutionResult::ParseError(error);
            }
        }
    }
}
解析器
在SteelDB主源代码中,我们的解析器源代码相当简洁:
use super::command::Command;
use super::config::DEFAULT_TABLE;
pub use steeldb_parser::{parse_select, ParseError};

pub fn parse(input: String) -> Result<Vec<Command>, ParseError> {
    let result = parse_select(input);
    match result {
        Ok(columns) => {
            return Ok(vec![Command::SelectFrom(
                columns,
                DEFAULT_TABLE.to_string(),
            )]);
        }
        Err(error) => {
            return Err(error);
        }
    }
}
这是因为实际的解析器是作为一个独立的包steeldb_parser来编写的。
在我们深入了解之前,请注意我们的解析器如何简单地将输入映射到命令,而这些命令又是以枚举的形式定义的:
pub enum Command {
    SelectFrom(Vec<String>, String), // columns, table_name
    Stub,
}
图形化地来看,这就是解析器在做的事情:
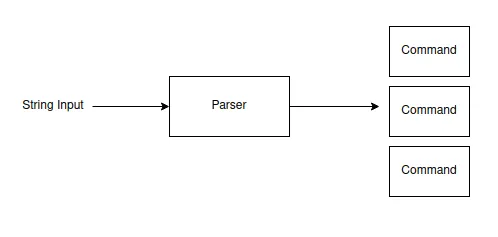
如果你回头看看SteelDB的代码,你会注意到命令被输入到了虚拟机中。
那么我们如何构建这个解析器呢?使用这个了不起的库:lalrpop。
基本上,我们只需要在一个以.larlpop结尾的文件中定义一个语法,例如,这里是我目前定义SELECT子句的方式:
grammar(v: &mut Vec<String>);
pub Select: () = {
    SELECT <c:Columns> SEMICOLON => {}
};
Columns: () = {
    <l:LITERAL> => v.push(l),
    Columns "," <l:LITERAL> => {
        v.push(l);
    }
}
SELECT: String = <s:r"select "> => s.to_string();
LITERAL: String = <s:r"[a-z\*_0-9]+"> => s.to_string();
SEMICOLON: String = <s:r";"> => s.to_string();
然后在我的 steeldb_parser lib.rs 文件中,我可以定义以下内容:
use lalrpop_util::lalrpop_mod;
lalrpop_mod!(pub select); // synthesized by LALRPOP
#[derive(Debug)]
pub enum ParseError {
    Error(String),
}
pub fn parse_select(input: String) -> Result<Vec<String>, ParseError> {
    let mut result: Vec<String> = vec![];
    let parser = select::SelectParser::new();
    let maybe_error = parser.parse(&mut result, input.as_str());
    match maybe_error {
        Ok(_) => {
            return Ok(result);
        }
        Err(error) => {
            let error = format!("{:?}", error);
            return Err(ParseError::Error(format!(
                "Failed to parse, error: {}",
                error
            )));
        }
    };
}
这个库使用一个构建钩子,以自动生成一个带有SelectParser的选择模块,该解析器实现了我们之前定义的语法解析。函数parse_select是我们在数据库中使用的。当然,一旦我们增加第二个命令,我们就必须使这个过程更加复杂,因为它是为select命令硬编码的。
虚拟机
这实际上是一个非常简单的实现。我们只需要取得我们拥有的命令列表,并为每个命令执行相应的代码。特别是在这一迭代中,我们将Command::SelectFrom命令映射到了Table::load。就像解析器一样,这将被扩展以支持更多命令,但总体上我预计这一层不会有太多结构性的变化。这里是源代码:
impl VirtualMachine {
    pub fn new() -> VirtualMachine {
        return VirtualMachine {};
    }
    pub fn execute(&self, commands: Vec<Command>) -> CommandResult {
        // keep track of last command execution
        // might be useful when implementing nested commands
        let mut maybe_command_result: Option<CommandResult> = None;
        // the reason we implement this as a list of commands is to supported
        // the execution of nested commands in the future
        // this assumes the parser built a list of commands in the right order of execution
        for command in commands {
            if let Command::SelectFrom(columns, table_name) = command {
                let table_result = Table::load(table_name, columns, FileFormat::SimpleColumnar);
                // if we found an error, we want to immediately abort the nested execution
                if table_result.is_err() {
                    let error = format!("{:?}", table_result.unwrap_err());
                    return CommandResult::Error(error);
                } else {
                    // if our command succeeds, we want to save the result in case the next command needs it
                    let table = table_result.unwrap();
                    maybe_command_result = Some(CommandResult::RetrievedDataSuccess(table));
                }
            } else if let Command::Stub = command {
                return CommandResult::VoidSuccess;
            };
        }
        // once we finish going through the list, the last command result is our final one, let's return it
        match maybe_command_result {
            Some(command_result) => command_result,
            None => CommandResult::Error("Empty command FIFO".to_string()),
        }
    }
}
结论
从头开始使用Rust构建一个简单的数据库,实际上比我最初想象的要容易得多!当然,它仍然只是一个玩具项目,但没有什么能阻止有人拿这个骨架并将其转变为一个实际有用的数据库。


