时间的构建:RNN的数学基础和Python实现
对于机器学习用户来说,能够从流行的库中构建和训练机器学习模型就足够了吗?可能不会太久了。随着 AutoAI 等工具的兴起,很多非常传统的机器学习技能(如使用 Pytorch 等常用库构建模型架构)可能会变得不那么重要。
可能持续存在的是对熟练用户的需求,他们需要对 ML 的基本原理有深刻的理解,特别是在需要新颖挑战、定制和优化的问题上。要想更具创新性和新颖性,就必须深刻理解这些算法的数学基础。
时间序列数据(或任何像语言这样的序列数据)具有时间依赖性,广泛应用于从天气预测到医疗应用等各个领域。RNN 是捕捉此类数据中序列模式的强大工具。在本文中,我们将深入探讨 RNN 的数学基础,并使用 python 从头开始实现这些方程。
了解 RNN: 数学描述
序列数据的一个重要因素是时间依赖性,即过去的值决定了当前和未来的值(就像我们生活在一个预定的世界,但我们还是不谈哲学,只谈 RNN 模型)。时间序列预测利用了序列数据的这一特性,重点是根据之前的 n 个值预测下一个值。根据模型的不同,这包括对过去数值的映射或回归。
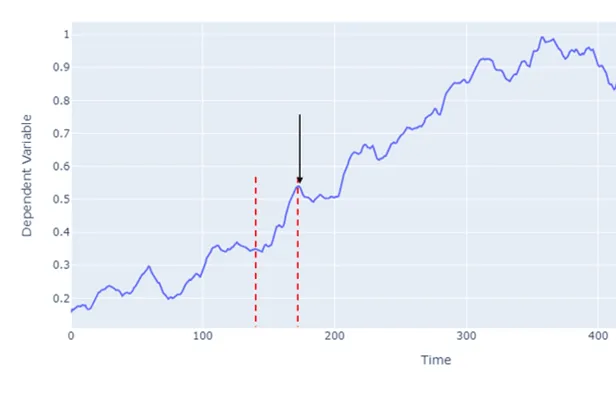
将黑色箭头所指的点 y 和 y 之前的点(红色虚线之间)表示为 X = {x1 , x2 , ....xt .....xT} 其中 T 是时间步数的总数。RNN 在处理输入序列 (X) 时,会将每个输入通过一个隐藏状态(有时也称为记忆状态)并输出 y。
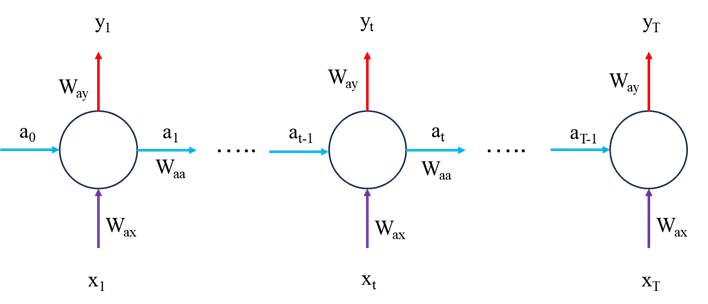
现在让我们来看看 RNN 模型中的数学运算,首先让我们考虑前向传递,我们稍后再讨论模型优化问题。
前向传递
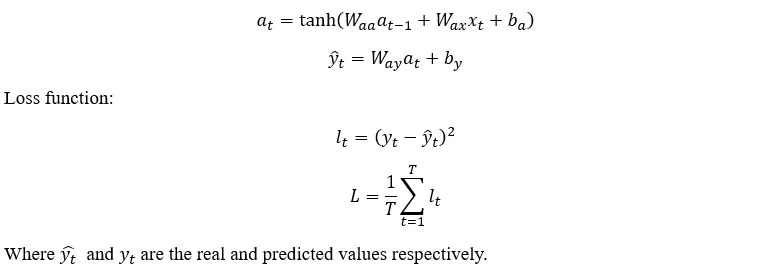
前向传递非常简单,如下所示:
时间反向传播
在机器学习中,优化(变量更新)是通过梯度下降法完成的:

因此,在训练过程中需要更新的所有参数都需要它们的偏导数。在这里,我们将推导出损失函数相对于前向传递方程中每个变量的偏导数:

注意图 2 中的前传方程和网络示意图,我们可以看到,在 T 时刻,L 只通过 y_T 取决于 a_T,即

不过,在 t < T 时,L 通过 y_T 和 a_(T+1) 取决于 a_T,因此我们对两者都使用链式法则:
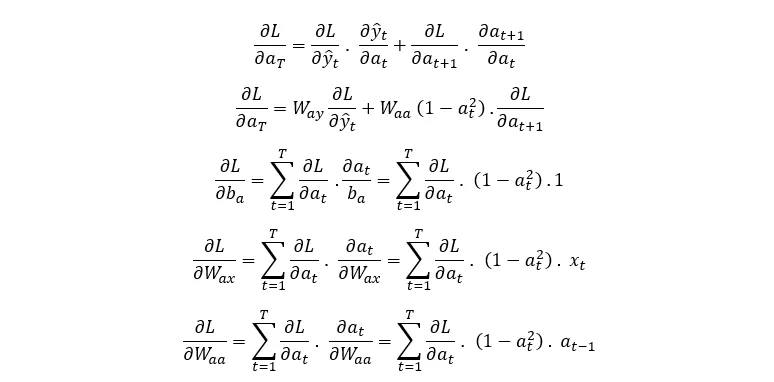
现在,我们得到了损失函数梯度与前向传递方程中所有参数相关的方程。这种算法被称为时间反向传播算法(Backpropagation Through Time)。需要说明的是,对于时间序列数据,通常只有最后一个值对损失函数有贡献,即所有其他输出都会被忽略,它们对损失函数的贡献设为 0。现在,让我们用 python 对这些方程进行编码,并将其应用于一个示例数据集。
编码实现
在实现上述方程之前,我们需要导入必要的数据集,进行预处理并为模型训练做好准备。所有这些工作在任何时间序列分析中都是非常标准的。
import numpy as np
import pandas as pd
import matplotlib.pyplot as plt
import plotly.graph_objs as go
from plotly.offline import iplot
import yfinance as yf
import datetime as dt
import math
#### Data Processing
start_date = dt.datetime(2020,4,1)
end_date = dt.datetime(2023,4,1)
#loading from yahoo finance
data = yf.download("GOOGL",start_date, end_date)
pd.set_option('display.max_rows', 4)
pd.set_option('display.max_columns',5)
display(data)

# #Splitting the dataset
training_data_len = math.ceil(len(data) * .8)
train_data = data[:training_data_len].iloc[:,:1]
test_data = data[training_data_len:].iloc[:,:1]
dataset_train = train_data.Open.values
# Reshaping 1D to 2D array
dataset_train = np.reshape(dataset_train, (-1,1))
dataset_train.shape
scaler = MinMaxScaler(feature_range=(0,1))
# scaling dataset
scaled_train = scaler.fit_transform(dataset_train)
dataset_test = test_data.Open.values
dataset_test = np.reshape(dataset_test, (-1,1))
scaled_test = scaler.fit_transform(dataset_test)

X_train = []
y_train = []
for i in range(50, len(scaled_train)):
    X_train.append(scaled_train[i-50:i, 0])
    y_train.append(scaled_train[i, 0])
X_test = []
y_test = []
for i in range(50, len(scaled_test)):
    X_test.append(scaled_test[i-50:i, 0])
    y_test.append(scaled_test[i, 0])
# The data is converted to Numpy array
X_train, y_train = np.array(X_train), np.array(y_train)
#Reshaping
X_train = np.reshape(X_train, (X_train.shape[0], X_train.shape[1],1))
y_train = np.reshape(y_train, (y_train.shape[0],1))
print("X_train :",X_train.shape,"y_train :",y_train.shape)
# The data is converted to numpy array
X_test, y_test = np.array(X_test), np.array(y_test)
#Reshaping
X_test = np.reshape(X_test, (X_test.shape[0], X_test.shape[1],1))
y_test = np.reshape(y_test, (y_test.shape[0],1))
模型
现在我们来实现数学公式。绝对值得通读代码,注意所有变量的维数和各自的导数,以便更好地理解这些公式。
class SimpleRNN:
    def __init__(self,input_dim,output_dim, hidden_dim):
        self.input_dim = input_dim
        self.output_dim = output_dim
        self.hidden_dim = hidden_dim
        self.Waa = np.random.randn(hidden_dim, hidden_dim) * 0.01 # we initialise as non-zero to help with training later
        self.Wax = np.random.randn(hidden_dim, input_dim) * 0.01
        self.Way = np.random.randn(output_dim, hidden_dim) * 0.01
        self.ba = np.zeros((hidden_dim, 1))
        self.by = 0 # a single value shared over all outputs #np.zeros((hidden_dim, 1))
    def FeedForward(self, x):
        # let's calculate the hidden states
        a = [np.zeros((self.hidden_dim,1))]
        y = []
        for ii in range(len(x)):
            a_next = np.tanh(np.dot(self.Waa, a[ii])+np.dot(self.Wax,x[ii].reshape(-1,1))+self.ba)
            a.append(a_next)
            y_local = np.dot(self.Way,a_next)+self.by
            y.append(np.dot(self.Way,a_next)+self.by)
        # remove the first a and y values used for initialisation
        #a = a[1:]
        return y, a

    def ComputeLossFunction(self, y_pred, y_actual):
        # for a normal many to many model:
        #loss = np.sum((y_pred - y_actual) ** 2)
        # in our case, we are only using the last value so we expect scalar values here rather than a vector
        loss = (y_pred[-1] - y_actual) ** 2
        return loss

    def ComputeGradients(self, a, x, y_pred, y_actual):
        # Backpropagation through time
        dLdy = []
        dLdby = np.zeros((self.output_dim, 1))
        dLdWay = np.random.randn(self.output_dim, self.hidden_dim)/5.0
        dLdWax = np.random.randn(self.hidden_dim, self.input_dim)/5.0
        dLdWaa = np.zeros((self.hidden_dim, self.hidden_dim))
        dLda = np.zeros_like(a)
        dLdba = np.zeros((self.hidden_dim, 1))

        for t in range(self.hidden_dim-1, 0, -1):
            if t == self.hidden_dim-1:
                dldy = 2*(y_pred[t] - y_actual)
            else:
                dldy = 0
            dLdy.append(dldy)
            #dLdby.append(dldy)
            dLdby += dldy
            #print(dldy.shape)
            dLdWay += np.dot(np.array(dldy).reshape(-1,1), a[t].T)

            # Calculate gradient of loss with respect to a[t]
            if t == self.hidden_dim-1:
                dlda_t= np.dot(self.Way.T, np.array(dldy).reshape(-1,1))
            else:
                dlda_t = np.dot(self.Way.T, np.array(dldy).reshape(-1,1)) + np.dot(self.Waa, dLda[t+1]) * (1 - a[t]**2)
            dLda[t] = dlda_t
            #print(dlda_t.shape)

            rec_term = (1-a[t]*a[t])

            dLdWax += np.dot(dlda_t, x[t].reshape(-1,1))*rec_term
            dLdWaa += np.dot(dlda_t, a[t-1].T)*rec_term
            dLdba += dlda_t*rec_term

        return dLdy[::-1], dLdby[::-1], dLdWay, dLdWax, dLdWaa, dLdba

    def UpdateParameters(self,dLdby, dLdWay, dLdWax, dLdWaa, dLdba,learning_rate):
        self.Waa -= learning_rate * dLdWaa
        self.Wax -= learning_rate * dLdWax
        self.Way -= learning_rate * dLdWay
        self.ba -= learning_rate * dLdba
        self.by -= learning_rate * dLdby

    def predict(self, x, n, a_training):
        # let's calculate the hidden states
        a_future = a_training
        y_predict = []
        # Predict the next n terms
        for ii in range(n):
            a_next = np.tanh(np.dot(self.Waa, a_future[-1]) + np.dot(self.Wax, x[ii]) + self.ba)
            a.append(a_next)
            y_predict.append(np.dot(self.Way, a_next) + self.by)
        return y_predict
培训和测试模型
input_dim = 1
output_dim = 1
hidden_dim = 50
learning_rate = 1e-3
# Initialize The RNN model
rnn_model = SimpleRNN(input_dim, output_dim, hidden_dim)
# train the model for 200 epochs
for epoch in range(200):
    for ii in range(len(X_train)):
        y_pred, a = rnn_model.FeedForward(X_train[ii])
        loss = rnn_model.ComputeLossFunction(y_pred, y_train[ii])
        dLdy, dLdby, dLdWay, dLdWax, dLdWaa, dLdba = rnn_model.ComputeGradients(a, X_train[ii], y_pred, y_train[ii])
        rnn_model.UpdateParameters(dLdby, dLdWay, dLdWax, dLdWaa, dLdba, learning_rate)
        print(f'Loss: {loss}')

y_test_predicted = []
for jj in range(len(X_test)):
    forecasted_values, _ = rnn_model.FeedForward(X_test[jj])
    y_test_predicted.append(forecasted_values[-1])
y_test_predicted_flat = np.array([val[0, 0] for val in y_test_predicted])
trace1 = go.Scatter(y = y_test.ravel(), mode ="lines", name = "original data")
trace2 = go.Scatter(y=y_test_predicted_flat, mode = "lines", name = "RNN output")
layout = go.Layout(title='Testing data Fit', xaxis=dict(title='X-Axis'), yaxis=dict(title='Dependent Variable'))
figure = go.Figure(data = [trace1,trace2], layout = layout)
iplot(figure)
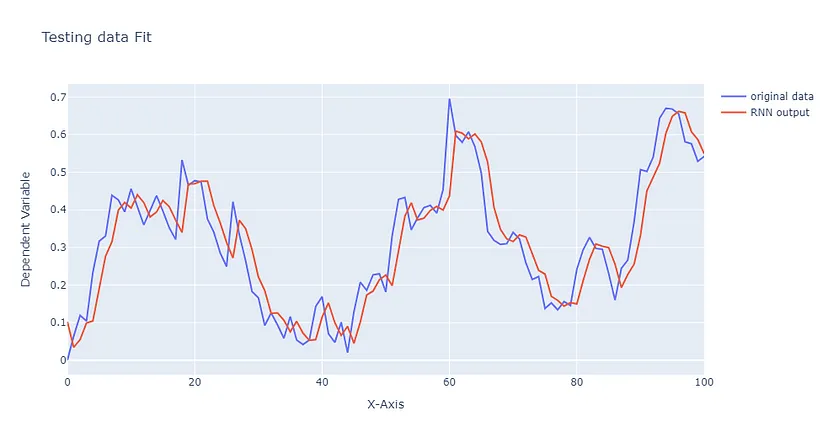
本演示到此结束,但希望这只是你了解这些强大模型的开始。你可能会发现,在前向传递中尝试使用不同的激活函数会有助于检验你的理解。或者进一步了解 LSTM 和变换器等序列模型,它们是非常强大的工具,尤其是在与语言相关的任务中。探索这些模型可以加深你对处理时间依赖性的更复杂机制的理解。


