使用Mergekit和Runpod创建你自己的专家混合模型
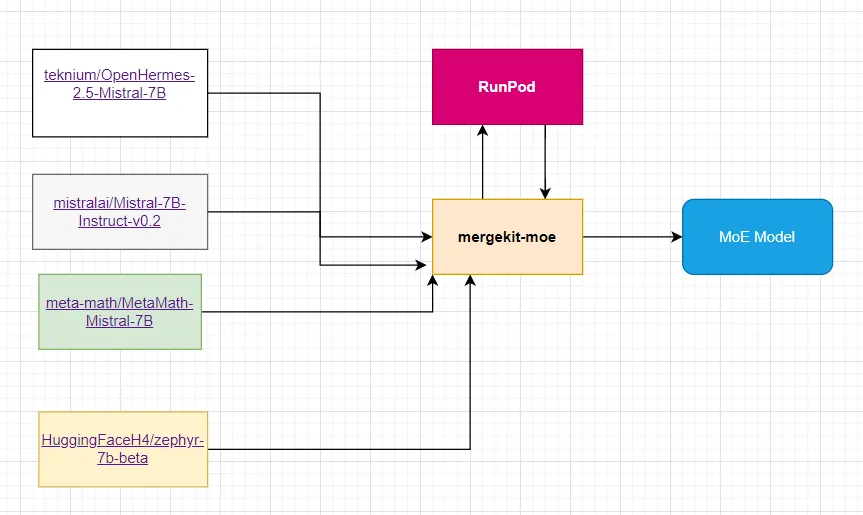
自从 Mistral AI 发布 Mixtral-8x7B 以来,人们对专家 (MoE) 模型的混合重新产生了兴趣。该架构利用专家子网络,在推理过程中,路由器网络仅选择并激活其中的一些子网络。
模型合并是一种将两个或多个LLM合并为一个模型的技术。模型合并的效果出人意料地好,并在Open LLM 排行榜上产生了许多最先进的模型。
MoE 非常简单且灵活,因此可以轻松制作定制 MoE。在 Hugging Face Hub 上,我们现在可以找到几个定制 MoE 的热门 LLM,例如mlabonne/phixtral-4x2_8。
模型架构 mlabonne/phixtral-4x2_8:
PhiForCausalLM(
  (transformer): PhiModel(
    (embd): Embedding(
      (wte): Embedding(51200, 2560)
      (drop): Dropout(p=0.0, inplace=False)
    )
    (h): ModuleList(
      (0-31): 32 x ParallelBlock(
        (ln): LayerNorm((2560,), eps=1e-05, elementwise_affine=True)
        (resid_dropout): Dropout(p=0.1, inplace=False)
        (mixer): MHA(
          (rotary_emb): RotaryEmbedding()
          (Wqkv): Linear4bit(in_features=2560, out_features=7680, bias=True)
          (out_proj): Linear4bit(in_features=2560, out_features=2560, bias=True)
          (inner_attn): SelfAttention(
            (drop): Dropout(p=0.0, inplace=False)
          )
          (inner_cross_attn): CrossAttention(
            (drop): Dropout(p=0.0, inplace=False)
          )
        )
        (moe): MoE(
          (mlp): ModuleList(
            (0-3): 4 x MLP(
              (fc1): Linear4bit(in_features=2560, out_features=10240, bias=True)
              (fc2): Linear4bit(in_features=10240, out_features=2560, bias=True)
              (act): NewGELUActivation()
            )
          )
          (gate): Linear4bit(in_features=2560, out_features=4, bias=False)
        )
      )
    )
  )
  (lm_head): CausalLMHead(
    (ln): LayerNorm((2560,), eps=1e-05, elementwise_affine=True)
    (linear): Linear(in_features=2560, out_features=51200, bias=True)
  )
  (loss): CausalLMLoss(
    (loss_fct): CrossEntropyLoss()
  )
)
从上述架构中,我们可以看到 MoE 有四个 MLP,即使用四个专家子网络。只有 MLP 模块是针对每个专家的。
不过,它们中的大多数并不是从零开始制作的传统 MoE,而只是将已经微调过的 LLM 作为专家进行组合。使用 mergekit 可以轻松创建这些模块。例如,Phixtral LLMs 就是用 mergekit 将多个 Phi-2 模型组合而成的。
在本教程中,我们将使用 mergekit 库来实现它。
什么是专家混合模型(MoE)?
模型的规模是提高模型质量的最重要轴心之一。在计算预算固定的情况下,用较少的步骤训练较大的模型比用较多的步骤训练较小的模型要好。
专家混合模型可以用更少的计算量对模型进行预训练,这意味着你可以用与密集模型相同的计算预算大幅扩大模型或数据集的规模。特别是,在预训练过程中,MoE 模型应能以更快的速度达到与密集模型相同的质量。
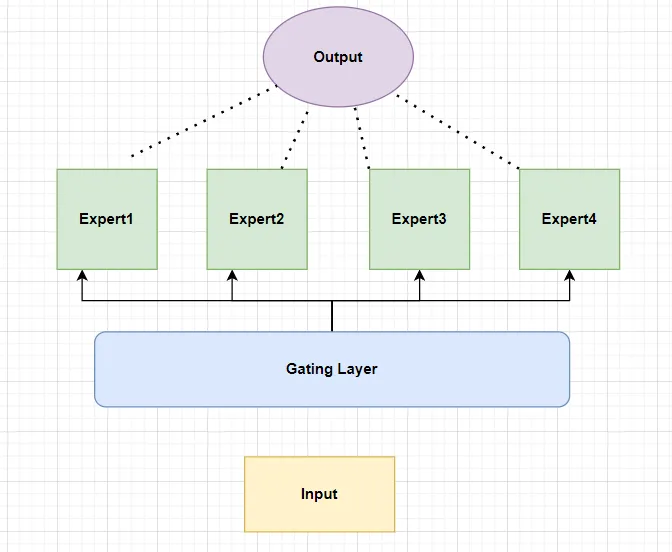
那么,究竟什么是 MoE?在变压器模型中,MoE 包含两个主要元素:
- 使用稀疏的 MoE 层代替密集的前馈网络(FFN)层。MoE 层有一定数量的 "专家"(如 8 个),每个专家都是一个神经网络。实际上,专家是 FFN,但也可以是更复杂的网络,甚至是 MoE 本身,从而形成分层的 MoE!
- 门网络或路由器,决定将哪个标记发送给哪个专家。例如,在下图中,令牌 "更多 "被发送到第二个专家,而令牌 "参数 "被发送到第一个网络。稍后我们将探讨,我们可以将一个令牌发送给多个专家。如何将令牌路由到专家是使用 MoE 时的重大决定之一--路由器由学习到的参数组成,并与网络的其他部分同时进行预训练。
什么是 Mergekit?
Mergekit 是一个免费的 Gihub 项目,旨在创建预训练模型的合并,"可以完全在 CPU 上运行,也可以使用 8 GB 的VRAM进行加速。支持多种合并算法"。
特点:
- 支持 Llama、Mistral、GPT-NeoX、StableLM 等模型
- 多种合并方法
- GPU 或 CPU 执行
- 懒加载张量,减少内存使用
- 参数值的插值梯度(受 Gryphe 的 BlockMerge_Gradient 脚本启发)
- 分层组装语言模型("Frankenmerging)
什么是 mergekit-moe?
mergekit-moe 是一个脚本,用于将相同大小的 Mistral 或 Llama 模型合并为 Mixtral 混合专家模型。该脚本会将 "基础 "模型中的自我关注和层归一化参数与一组 "专家 "模型中的 MLP 参数相结合:
base_model: path/to/self_attn_donor
gate_mode: hidden # one of "hidden", "cheap_embed", or "random"
dtype: bfloat16 # output dtype (float32, float16, or bfloat16)
## (optional)
# experts_per_token: 2
experts:
  - source_model: expert_model_1
    positive_prompts:
      - "This is a prompt that is demonstrative of what expert_model_1 excels at"
    ## (optional)
    # negative_prompts:
    #   - "This is a prompt expert_model_1 should not be used for"
  - source_model: expert_model_2
  # ... and so on
我们可以定义有助于激活正确专家的提示。在配置(如上)中,positive_prompts 是我们希望路由器网络选择相应专家的提示示例列表。在推理时,当用户输入的提示语义与 positive_prompts 接近时,模型的路由器网络就会激活正确的专家模型。
门模式:
有三种方法可以填充 MoE 门。
"隐藏"
使用正/负提示的隐藏状态表示作为 MoE 栅极参数。质量最好、最有效的选项;默认值。需要使用基本模型评估每个提示,因此可能无法在受限硬件上使用(取决于模型)。可以使用 --load-in-8bit 或 --load-in-4bit 来减少 VRAM 占用。
"廉价嵌入”
仅使用提示的原始标记嵌入,每层使用相同的门参数。效果明显不如 "隐藏"。可在更低端的硬件上运行。
“随机”
随机初始化 MoE 门。如果你打算事后对模型进行微调,或者你想要一些不规则的东西,那么它就很适合你。我不做判断。
在这里,我们任意选择了四个 Mistral 7B 模型。
- teknium/OpenHermes-2.5-Mistral-7B:该模型已针对代码生成进行了微调。
- mistralai/Mistral-7B-Instruct-v0.2: 由 Mistral AI 微调的 instruct 版本。
- meta-math/MetaMath-Mistral-7B:该模型已针对数学进行了微调。
- HuggingFaceH4/zephyr-7b-beta: 使用 DPO 在 UltraFeedback 上训练的另一个指导版本。
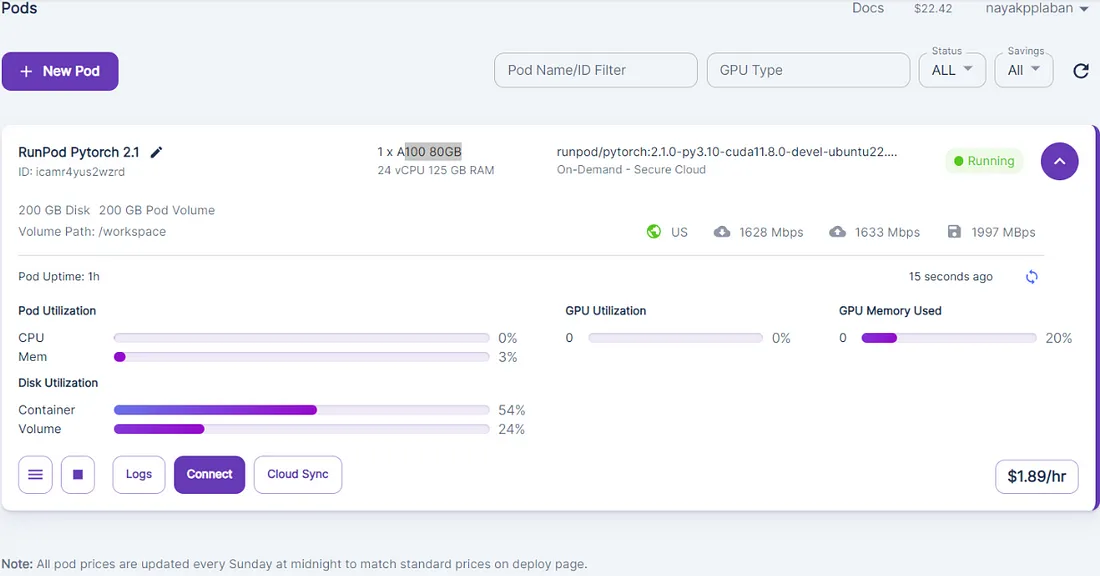
RunPOD 是什么?
RunPod 是一个云计算平台,主要面向人工智能和机器学习应用。RunPod 的主要产品包括 Pod、无服务器计算和 AI API。
代码执行
安装所需的依赖项
!git clone -b mixtral https://github.com/cg123/mergekit.git
!cd mergekit && pip install -qqq -e . --progress-bar off
!pip install -qqq -U transformers --progress-bar off
!pip install bitsandbytes accelerate
准备 config.yaml 文件
该文件基于 mergekit-moe YML 配置语法
merge_config = """
base_model: mistralai/Mistral-7B-Instruct-v0.2
dtype: float16
gate_mode: cheap_embed
experts:
  - source_model: HuggingFaceH4/zephyr-7b-beta
    positive_prompts: ["You are an helpful general-pupose assistant."]
  - source_model: mistralai/Mistral-7B-Instruct-v0.2
    positive_prompts: ["You are helpful assistant."]
  - source_model: teknium/OpenHermes-2.5-Mistral-7B
    positive_prompts: ["You are helpful a coding assistant."]
  - source_model: meta-math/MetaMath-Mistral-7B
    positive_prompts: ["You are an assistant good at math."]
"""
with open('config.yaml', 'w') as f:
    f.write(merge_config)
然后,我们使用以下参数运行合并命令:
- --copy-tokenizer从基本模型复制标记生成器
- --allow-crimes并将--out-shard-size模型分成更小的分片,这些分片可以在 RAM 较低的 CPU 上进行计算
- --lazy-unpickle启用实验性惰性 unpickler 以降低内存使用量
此外,某些模型可能需要 --trust_remote_code 标志(Mistral-7B 不需要)。
该命令将下载合并配置中列出的所有模型的权重,并运行选定的合并方法。
合并本身只需要 CPU,但需要注意的是,由于我们需要下载所有专家,因此你的磁盘需要很大的空间。
!mergekit-moe config.yaml merge --copy-tokenizer --allow-crimes --out-shard-size 1B --lazy-unpickle --trust-remote-code
######Sample log Information ##########
.......
.......
.......
pytorch_model-00001-of-00002.bin:  99%|████▉| 9.85G/9.94G [01:23<00:00, 131MB/s]

pytorch_model-00001-of-00002.bin:  99%|████▉| 9.87G/9.94G [01:23<00:00, 129MB/s]

pytorch_model-00001-of-00002.bin:  99%|████▉| 9.89G/9.94G [01:24<00:00, 126MB/s]

pytorch_model-00001-of-00002.bin: 100%|████▉| 9.91G/9.94G [01:24<00:00, 100MB/s]

pytorch_model-00001-of-00002.bin: 100%|█████| 9.94G/9.94G [01:24<00:00, 118MB/s]
Fetching 9 files: 100%|███████████████████████████| 9/9 [01:24<00:00,  9.40s/it]
Warm up loaders: 100%|███████████████████████████| 5/5 [09:48<00:00, 117.62s/it]
100%|█████████████████████████████████████████████| 9/9 [01:34<00:00, 10.44s/it]
Fetching 11 files: 100%|█████████████████████| 11/11 [00:00<00:00, 59150.44it/s]
expert prompts: 100%|█████████████████████████████| 4/4 [00:00<00:00,  4.47it/s]
WARNING:root:ALL layers have degenerate routing parameters - your prompts may be too similar.
WARNING:root:One or more experts will be underutilized in your model.
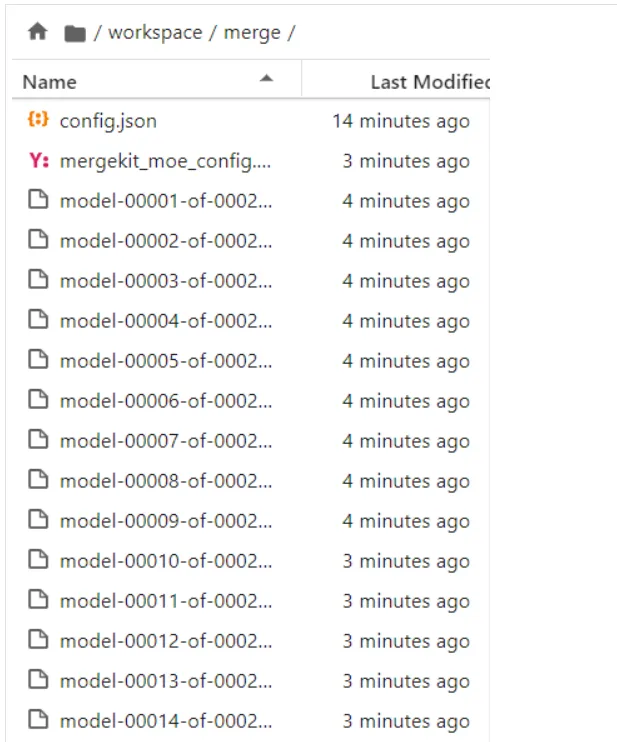
现在模型已合并并保存在 `merge` 目录中。
测试推理并将模型推送到HF Hub
加载合并模型
from transformers import AutoTokenizer, AutoModelForCausalLM
import torch
tokenizer = AutoTokenizer.from_pretrained("mistralai/Mistral-7B-Instruct-v0.2", use_fast=True)
model = AutoModelForCausalLM.from_pretrained(
            "merge/", device_map='cpu', torch_dtype=torch.float16
)
登录 Huggingface Hub
from huggingface_hub import notebook_login
notebook_login()
将模型推送到 Huggingface Hub
指定 <popoid/merged-model-name> 名称
model.push_to_hub("Plaban81/Moe-4x7b-math-reason-code")
tokenizer.push_to_hub("Plaban81/Moe-4x7b-math-reason-code")
测试合并模型
from transformers import AutoTokenizer
import transformers
import torch
model = "Plaban81/Moe-4x7b-math-reason-code" #If you want to test your own model, replace this value with the model directory path
tokenizer = AutoTokenizer.from_pretrained(model)
pipeline = transformers.pipeline(
    "text-generation",
    model=model,
    model_kwargs={"torch_dtype": torch.float16, "load_in_4bit": True},
)
生成响应的辅助函数
def generate_resposne(query):
    messages = [{"role": "user", "content": query}]
    prompt = pipeline.tokenizer.apply_chat_template(messages, tokenize=False, add_generation_prompt=True)
    outputs = pipeline(prompt, max_new_tokens=256, do_sample=True, temperature=0.7, top_k=50, top_p=0.95)
    return outputs[0]['generated_text']
问题1
response = generate_resposne("How to cook pizza.Please provide a step by step procedure")
print(response)
#########Output###############
<s>[INST] How to cook pizza.Please provide a step by step procedure [/INST]Cooking a pizza at home can be a fun and delicious experience. Here's a step-by-step procedure to help you make the perfect pizza:
Ingredients:
- Pizza dough (store-bought or homemade)
- Pizza sauce (store-bought or homemade)
- Shredded mozzarella cheese
- Your choice of toppings (pepperoni, mushrooms, onions, peppers, etc.)
- Olive oil
- Cornmeal or flour for dusting
Equipment:
- Pizza stone or baking sheet
- Parchment paper
- Rolling pin
- Spatula
Instructions:
1. Preheat the oven to 450°F (232°C) with a pizza stone or baking sheet inside. If using a pizza stone, place it on the bottom rack of the oven.
2. Dust a clean work surface with flour or cornmeal. Roll out the pizza dough to your desired thickness using a rolling pin.
3. Drizzle a little olive oil on the work surface and place the pizza dough on top
问题2
response = generate_resposne("Write a python program to generate fibonnaci series.")
print(response)
############ Response #####################
<s>[INST] Write a python program to generate fibonnaci series. [/INST] Here is a simple Python program that generates the Fibonacci series using a loop:
```python
def fibonacci(n):
    a, b = 0, 1
    for i in range(n):
        yield a
        a, b = b, a + b
numbers = fibonacci(10)
for number in numbers:
    print(number)
```
In this program, we define a generator function `fibonacci` that takes a single argument `n`. Inside the function, we initialize two variables `a` and `b` to 0 and 1, respectively. We then use a loop to generate the Fibonacci series up to the `n`th term. In each iteration of the loop, we yield the current value of `a` (which is the `i`th term of the series) and update `a` and `b` to prepare for the next iteration.
To test the function, we call it with an argument of 10, which generates the first 10 terms of the Fibonacci series. We then use a `for` loop to print each term
问题 3
response = generate_resposne("""Select the prime number from the list of numbers provided below.
[1,3,5,6,123,2000]""")
print(response)
###############Response ####################
<s>[INST] Select the prime number from the list of numbers provided below.
[1,3,5,6,123,2000] [/INST]
The prime numbers from the given list are 1, 3, and 5. However, 1 is not considered a prime number in mathematics as it is not greater than 1. Therefore, the only prime number from the list is 3. The other numbers, 6, 123, and 2000, are not prime numbers.
问题 4
response = generate_resposne("""Write an essay on Indusriatlization within 500 words.""")
print(response)
######## Response #####################
<s>[INST] Write an essay on Indusriatlization within 500 words. [/INST] Indusriatlization refers to the process of transforming a traditional agricultural economy into a modern industrial one. This transition, which began in the 19th century, has had a profound impact on the socio-economic development of India. In this essay, we will examine the historical context of Indusriatlization, its key drivers, and its effects on various sectors of the Indian economy.
Historical Context
The British colonization of India in the 19th century laid the foundation for Indusriatlization in the country. The British, who were interested in India's vast market and resources, introduced modern industries such as textiles, iron and steel, and coal mining. They also established modern institutions such as technical schools, research institutes, and factories. The British also implemented policies such as the Doctrine of Lapse, which enabled them to annex Indian princely states, and the Indian Penal Code, which provided a legal framework for contractual relationships.
Key Drivers
There were several key drivers of Indusriatlization in India. The first was the availability of capital. The British capital, which was invested in India, played a crucial
问题 5
response = generate_resposne("""what is square root of 81 + square root of 9""")
print(response)
############ Response####################
<s>[INST] what is square root of 81 + square root of 9 [/INST]
The square root of 81 is 9 (since 9^2 = 81), and the square root of 9 is 3 (since 3^2 = 9).
Therefore, the expression simplifies to 9 + 3, or 12.
自动评估合并模型
模型评估是开发和完善模型的一个重要方面。人们设计了各种评估框架和基准来评估这些模型的不同能力。
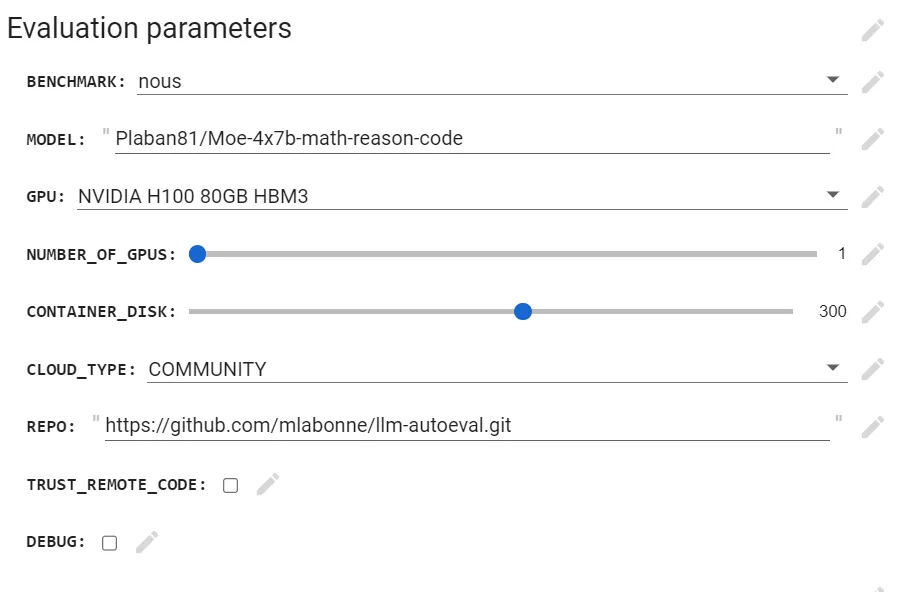

我们需要为 RunPod 和 GitHub 提供令牌。
AutoEval 的运行分为三个步骤:
- 使用 RunPod 自动设置和执行。
- 自定义评估参数,进行量身定制的基准测试。
- 生成摘要并上传到 GitHub Gist,便于共享和参考。
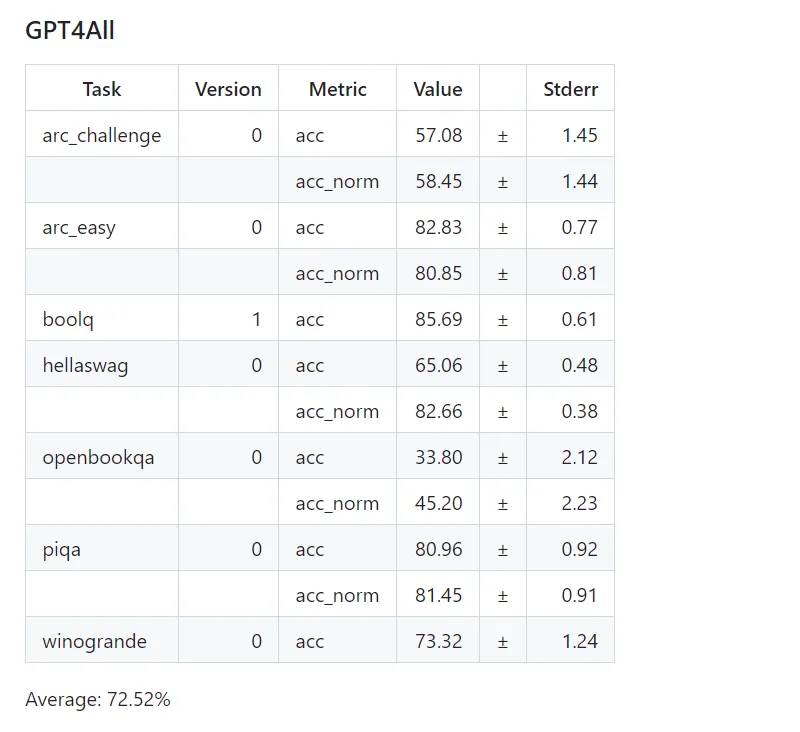
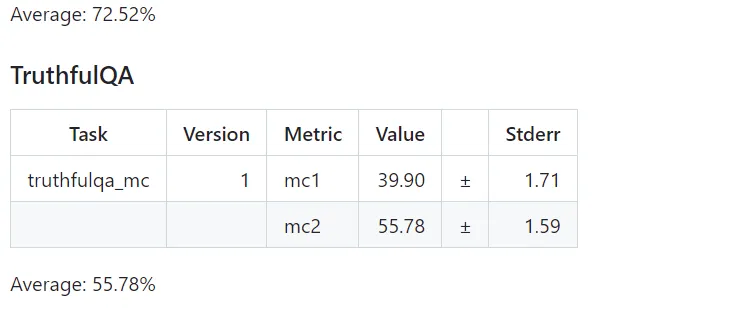
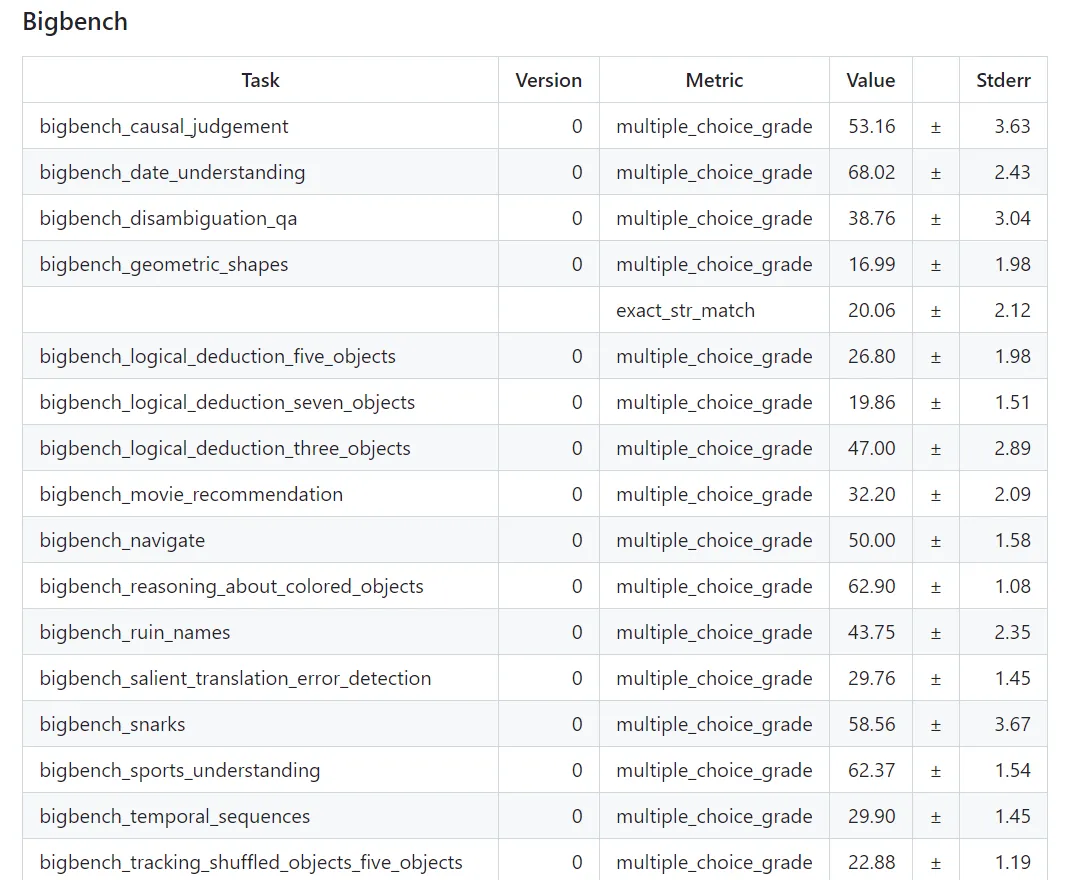
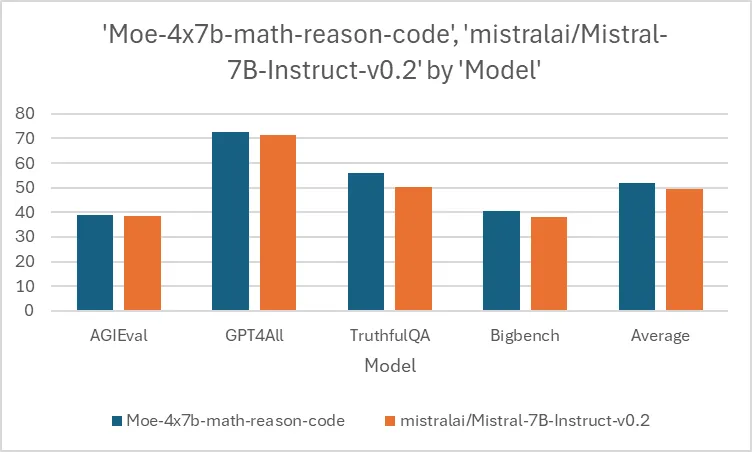
AutoEval 使用 nous 基准套件,其中包含以下任务列表:
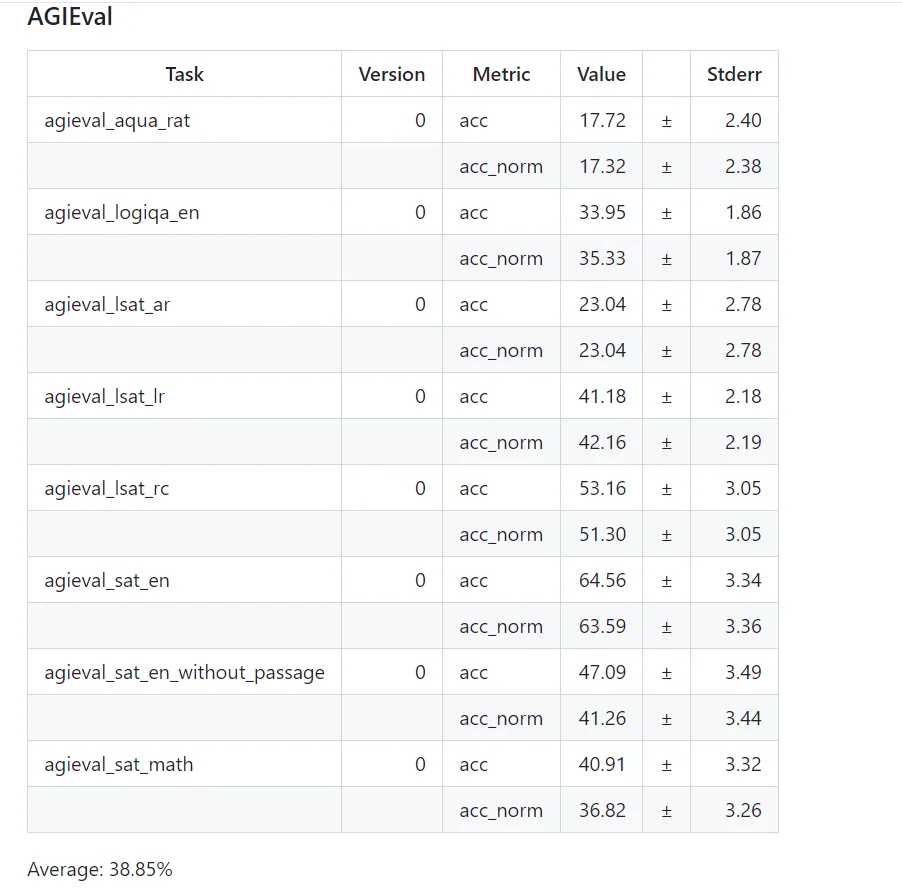
- AGIEval:以人为中心的基准,旨在评估基础模型在与人类认知和解决问题相关的任务中的一般能力。AGIEval v1.0 包含 20 个任务,包括两个掐词任务(Gaokao-Math-Cloze 和 MATH)和 18 个多选题回答任务。
- GPT4ALL:用于评估 LLM 实际语言理解能力的基准套件。它由各种任务组成,旨在评估 LLM 理解和回答事实性问题的能力。GPT4All 的部分任务包括开放式问题解答、封闭式问题解答、文本摘要和自然语言推理。
- TruthfulQA:用于评估 LLM 真实性的基准套件。它由各种任务组成,旨在评估 LLM 区分真假语句的能力。TruthfulQA 的部分任务包括多选题和文本蕴含。
- BigBench:一个广泛的基准套件,旨在评估和衡量模型在各种任务中的能力。它包括推理、语言理解、问题解决等测试。BigBench 背后的理念是提供一套全面且具有挑战性的任务,以揭示人工智能模型在不同领域的优缺点。
在执行 autoevalaution 脚本时,将显示以下消息
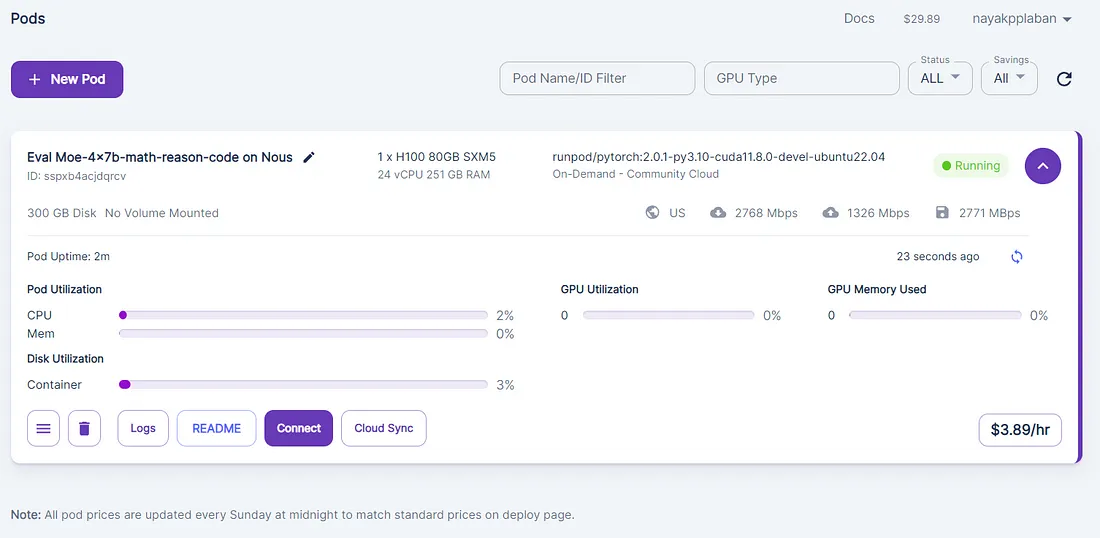
登录runpod账户,可看到正在运行的pod
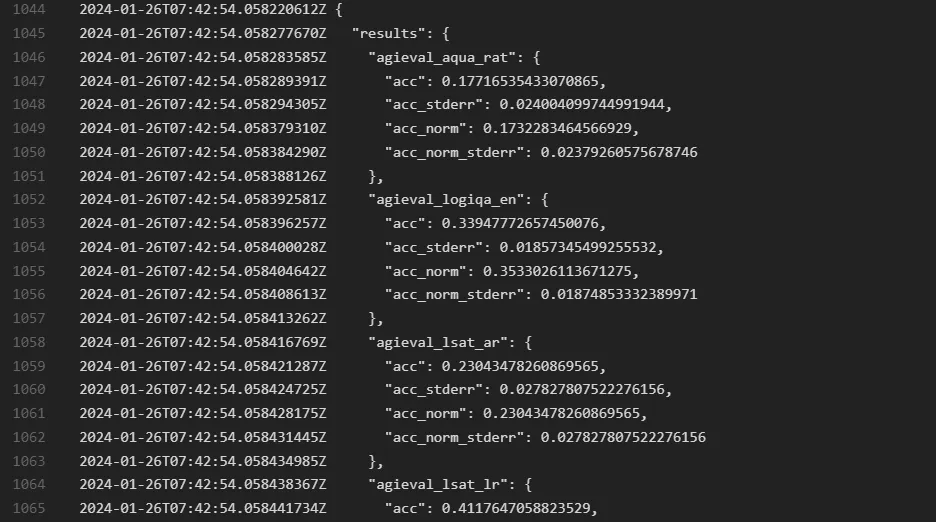
点击日志查看执行详情
整个过程耗时 1 小时 53 秒,以下是以 .md 文件形式写入 github 仓库的结果。

与Expert1 模型的单独比较

结论
现在,创建专家混合模型(MoEs)既简单又实惠。虽然 mergekit 目前只支持几种模型类型,但它的受欢迎程度表明,很快就会有更多的模型类型加入进来。
在本文中,我们组合了不同的模型,并使用生成的模型进行预测。虽然我们的新 MoE 得出了很好的结果,但需要注意的是,我们还没有对其进行微调。为了使结果更好,最好使用 QLoRA 对其进行微调。


