使用PyTorch从头开始构建BitNet 1.58位
什么是量化以及为什么需要它?
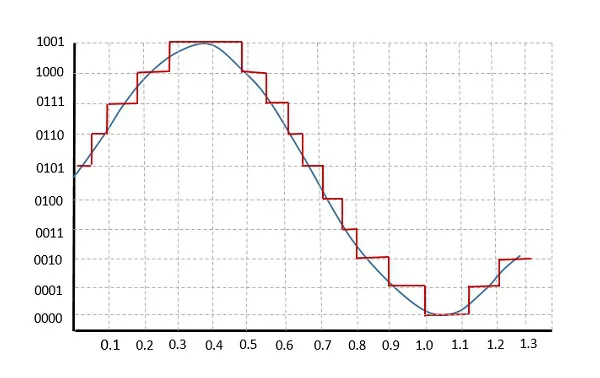
量化是用较少的位数表示浮点数的过程。当 2 个数字以相同的位数进行量化时,对数字进行浮点运算的计算成本几乎以减少位数的相同系数减少(理论上)。这让我们可以提高速度,减少 ML 模型的内存消耗。但这往往会造成信息损失,导致准确度下降,而我们可以通过对量化模型进行更多的微调来弥补这一损失。
现有量化方法与 BitNet 1.58bit 的比较
市场上的大多数量化算法都需要一个全精度的预训练模型。为了让这些算法有效地工作,人们会应用一些技术,如训练后量化和量化感知训练(Quantization Aware Training)。
PTQ 是一种量化技术,即在训练后对模型进行量化。QAT 是对 PTQ 模型的微调,即在考虑量化的情况下对模型进行进一步训练。- Deci.AI
BitNet 采用了一种截然不同的方法,即从头开始训练模型,并进行量化处理!
BitNet 的量化算法
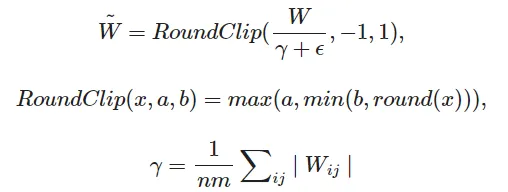
在上图中,权重剪切阈值 γ 是通过取绝对值平均值的一半计算得出的(假设 n=2)。然后将权重矩阵 W 除以相同的值,当原始权重值≥ γ 时,新权重矩阵的值≥ 1;当原始权重值≤ -γ 时,新权重矩阵的值≤-1。对于-γ 之间的值,γ 值被映射为-0.99999... 至 0.9999...
原始值≥ γ 的新值为 1.0,原始值≤ -γ 的新值为-1.0,原始值介于 -γ 和 γ 之间的新值为 0.0。
根据信息编码理论,理论上的结果值可以用 1.58 比特来表示。由于比特不能是小数,我们可以用 2 比特来表示。
在 Pytorch 中实现量化函数
阈值计算
def compute_adjustment_factor(self, input_tensor: torch.Tensor):
    absmean_weight = torch.mean(torch.abs(input_tensor))
    adjustment_factor = 1e-4 + absmean_weight * 2 # 1e-4 to avoid zero divison error
    return adjustment_factor
我犯了一个小错误,我没有将 absmean 值减半,而是乘以 2!
RoundClip (1.58~= 2bit)
def compute_2bit_quantized_tensor(self, input_tensor: torch.Tensor):
    twobit_matrix = torch.clip(input=torch.round(input_tensor), min=-1, max=1)
    return twobit_matrix
def compute_1bit_quantized_tensor(self, input_tensor: torch.Tensor):
    return torch.sign(input_tensor)
def compute_quantized_tensor(self, input_tensor: torch.Tensor):
    if self.quantization_mode == QuantizationMode.two_bit:
        return self.compute_2bit_quantized_tensor(input_tensor)
    else:
        return self.compute_1bit_quantized_tensor(input_tensor)
量化步骤
weight_adjustment_factor = self.compute_adjustment_factor(self.weight)
adjusted_weight = self.weight / weight_adjustment_factor
quantized_weight = self.compute_quantized_tensor(adjusted_weight)
线性层操作
F.linear(weight_adjustment_factor * x, quantized_weight, self.bias)
# adjustment factor is multiplied with input and quantized weight was divided of the same
但模型不会学习
如果在将权重传递给线性层函数之前对其进行量化,那么量化矩阵的更新将不会通过量化函数(因为大多数更新将介于 1e-4 到 1e-2 之间,在反向传播量化步骤时将变为零)。因此,原始权重矩阵永远不会更新,模型也永远不会学习!
但有一个巧妙的工程设计技巧可以解决这个问题
完整的正向块是这样的
def forward(self, x):
    weight_adjustment_factor = self.compute_adjustment_factor(self.weight)
    adjusted_weight = self.weight / weight_adjustment_factor
    if self.training:
        quantized_weight = (
            adjusted_weight
            + (
                self.compute_quantized_tensor(adjusted_weight) - adjusted_weight
            ).detach()
        )
    else:
        quantized_weight = self.compute_quantized_tensor(adjusted_weight)
    return F.linear(weight_adjustment_factor * x, quantized_weight, self.bias)
无论是否将 self.training 设为 True,量化权重块的值都是一样的。但当 self.training 设置为 "True "时,量化权重计算出的梯度会被漂亮地复制到调整后的权重中。这样,调整后的权重就能在训练过程中得到更新,原始权重矩阵也会随之更新。
自定义 Pytorch 实现的实验结果
下面的实验选择了一个小模型和一个与小模型相关的足够大的数据集。此外,要创建目标模型的量化变体,我只需使用以下代码块,将 nn.Linear 代码块替换为我的自定义实现
import copy
def create_quantized_copy_of_model(
    input_model: nn.Module, quantization_mode: QuantizationMode
):
    model_copy = copy.deepcopy(input_model)
    hash_table = {n: m for n, m in model_copy.named_modules()}
    for key in list(hash_table.keys()):
        if isinstance(hash_table[key], nn.Linear):
            new_module = BitNetLinearLayer(
                in_features=hash_table[key].in_features,
                out_features=hash_table[key].out_features,
                bias=hash_table[key].bias is not None,
                quantization_mode=quantization_mode,
            )
            name_chain = key.split(".")
            parent_module_attr_name = ".".join(name_chain[:-1])
            parent_module = hash_table[parent_module_attr_name]
            setattr(parent_module, name_chain[-1], new_module)
    for n, m in model_copy.named_modules():
        assert not isinstance(m, nn.Linear)
    return model_copy
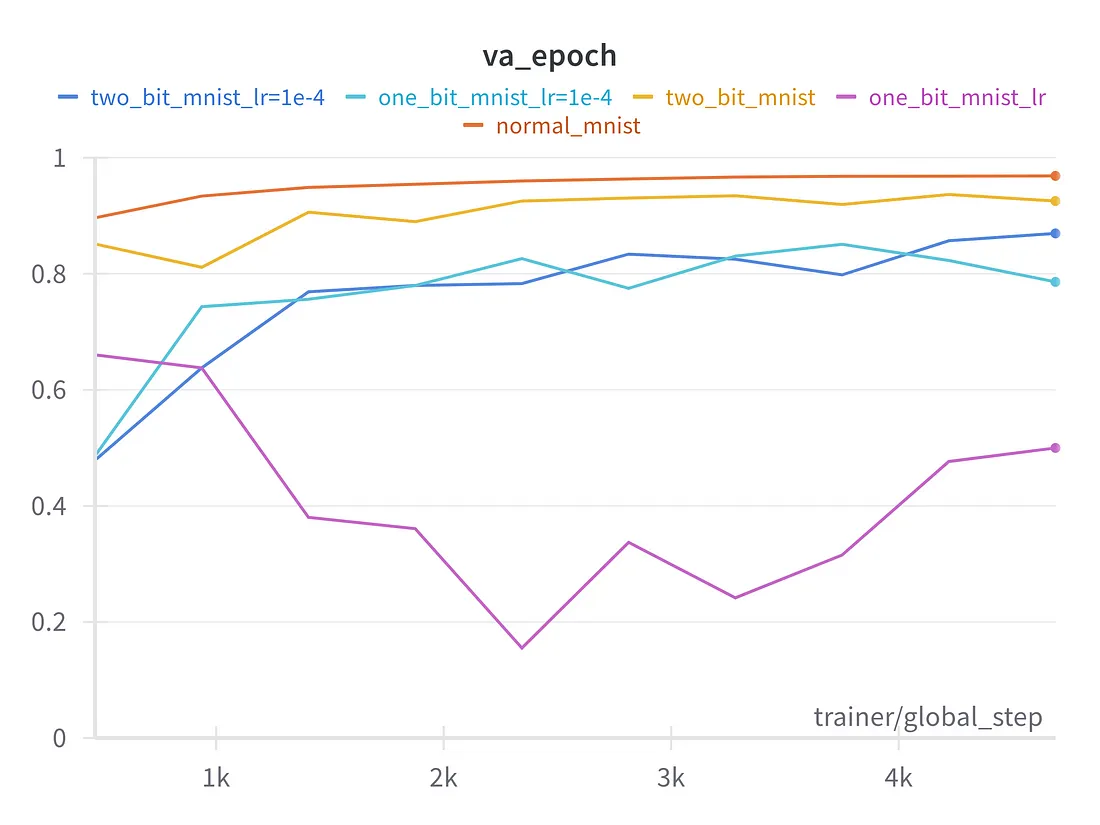
使用 4 层前馈神经网络的 Mnist
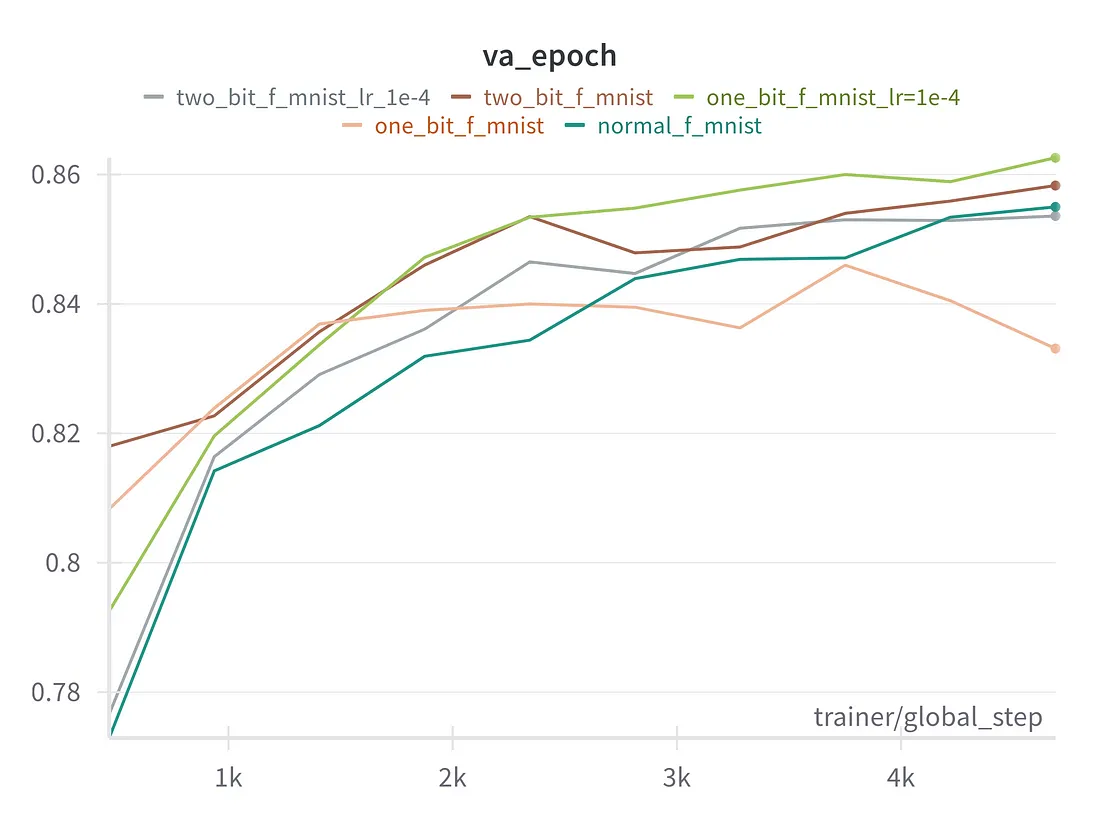
采用 128 维向量的时尚 MNIST 6 块版 VIT
采用 128 维向量的 CIFAR100,8 块版 VIT
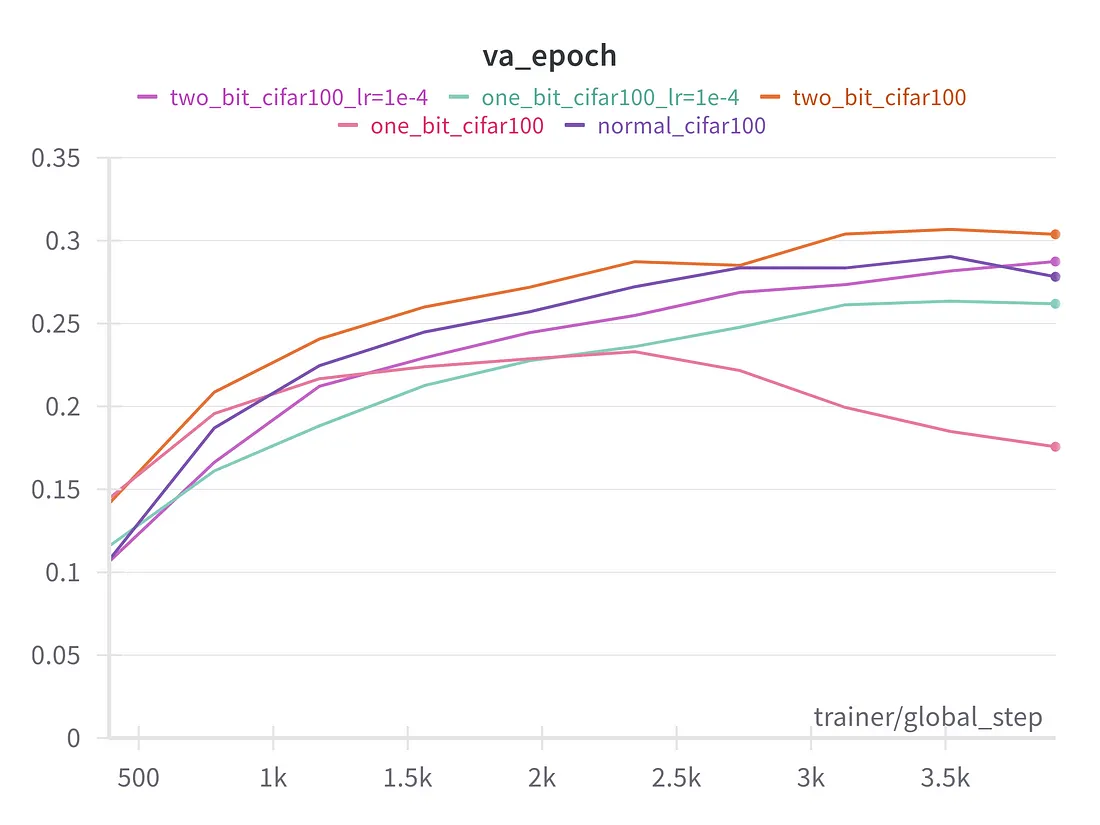
在上述实验中,我们可以看到,除第一次实验外,模型的 2bit 和 1bit 变体与模型的全精度正常变体表现一样好。在第一个实验中,量化模型可能发生了灾难性遗忘,而其余实验中的残余连接避免了这种遗忘。
当然,这些实验并不是用 LLM 进行的,只是为了测试论文中关于这种系统能够与全精度模型竞争的说法。


