使用Python微调Gemini 1.0 Pro
谷歌的 Gemini 1.0 Pro 是语言模型的一个重要工具。它有一个免费的 API,每分钟可使用 60 次,非常适合小型项目,尤其是学生项目。本文将向你展示如何使用 Python 对 Gemini 1.0 Pro 进行微调,看看它的效果如何。
准备数据集
与 OpenAI 模型类似,微调 Gemini 1.0 Pro 需要特定的数据集格式,即 JSON。我们当前的数据集是 CSV 格式,因此需要将其转换为 JSON 格式,以确保兼容性。我们的数据集由两列组成:输入和输出。
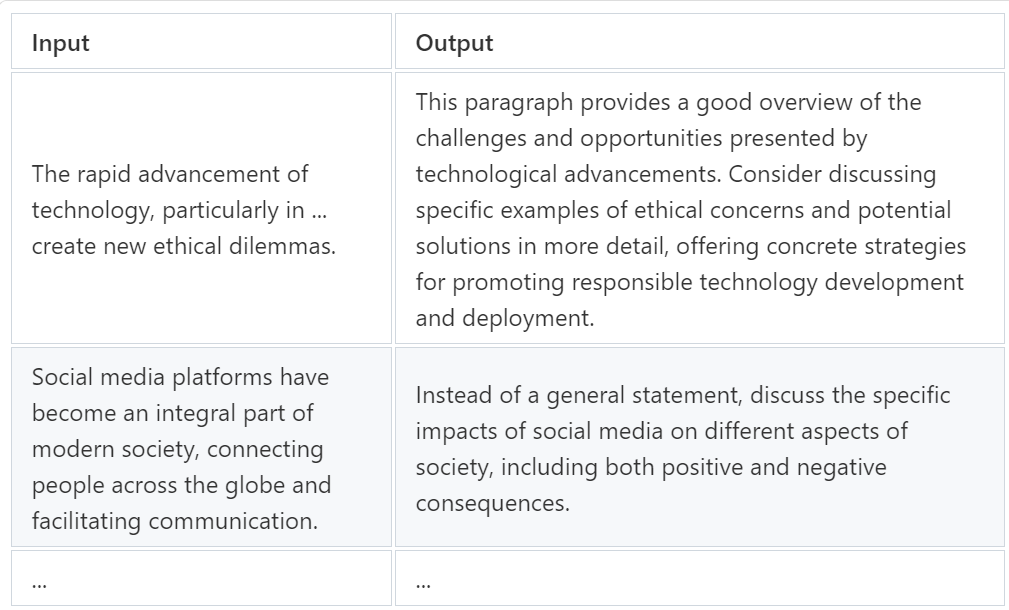
我们的数据集包含 372 个示例,专为文章内容评论而设计,输入为长段落,输出为带有改进建议的评论。在对 Gemini 1.0 Pro 进行微调后,它就能充当我所提供内容的评论者。
让我们加载数据集并将其转换为 JSON 格式。
import csv  # Import the csv module to work with CSV files
# Define a function that converts a CSV file to a list of dictionaries
def csv_to_list_of_dicts(csv_file):
    data = []
    with open(csv_file, 'r') as file:

        # Create a CSV reader object
        csv_reader = csv.DictReader(file)

        # Iterate over each row in the CSV file
        for row in csv_reader:
            data.append({'text_input': row['input'],
                          'output': row['output']})
    # Return the list of dictionaries
    return data
# Replace 'your_dataset.csv' with the path to your CSV file
fine_tuning_data = csv_to_list_of_dicts('dataset.csv')
让我们打印新格式化数据集的前几项,以验证其结构:
# Print the list of dictionaries
print(dataset[:2])

####### OUTPUT #######
[
    {
        "text_input": "The rapid advance ... ethical dilemmas.",
        "output": "This para for promoting ... deployment."
    },
    {
        "text_input": "Social mediafacilitating ... communication.",
        "output": "Instead of a general negative ... consequences."
    }
]
####### OUTPUT #######
现在我们的数据集已经准备就绪,下一步就是安装和设置必要的库和软件,以便在本地环境中进行微调。
安装必要的库/软件
第一步是安装 Google Cloud CLI。你可以从此处下载并按照简单明了的安装说明进行安装。或者,也可以打开 PowerShell 终端并运行以下命令进行安装:
(New-Object Net.WebClient).DownloadFile("https://dl.google.com/dl/cloudsdk/channels/rapid/GoogleCloudSDKInstaller.exe", "$env:Temp\GoogleCloudSDKInstaller.exe")"https://dl.google.com/dl/cloudsdk/channels/rapid/GoogleCloudSDKInstaller.exe", "$env:Temp\GoogleCloudSDKInstaller.exe")
& $env:Temp\GoogleCloudSDKInstaller.exe
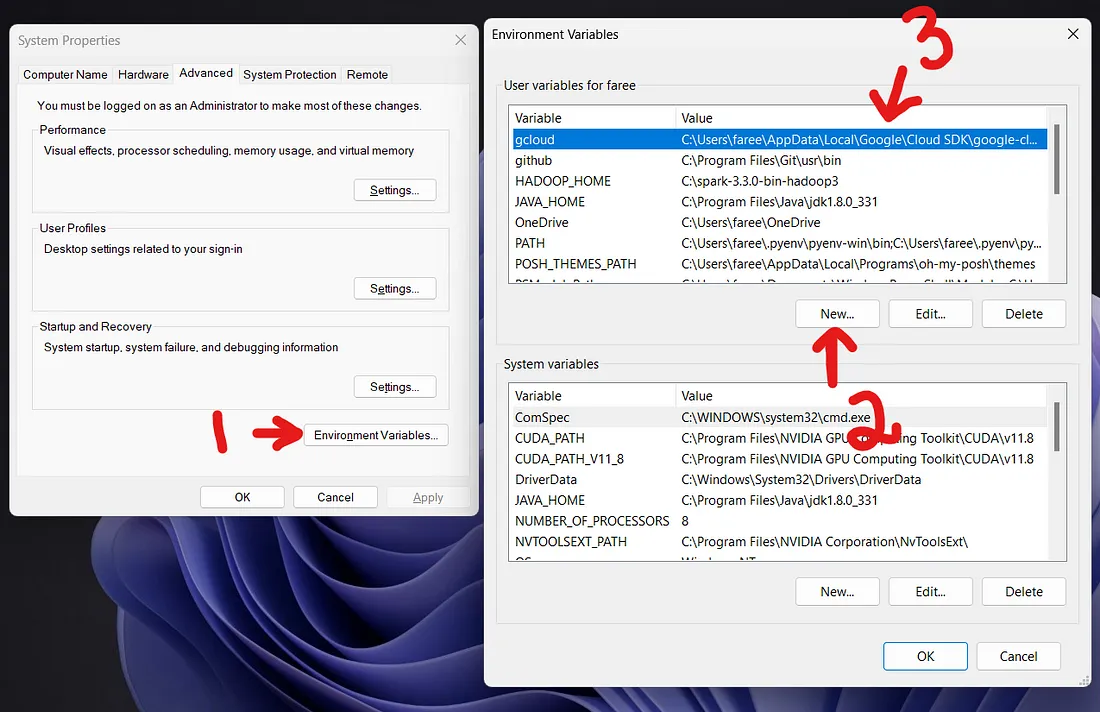
安装完成后,你需要在环境变量中添加 Google Cloud CLI 路径。为此,请在系统搜索栏中搜索 "环境变量",然后添加一个名为 "gcloud "的新变量。将其值设置为安装 SDK 的路径(例如,C:\users\faree\AppData\Local\Google\Cloud SDK\google-cloud-sdk\bin,其中 "faree "为你的用户名)。
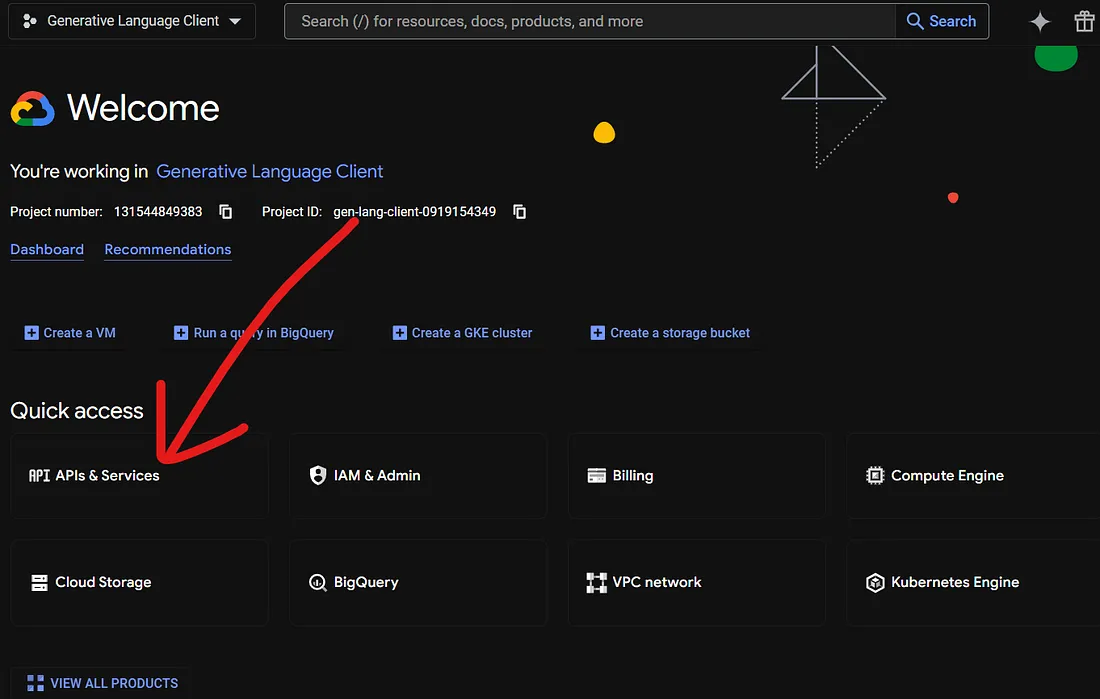
导航至 console.cloud.google.com,选择 "APIs & Services"。确保所选项目为 "生成语言客户端 "或与 Gemini API 密钥相关联的项目。
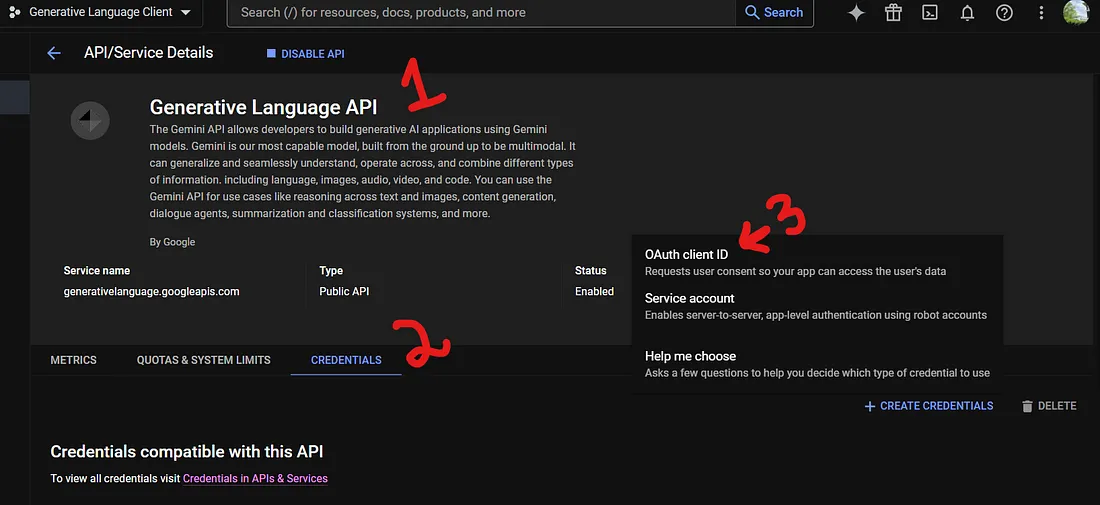
在生成语言 API 部分的 "凭证 "选项卡下,创建一个新凭证并选择 "OAuth 客户 ID"。
除 "Web 应用程序 "外,你可以选择任何应用程序类型。选择 "Web 应用程序 "将无法在本地计算机上对 Gemini 进行微调。
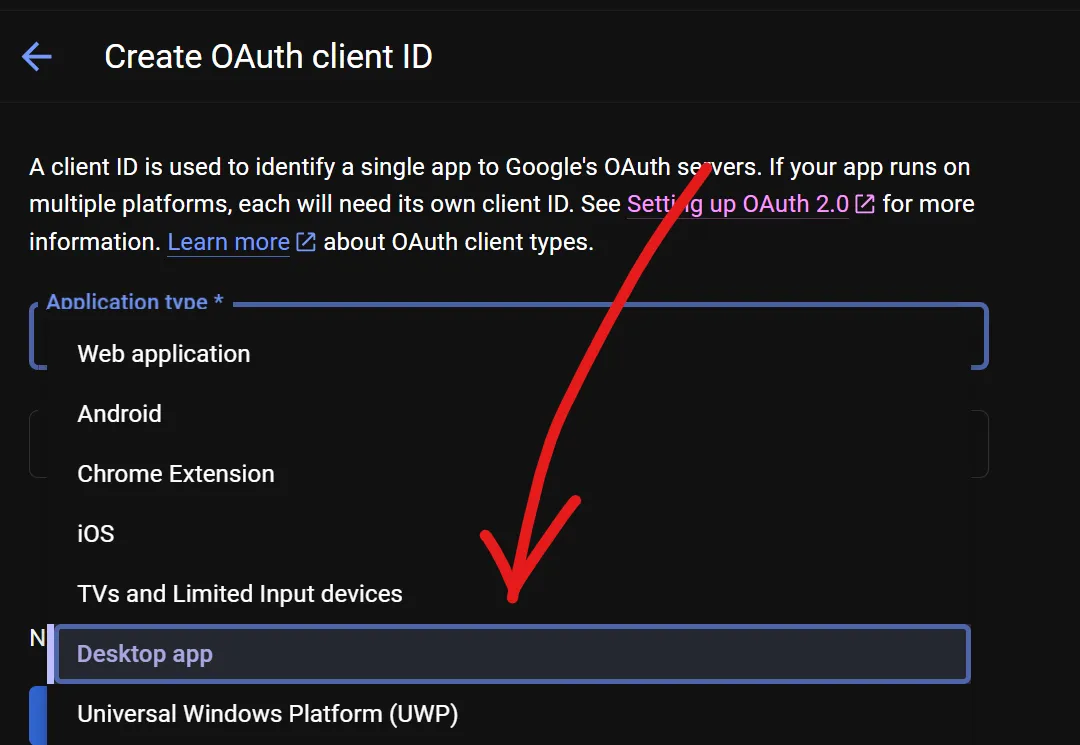
为凭据指定一个名称并创建它。创建后,下载凭证 JSON 文件。该文件将用于授权你的环境访问经过微调的 Gemini LLM。

复制下载的 JSON 文件,并将其放到要编写微调代码的目录中。然后,在该目录下打开命令提示符或终端,执行以下命令:
gcloud auth application-default login --client-id-file client_secret.json --scopes='https://www.googleapis.com/auth/cloud-platform,https://www.googleapis.com/auth/generative-language.tuning'default login --client-id-file client_secret.json --scopes='https://www.googleapis.com/auth/cloud-platform,https://www.googleapis.com/auth/generative-language.tuning'
该命令将生成一个链接。打开链接,使用创建凭证 JSON 文件时使用的同一账户登录。单击 "继续 "并授予所有必要的权限。返回命令提示符或终端后,你应该会看到一条确认信息,表明你现在可以在本地环境中执行微调。

接下来,我们需要安装必要的库,以便与 Gemini 1.0 Pro API 交互。
# Install necessary libraries
pip install google-generativeai grpcio grpcio-tools
微调Gemini1.0 Pro
我们需要导入程序库并开始工作。
# Importing the generativeai module from the google package.
import google.generativeai as genai
# Configuring the generativeai module to use gRPC (Google Remote Procedure Call) as the transport protocol.
genai.configure(transport='grpc')
你可以使用 genai.list_tuned_model 方法检查现有的调谐模型。
# genai.list_tuned_models() returns a generator of tuned models.
for i, m in zip(range(5), genai.list_tuned_models()):

  # Printing the name of the current tuned model (m).
  print(m.name)
因为我们还没有任何微调模型,所以它不会输出任何信息。
要创建微调模型,我们需要在 genai.create_tuned_model 方法中将数据集传递给模型。你可以在调用中直接定义输入和输出值,我们已经在数据帧中做到了这一点。
# Assigning a name to the fine-tuned model.
my_finetuned_model_name = "blog-writing-feedback-llm"
# Creating a tuned model operation with specified parameters.
operation = genai.create_tuned_model(
    # Setting the source model for tuning.
    source_model= 'models/gemini-1.0-pro-001',
    # Providing the training data for fine-tuning.
    training_data = dataset,
    # Assigning an ID to the fine-tuned model.
    id = my_finetuned_model_name,
    # Setting the number of epochs for training.
    epoch_count = 100,
    # Specifying the batch size for training.
    batch_size=4,
    # Setting the learning rate for training.
    learning_rate=0.001,
)
在代码中,我们指定了微调模型的名称、源模型名称、历时次数和学习率。历时和学习率是通过反复试验确定的。运行代码后,我们的微调模型会被添加到微调模型列表中,但在微调过程中,它的状态最初被设置为 "创建"。
我们可以使用以下命令查看其状态:
model = genai.get_tuned_model(f'tunedModels/{my_finetuned_model_name}')f'tunedModels/{my_finetuned_model_name}')
model.state

####### OUTPUT #######
<State.CREATING: 1>
####### OUTPUT #######
要监控微调过程中完成的步骤数,可以使用以下命令:
operation.metadata

####### OUTPUT #######
total_steps: 375
tuned_model: "tunedModels/blog-writing-feedback-llm"
####### OUTPUT #######
To stop or cancel the fine-tuning process you can use:
要停止或取消微调过程,你可以使用
operation.cancel()
调整完成后,你可以查看调整结果的损失曲线。损失曲线显示了模型预测与理想输出的偏差程度。
# Importing the pandas library with an alias pd for ease of use.
import pandas as pd
# Importing the seaborn library with an alias sns for ease of use.
import seaborn as sns
# Retrieving the result of the operation, which is the fine-tuned model.
model = operation.result()
# Creating a DataFrame from the snapshots of the tuning task in the model.
snapshots = pd.DataFrame(model.tuning_task.snapshots)
# Creating a line plot using seaborn, with epoch on the x-axis and mean loss on the y-axis.
sns.lineplot(data=snapshots, x='epoch', y='mean_loss')
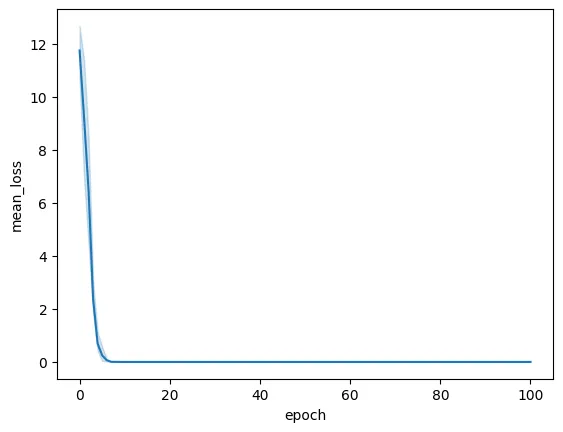
你可以使用 genai.generate_text 方法并指定模型名称来测试模型性能。
# Loading the fine-tuned model using the specified model name.
model = genai.GenerativeModel(model_name=f'tunedModels/{my_finetuned_model_name}')
# Providing a prompt for the model to generate content based on.
prompt = ''' My lengthy blog ... '''
# Generating content using the loaded model and the provided prompt.
result = model.generate_content(prompt)
# Printing the generated content.
print(result.text)

####### OUTPUT #######
This paragraph beautifully captures the romantic and aspirational
essence of air travel, highlighting its historic significance and
symbolic importance. Consider inviting readers to reflect on the
transformative power of flight and the role of aviation in
shaping our understanding of the world and our place in it.
####### OUTPUT #######
我用我的机密博文测试了微调后的模型,它提供了建设性的反馈意见,即使只有 372 个训练示例,也表现出了良好的性能。
当我们列出微调模型时,它现在应该会出现在列表中:
# genai.list_tuned_models() returns a generator of tuned models.
for i, m in zip(range(5), genai.list_tuned_models()):

  # Printing the name of the current tuned model (m).
  print(m.name)

####### OUTPUT #######
tunedModels/blog-writing-feedback-llm
####### OUTPUT #######


