【指南】在Triton推理服务器上使用TensorRT-LLM部署LLM
在本文中,我将讨论如何从大型语言模型(LLM)中进行推理,以及如何使用 TensorRT-LLM 框架将 Trendyol LLM v1.0 模型部署到 Triton Inference Server 上。
目前已开发出 vLLM、TGI 和 TensorRT-LLM 等多种框架,用于根据 LLM 进行推理。在这些工具中,TensorRT-LLM 是一个重要的框架,可以在生产环境中有效使用模型。
Triton 推理服务器是 Nvidia 开发的推理工具,支持各种机器学习框架的基础架构。该服务器专为需要大规模模型部署和处理的应用而设计。通过支持 TensorFlow、PyTorch、ONNX Runtime 等各种深度学习框架,Triton Inference Server 能够在生产环境中快速高效地运行这些模型。此外,Triton 还能在 GPU 上进行并行计算,促进大规模模型的快速高效处理。因此,开发人员可以在 Triton 推断服务器上轻松管理和部署复杂的模型架构和大型数据集。
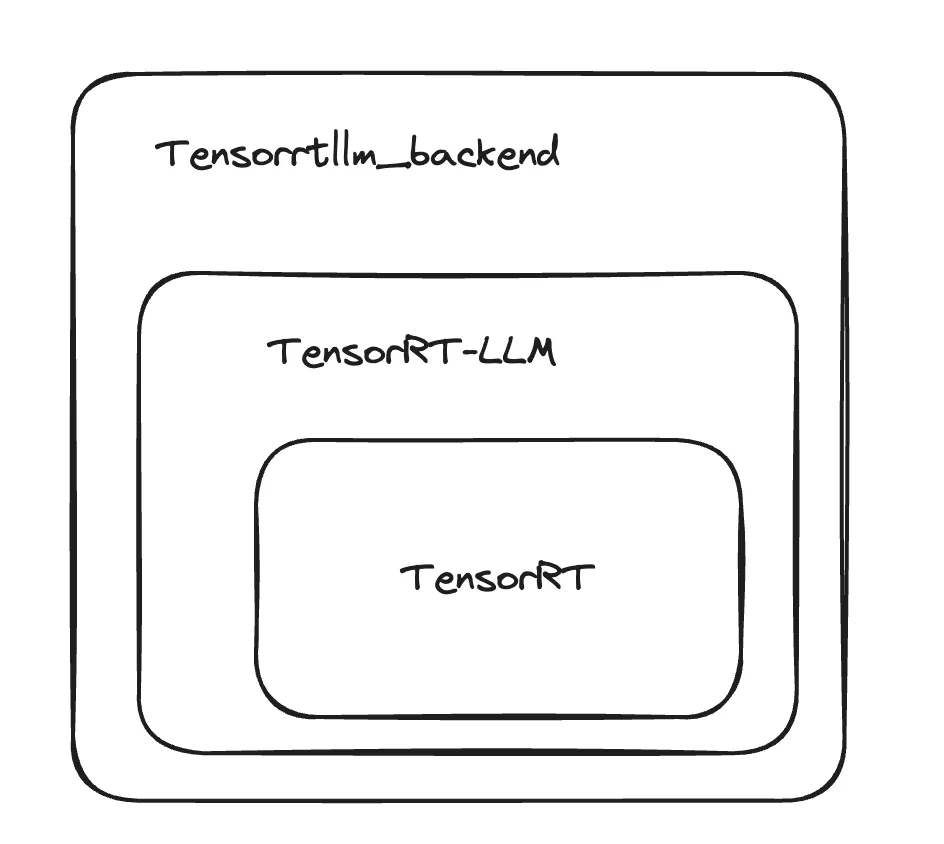
Triton 推论服务器还通过 tensorrtllm_backend 后端支持 TensorRT-LLM 框架。借助 tensorrtllm_backend,我们可以在 Triton Inference Server 上部署在 TensorRT-LLM 框架上运行的模型。如下图所示,tensorrtllm_backend 后端显然是构建在 TensorRT-LLM 框架和 TensorRT 环境之上的。
在 TensorRT-LLM 中,模型不是以原始形式使用的。为了使用模型,需要专门针对相应的 GPU 对模型进行编译,生成一个称为引擎的模型文件。在根据原始模型创建引擎的过程中,可以应用 GPU 支持的各种优化和量化技术。此外,如果需要对模型进行并行化,则需要在编译阶段进行指定,同时还必须在此阶段指定部署模型的 GPU 数量。由于每个 GPU 模型都需要特定的编译流程,因此应在同一模型的 GPU 上编译同一模型,以便进行推理。这就是 TensorRT-LLM 速度的源泉。编译模型的步骤如下图所示。从流程中可以看出,首先,在 GPU 环境中编译要与 TensorRT-LLM 框架一起使用的模型,以创建 TensorRT-LLM 检查点。然后,使用该检查点创建 TensorRT 引擎文件。
生成的 TensorRT 引擎文件将被存储并用于 Triton 推理服务器上的 TensorRT-LLM ModelRunner 或 tensorrtllm_backend 后端进行推理。
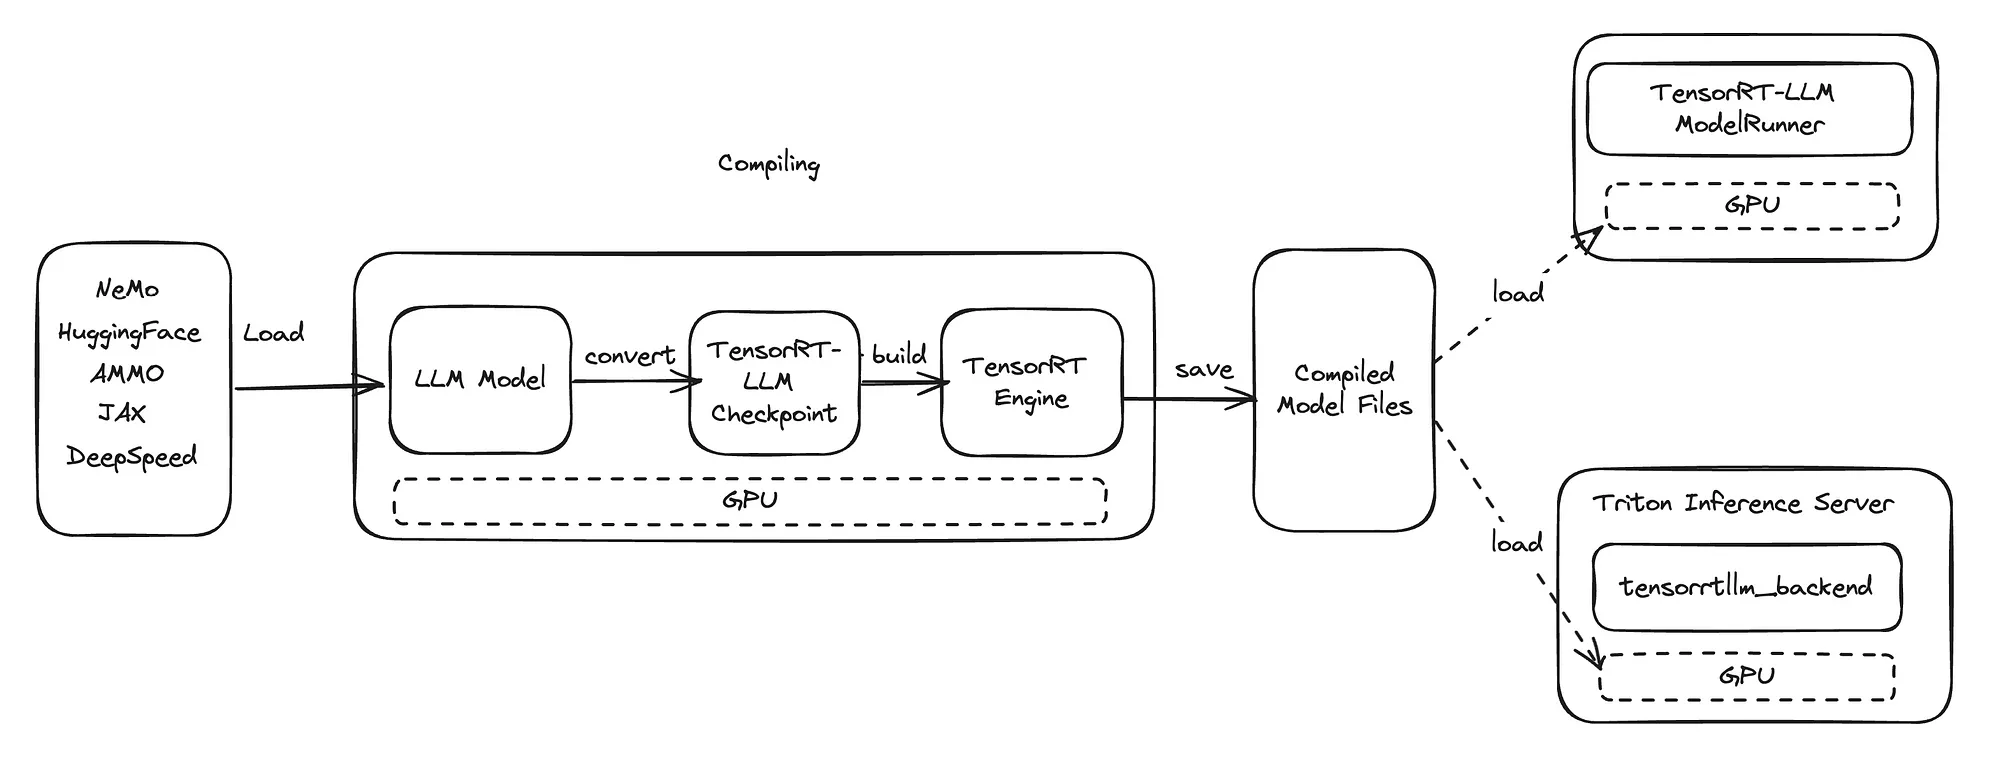
现在,让我们根据这些信息,使用 Triton Inference Server 上的 tensorrtllm_backend 后端对 Trendyol LLM 模型执行推理的步骤。
创建 TensorRT 引擎
步骤 1 确定将安装 Triton 推理服务器进行推理的 GPU 模型。我们将使用 A100 GPU。
第 2 步 确定要安装的 Triton 推理服务器版本。我们将使用 "nvcr.io/nvidia/tritonserver:24.02-trllm-python-py3 "镜像,因此版本为 24.02。
步骤 3 查看 Triton 推理服务器 "24.02 "版本的支持矩阵。确定 tensorrtllm_backend 和 TensorRT-LLM 的兼容版本。由于 24.02 版本与 TensorRT-LLM v0.8.0 兼容,我们将使用 tensorrtllm_backend v0.8.0 版本。
步骤4 我们有一台配备 A100 GPU 的服务器,需要为 A100 安装必要的驱动程序和兼容的 CUDA 版本。如果要使用 Docker,则需要在 Docker 环境中为 GPU 的使用设置必要的安装程序。
nvidia-smi
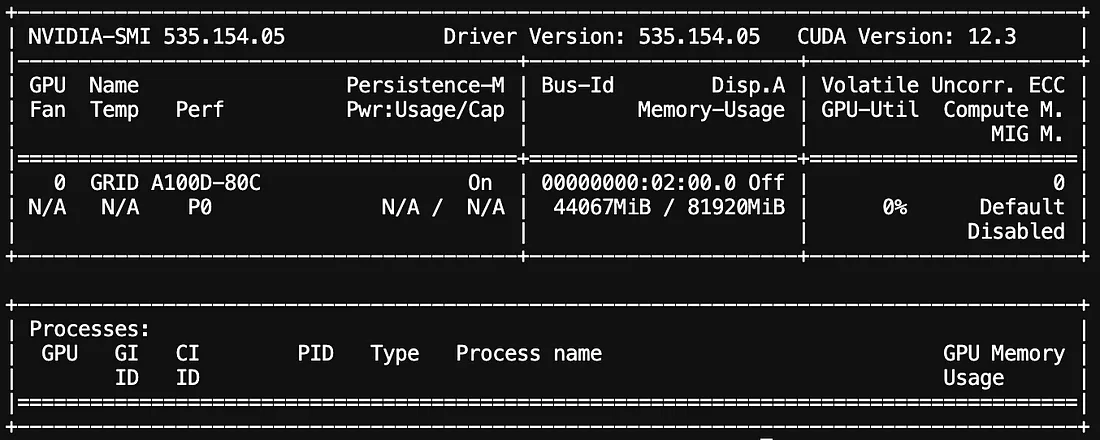
步骤5 在 Docker 或 Kubernetes 环境中使用 "nvcr.io/nvidia/tritonserver:24.02-trtllm-python-py3 "镜像创建一个容器。我们使用该镜像并创建了一个 Dockerfile,以便在其中安装 JupyterLab。由于我们的 GPU 资源在 Kubernetes 上,因此我们用该 Dockerfile 构建了一个镜像,并通过定义必要的服务配置,通过相关服务运行 JupyterLab。如果你能通过 SSH 连接到服务器,就可以使用下面的 Dockerfile 创建一个镜像,根据自己的喜好使用 JupyterLab 或终端。
Dockerfile
FROM nvcr.io/nvidia/tritonserver:24.02-trtllm-python-py3
WORKDIR /
COPY . .
RUN pip install protobuf SentencePiece torch
RUN pip install jupyterlab
EXPOSE 8888
EXPOSE 8000
EXPOSE 8001
EXPOSE 8002
CMD ["/bin/sh", "-c", "jupyter lab --LabApp.token='password' --LabApp.ip='0.0.0.0' --LabApp.allow_root=True"]
步骤6 从 Dockerfile 中创建容器,并通过 JupyterLab 打开终端或使用 "docker exec -it container-name sh "命令连接到容器 shell 后,我们将安装 Git,因为我们将使用 Git 拉取模型和 tensorrtllm_backend。为此,我们将在根目录下创建一个名为 /tensorrt 的文件夹。我们将在该文件夹下收集所有必要的文件。
mkdir /tensorrt
cd /tensorrt
创建 /tensorrt 目录并导航进入后,将创建以下文件:
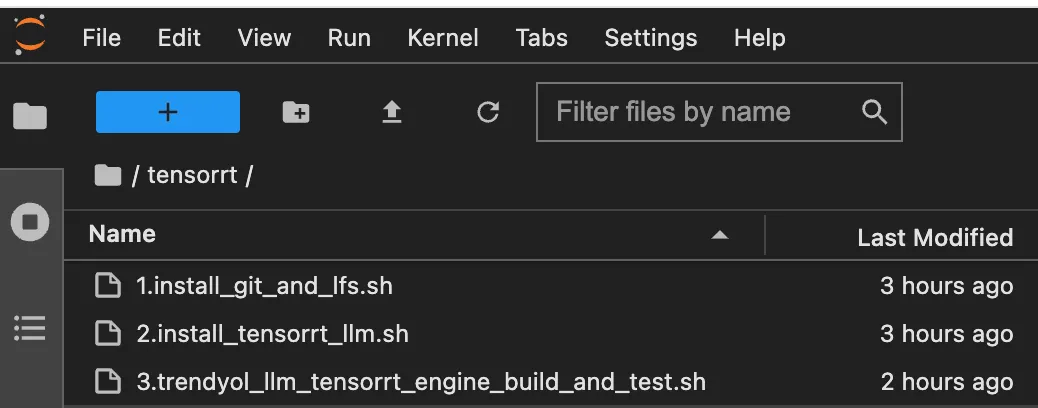
"1.install_git_and_lfs.sh" : 如果尚未安装 Git 和 Git LFS,我们将使用此文件进行安装。
#!/bin/bash
# Author: Murat Tezgider
# Date: 2024-03-18
# Description: This script automates the check for Git and Git LFS installations, installing them if not already installed.
set -e
# Function to check if Git is installed
is_git_installed() {
    if command -v git &>/dev/null; then
        return 0
    else
        return 1
    fi
}
# Function to check if Git LFS is installed
is_git_lfs_installed() {
    if command -v git-lfs &>/dev/null; then
        return 0
    else
        return 1
    fi
}
# Check if Git is already installed
if is_git_installed; then
    echo "Git is already installed."
    git --version
    # Check if Git LFS is installed
    if is_git_lfs_installed; then
        echo "Git LFS is already installed."
        git-lfs --version
    else
        echo "Installing Git LFS..."
        apt-get update && apt-get install git-lfs -y || { echo "Failed to install Git LFS"; exit 1; }
        echo "Git LFS has been installed successfully."
    fi
else
    # Update package lists and install Git
    apt-get update && apt-get install git -y || { echo "Failed to install Git"; exit 1; }
    # Install Git LFS
    apt-get install git-lfs -y || { echo "Failed to install Git LFS"; exit 1; }
    echo "Git and Git LFS have been installed successfully."
fi
"2.install_tensorrt_llm.sh" : 我们拉取了 tensorrtllm_backend 项目及其子模块(如 tensorrt_llm,等等),通过此文件确保与 Triton 兼容。由于与 Triton 版本兼容的 tensorrtllm_backend 版本是 v0.8.0,我们在文件中指定了 TENSORRT_BACKEND_LLM_VERSION=v0.8.0。
#!/bin/bash
# Author: Murat Tezgider
# Date: 2024-03-18
# Description: This script automates the installation process for TensorRT-LLM. Prior to running this script, ensure that Git and Git LFS ('apt-get install git-lfs') are installed.
# Step 1: Defining folder path and version
echo "Step 1: Defining folder path and version"
TENSORRT_BACKEND_LLM_VERSION=v0.8.0
TENSORRT_DIR="/tensorrt/$TENSORRT_BACKEND_LLM_VERSION"
# Step 2: Enter the installation folder and clone
echo "Step 2: Enter the installation folder and clone"
[ ! -d "$TENSORRT_DIR" ] && mkdir -p "$TENSORRT_DIR"
cd "$TENSORRT_DIR" || { echo "Failed to change directory to $TENSORRT_DIR"; exit 1; }
git clone -b "$TENSORRT_BACKEND_LLM_VERSION" https://github.com/triton-inference-server/tensorrtllm_backend.git --progress --verbose || { echo "Failed to clone repository"; exit 1; }
cd "$TENSORRT_DIR"/tensorrtllm_backend || { echo "Failed to change directory to $TENSORRT_DIR/tensorrtllm_backend"; exit 1; }
git submodule update --init --recursive || { echo "Failed to update submodules"; exit 1; }
git lfs install || { echo "Failed to install Git LFS"; exit 1; }
git lfs pull || { echo "Failed to pull Git LFS files"; exit 1; }
# Step 3: Enter the backend folder and Install backend related dependencies
echo "Step 3: Enter the backend folder and Install backend related dependencies"
cd "$TENSORRT_DIR"/tensorrtllm_backend || { echo "Failed to change directory to $TENSORRT_DIR/tensorrtllm_backend"; exit 1; }
apt-get update && apt-get install -y --no-install-recommends rapidjson-dev python-is-python3 || { echo "Failed to install dependencies"; exit 1; }
pip3 install -r requirements.txt --extra-index-url https://pypi.ngc.nvidia.com || { echo "Failed to install Python dependencies"; exit 1; }
# Step 4: Install tensorrt-llm library
echo "Step 4: Install tensorrt-llm library"
pip install tensorrt_llm=="$TENSORRT_BACKEND_LLM_VERSION" -U --pre --extra-index-url https://pypi.nvidia.com || { echo "Failed to install tensorrt-llm library"; exit 1; }
"3.trendyol_llm_tensorrt_engine_build_and_test.sh":通过运行此文件,我们从 Hugging Face 下载 Trendyol/Trendyol-LLM-7b-chat-v1.0 模型,并将其转换为 TensorRT-LLM 检查点。然后,我们从这个检查点创建一个 TensorRT-LLM 引擎。最后,我们运行创建的引擎进行测试。
#!/bin/bash
# Author: Murat Tezgider
# Date: 2024-03-18
# Description: This script automates the installation and inference process for a Hugging Face model using TensorRT-LLM. Ensure that Git and Git LFS ('apt-get install git-lfs') are installed before running this script. Before running this script, run the following scripts sequentially: 1. install_git_and_lfs.sh 2. install_tensorrt_llm.sh
HF_MODEL_NAME="Trendyol-LLM-7b-chat-v1.0"
HF_MODEL_PATH="Trendyol/Trendyol-LLM-7b-chat-v1.0"
# Clone the Hugging Face model repository
mkdir -p /tensorrt/models && cd /tensorrt/models && git clone https://huggingface.co/$HF_MODEL_PATH
# Convert the model checkpoint to TensorRT format
python /tensorrt/v0.8.0/tensorrtllm_backend/tensorrt_llm/examples/llama/convert_checkpoint.py \
    --model_dir /tensorrt/models/$HF_MODEL_NAME \
    --output_dir /tensorrt/tensorrt-models/$HF_MODEL_NAME/v0.8.0/trt-checkpoints/fp16/1-gpu/ \
    --dtype float16
# Build TensorRT engine
trtllm-build --checkpoint_dir /tensorrt/tensorrt-models/$HF_MODEL_NAME/v0.8.0/trt-checkpoints/fp16/1-gpu/ \
    --output_dir /tensorrt/tensorrt-models/$HF_MODEL_NAME/v0.8.0/trt-engines/fp16/1-gpu/ \
    --remove_input_padding enable \
    --context_fmha enable \
    --gemm_plugin float16 \
    --max_input_len 32768 \
    --strongly_typed
# Run inference with the TensorRT engine
python3 /tensorrt/v0.8.0/tensorrtllm_backend/tensorrt_llm/examples/run.py \
    --max_output_len=250 \
    --tokenizer_dir /tensorrt/models/$HF_MODEL_NAME \
    --engine_dir=/tensorrt/tensorrt-models/$HF_MODEL_NAME/v0.8.0/trt-engines/fp16/1-gpu/ \
    --max_attention_window_size=4096 \
    --temperature=0.3 \
    --top_k=50 \
    --top_p=0.9 \
    --repetition_penalty=1.2 \
    --input_text="[INST] Sen yardımsever bir asistansın ve sana verilen talimatlar doğrultusunda en iyi cevabı üretmeye çalışacaksın.\n\nTürkiye'nin doğusunda ne var? [/INST]"
步骤7 创建文件后,我们为它们授予执行权限,如下所示。
chmod +x 1.install_git_and_lfs.sh 2.install_tensorrt_llm.sh 3.trendyol_llm_tensorrt_engine_build_and_test.sh
步骤 8 现在,我们可以运行分别名为 "1.install_git_and_lfs.sh"、"2.install_tensorrt_llm.sh "和 "3.trendyol_llm_tensorrt_engine_build_and_test.sh "的 bash 文件。
./1.install_git_and_lfs.sh && ./2.install_tensorrt_llm.sh && ./3.trendyol_llm_tensorrt_engine_build_and_test.sh
执行完文件中的所有步骤后,你应该会在终端屏幕的末尾看到类似下面的 LLM 结果输出。

所有脚本都成功执行后,在 /tensorrt 目录下会出现如下所示的文件夹结构。
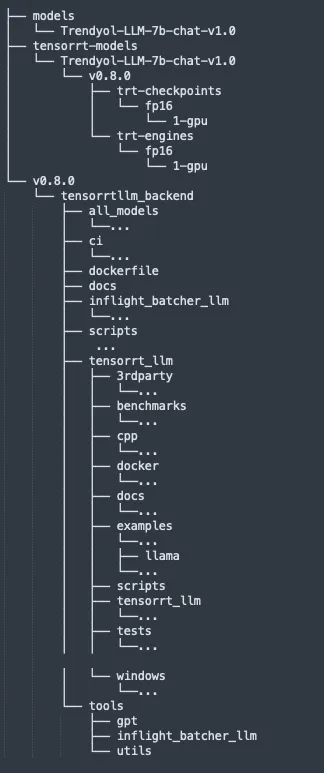
现在,我们已经成功编译了模型,创建并运行了 TensorRT-LLM 引擎文件,接下来就可以将这些 TensorRT-LLM 引擎文件部署到 Triton 推理服务器上了。
使用 Triton 推断服务器部署模型的步骤
Triton 推论服务器将模型存储在一个名为 "repository "的目录中。在该目录下,每个模型都位于一个以模型命名的文件夹中,同时还有一个名为 "config.pbtxt "的配置文件。在 "tensorrtllm_backend/all_models/inflight_batcher_llm "目录下创建了示例模型。在这些示例模型定义中,我们需要根据需要更新'config.ppbtxt'文件中的一些变量。为了轻松更新这些参数,我们使用了 "tensorrtllm_backend/tools/fill_template.py" python 工具。我们使用该工具更新了 "config.pbtxt "文件。
步骤1 我们创建一个目录来存储模型定义,然后将位于"/tensorrt/v0.8.0/tensorrtllm_backend/all_models/inflight_batcher_llm "下的示例模型定义复制到这个新创建的目录"/tensorrt/triton-repos/trtibf-Trendyol-LLM-7b-chat-v1.0/"。
mkdir -p  /tensorrt/triton-repos/trtibf-Trendyol-LLM-7b-chat-v1.0/
cp /tensorrt/v0.8.0/tensorrtllm_backend/all_models/inflight_batcher_llm/* /tensorrt/triton-repos/trtibf-Trendyol-LLM-7b-chat-v1.0/ -r
triton-repos
└── trtibf-Trendyol-LLM-7b-chat-v1.0
    ├── ensemble
    │   ├── 1
    │   └── config.pbtxt
    ├── postprocessing
    │   ├── 1
    │   │   └── model.py
    │   └── config.pbtxt
    ├── preprocessing
    │   ├── 1
    │   │   └── model.py
    │   └── config.pbtxt
    ├── tensorrt_llm
    │   ├── 1
    │   └── config.pbtxt
    └── tensorrt_llm_bls
        ├── 1
        │   └── model.py
        └── config.pbtxt
步骤2 随后,在 "config.pbtxt "文件中,我们用以下值更新模型正常运行所需的参数,如 "tokenizer "和 "engine_dir"。
python3 /tensorrt/v0.8.0/tensorrtllm_backend/tools/fill_template.py -i /tensorrt/triton-repos/trtibf-Trendyol-LLM-7b-chat-v1.0/preprocessing/config.pbtxt tokenizer_dir:/tensorrt/models/Trendyol-LLM-7b-chat-v1.0,tokenizer_type:llama,triton_max_batch_size:64,preprocessing_instance_count:1
python3 /tensorrt/v0.8.0/tensorrtllm_backend/tools/fill_template.py -i /tensorrt/triton-repos/trtibf-Trendyol-LLM-7b-chat-v1.0/postprocessing/config.pbtxt tokenizer_dir:/tensorrt/models/Trendyol-LLM-7b-chat-v1.0,tokenizer_type:llama,triton_max_batch_size:64,postprocessing_instance_count:1
python3 /tensorrt/v0.8.0/tensorrtllm_backend/tools/fill_template.py -i /tensorrt/triton-repos/trtibf-Trendyol-LLM-7b-chat-v1.0/tensorrt_llm_bls/config.pbtxt triton_max_batch_size:64,decoupled_mode:False,bls_instance_count:1,accumulate_tokens:False
python3 /tensorrt/v0.8.0/tensorrtllm_backend/tools/fill_template.py -i /tensorrt/triton-repos/trtibf-Trendyol-LLM-7b-chat-v1.0/ensemble/config.pbtxt triton_max_batch_size:64
python3 /tensorrt/v0.8.0/tensorrtllm_backend/tools/fill_template.py -i /tensorrt/triton-repos/trtibf-Trendyol-LLM-7b-chat-v1.0/tensorrt_llm/config.pbtxt triton_max_batch_size:64,decoupled_mode:False,max_beam_width:1,engine_dir:/tensorrt/tensorrt-models/Trendyol-LLM-7b-chat-v1.0/v0.8.0/trt-engines/fp16/1-gpu/,max_tokens_in_paged_kv_cache:2560,max_attention_window_size:2560,kv_cache_free_gpu_mem_fraction:0.9,exclude_input_in_output:True,enable_kv_cache_reuse:False,batching_strategy:inflight_batching,max_queue_delay_microseconds:600
步骤3 现在,我们的 Triton 资源库已经准备就绪,我们可以运行 Triton 服务器从该资源库读取模型。
tritonserver --model-repository=/tensorrt/triton-repos/trtibf-Trendyol-LLM-7b-chat-v1.0 --model-control-mode=explicit --load-model=preprocessing --load-model=postprocessing --load-model=tensorrt_llm --load-model=tensorrt_llm_bls --load-model=ensemble --log-verbose=2 --log-info=1 --log-warning=1 --log-error=1
要想顺利启动 Triton 服务器,所有机型都必须处于 "就绪 "状态。当你看到如下所示的输出时,Triton 服务器已经顺利启动。
I0320 11:44:44.456547 15296 model_lifecycle.cc:273] ModelStates()
I0320 11:44:44.456580 15296 server.cc:677]
+------------------+---------+--------+
| Model            | Version | Status |
+------------------+---------+--------+
| ensemble         | 1       | READY  |
| postprocessing   | 1       | READY  |
| preprocessing    | 1       | READY  |
| tensorrt_llm     | 1       | READY  |
| tensorrt_llm_bls | 1       | READY  |
+------------------+---------+--------+
I0320 11:44:44.474142 15296 metrics.cc:877] Collecting metrics for GPU 0: GRID A100D-80C
I0320 11:44:44.475350 15296 metrics.cc:770] Collecting CPU metrics
I0320 11:44:44.475507 15296 tritonserver.cc:2508]
+----------------------------------+----------------------------------------------------------------------------------------------------------------+
| Option                           | Value                                                                                                          |
+----------------------------------+----------------------------------------------------------------------------------------------------------------+
| server_id                        | triton                                                                                                         |
| server_version                   | 2.43.0                                                                                                         |
| server_extensions                | classification sequence model_repository model_repository(unload_dependents) schedule_policy model_configurati |
|                                  | on system_shared_memory cuda_shared_memory binary_tensor_data parameters statistics trace logging              |
| model_repository_path[0]         | /tensorrt/triton-repos/trtibf-Trendyol-LLM-7b-chat-v1.0                                                        |
| model_control_mode               | MODE_EXPLICIT                                                                                                  |
| startup_models_0                 | ensemble                                                                                                       |
| startup_models_1                 | postprocessing                                                                                                 |
| startup_models_2                 | preprocessing                                                                                                  |
| startup_models_3                 | tensorrt_llm                                                                                                   |
| startup_models_4                 | tensorrt_llm_bls                                                                                               |
| strict_model_config              | 0                                                                                                              |
| rate_limit                       | OFF                                                                                                            |
| pinned_memory_pool_byte_size     | 268435456                                                                                                      |
| cuda_memory_pool_byte_size{0}    | 67108864                                                                                                       |
| min_supported_compute_capability | 6.0                                                                                                            |
| strict_readiness                 | 1                                                                                                              |
| exit_timeout                     | 30                                                                                                             |
| cache_enabled                    | 0                                                                                                              |
+----------------------------------+----------------------------------------------------------------------------------------------------------------+
I0320 11:44:44.476247 15296 grpc_server.cc:2426]
+----------------------------------------------+---------+
| GRPC KeepAlive Option                        | Value   |
+----------------------------------------------+---------+
| keepalive_time_ms                            | 7200000 |
| keepalive_timeout_ms                         | 20000   |
| keepalive_permit_without_calls               | 0       |
| http2_max_pings_without_data                 | 2       |
| http2_min_recv_ping_interval_without_data_ms | 300000  |
| http2_max_ping_strikes                       | 2       |
+----------------------------------------------+---------+
I0320 11:44:44.476757 15296 grpc_server.cc:102] Ready for RPC 'Check', 0
I0320 11:44:44.476795 15296 grpc_server.cc:102] Ready for RPC 'ServerLive', 0
I0320 11:44:44.476810 15296 grpc_server.cc:102] Ready for RPC 'ServerReady', 0
I0320 11:44:44.476824 15296 grpc_server.cc:102] Ready for RPC 'ModelReady', 0
I0320 11:44:44.476838 15296 grpc_server.cc:102] Ready for RPC 'ServerMetadata', 0
I0320 11:44:44.476851 15296 grpc_server.cc:102] Ready for RPC 'ModelMetadata', 0
I0320 11:44:44.476865 15296 grpc_server.cc:102] Ready for RPC 'ModelConfig', 0
I0320 11:44:44.476881 15296 grpc_server.cc:102] Ready for RPC 'SystemSharedMemoryStatus', 0
I0320 11:44:44.476895 15296 grpc_server.cc:102] Ready for RPC 'SystemSharedMemoryRegister', 0
I0320 11:44:44.476910 15296 grpc_server.cc:102] Ready for RPC 'SystemSharedMemoryUnregister', 0
I0320 11:44:44.476923 15296 grpc_server.cc:102] Ready for RPC 'CudaSharedMemoryStatus', 0
I0320 11:44:44.476936 15296 grpc_server.cc:102] Ready for RPC 'CudaSharedMemoryRegister', 0
I0320 11:44:44.476949 15296 grpc_server.cc:102] Ready for RPC 'CudaSharedMemoryUnregister', 0
I0320 11:44:44.476963 15296 grpc_server.cc:102] Ready for RPC 'RepositoryIndex', 0
I0320 11:44:44.476977 15296 grpc_server.cc:102] Ready for RPC 'RepositoryModelLoad', 0
I0320 11:44:44.476989 15296 grpc_server.cc:102] Ready for RPC 'RepositoryModelUnload', 0
I0320 11:44:44.477003 15296 grpc_server.cc:102] Ready for RPC 'ModelStatistics', 0
I0320 11:44:44.477018 15296 grpc_server.cc:102] Ready for RPC 'Trace', 0
I0320 11:44:44.477031 15296 grpc_server.cc:102] Ready for RPC 'Logging', 0
I0320 11:44:44.477060 15296 grpc_server.cc:359] Thread started for CommonHandler
I0320 11:44:44.477204 15296 infer_handler.h:1188] StateNew, 0 Step START
I0320 11:44:44.477245 15296 infer_handler.cc:680] New request handler for ModelInferHandler, 0
I0320 11:44:44.477276 15296 infer_handler.h:1312] Thread started for ModelInferHandler
I0320 11:44:44.477385 15296 infer_handler.h:1188] StateNew, 0 Step START
I0320 11:44:44.477418 15296 infer_handler.cc:680] New request handler for ModelInferHandler, 0
I0320 11:44:44.477443 15296 infer_handler.h:1312] Thread started for ModelInferHandler
I0320 11:44:44.477550 15296 infer_handler.h:1188] StateNew, 0 Step START
I0320 11:44:44.477582 15296 stream_infer_handler.cc:128] New request handler for ModelStreamInferHandler, 0
I0320 11:44:44.477608 15296 infer_handler.h:1312] Thread started for ModelStreamInferHandler
I0320 11:44:44.477622 15296 grpc_server.cc:2519] Started GRPCInferenceService at 0.0.0.0:8001
I0320 11:44:44.477845 15296 http_server.cc:4637] Started HTTPService at 0.0.0.0:8000
I0320 11:44:44.518903 15296 http_server.cc:320] Started Metrics Service at 0.0.0.0:8002
步骤4 现在,你可以打开一个新终端,使用 curl 向我们的模型发送请求。
curl -X POST localhost:8000/v2/models/ensemble/generate -d '{"text_input": "Türkiye nin doğusunda ne var?", "max_tokens": 200, "bad_words": "", "stop_words": ""}'"text_input": "Türkiye nin doğusunda ne var?", "max_tokens": 200, "bad_words": "", "stop_words": ""}'结果:
{"context_logits":0.0,"cum_log_probs":0.0,"generation_logits":0.0,"model_name":"ensemble","model_version":"1","output_log_probs":[0.0,0.0,0.0,0.0,0.0,0.0,0.0,0.0,0.0,0.0,0.0,0.0,0.0,0.0,0.0,0.0,0.0],"sequence_end":false,"sequence_id":0,"sequence_start":false,"text_output":"\nYani, Türkiye'nin doğusunda İran, Irak ve Suriye var."}"context_logits":0.0,"cum_log_probs":0.0,"generation_logits":0.0,"model_name":"ensemble","model_version":"1","output_log_probs":[0.0,0.0,0.0,0.0,0.0,0.0,0.0,0.0,0.0,0.0,0.0,0.0,0.0,0.0,0.0,0.0,0.0],"sequence_end":false,"sequence_id":0,"sequence_start":false,"text_output":"\nYani, Türkiye'nin doğusunda İran, Irak ve Suriye var."}如果你已经顺利完成了这一步,那就意味着你已经一步步地成功完成了用 Triton 部署 LLM 模型的工作。下一步,我们要把引擎、标记化器和 Triton 资源库的模型定义文件移到一个存储区域,以便 Triton 能够从这个源读取。
结论
在本文中,我们概述了使用 Triton 推论服务器部署 LLM 模型的简化流程。通过准备模型、创建 TensorRT-LLM 引擎文件并将其部署到 Triton 上,我们展示了在生产中提供 LLM 模型的高效方法。未来的工作重点可能是将这些文件传输到存储中,并详细说明其用途。总的来说,Triton 为有效部署 LLM 模型提供了一个强大的平台。


