【完整指南】Python构建美观的Web应用程序
在本文中,我们将基于现有的检索相邻块的 FastAPI 项目进行构建。
探索的技术:
- FastAPI — Python Web 框架
- Jinja2 — 模板引擎
- DaisyUI — Tailwind CSS 的组件库
如果你是经验丰富的 Web 应用程序开发人员或编程专家,那么本文可能不会提供太多新见解。但是,如果你对使用 Python 构建 Web 应用程序的细节感到好奇,与 Streamlit 之类的东西相比,它为你提供了更多的控制权,或者如果你曾经想知道 Python Web 开发人员的职位描述包括哪些内容,那么你来对地方了。让我们一起探索这个过程。
使用 FastAPI 构建前端轻而易举,但将 tailwindcss (daisyUI) 与应用程序集成对我来说是最耗时的部分。
什么是 DaisyUI?
每个人都喜欢漂亮的用户界面,但实事求是地说,编写 CSS 样式的繁琐工作常常让人们对创建具有视觉吸引力的网络应用前端望而却步。我可能听起来像个老唱片,但我还是要说: 说到 CSS,我很懒,它通常是我待办事项清单上的最后一件事。学校里的美术课?只能说勉强凑合。而深入研究 CSS 中错综复杂的像素完美样式也不会让我感到兴奋。
对于像我这样的人来说(是的,Tailwind 也用于生产级应用程序),Tailwind 是我的救星。它为 HTML 组件提供了预定义的样式和模板,让你可以通过添加特定类来轻松定制。
Tailwind 已经大受欢迎,现在已成为各领域应用程序的主打产品。如果你精于此道,往往能发现某个应用程序是否使用了 Tailwind CSS。你可以根据自己的喜好精心调整 Tailwind 类,也可以走捷径,使用专为 Tailwind 量身定制的组件库。有许多组件库可用,DaisyUI 就是其中之一。
Web应用程序的文件结构
root
|-app
  |- chroma_db
  |- functions.py
  |- main.py
  |- models.py
  |- chroma_db
  |- static
    |- css
      |- app.css
  |- styles
    |- app.css
  |- templates
    |- index.html
  |- files
    |- samples.pdf
用户界面
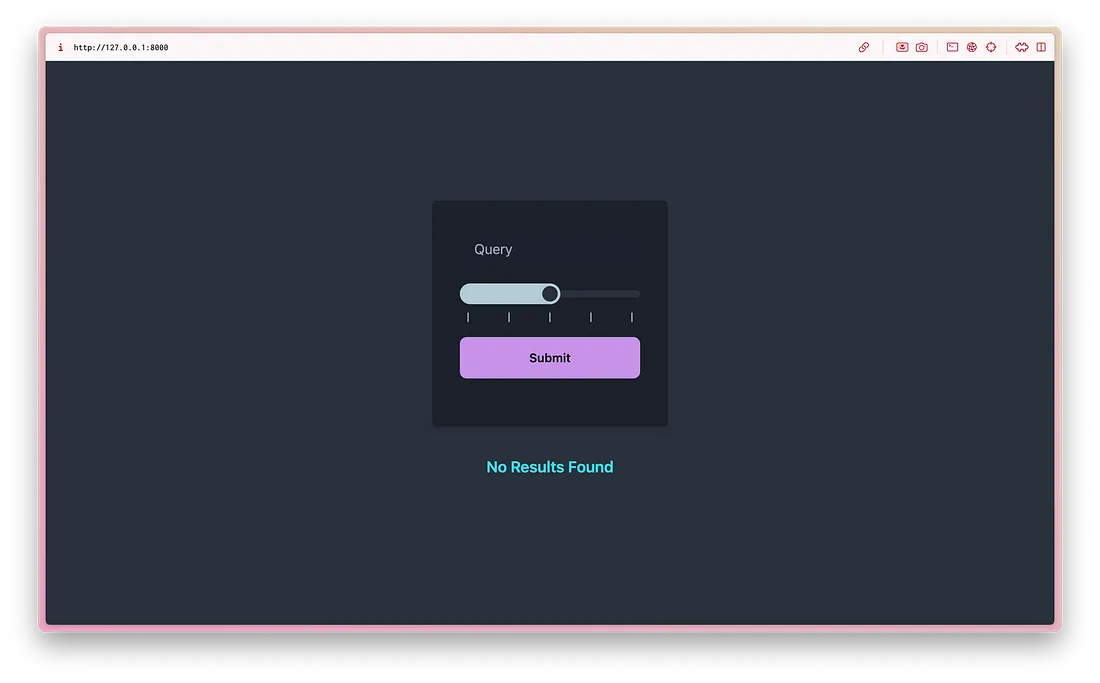
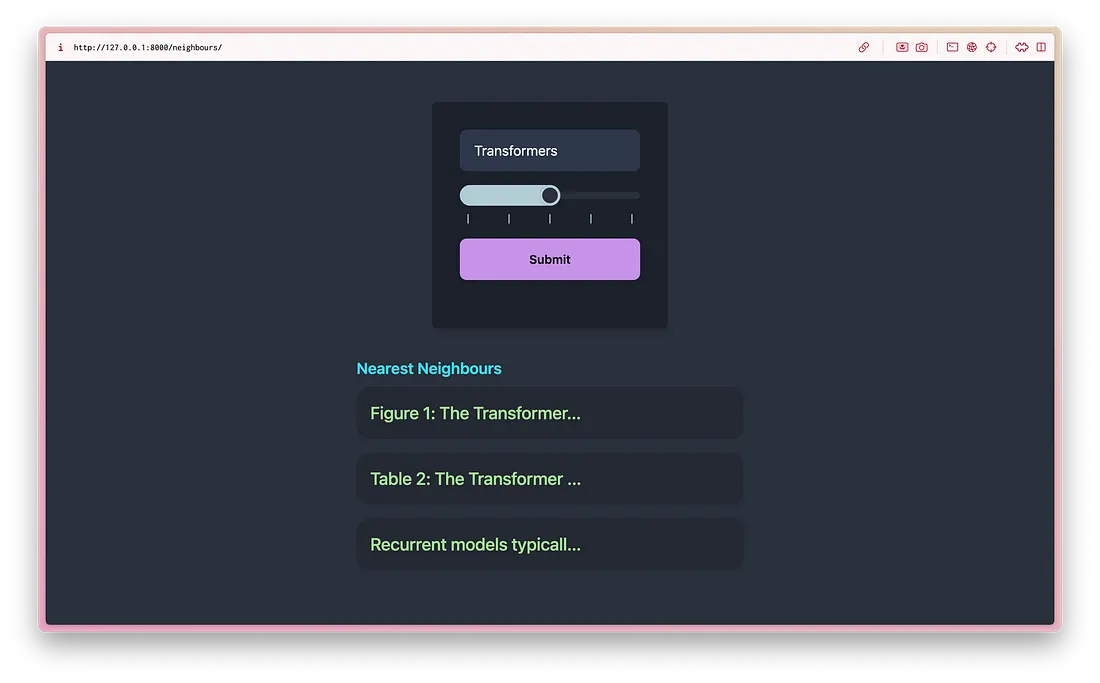
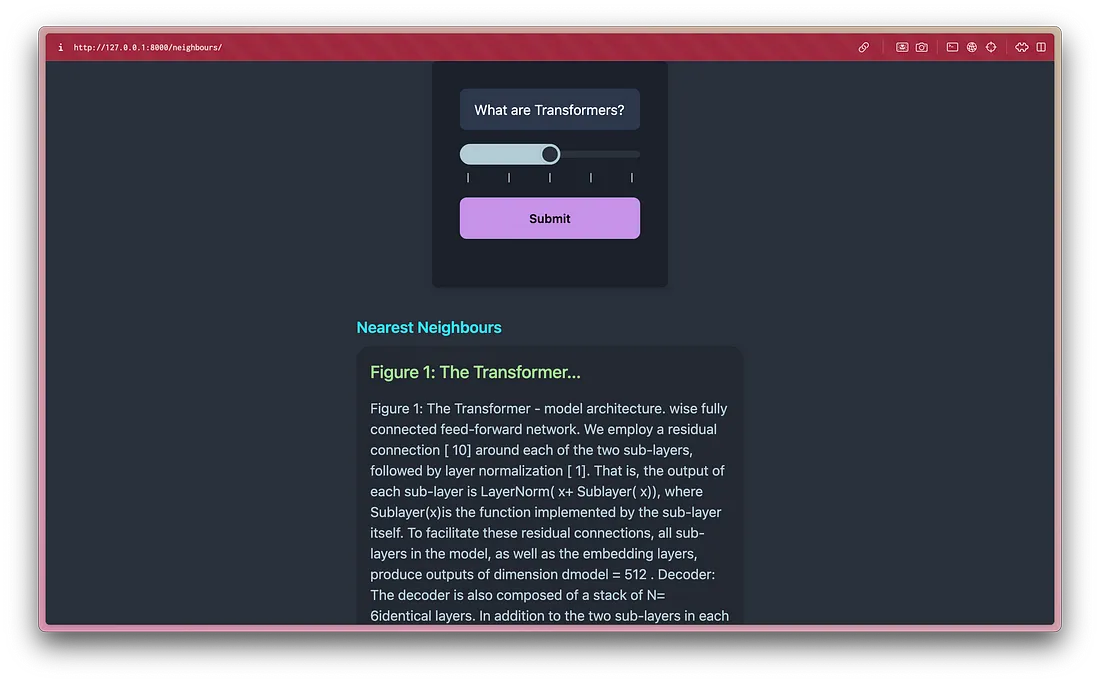
在你对所有技术细节感到厌倦之前,这里有一个用户界面的缩影,应该会让你兴奋不已:


虽然你不能在 Behance 上灵活运用它,但它看起来确实不错,不是吗?就我个人而言,比起默认的 Times New Roman 黑白主题,我更喜欢它,因为它让我对网页开发望而却步。
为应用程序设置 Tailwind
你既可以使用 DaisyUI 的 CDN(这会让过程变得更简单,但不建议在生产中使用),也可以将其安装为 Tailwind 插件。我们将采用推荐的方法:将其安装为 Tailwind 插件。
要安装 Tailwind,请确保已安装 NPM(JavaScript 的软件包管理器)。
在项目根目录下的终端,运行以下命令:
npm install -D tailwindcss
npx tailwindcss init
npm i -D daisyui@latest
成功执行后,将在项目根目录下创建一个名为 tailwind.config.js 的配置文件。
在 tailwind.config.js 文件中,我们必须将 DaisyUI 添加为插件。该文件将如下所示:
const { default: daisyui } = require('daisyui');
/** @type {import('tailwindcss').Config} */
module.exports = {
  content: ["./app/templates/*.html"],
  theme: {
    extend: {},
  },
  plugins: [
    require("daisyui")
  ],
  daisyui: {
    themes: ["light", "dim", "acid"],
  },
}
我花了很多时间来弄清为什么没有应用样式。花了 30 多分钟后,我发现这是由于内容部分的 HTML 文件路径不正确造成的。如果你遇到类似问题,请先检查这一点。DaisyUI 主题也可以在这里设置。
现在我们已经完成了所有手续,是时候生成尾风 CSS 文件了。主要有两个文件:styles/app.css(输入文件)和 static/css/app.css(生成的 CSS 文件,包含所有带类组件的样式)。
在 styles/app.css 中,定义 tailwind 指令:
@tailwind base;
@tailwind components;
@tailwind utilities;
要生成 tailwind CSS 文件,请运行此命令:
npx tailwindcss -i ./styles/app.css -o ./static/css/app.css --watch 就是这样。我们已经成功安装了 Tailwind 和 DaisyUI。
使用 Jinja2 创建模板
Jinja2 是一个 Python 模板引擎,用于在应用程序中创建模块化的动态 HTML 内容。由于我们在网络应用中完全不使用 JavaScript,因此这一点特别有用。我们将把从 API 获取的信息映射到 HTML 模板,然后使用 Jinja2 渲染。Jinja2 允许我们使用表达式在 HTML 中直接加入循环、条件、过滤器、变量等。
<div>
    <!-- Check if results exist -->
    {% if not results %}
    <h2>No Results Found</h2>
    {% endif %}
    {% if results %}
    <h2>Nearest Neighbours</h2>
    <div id="results">
        <!-- Nearest neighbours will be displayed here -->
        {% for result in results %}
        <div>
            <input type="checkbox" />
            <div>
                <p>{{ result.page_content[:25]|safe }}...</p>
            </div>
            <div>
                <p>{{ result.page_content }}</p>
            </div>
        </div>
        {% endfor %}
    </div>
    {% endif %}
</div>
该模板使用条件表达式来验证结果是否存在。如果找到了结果,它就会遍历这些结果,为每个结果生成一个模态。如果你熟悉 Python 编程,掌握这一点应该不会太难。
将Tailwind CSS 文件链接到 HTML
要激活Tailwind样式,我们必须在 <head></head> 标记中添加这行代码,将其链接到 HTML。
<link rel="stylesheet" href="{{url_for('static',path='css/app.css')}}">
Adding tailwind classes to the template
I won’t be delving deep into tailwind classes since it would extend this article by quite a margin. You can read about the different utility classes available here. With tailwind classes, the above HTML would look like this:
<div class="max-w-md mx-auto">
    <!-- Check if results exist -->
    {% if not results %}
    <h2 class="text-lg font-semibold mb-2 text-info">No Results Found</h2>
    {% endif %}
    {% if results %}
    <h2 class="text-lg font-semibold mb-2 text-info">Nearest Neighbours</h2>
    <div id="results">
        <!-- Nearest neighbours will be displayed here -->
        {% for result in results %}
        <div class="collapse bg-base-200 mb-4">
            <input type="checkbox" />
            <div class="collapse-title text-xl font-medium text-primary">
                <p>{{ result.page_content[:25]|safe }}...</p>
            </div>
            <div class="collapse-content">
                <p>{{ result.page_content }}</p>
            </div>
        </div>
        {% endfor %}
    </div>
    {% endif %}
</div>
简而言之,一些Tailwind实用程序类表示如下:
- text-lg: 大字体
- mb-2:比例为 2 的底部边距。
- bg-base-200:基类的背景颜色。这将根据你选择的主题或在 static/css/app.css 中设置的样式而有所不同。
要为整个 HTML 或 HTML 的特定部分选择主题,请使用 data-theme 属性。
例如:
<html data-theme="cupcake"></html>或
<html data-theme="dark">
  <div data-theme="light">
    This div will always use light theme
    <span data-theme="retro">This span will always use retro theme!</span>
  </div>
</html>
使用API获取数据
正如我们在之前所创建的那样,我们的 API 已经准备就绪,现在我们需要将数据提取到 HTML 中。为此,我们需要对 main.py 文件做一些简单的修改,然后就可以开始了。但在此之前,我们先创建一个 HTML 表单,作为获取数据的触发器。
HTML 表单
<div class="max-w-md p-8 mx-auto mb-8 rounded-md shadow-md bg-neutral">
        <form id="query-form" method="post" action="/neighbours/" class="flex flex-col mb-6">
            <div class="mb-4">
                <input type="text" placeholder="Query" id="query" name="query" required
                    class="input input-ghost w-full max-w-xs" />
            </div>
            <div class="mb-4">
                <input type="range" min="1" max="5" value="3" class="range" step="1" name="neighbours" id="neighbours" />
                <div class="w-full flex justify-between text-xs px-2">
                    <span>|</span>
                    <span>|</span>
                    <span>|</span>
                    <span>|</span>
                    <span>|</span>
                </div>
            </div>
            <button type="submit" class="btn btn-accent">Submit</button>
        </form>
  </div>
其中大部分由 DaisyUI 组件组成。需要记住的关键点是表单中的 action 属性,它应指向我们 API 的 /neighbours 端点,并使用 POST 方法。
FastAPI 应用程序
为了呈现 Jinja2 模板,我们需要使用 fastapi.templating 模块。
from fastapi.templating import Jinja2Templates
templates = Jinja2Templates(directory="templates")
由于 HTML 模板是动态渲染的,因此需要加载包含 CSS 样式或任何其他静态资源的文件夹。这样,我们就可以访问模板中的文件夹。
from fastapi.staticfiles import StaticFiles
app.mount("/static", StaticFiles(directory="static"), name="static")
端点函数唯一需要调整的是将响应类更改为 HTMLResponse,因为我们要呈现的是网页而不是 JSON 对象。
@app.get("/", response_class=HTMLResponse)
async def main(request: Request):
    return templates.TemplateResponse("index.html", {"request": request})
# Fetch neighbours
@app.post("/neighbours/", response_class=HTMLResponse)
async def fetch_item(request: Request, query: str=Form(...), neighbours: int=Form(...)):
    embedding_function = SentenceTransformerEmbeddings(model_name="all-MiniLM-L6-v2")
    db = Chroma(persist_directory="./chroma_db", embedding_function=embedding_function)
    results = db.similarity_search(query, k=neighbours)
    return templates.TemplateResponse("index.html", {"request": request, "results": results})
FastAPI 表单不支持 Pydantic 模型,而是使用表单方法来解析表单发布的数据。在函数参数中,query: str = Form(...) 表示端点期待一个名为 query 的表单字段,它是一个字符串。调用该函数时,它会返回一个 TemplateResponse,并将结果传递给模板。
我们大功告成了。这绝对是不用 Streamlit 用 Python 构建网络应用最简单的方法之一。如果我选择不使用任何 Tailwind 或 DaisyUI CSS 的基本 "Hello World "应用程序,它可能会更简单。

结论
我尽可能详尽地介绍了使用 FastAPI 在 Python 中构建 Web 应用程序所需的每一个重要关键环节。如果你在构建前端时遇到任何问题,你可以随时依靠 ChatGPT(不用说),让它为你制作一个前端,就像我做的那样。一个有用的建议是提供 Tailwind 文档中的示例代码,并要求它将其集成到你的应用程序中。一旦你有了一个强大的模板,你就可以对其进行逆向工程,并根据自己的喜好进行定制。这种方法简化了过程,比花时间阅读整个文档更有吸引力。


