使用PyTorch从头构建自己的大型语言模型 (LLM)
LLM 是 ChatGPT、Gemini、MetaAI、Mistral AI 等最流行的人工智能聊天机器人的核心基础。每个 LLM 的核心都有一个名为 Transformer 的架构。因此,我们将首先根据著名论文 "Attention is all you need " -https://arxiv.org/abs/1706.03762 来构建 transformer 架构。
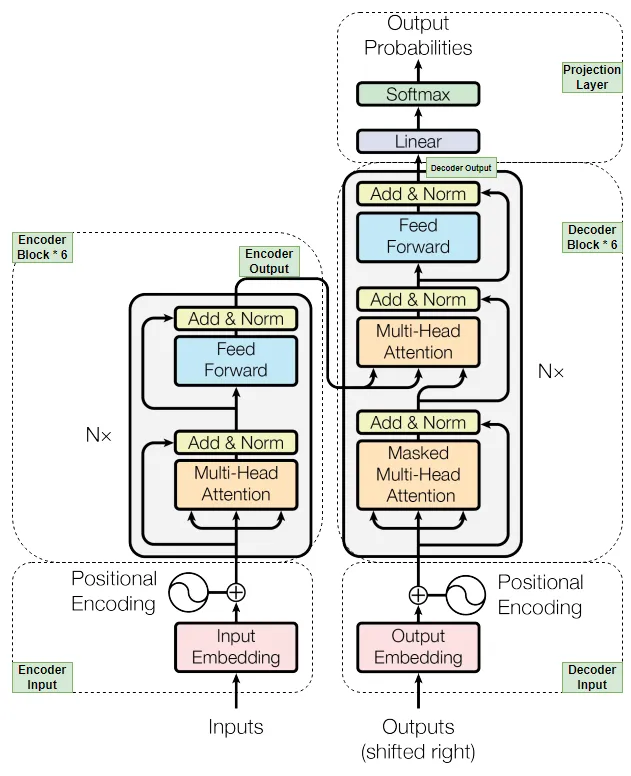
首先,我们将逐块构建Transforme模型的所有组件。然后,我们将组装所有模块,构建模型。然后,我们将使用从 "Hugging Face "数据集获得的数据集来训练和验证我们的模型。最后,我们将通过在新的翻译文本数据上执行翻译来测试我们的模型。
重要说明:我将一步一步地对Transforme架构中的所有组件进行编码,并对 "是什么"、"为什么 "和 "如何做 "的概念进行必要的解释。我还会对我认为需要解释的代码逐行进行注释。通过这种方式,我相信你可以在自己编码的同时了解整体工作流程。

步骤 1:加载数据集
为了让 LLM 模型能够完成从英语到马来语的翻译任务,我们需要使用一个同时包含源语言(英语)和目标语言(马来语)的数据集。因此,我们将使用 Huggingface 提供的名为 "Helsinki-NLP/opus-100 "的数据集。它有 100 万对英语-马来语训练数据集,足以获得良好的准确性,验证和测试数据集各有 2000 个数据。它已经预先进行了数据集拆分,因此我们无需再次进行数据集拆分。
# Import necessary libraries
# Install datasets, tokenizers library if you've not done so yet (!pip install datasets, tokenizers).
import os
import math
import torch
import torch.nn as nn
from torch.utils.data import Dataset, DataLoader
from pathlib import Path
from datasets import load_dataset
from tqdm import tqdm
# Assign device value as "cuda" to train on GPU if GPU is available. Otherwise it will fall back to default as "cpu".
device = torch.device("cuda" if torch.cuda.is_available() else "cpu")
# Loading train, validation, test dataset from huggingface path below.
raw_train_dataset = load_dataset("Helsinki-NLP/opus-100", "en-ms", split='train')
raw_validation_dataset = load_dataset("Helsinki-NLP/opus-100", "en-ms", split='validation')
raw_test_dataset = load_dataset("Helsinki-NLP/opus-100", "en-ms", split='test')
# Directory to store dataset files.
os.mkdir("./dataset-en")
os.mkdir("./dataset-my")
# Directory to save model during model training after each EPOCHS (in step 10).
os.mkdir("./malaygpt")
# Director to store source and target tokenizer.
os.mkdir("./tokenizer_en")
os.mkdir("./tokenizer_my")
dataset_en = []
dataset_my = []
file_count = 1
# In order to train the tokenizer (in step 2), we'll separate the training dataset into english and malay.
# Create multiple small file of size 50k data each and store into dataset-en and dataset-my directory.
for data in tqdm(raw_train_dataset["translation"]):
    dataset_en.append(data["en"].replace('\n', " "))
    dataset_my.append(data["ms"].replace('\n', " "))
    if len(dataset_en) == 50000:
        with open(f'./dataset-en/file{file_count}.txt', 'w', encoding='utf-8') as fp:
            fp.write('\n'.join(dataset_en))
            dataset_en = []
        with open(f'./dataset-my/file{file_count}.txt', 'w', encoding='utf-8') as fp:
            fp.write('\n'.join(dataset_my))
            dataset_my = []
        file_count += 1
步骤 2:创建标记器
Transforme模型不处理原始文本,它只处理数字。因此,我们必须将原始文本转换为数字。为此,我们将使用一种名为 BPE tokenizer 的流行标记符,它是一种子词标记符,被用于 GPT3 等模型中。首先,我们将在步骤 1 中准备好的语料库数据(本例中为训练数据集)上训练 BPE 标记器。具体流程如下图所示。
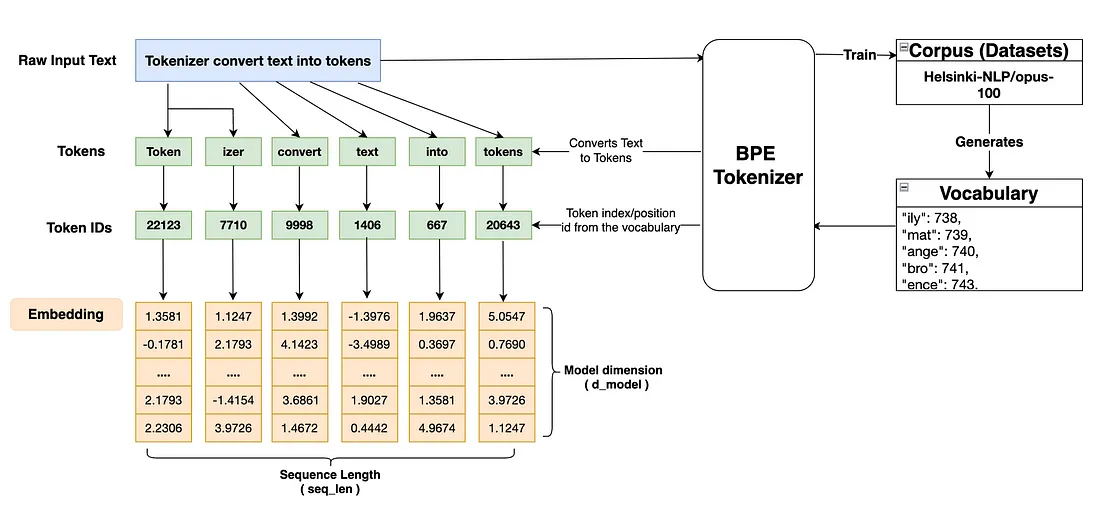
训练完成后,tokenizer 会生成英语和马来语的词汇。词汇是语料库数据中唯一标记的集合。由于我们执行的是翻译任务,因此需要两种语言的标记器。BPE 标记器接收原始文本,将其与词汇表中的标记映射,并为输入原始文本中的每个单词返回一个标记。标记可以是单词或子词。与其他标记符号生成器相比,子词标记符号生成器的优势之一就是可以克服 OOV(词汇量不足)问题。然后,标记符号生成器会返回该标记符号在词汇中的唯一索引或位置 ID,如上图所示,该 ID 将被进一步用于创建嵌入。
# import tokenzier library classes and modules.
from tokenizers import Tokenizer
from tokenizers.models import BPE
from tokenizers.trainers import BpeTrainer
from tokenizers.pre_tokenizers import Whitespace
# path to the training dataset files which will be used to train tokenizer.
path_en = [str(file) for file in Path('./dataset-en').glob("**/*.txt")]
path_my = [str(file) for file in Path('./dataset-my').glob("**/*.txt")]
# [ Creating Source Language Tokenizer - English ].
# Additional special tokens are created such as [UNK] - to represent Unknown words, [PAD] - Padding token to maintain same sequence length across the model.
# [CLS] - token to denote start of sentence, [SEP] - token to denote end of sentence.
tokenizer_en = Tokenizer(BPE(unk_token="[UNK]"))
trainer_en = BpeTrainer(min_frequency=2, special_tokens=["[PAD]","[UNK]","[CLS]", "[SEP]", "[MASK]"])
# splitting tokens based on whitespace.
tokenizer_en.pre_tokenizer = Whitespace()
# Tokenizer trains the dataset files created in step 1
tokenizer_en.train(files=path_en, trainer=trainer_en)
# Save tokenizer for future use.
tokenizer_en.save("./tokenizer_en/tokenizer_en.json")
# [ Creating Target Language Tokenizer - Malay ].
tokenizer_my = Tokenizer(BPE(unk_token="[UNK]"))
trainer_my = BpeTrainer(min_frequency=2, special_tokens=["[PAD]","[UNK]","[CLS]", "[SEP]", "[MASK]"])
tokenizer_my.pre_tokenizer = Whitespace()
tokenizer_my.train(files=path_my, trainer=trainer_my)
tokenizer_my.save("./tokenizer_my/tokenizer_my.json")
tokenizer_en = Tokenizer.from_file("./tokenizer_en/tokenizer_en.json")
tokenizer_my = Tokenizer.from_file("./tokenizer_my/tokenizer_my.json")
# Getting size of both tokenizer.
source_vocab_size = tokenizer_en.get_vocab_size()
target_vocab_size = tokenizer_my.get_vocab_size()
# Define token-ids variables, we need this for training model.
CLS_ID = torch.tensor([tokenizer_my.token_to_id("[CLS]")], dtype=torch.int64).to(device)
SEP_ID = torch.tensor([tokenizer_my.token_to_id("[SEP]")], dtype=torch.int64).to(device)
PAD_ID = torch.tensor([tokenizer_my.token_to_id("[PAD]")], dtype=torch.int64).to(device)
步骤3:准备数据集和数据加载器
在这一步中,我们将准备源语言和目标语言的数据集,这些数据集稍后将用于训练和验证我们将要构建的模型。我们将创建一个接收原始数据集的类,并定义一个函数,使用源语言标记符(tokenizer_en)和目标语言标记符(tokenizer_my)分别对源文本和目标文本进行编码。最后,我们将为训练和验证数据集创建一个数据加载器(DataLoader),该加载器将分批迭代数据集(在我们的示例中,批量大小将设置为 10)。批量大小可根据数据大小和可用处理能力进行更改。
# This class takes raw dataset and max_seq_len (maximum length of a sequence in the entire dataset).
class EncodeDataset(Dataset):
    def __init__(self, raw_dataset, max_seq_len):
        super().__init__()
        self.raw_dataset = raw_dataset
        self.max_seq_len = max_seq_len

    def __len__(self):
        return len(self.raw_dataset)
    def __getitem__(self, index):

        # Fetching raw text for the given index that consists of source and target pair.
        raw_text = self.raw_dataset[index]

        # Separating text to source and target text and will be later used for encoding.
        source_text = raw_text["en"]
        target_text = raw_text["ms"]
        # Encoding source text with source tokenizer(tokenizer_en) and target text with target tokenizer(tokenizer_my).
        source_text_encoded = torch.tensor(tokenizer_en.encode(source_text).ids, dtype = torch.int64).to(device)
        target_text_encoded = torch.tensor(tokenizer_my.encode(target_text).ids, dtype = torch.int64).to(device)
        # To train the model, the sequence lenth of each input sequence should be equal max seq length.
        # Hence additional number of padding will be added to the input sequence if the length is less than the max_seq_len.
        num_source_padding = self.max_seq_len - len(source_text_encoded) - 2
        num_target_padding = self.max_seq_len - len(target_text_encoded) - 1
        encoder_padding = torch.tensor([PAD_ID] * num_source_padding, dtype = torch.int64).to(device)
        decoder_padding = torch.tensor([PAD_ID] * num_target_padding, dtype = torch.int64).to(device)

        # encoder_input has the first token as start of sentence - CLS_ID, followed by source encoding which is then followed by the end of sentence token - SEP.
        # To reach the required max_seq_len, addition PAD token will be added at the end.
        encoder_input = torch.cat([CLS_ID, source_text_encoded, SEP_ID, encoder_padding]).to(device)
        # decoder_input has the first token as start of sentence - CLS_ID, followed by target encoding.
        # To reach the required max_seq_len, addition PAD token will be added at the end. There is no end of sentence token - SEP in decoder_input.
        decoder_input = torch.cat([CLS_ID, target_text_encoded, decoder_padding ]).to(device)

        # target_label has the first token as target encoding followed by end of sentence token - SEP. There is no start of sentence token - CLS in target label.
        # To reach the required max_seq_len, addition PAD token will be added at the end.
        target_label = torch.cat([target_text_encoded,SEP_ID,decoder_padding]).to(device)

        # As we've added extra padding token with input encoding, during training, we don't want this token to be trained by model as there is nothing to learn in this token.
        # So, we'll use encoder mask to nullify the padding token value prior to calculating output of self attention in encoder block.
        encoder_mask = (encoder_input != PAD_ID).unsqueeze(0).unsqueeze(0).int().to(device)

        # We also don't want any token to get influenced by the future token during the decoding stage. Hence, Causal mask is being implemented during masked multihead attention to handle this.
        decoder_mask = (decoder_input != PAD_ID).unsqueeze(0).unsqueeze(0).int() & causal_mask(decoder_input.size(0)).to(device)
        return {
            'encoder_input': encoder_input,
            'decoder_input': decoder_input,
            'target_label': target_label,
            'encoder_mask': encoder_mask,
            'decoder_mask': decoder_mask,
            'source_text': source_text,
            'target_text': target_text
        }
# Causal mask will make sure any token that comes after the current token will be masked, meaning the value will be replaced by -ve infinity which will be converted to zero or close to zero after softmax function.
# Hence the model will just ignore these value or willn't be able to learn anything from these values.
def causal_mask(size):
  # dimension of causal mask (batch_size, seq_len, seq_len)
  mask = torch.triu(torch.ones(1, size, size), diagonal = 1).type(torch.int)
  return mask == 0
# To calculate the max sequence lenth in the entire training dataset for the source and target dataset.
max_seq_len_source = 0
max_seq_len_target = 0
for data in raw_train_dataset["translation"]:
    enc_ids = tokenizer_en.encode(data["en"]).ids
    dec_ids = tokenizer_my.encode(data["ms"]).ids
    max_seq_len_source = max(max_seq_len_source, len(enc_ids))
    max_seq_len_target = max(max_seq_len_target, len(dec_ids))

print(f'max_seqlen_source: {max_seq_len_source}')   #530
print(f'max_seqlen_target: {max_seq_len_target}')   #526
# To simplify the training process, we'll just take single max_seq_len and add 20 to cover the additional length of tokens such as PAD, CLS, SEP in the sequence.
max_seq_len = 550
# Instantiate the EncodeRawDataset class and create the encoded train and validation-dataset.
train_dataset = EncodeDataset(raw_train_dataset["translation"], max_seq_len)
val_dataset = EncodeDataset(raw_validation_dataset["translation"], max_seq_len)
# Creating DataLoader wrapper for both training and validation dataset. This dataloader will be used later stage during training and validation of our LLM model.
train_dataloader = DataLoader(train_dataset, batch_size = 10, shuffle = True, generator=torch.Generator(device='cuda'))
val_dataloader = DataLoader(val_dataset, batch_size = 1, shuffle = True, generator=torch.Generator(device='cuda'))
步骤 4:输入嵌入和位置编码
输入嵌入: 步骤 2 中由标记化器生成的标记 ID 序列将被输入到嵌入层。嵌入层将标记 ID 映射为词汇,并为每个标记生成一个维度为 512 的嵌入向量。嵌入向量可以根据训练数据集捕捉标记的语义。嵌入向量内的每个维度值都代表与标记相关的某种特征。例如,如果标记是 "狗"(Dog),那么某些维度值就代表眼睛、嘴巴、腿、身高等。如果我们在 n 维空间中绘制一个向量,那么外观相似的物体(如狗和猫)就会彼此靠近,而外观不相似的物体(如学校、家庭嵌入向量)则会离得更远。
位置编码: Transforme结构的优点之一是可以并行处理任意数量的输入序列,这不仅可以减少大量的训练时间,还能大大加快预测速度。但是,它也有一个缺点,那就是在并行处理多个词块序列时,词块在句子中的位置将不按顺序排列。这有可能导致句子的含义或上下文因标记的位置而不同。因此,为解决这一问题,本文采用了位置编码法。该论文建议在每个标记的 512 维度的索引层上应用两个数学函数(一个是正弦函数,一个是余弦函数)。以下是简单的正弦和余弦数学函数。
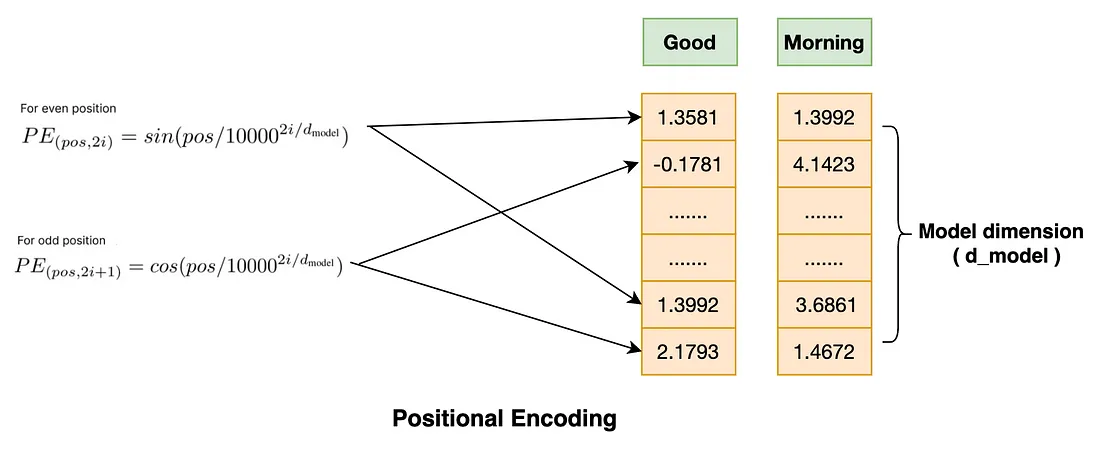
Sin 函数应用于嵌入向量的每个偶数维值,而余弦函数则应用于嵌入向量的奇数维值。最后,得到的位置编码器向量将被添加到嵌入向量中。现在,我们就有了既能捕捉词块语义又能捕捉词块位置的嵌入向量。请注意,位置编码的值在每个序列中都保持不变。
# Input embedding and positional encoding
class EmbeddingLayer(nn.Module):
    def __init__(self, vocab_size: int, d_model: int):
        super().__init__()
        self.d_model = d_model

        # Using pytorch embedding layer module to map token id to vocabulary and then convert into embeeding vector.
        # The vocab_size is the vocabulary size of the training dataset created by tokenizer during training of corpus dataset in step 2.
        self.embedding = nn.Embedding(vocab_size, d_model)

    def forward(self, input):
        # In addition of feeding input sequence to the embedding layer, the extra multiplication by square root of d_model is done to normalize the embedding layer output
        embedding_output = self.embedding(input) * math.sqrt(self.d_model)
        return embedding_output

class PositionalEncoding(nn.Module):
    def __init__(self, max_seq_len: int, d_model: int, dropout_rate: float):
        super().__init__()
        self.dropout = nn.Dropout(dropout_rate)

        # We're creating a matrix of the same shape as embedding vector.
        pe = torch.zeros(max_seq_len, d_model)

        # Calculate the position part of PE functions.
        pos = torch.arange(0, max_seq_len, dtype=torch.float).unsqueeze(1)
        # Calculate the division part of PE functions. Take note that the div part expression is slightly different that papers expression as this exponential functions seems to works better.
        div_term = torch.exp(torch.arange(0, d_model, 2).float()) * (-math.log(10000)/d_model)

        # Fill in the odd and even matrix value with the sin and cosine mathematical function results.
        pe[:, 0::2] = torch.sin(pos * div_term)
        pe[:, 1::2] = torch.cos(pos * div_term)

        # Since we're expecting the input sequences in batches so the extra batch_size dimension is added in 0 postion.
        pe = pe.unsqueeze(0)

    def forward(self, input_embdding):
        # Add positional encoding together with the input embedding vector.
        input_embdding = input_embdding + (self.pe[:, :input_embdding.shape[1], :]).requires_grad_(False)

        # Perform dropout to prevent overfitting.
        return self.dropout(input_embdding)
步骤 5:多头注意力模块
就像 Transformer 是 LLM 的核心一样,自我注意机制也是 Transformer 架构的核心。
下面让我们用一个简单的例子来回答这个问题。

在句子 1 和句子 2 中,"银行 "一词显然有两种不同的含义。但是,在这两个句子中,"bank "一词的嵌入值是相同的。这是不对的。我们希望根据句子的上下文来改变嵌入值。因此,我们需要一种可以动态改变嵌入值的机制,以便根据句子的整体含义赋予上下文含义。自我关注机制可以动态更新嵌入值,从而根据句子的上下文意思来表示嵌入值。
既然自我注意已经如此出色,我们为什么还需要多头自我注意呢?让我们从下面的另一个例子中找出答案。

在这个例子中,如果我们使用自我关注,可能只会关注句子的一个方面,也许只是 "什么 "方面,比如它只能捕捉到 "约翰做了什么?"。但是,其他方面,如 "什么时候 "或 "在哪里",也同样需要学习,这样模型才能表现得更好。因此,我们需要找到一种方法,让 "自我关注 "机制同时学习句子中的这些多重关系。因此,这就是多头自我注意(多头注意可以互换使用)的用武之地。在多头注意力中,单头嵌入将分为多个头,这样每个头就会研究句子的不同方面,并进行相应的学习。这正是我们想要的。
现在,我们知道为什么需要多头注意力了。让我们来看看这部分是如何实现的。多头注意力究竟是如何运作的?让我们直接进入主题。
如果你能熟练掌握矩阵乘法,那么要理解其中的机理就轻而易举了。让我们先看看整个流程图,下面我将分点说明多头注意力从输入到输出的流程。
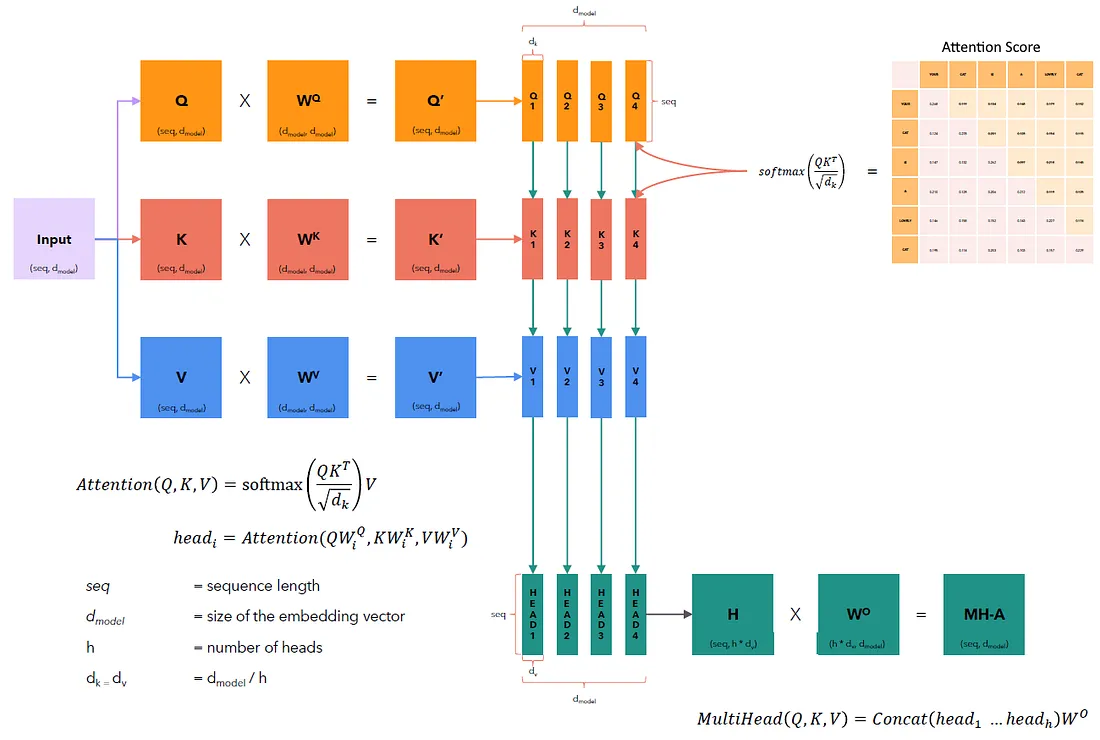
1. 首先,我们制作 3 份编码器输入的副本(输入嵌入和位置编码的组合,我们已在第 4 步中完成)。我们给它们分别取名为 Q、K 和 V。编码器输入形状:(seq_len, d_model),seq_len:最大序列长度,d_model:嵌入向量维数,本例中为 512。
2. 接下来,我们将对权重为 W_q 的 Q、权重为 W_k 的 K 和权重为 W_v 的 V 进行矩阵乘法运算。每个权重矩阵的形状都是(d_model, d_model)。由此产生的新查询、键和值嵌入向量的形状为(seq_len,d_model)。权重参数将由模型随机初始化,随后在模型开始训练时更新。为什么我们首先需要权重矩阵乘法?因为这些参数是可学习的,查询、关键字和值嵌入向量需要这些参数来提供更好的表示。
3. 根据注意文件,头的数量为 8。每个新的查询、键和值嵌入向量将被分成 8 个较小的查询、键和值嵌入向量单元。新的嵌入向量形状为(seq_len,d_model/num_heads)或(seq_len,d_k)。[d_k = d_model/num_heads ]。
4. 每个查询嵌入向量将与序列中自身和所有其他嵌入向量的关键嵌入向量的转置进行点积运算。这个点积给出了注意力分数。注意力分数显示了给定输入序列中给定标记与所有其他标记的相似程度。分数越高,相似度越高。
- 然后,关注度得分将除以 d_k 的平方根,这是对整个矩阵的得分值进行归一化的必要条件。但为什么必须除以 d_k 才能归一化呢?主要原因是,随着嵌入向量维度的增加,注意力矩阵的总方差也会相应增加。这就是为什么除以 d_k 可以平衡方差的增加。如果我们不除以 d_k,对于任何给定的较高注意力分值,softmax 函数都会给出一个非常高的概率值,同样,对于任何较低的注意力分值,softmax 函数都会给出一个非常低的概率值。这最终会使模型只关注学习概率值高的特征,而忽略概率值低的特征,从而导致梯度消失。因此,对注意力分数矩阵进行归一化处理是非常必要的。
- 在执行软最大值函数之前,如果编码器掩码不是 None,那么注意力分数将矩阵乘以编码器掩码。如果掩码是因果掩码,那么输入序列中在它之后的嵌入标记的注意分数值将被-ve infinity 取代。softmax 函数会将-ve infinity 值转换为接近于零的值。因此,模型将不会学习当前标记后的那些特征。这就是我们如何防止未来标记影响模型学习的方法。
5. 然后,将 softmax 函数应用于注意力得分矩阵,并输出形状为 (seq_len, seq_len) 的权重矩阵。
6. 然后,这些权重矩阵将与相应的值嵌入向量进行矩阵乘法运算。这将产生 8 个形状为(seq_len, d_v)的注意力头。[d_v = d_model/num_heads ]。
7. 最后,所有的注意力头都会被串联成一个新形状(seq_len,d_model)的注意力头。这个新的单一头部将与输出权重矩阵 W_o (d_model, d_model)相乘。多词头注意力的最终输出代表了单词的上下文含义以及对输入句子进行多方面学习的能力。
有了这些,让我们开始对多头注意力模块进行编码,这将变得更加简单和简短。
class MultiHeadAttention(nn.Module):
    def __init__(self, d_model: int, num_heads: int, dropout_rate: float):
        super().__init__()
        # Define dropout to prevent overfitting.
        self.dropout = nn.Dropout(dropout_rate)

        # Weight matrix are introduced and are all learnable parameters.
        self.W_q = nn.Linear(d_model, d_model)
        self.W_k = nn.Linear(d_model, d_model)
        self.W_v = nn.Linear(d_model, d_model)
        self.W_o = nn.Linear(d_model, d_model)
        self.num_heads = num_heads
        assert d_model % num_heads == 0, "d_model must be divisible by number of heads"

        # d_k is the new dimension of each splitted self attention heads
        self.d_k = d_model // num_heads
    def forward(self, q, k, v, encoder_mask=None):

        # We'll be training our model with multiple batches of sequence at once in parallel, hence we'll need to include batch_size in the shape as well.
        # query, key and value are calculated by matrix multiplication of corresponding weights with the input embeddings.
        # Change of shape: q(batch_size, seq_len, d_model) @ W_q(d_model, d_model) => query(batch_size, seq_len, d_model) [same goes to key and value].
        query = self.W_q(q)
        key = self.W_k(k)
        value = self.W_v(v)
        # Splitting query, key and value into number of heads. d_model is splitted in d_k across 8 heads.
        # Change of shape: query(batch_size, seq_len, d_model) => query(batch_size, seq_len, num_heads, d_k) -> query(batch_size,num_heads, seq_len,d_k) [same goes to key and value].
        query = query.view(query.shape[0], query.shape[1], self.num_heads ,self.d_k).transpose(1,2)
        key = key.view(key.shape[0], key.shape[1], self.num_heads ,self.d_k).transpose(1,2)
        value = value.view(value.shape[0], value.shape[1], self.num_heads ,self.d_k).transpose(1,2)
        # :: SELF ATTENTION BLOCK STARTS ::
        # Attention score is calculated to find the similarity or relation between query with key of itself and all other embedding in the sequence.
        #  Change of shape: query(batch_size,num_heads, seq_len,d_k) @ key(batch_size,num_heads, seq_len,d_k) => attention_score(batch_size,num_heads, seq_len,seq_len).
        attention_score = (query @ key.transpose(-2,-1))/math.sqrt(self.d_k)
        # If mask is provided, the attention score needs to modify as per the mask value. Refer to the details in point no 4.
        if encoder_mask is not None:
            attention_score = attention_score.masked_fill(encoder_mask==0, -1e9)

        # Softmax function calculates the probability distribution among all the attention scores. It assign higher probabiliy value to higher attention score. Meaning more similar tokens get higher probability value.
        # Change of shape: same as attention_score
        attention_weight = torch.softmax(attention_score, dim=-1)
        if self.dropout is not None:
            attention_weight = self.dropout(attention_weight)
        # Final step in Self attention block is, matrix multiplication of attention_weight with Value embedding vector.
        # Change of shape: attention_score(batch_size,num_heads, seq_len,seq_len) @  value(batch_size,num_heads, seq_len,d_k) => attention_output(batch_size,num_heads, seq_len,d_k)
        attention_output = attention_score @ value

        # :: SELF ATTENTION BLOCK ENDS ::
        # Now, all the heads will be combined back to a single head
        # Change of shape:attention_output(batch_size,num_heads, seq_len,d_k) => attention_output(batch_size,seq_len,num_heads,d_k) => attention_output(batch_size,seq_len,d_model)
        attention_output = attention_output.transpose(1,2).contiguous().view(attention_output.shape[0], -1, self.num_heads * self.d_k)
        # Finally attention_output is matrix multiplied with output weight matrix to give the final Multi-Head attention output.
        # The shape of the multihead_output is same as the embedding input
        # Change of shape: attention_output(batch_size,seq_len,d_model) @ W_o(d_model, d_model) => multihead_output(batch_size, seq_len, d_model)
        multihead_output = self.W_o(attention_output)

        return multihead_output
步骤 6:前馈网络、层归一化和 AddAndNorm
前馈网络: 前馈网络使用深度神经网络来学习两个线性层(第一层有 d_model 节点,第二层有 d_ff 节点,其值根据关注论文分配)中嵌入向量的所有特征,并将 ReLU 激活函数应用于第一线性层的输出,为嵌入值提供非线性,同时应用 dropout 来进一步避免过拟合。
层归一化: 我们对嵌入值进行层归一化处理,以确保网络中嵌入向量的值分布保持一致。这将确保学习的顺利进行。我们将使用称为 gamma 和 beta 的额外学习参数,以根据网络需要调整和移动嵌入值。
添加和规范: 这包括一个跳转连接和一个分层归一化(如前所述)。在前向传递过程中,跳转连接确保前一层的特征在后一阶段仍能被记住,从而在计算输出时做出必要的贡献。同样,在后向传播过程中,Skip 连接可以确保在每个阶段少进行一次后向传播,从而防止梯度消失。编码器(2 次)和解码器模块(3 次)中都使用了 AddAndNorm。它接收前一层的输入,首先将其归一化,然后再将其添加到前一层的输出中。
# Feedfoward Network, Layer Normalization and AddAndNorm Block
class FeedForward(nn.Module):
    def __init__(self, d_model: int, d_ff: int, dropout_rate: float):
        super().__init__()
        self.layer_1 = nn.Linear(d_model, d_ff)
        self.activation_1 = nn.ReLU()
        self.dropout = nn.Dropout(dropout_rate)
        self.layer_2 = nn.Linear(d_ff, d_model)

    def forward(self, input):
        return self.layer_2(self.dropout(self.activation_1(self.layer_1(input))))
class LayerNorm(nn.Module):
    def __init__(self, eps: float = 1e-5):
        super().__init__()
        #Epsilon is a very small value and it plays an important role to prevent potentially division by zero problem.
        self.eps = eps
        #Extra learning parameters gamma and beta are introduced to scale and shift the embedding value as the network needed.
        self.gamma = nn.Parameter(torch.ones(1))
        self.beta = nn.Parameter(torch.zeros(1))

    def forward(self, input):
        mean = input.mean(dim=-1, keepdim=True)
        std = input.std(dim=-1, keepdim=True)
        return self.gamma * ((input - mean)/(std + self.eps)) + self.beta


class AddAndNorm(nn.Module):
    def __init__(self, dropout_rate: float):
        super().__init__()
        self.dropout = nn.Dropout(dropout_rate)
        self.layer_norm = LayerNorm()
    def forward(self, input, sub_layer):
        return input + self.dropout(sub_layer(self.layer_norm(input)))
步骤 7:编码器模块和编码器
编码器模块: 编码器模块内有两个主要组件: 多头注意和前馈。另外还有 Add 和 Norm 两个单元。首先,我们将按照 Attention 论文中的流程,将所有这些组件组装到 EncoderBlock 类中。根据该论文,这个编码器模块已经重复了 6 次。
编码器: 然后,我们将创建一个名为 Encoder 的附加类,它将接收 EncoderBlock 列表并将其堆叠,然后给出最终的 Encoder 输出。
class EncoderBlock(nn.Module):
    def __init__(self, multihead_attention: MultiHeadAttention, feed_forward: FeedForward, dropout_rate: float):
        super().__init__()
        self.multihead_attention = multihead_attention
        self.feed_forward = feed_forward
        self.add_and_norm_list = nn.ModuleList([AddAndNorm(dropout_rate) for _ in range(2)])
    def forward(self, encoder_input, encoder_mask):
        # First AddAndNorm unit taking encoder input from skip connection and adding it with the output of MultiHead attention block.
        encoder_input = self.add_and_norm_list[0](encoder_input, lambda encoder_input: self.multihead_attention(encoder_input, encoder_input, encoder_input, encoder_mask))

        # Second AddAndNorm unit taking output of MultiHead attention block from skip connection and adding it with the output of Feedforward layer.
        encoder_input = self.add_and_norm_list[1](encoder_input, self.feed_forward)
        return encoder_input
class Encoder(nn.Module):
    def __init__(self, encoderblocklist: nn.ModuleList):
        super().__init__()
        # Encoder class is initialized by taking encoderblock list.
        self.encoderblocklist = encoderblocklist
        self.layer_norm = LayerNorm()
    def forward(self, encoder_input, encoder_mask):
        # Looping through all the encoder block - 6 times.
        for encoderblock in self.encoderblocklist:
            encoder_input = encoderblock(encoder_input, encoder_mask)
        # Normalize the final encoder block output and return. This encoder output will be used later on as key and value for the cross attention in decoder block.
        encoder_output = self.layer_norm(encoder_input)
        return encoder_output
步骤 8:解码块、解码器和投影层
解码器模块: 解码器区块有三个主要组件: 屏蔽多头注意力、多头注意力和前馈。解码器块中还有 3 个添加和规范单元。我们将按照注意力论文中的流程,在 DecoderBlock 类中组装所有这些组件。根据该论文,这个解码器模块已经重复了 6 次。
解码器: 我们将创建名为 Decoder 的附加类,该类将接收 DecoderBlock 列表,将其堆叠并给出最终的 Decoder 输出。
在解码器块中有两种类型的多头注意(Multi-head Attention)。第一种是屏蔽多头注意。它接收解码器输入(如查询、键和值)和解码器掩码(也称为因果掩码)。因果掩码可以防止模型查看序列顺序靠前的嵌入。步骤 3 和步骤 5 将详细解释其工作原理。
投影层: 解码器的最终输出将进入投影层。在该层中,解码器输出将首先被送入线性层,在该层中,嵌入的形状将按照下面代码部分提供的方式发生变化。随后,softmax 函数将解码器输出转换为词汇的概率分布,并选择概率最高的标记作为预测输出。
class DecoderBlock(nn.Module):
    def __init__(self, masked_multihead_attention: MultiHeadAttention,multihead_attention: MultiHeadAttention, feed_forward: FeedForward, dropout_rate: float):
        super().__init__()
        self.masked_multihead_attention = masked_multihead_attention
        self.multihead_attention = multihead_attention
        self.feed_forward = feed_forward
        self.add_and_norm_list = nn.ModuleList([AddAndNorm(dropout_rate) for _ in range(3)])
    def forward(self, decoder_input, decoder_mask, encoder_output, encoder_mask):
        # First AddAndNorm unit taking decoder input from skip connection and adding it with the output of Masked Multi-Head attention block.
        decoder_input = self.add_and_norm_list[0](decoder_input, lambda decoder_input: self.masked_multihead_attention(decoder_input,decoder_input, decoder_input, decoder_mask))
        # Second AddAndNorm unit taking output of Masked Multi-Head attention block from skip connection and adding it with the output of MultiHead attention block.
        decoder_input = self.add_and_norm_list[1](decoder_input, lambda decoder_input: self.multihead_attention(decoder_input,encoder_output, encoder_output, encoder_mask))            # cross attention
        # Third AddAndNorm unit taking output of MultiHead attention block from skip connection and adding it with the output of Feedforward layer.
        decoder_input = self.add_and_norm_list[2](decoder_input, self.feed_forward)
        return decoder_input
class Decoder(nn.Module):
    def __init__(self,decoderblocklist: nn.ModuleList):
        super().__init__()
        self.decoderblocklist = decoderblocklist
        self.layer_norm = LayerNorm()
    def forward(self, decoder_input, decoder_mask, encoder_output, encoder_mask):
        for decoderblock in self.decoderblocklist:
            decoder_input = decoderblock(decoder_input, decoder_mask, encoder_output, encoder_mask)
        decoder_output = self.layer_norm(decoder_input)
        return decoder_output
class ProjectionLayer(nn.Module):
    def __init__(self, vocab_size: int, d_model: int):
        super().__init__()
        self.projection_layer = nn.Linear(d_model, vocab_size)
    def forward(self, decoder_output):
        # Projection layer first take in decoder output and passed into the linear layer of shape (d_model, vocab_size)
        # Change in shape: decoder_output(batch_size, seq_len, d_model) @ linear_layer(d_model, vocab_size) => output(batch_size, seq_len, vocab_size)
        output = self.projection_layer(decoder_output)

        # softmax function to output the probability distribution over the vocabulary
        return torch.log_softmax(output, dim=-1)
步骤9:创建并构建Transforme
最后,我们完成了变压器架构中所有组件模块的构建。现在唯一的任务就是将它们组装在一起。
首先,我们创建一个转换器类,它将初始化所有组件类的实例。在变换器类中,我们将首先定义编码函数,该函数将完成变换器编码器部分的所有任务,并生成编码器输出。
其次,我们定义一个解码函数,该函数执行变换器解码器部分的所有任务并生成解码器输出。
第三,我们定义一个项目函数,该函数接收解码器输出,并将输出映射到词汇表中进行预测。
现在,转换器架构已经准备就绪。现在,我们可以通过定义一个函数来建立翻译 LLM 模型,该函数将接收下面代码中给出的所有必要参数。
class Transformer(nn.Module):
    def __init__(self, source_embed: EmbeddingLayer, target_embed: EmbeddingLayer, positional_encoding: PositionalEncoding, multihead_attention: MultiHeadAttention, masked_multihead_attention: MultiHeadAttention, feed_forward: FeedForward, encoder: Encoder, decoder: Decoder, projection_layer: ProjectionLayer, dropout_rate: float):
        super().__init__()

        # Initialize instances of all the component class of transformer architecture.
        self.source_embed = source_embed
        self.target_embed = target_embed
        self.positional_encoding = positional_encoding
        self.multihead_attention = multihead_attention
        self.masked_multihead_attention = masked_multihead_attention
        self.feed_forward = feed_forward
        self.encoder = encoder
        self.decoder = decoder
        self.projection_layer = projection_layer
        self.dropout = nn.Dropout(dropout_rate)

    # Encode function takes in encoder input, does necessary processing inside all encoder blocks and gives encoder output.
    def encode(self, encoder_input, encoder_mask):
        encoder_input = self.source_embed(encoder_input)
        encoder_input = self.positional_encoding(encoder_input)
        encoder_output = self.encoder(encoder_input, encoder_mask)
        return encoder_output
    # Decode function takes in decoder input, does necessary processing inside all decoder blocks and gives decoder output.
    def decode(self, decoder_input, decoder_mask, encoder_output, encoder_mask):
        decoder_input = self.target_embed(decoder_input)
        decoder_input = self.positional_encoding(decoder_input)
        decoder_output = self.decoder(decoder_input, decoder_mask, encoder_output, encoder_mask)
        return decoder_output
    # Projec function takes in decoder output into its projection layer and maps the output to the vocabulary for prediction.
    def project(self, decoder_output):
        return self.projection_layer(decoder_output)
def build_model(source_vocab_size, target_vocab_size, max_seq_len=1135, d_model=512, d_ff=2048, num_heads=8, num_blocks=6, dropout_rate=0.1):

    # Define and assign all the parameters value needed for the transformer architecture
    source_embed = EmbeddingLayer(source_vocab_size, d_model)
    target_embed = EmbeddingLayer(target_vocab_size, d_model)
    positional_encoding = PositionalEncoding(max_seq_len, d_model, dropout_rate)
    multihead_attention = MultiHeadAttention(d_model, num_heads, dropout_rate)
    masked_multihead_attention = MultiHeadAttention(d_model, num_heads, dropout_rate)
    feed_forward = FeedForward(d_model, d_ff, dropout_rate)
    projection_layer = ProjectionLayer(target_vocab_size, d_model)
    encoder_block = EncoderBlock(multihead_attention, feed_forward, dropout_rate)
    decoder_block = DecoderBlock(masked_multihead_attention,multihead_attention, feed_forward, dropout_rate)
    encoderblocklist = []
    decoderblocklist = []
    for _ in range(num_blocks):
        encoderblocklist.append(encoder_block)

    for _ in range(num_blocks):
        decoderblocklist.append(decoder_block)

    encoderblocklist = nn.ModuleList(encoderblocklist)
    decoderblocklist = nn.ModuleList(decoderblocklist)

    encoder = Encoder(encoderblocklist)
    decoder = Decoder(decoderblocklist)

    # Instantiate the transformer class by providing all the parameters values
    model = Transformer(source_embed, target_embed, positional_encoding, multihead_attention, masked_multihead_attention,feed_forward, encoder, decoder, projection_layer, dropout_rate)
    for param in model.parameters():
        if param.dim() > 1:
            nn.init.xavier_uniform_(param)

    return model
# Finally, call build model and assign it to model variable.
# This model is now fully ready to train and validate our dataset.
# After training and validation, we can perform new translation task using this very model
model = build_model(source_vocab_size, target_vocab_size)
步骤 10: 训练和验证我们建立的 LLM 模型
现在是训练模型的时候了。训练过程非常简单。我们将使用在步骤 3 中创建的训练数据加载器。由于训练数据集总数为 100 万,我强烈建议在 GPU 设备上训练我们的模型。我花了大约 5 小时完成 20 个 epoch。每个epoch之后,我们都要保存模型权重和优化器状态,这样就能更容易地从停止前的点恢复训练,而不是从头开始。
在每个epoch之后,我们将使用验证数据加载器启动验证。验证数据集的大小为 2000,这是相当合理的。在验证过程中,我们只需要计算一次编码器输出,直到解码器输出获得句末标记 [SEP],这是因为在解码器获得 [SEP] 标记之前,我们必须一次又一次地发送相同的编码器输出,这并不合理。
解码器输入将首先从句子标记 [CLS] 开始。每次预测后,解码器输入都会添加下一个生成的标记,直到句末标记 [SEP]。最后,投影层将输出映射到相应的文本表示。
def training_model(preload_epoch=None):
    # The entire training, validation cycle will run for 20 times.
    EPOCHS = 20
    initial_epoch = 0
    global_step = 0

    # Adam is one of the most commonly used optimization algorithms that hold the current state and will update the parameters based on the computed gradients.
    optimizer = torch.optim.Adam(model.parameters(), lr=1e-3)

    # If the preload_epoch is not none, that means the training will start with the weights, optimizer that has been last saved. The new epoch number will be preload epoch + 1.
    if preload_epoch is not None:
        model_filename = f"./malaygpt/model_{preload_epoch}.pt"
        state = torch.load(model_filename)
        initial_epoch = state['epoch'] + 1
        optimizer.load_state_dict(state['optimizer_state_dict'])
        global_step = state['global_step']
    # The CrossEntropyLoss loss function computes the difference between the projection output and target label.
    loss_fn = nn.CrossEntropyLoss(ignore_index = tokenizer_en.token_to_id("[PAD]"), label_smoothing=0.1).to(device)
    for epoch in range(initial_epoch, EPOCHS):
        # ::: Start of Training block :::
        model.train()

        # training with the training dataloder prepared in step 3.
        for batch in tqdm(train_dataloader):
            encoder_input = batch['encoder_input'].to(device)   # (batch_size, seq_len)
            decoder_input = batch['decoder_input'].to(device)    # (batch_size, seq_len)
            target_label = batch['target_label'].to(device)      # (batch_size, seq_len)
            encoder_mask = batch['encoder_mask'].to(device)
            decoder_mask = batch['decoder_mask'].to(device)
            encoder_output = model.encode(encoder_input, encoder_mask)
            decoder_output = model.decode(decoder_input, decoder_mask, encoder_output, encoder_mask)
            projection_output = model.project(decoder_output)
            # projection_output(batch_size, seq_len, vocab_size)
            loss = loss_fn(projection_output.view(-1, projection_output.shape[-1]), target_label.view(-1))

            # backward pass
            optimizer.zero_grad()
            loss.backward()
            # update weights
            optimizer.step()
            global_step += 1
        print(f'Epoch [{epoch+1}/{EPOCHS}]: Train Loss: {loss.item():.2f}')

        # save the state of the model after every epoch
        model_filename = f"./malaygpt/model_{epoch}.pt"
        torch.save({
            'epoch': epoch,
            'model_state_dict': model.state_dict(),
            'optimizer_state_dict': optimizer.state_dict(),
            'global_step': global_step
        }, model_filename)
        # ::: End of Training block :::
        # ::: Start of Validation block :::
        model.eval()
        with torch.inference_mode():
            for batch in tqdm(val_dataloader):
                encoder_input = batch['encoder_input'].to(device)   # (batch_size, seq_len)
                encoder_mask = batch['encoder_mask'].to(device)
                source_text = batch['source_text']
                target_text = batch['target_text']

                # Computing the output of the encoder for the source sequence.
                encoder_output = model.encode(encoder_input, encoder_mask)
                # for prediction task, the first token that goes in decoder input is the [CLS] token
                decoder_input = torch.empty(1,1).fill_(tokenizer_my.token_to_id('[CLS]')).type_as(encoder_input).to(device)
                # since we need to keep adding the output back to the input until the [SEP] - end token is received.
                while True:
                    # check if the max length is received, if it is, then we stop.
                    if decoder_input.size(1) == max_seq_len:
                        break
                    # Recreate mask each time the new output is added the decoder input for next token prediction
                    decoder_mask = causal_mask(decoder_input.size(1)).type_as(encoder_mask).to(device)
                    decoder_output = model.decode(decoder_input,decoder_mask,encoder_output,encoder_mask)

                    # Apply projection only to the next token.
                    projection = model.project(decoder_output[:, -1])
                    # Select the token with highest probablity which is a called greedy search implementation.
                    _, new_token = torch.max(projection, dim=1)
                    new_token = torch.empty(1,1). type_as(encoder_input).fill_(new_token.item()).to(device)
                    # Add the new token back to the decoder input.
                    decoder_input = torch.cat([decoder_input, new_token], dim=1)
                    # Check if the new token is the end of token, then we stop if received [SEP].
                    if new_token == tokenizer_my.token_to_id('[SEP]'):
                        break
                # Assigned decoder output as the fully appended decoder input.
                decoder_output = decoder_input.sequeeze(0)
                model_predicted_text = tokenizer_my.decode(decoder_output.detach().cpu.numpy())

                print(f'SOURCE TEXT": {source_text}')
                print(f'TARGET TEXT": {target_text}')
                print(f'PREDICTED TEXT": {model_predicted_text}')
                # ::: End of Validation block :::
# This function runs the training and validation for 20 epochs
training_model(preload_epoch=None)
步骤11:创建一个函数,用我们构建的模型测试新的翻译任务
我们将给翻译函数起一个新的通用名称,叫做 malaygpt。该函数接收用户输入的英语原始文本,并输出马来语翻译文本。让我们运行该函数并试一试。
解码器输入将首先从句子标记 [CLS] 开始。每次预测后,解码器输入都会添加下一个生成的标记,直到句末标记 [SEP]。最后,投影层将输出映射到相应的文本表示。
def malaygpt(user_input_text):
  model.eval()
  with torch.inference_mode():
    user_input_text = user_input_text.strip()
    user_input_text_encoded = torch.tensor(tokenizer_en.encode(user_input_text).ids, dtype = torch.int64).to(device)
    num_source_padding = max_seq_len - len(user_input_text_encoded) - 2
    encoder_padding = torch.tensor([PAD_ID] * num_source_padding, dtype = torch.int64).to(device)
    encoder_input = torch.cat([CLS_ID, user_input_text_encoded, SEP_ID, encoder_padding]).to(device)
    encoder_mask = (encoder_input != PAD_ID).unsqueeze(0).unsqueeze(0).int().to(device)
    # Computing the output of the encoder for the source sequence
    encoder_output = model.encode(encoder_input, encoder_mask)
    # for prediction task, the first token that goes in decoder input is the [CLS] token
    decoder_input = torch.empty(1,1).fill_(tokenizer_my.token_to_id('[CLS]')).type_as(encoder_input).to(device)
    # since we need to keep adding the output back to the input until the [SEP] - end token is received.
    while True:
        # check if the max length is received
        if decoder_input.size(1) == max_seq_len:
            break
        # recreate mask each time the new output is added the decoder input for next token prediction
        decoder_mask = causal_mask(decoder_input.size(1)).type_as(encoder_mask).to(device)
        decoder_output = model.decode(decoder_input,decoder_mask,encoder_output,encoder_mask)
        # apply projection only to the next token
        projection = model.project(decoder_output[:, -1])
        # select the token with highest probablity which is a greedy search implementation
        _, new_token = torch.max(projection, dim=1)
        new_token = torch.empty(1,1). type_as(encoder_input).fill_(new_token.item()).to(device)
        # add the new token back to the decoder input
        decoder_input = torch.cat([decoder_input, new_token], dim=1)
        # check if the new token is the end of token
        if new_token == tokenizer_my.token_to_id('[SEP]'):
            break
    # final decoder out is the concatinated decoder input till the end token
    decoder_output = decoder_input.sequeeze(0)
    model_predicted_text = tokenizer_my.decode(decoder_output.detach().cpu.numpy())
    return model_predicted_text
测试时间 !让我们进行一些翻译测试。
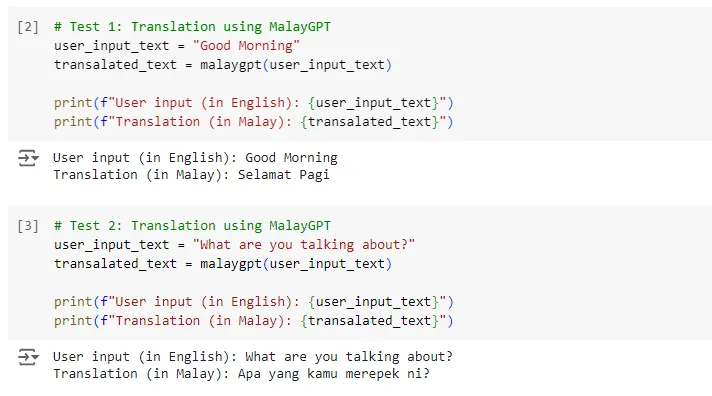
就是这样!我相信你现在已经能够使用 PyTorch 从零开始构建自己的大型语言模型了。你还可以在其他语言数据集上训练这个模型,并执行该语言的翻译任务。现在,你已经学会了如何从头开始构建原始转换器,我可以向你保证,你现在已经有能力在目前市场上的大多数 LLM 上学习和实现自己的应用了。
下一步是什么?我将通过微调 Llama 3 模型来构建一个功能齐全的应用程序,该模型是目前市场上最流行的开源 LLM 模型之一。我还将分享完整的源代码。


