使用SingleStore和LlamaIndex构建Ayurveda Healthcare多PDF代理
简介
随着人工智能代理和 RAG 的出现,医疗保健行业发生了重大变革。这种变革影响到各个领域,包括患者人口统计、病史、治疗建议、药物开发等。试想一下,如果有一个人工智能代理能够提供有关合理饮食、瑜伽、草药疗法和药物的信息,那将是多么令人着迷。预防胜于治疗的格言与阿育吠陀的原则不谋而合,后者为保持健康的生活方式提供了全面的指导。
使用单一 PDF 文档开发人工智能代理和 RAG 应用程序很容易,但在处理多 PDF 文档时,我们会遇到一些挑战。为了解决这个问题,我们使用 HyDE 实现了优化检索的查询管道。在深入研究创建 Ayurveda Healthcare 多 PDF 代理之前,让我们先了解一下什么是 HyDE。
HyDE 概述
HyDE 是一种检索方法,它使用大型语言模型根据用户查询创建假设文档。这些文档旨在捕捉查询的本质和上下文。假设文档生成后,HyDE 使用对比编码器将其编码为密集向量。这一编码过程捕捉了假设文档与检索语料库中实际文档之间的语义相似性。然后,将假设文档的编码向量与语料库中真实文档的向量进行比较。检索出与查询的假设表示相似度最高的文档,并将其呈现给用户。

HyDE 在各种检索任务(如网络搜索、低资源检索和多语言检索)中表现出色。
在SingleStore Helios上使用HyDE实施查询管道
我们将使用SingleStore Helios,它提供一个共享版本,包括一个免费的启动工作区,用于免费开发我们的生产应用程序。注册免费共享层级以使用启动工作区。
启动工作区包含一个附加数据库。在 SingleStore Helios 中,我们无需安装 SingleStore 库即可使用笔记本和秘密。通过添加外部端点,我们可以使用防火墙确保笔记本的外部访问安全。
让我们开始编码!
要开始学习,首先安装并导入所需的依赖项。
!pip install -q llama-index
!pip install -q pyvis
!pip install -q llama-index-embeddings-huggingface
!pip install -q llama-index-llms-openai
!pip install -q -U llama-index-vector-stores-singlestoredb
import logging
import sys
from llama_index.core import VectorStoreIndex, SimpleDirectoryReader, StorageContext, load_index_from_storage
from llama_index.core.indices.query.query_transform import HyDEQueryTransform
from llama_index.core.node_parser.text import SentenceSplitter
from llama_index.embeddings.huggingface import HuggingFaceEmbedding
from llama_index.llms.openai import OpenAI
from llama_index.core.query_engine import TransformQueryEngine
from IPython.display import Markdown, display
from llama_index.vector_stores.singlestoredb import SingleStoreVectorStore
from llama_index.core.tools import QueryEngineTool, ToolMetadata, BaseTool
from llama_index.core.settings import Settings
from llama_index.core.callbacks import CallbackManager
from llama_index.core.agent.react.types import (
    ActionReasoningStep,
    ObservationReasoningStep,
    ResponseReasoningStep,
)
from llama_index.core.agent import Task, AgentChatResponse, ReActChatFormatter, QueryPipelineAgentWorker
from llama_index.core.query_pipeline import (
    AgentInputComponent,
    AgentFnComponent,
    CustomAgentComponent,
    QueryComponent,
    ToolRunnerComponent,
    InputComponent,
    Link,
    QueryPipeline
)
from llama_index.core.llms import MessageRole, ChatMessage, ChatResponse
from typing import Dict, Any, Optional, Tuple, List, Set, cast
from singlestoredb.management import get_secret
from sqlalchemy import *
from pyvis.network import Network
from IPython.display import display, HTML
logging.basicConfig(stream=sys.stdout, level=logging.INFO)
logging.getLogger().addHandler(logging.StreamHandler(stream=sys.stdout))
callback_manager = CallbackManager()
Settings.callback_manager = callback_manager
为了创建 Ayurveda Healthcare Multi-PDF 代理,我收集了 40 本Ayurveda电子书,并利用 GitHub 存储库将数据导入 SingleStore 笔记本。
!git clone <link_to_github_repo>
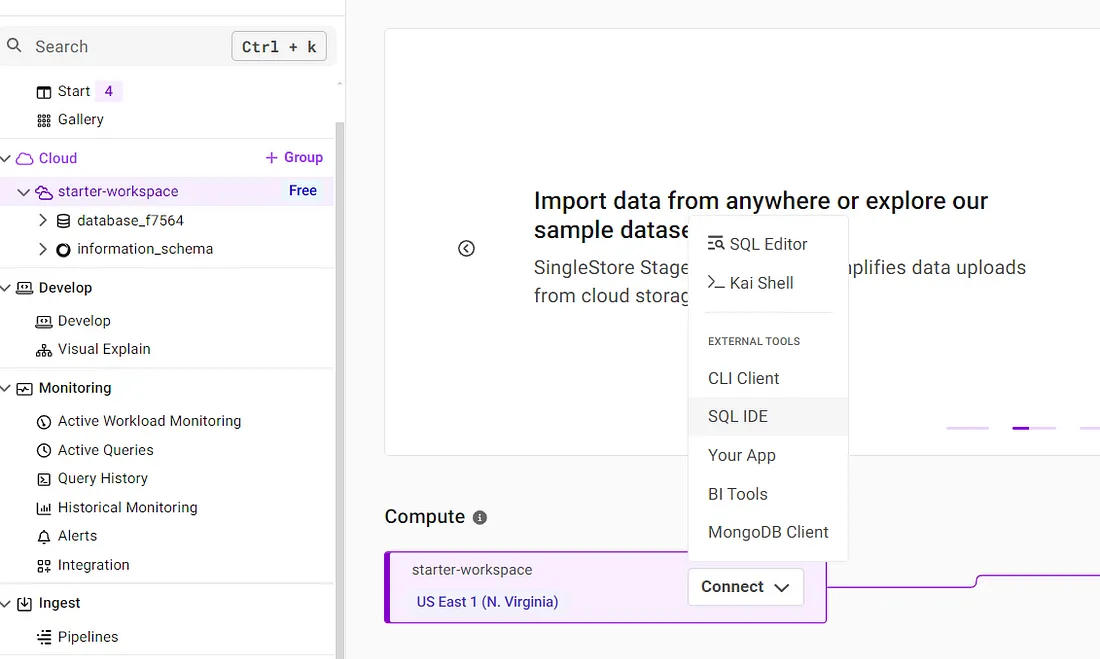
使用 SingleStore 的第一步是获取连接信息。连接信息包括用户名、密码、数据库名称、主机和端口,可以在连接到启动工作区时从任何客户端获取。

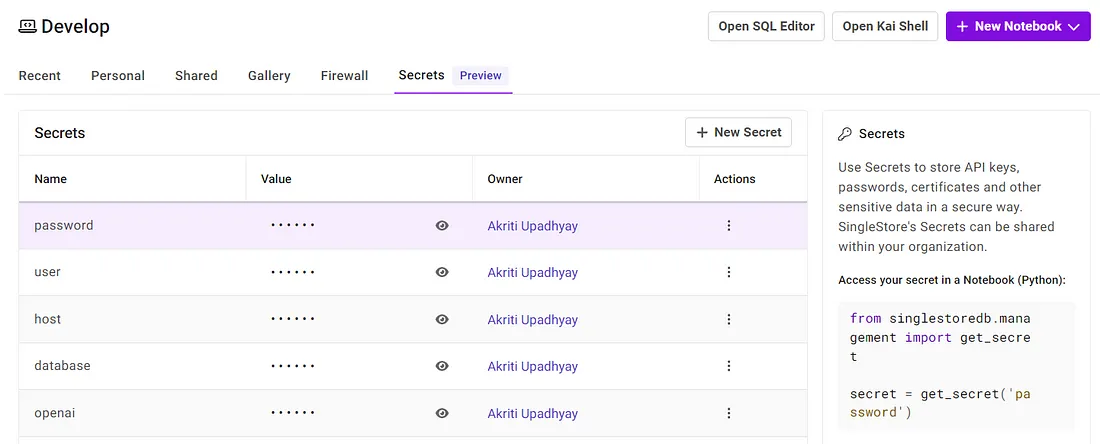
我从 SQL IDE 中获取了这些信息。我们可以将该信息保存在 Secrets 中。除了这些信息,我们还应该保存 OpenAI API 密钥,因为我们将使用 OpenAI 模型 GPT-4。

让我们找回秘密。
user = get_secret('user')
password = get_secret('password')
host = get_secret('host')
database = get_secret('database')
openai = get_secret('openai')
现在,我们将使用 Secrets 中保存的信息启动矢量存储。
vector_store = SingleStoreVectorStore(
    table_name="embeddings",
    content_field="content",
    metadata_field="metadata",
    vector_field="vector",
    host = host,
    port = "3333",
    database = database,
    user = user,
    password = password,
)
我们将把向量存储在存储上下文中,因为我们将使用它来创建向量索引。
storage_context = StorageContext.from_defaults(vector_store=vector_store)
接下来,我们将创建嵌入,这是创建向量存储索引所必需的。
embed_model = HuggingFaceEmbedding()
Settings.embed_model = embed_model
由于我们有 40 份 PDF 文件,我们将加载它们,并以字典格式为每份文件生成索引。这些索引将在创建向量存储索引后生成。向量存储索引将使用节点、存储上下文和句子分割器作为转换。
pdf_directory = "./AyurvedicData"
pdf_files = [file for file in os.listdir(pdf_directory) if file.endswith('.pdf')]
storage_base_dir = "./storage"
Settings.transformations = [SentenceSplitter(chunk_size=1024)]
def generate_storage_dir(file_name):
    base_name = os.path.splitext(file_name)[0]  # Remove extension
    safe_name = base_name.replace(' ', '_').replace('&', 'and')
    return os.path.join(storage_base_dir, safe_name)
all_indices_loaded = True
indices = {}
for pdf_file in pdf_files:
    try:
        storage_dir = generate_storage_dir(pdf_file)
        storage_context = StorageContext.from_defaults(persist_dir=storage_dir)
        index = load_index_from_storage(storage_context)
        indices[pdf_file] = index
    except Exception as e:
        print(f"Failed to load index for {pdf_file}: {e}")
        all_indices_loaded = False
if not all_indices_loaded:
    for pdf_file in pdf_files:
        if pdf_file not in indices:
            try:
                input_path = os.path.join(pdf_directory, pdf_file)
                docs = SimpleDirectoryReader(input_files=[input_path]).load_data()

                text_parser = SentenceSplitter(chunk_size=1024)
                text_chunks = []
                doc_idxs = []
                for doc_idx, doc in enumerate(docs):
                    cur_text_chunks = text_parser.split_text(doc.text)
                    text_chunks.extend(cur_text_chunks)
                    doc_idxs.extend([doc_idx] * len(cur_text_chunks))
                from llama_index.core.schema import TextNode
                nodes = []
                for idx, text_chunk in enumerate(text_chunks):
                    node = TextNode(text=text_chunk)
                    src_doc = docs[doc_idxs[idx]]
                    node.metadata = src_doc.metadata
                    nodes.append(node)

                vectorstoreindex = VectorStoreIndex(nodes = nodes, storage_context=storage_context,transformations=Settings.transformations,)
                index = vectorstoreindex.from_documents(docs)

                storage_dir = generate_storage_dir(pdf_file)
                index.storage_context.persist(persist_dir=storage_dir)

                indices[pdf_file] = index
            except Exception as e:
                print(f"Failed to process {pdf_file}: {e}")
现在,indices 变量包含所有已加载或新创建的索引。创建索引后,我们将初始化 LLM。在此过程中,我们使用的是 OpenAI 的 GPT-3.5。
llm = OpenAI(model="gpt-3.5-turbo")
Settings.llm = llm
对于索引中的每个项目,我们都将创建 HyDE 查询引擎。
query_engines={}
for pdf_name, index in indices.items():
    try:
        query_engine = index.as_query_engine(similarity_top_k=3)

        hyde = HyDEQueryTransform(include_original=True)

        hyde_query_engine = TransformQueryEngine(query_engine, hyde)

        query_engines[pdf_name] = hyde_query_engine

        print(f"HyDE query engine created for {pdf_name}")
    except Exception as e:
        print(f"An error occurred while creating query engine for {pdf_name}: {e}")
对于每个索引,我们将使用 HyDE 查询引擎实例化一个 QueryEngineTool。
query_engine_tools = []
for pdf_name, hyde_query_engine in query_engines.items():
    try:
        description = "Provides information about improving lifestyle, diet, and medicinal benefits using Ayurveda. Use a detailed plain text question as input to the tool."

        metadata = ToolMetadata(
            name=pdf_name.replace(".pdf", "").replace(" ", "_").lower(),
            description=description
        )

        tool = QueryEngineTool(
            query_engine=hyde_query_engine,
            metadata=metadata
        )

        query_engine_tools.append(tool)

        print(f"QueryEngineTool created for {pdf_name}")

    except Exception as e:
        print(f"An error occurred while creating QueryEngineTool for {pdf_name}: {e}")
现在,我们将启动代理输入组件。
def agent_input_fn(task: Task, state: Dict[str, Any]) -> Dict[str, Any]:state: Dict[str, Any]) -> Dict[str, Any]:
    """Agent input function.
    Returns:
        A Dictionary of output keys and values. If you are specifying
        src_key when defining links between this component and other
        components, make sure the src_key matches the specified output_key.
    """
    if "current_reasoning" not in state:
        state["current_reasoning"] = []
    reasoning_step = ObservationReasoningStep(observation=task.input)
    state["current_reasoning"].append(reasoning_step)
    return {"input": task.input}

agent_input_component = AgentInputComponent(fn=agent_input_fn)
我们定义了负责创建 ReAct 提示的代理组件。LLM 生成输出后,将其解析为结构化对象。到输入后,会使用 ReAct 代理提示调用 LLM。我们将使用 Chain -Of-Thought + Acting方法定义 ReAct Prompt 组件。
def react_prompt_fn(
    task: Task, state: Dict[str, Any], input: str, tools: List[BaseTool]
) -> List[ChatMessage]:
    chat_formatter = ReActChatFormatter()
    return chat_formatter.format(
        tools,
        chat_history=task.memory.get() + state["memory"].get_all(),
        current_reasoning=state["current_reasoning"],
    )

react_prompt_component = AgentFnComponent(
    fn=react_prompt_fn, partial_dict={"tools": query_engine_tools}
)
在 LLM 产生输出后,我们会遵循决策树流程:
- 如果产生了答案,我们就直接处理输出结果。
- 但是,如果指定了一个操作,我们就会使用指定的参数执行指定的工具,然后处理产生的输出。
为了处理代理的回复,我们将定义一些函数,这些函数最终将遵循决策树流程。
def parse_react_output_fn(
    task: Task, state: Dict[str, Any], chat_response: ChatResponse
):
    """Parse ReAct output into a reasoning step."""
    output_parser = ReActOutputParser()
    reasoning_step = output_parser.parse(chat_response.message.content)
    return {"done": reasoning_step.is_done, "reasoning_step": reasoning_step}

parse_react_output = AgentFnComponent(fn=parse_react_output_fn)

def run_tool_fn(
    task: Task, state: Dict[str, Any], reasoning_step: ActionReasoningStep
):
    """Run tool and process tool output."""
    tool_runner_component = ToolRunnerComponent(
        query_engine_tools, callback_manager=task.callback_manager
    )
    tool_output = tool_runner_component.run_component(
        tool_name=reasoning_step.action,
        tool_input=reasoning_step.action_input,
    )
    observation_step = ObservationReasoningStep(observation=str(tool_output))
    state["current_reasoning"].append(observation_step)
    return {"response_str": observation_step.get_content(), "is_done": False}

run_tool = AgentFnComponent(fn=run_tool_fn)

def process_response_fn(
    task: Task, state: Dict[str, Any], response_step: ResponseReasoningStep
):
    """Process response."""
    state["current_reasoning"].append(response_step)
    response_str = response_step.response
    state["memory"].put(ChatMessage(content=task.input, role=MessageRole.USER))
    state["memory"].put(
        ChatMessage(content=response_str, role=MessageRole.ASSISTANT)
    )
    return {"response_str": response_str, "is_done": True}

process_response = AgentFnComponent(fn=process_response_fn)

def process_agent_response_fn(
    task: Task, state: Dict[str, Any], response_dict: dict
):
    """Process agent response."""
    return (
        AgentChatResponse(response_dict["response_str"]),
        response_dict["is_done"],
    )

process_agent_response = AgentFnComponent(fn=process_agent_response_fn)
现在,我们将创建一个查询管道,并在其中添加已创建的组件作为模块。我们将在查询管道中添加链和链接。
qp = QueryPipeline(verbose=True)
qp.add_modules(
    {
        "agent_input": agent_input_component,
        "react_prompt": react_prompt_component,
        "llm": llm,
        "react_output_parser": parse_react_output,
        "run_tool": run_tool,
        "process_response": process_response,
        "process_agent_response": process_agent_response,
    }
)
qp.add_chain(["agent_input", "react_prompt", "llm", "react_output_parser"])
qp.add_link(
    "react_output_parser",
    "run_tool",
    condition_fn=lambda x: not x["done"],
    input_fn=lambda x: x["reasoning_step"],
)
qp.add_link(
    "react_output_parser",
    "process_response",
    condition_fn=lambda x: x["done"],
    input_fn=lambda x: x["reasoning_step"],
)
qp.add_link("process_response", "process_agent_response")
qp.add_link("run_tool", "process_agent_response")
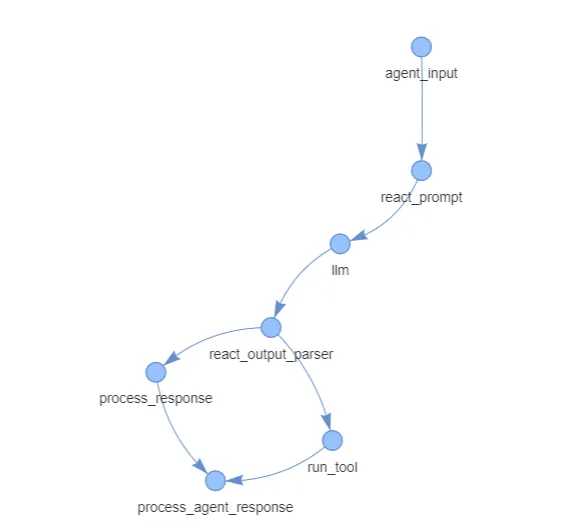
为了使查询管道可视化,我们将使用 Pyvis 库中的 Network。
net = Network(notebook=True, cdn_resources="in_line", directed=True)
net.from_nx(qp.clean_dag)
print(net)
结果管道如下。
{
    "Nodes": [
        "agent_input",
        "react_prompt",
        "llm",
        "react_output_parser",
        "run_tool",
        "process_response",
        "process_agent_response"
    ],
    "Edges": [
        {
            "src_key": null,
            "dest_key": null,
            "condition_fn": null,
            "input_fn": null,
            "width": 1,
            "from": "agent_input",
            "to": "react_prompt",
            "arrows": "to"
        },
        {
            "src_key": null,
            "dest_key": null,
            "condition_fn": null,
            "input_fn": null,
            "width": 1,
            "from": "react_prompt",
            "to": "llm",
            "arrows": "to"
        },
        {
            "src_key": null,
            "dest_key": null,
            "condition_fn": null,
            "input_fn": null,
            "width": 1,
            "from": "llm",
            "to": "react_output_parser",
            "arrows": "to"
        },
        {
            "src_key": null,
            "dest_key": null,
            "width": 1,
            "from": "react_output_parser",
            "to": "run_tool",
            "arrows": "to"
        },
        {
            "src_key": null,
            "dest_key": null,
            "width": 1,
            "from": "react_output_parser",
            "to": "process_response",
            "arrows": "to"
        },
        {
            "src_key": null,
            "dest_key": null,
            "condition_fn": null,
            "input_fn": null,
            "width": 1,
            "from": "run_tool",
            "to": "process_agent_response",
            "arrows": "to"
        },
        {
            "src_key": null,
            "dest_key": null,
            "condition_fn": null,
            "input_fn": null,
            "width": 1,
            "from": "process_response",
            "to": "process_agent_response",
            "arrows": "to"
        }
    ],
    "Height": "600px",
    "Width": "100%",
    "Heading": ""
}
我们将把网络保存为 HTML 文件并显示其内容。
net.write_html("agent.html")"agent.html")
with open("agent.html", "r") as file:
    html_content = file.read()
display(HTML(html_content))
下一步是围绕查询引擎设置代理 Worker。
agent_worker = QueryPipelineAgentWorker(qp)
agent = agent_worker.as_agent(
    callback_manager=CallbackManager([]), verbose=True
)
我们将创建代理任务并提出问题。
task = agent.create_task(
    "What are ayurvedic treatments and prevention of migraine?""What are ayurvedic treatments and prevention of migraine?"
)
step_output = agent.run_step(task.task_id)
print(step_output)
代理人会给出以下答案:
在Ayurveda中,治疗和预防偏头痛的重点是恢复身体各部位的平衡,尤其是 Vata 和 Kapha。预防措施包括避免白天睡觉、防寒(尤其是早晨)以及及时处理过敏性疾病。它还强调饮食限制,如避免酸奶、油腻食物、牛奶与酸性食物或鱼类的搭配。治疗方法包括使用草药来扩张毛细血管、减少液体渗出和促进液体过滤。主要的草药和化合物,如用于扩张毛细血管的 Guggulu、用于干燥渗出物的 Vachadi 和用于诱导清洁喷嚏的 Pippalishrita。此外,Shirashularivajrarasa 和 Sadbindutaila 等药方可用于恢复神经、动脉和静脉系统之间的协调,这对缓解和预防偏头痛发作至关重要。
让我们试试另一个问题。
task = agent.create_task(
    "What dosha does the person have if his skin is dry and thin, and he also has joint pains?""What dosha does the person have if his skin is dry and thin, and he also has joint pains?"
)
step_output = agent.run_step(task.task_id)
print(step_output)
代理人会给出以下答案:
如果一个人的皮肤又干又薄,同时还伴有关节疼痛,这表明他体内的瓦塔体质失衡。瓦塔掌管一切运动,与身体的干燥和寒冷有关。当 Vata 失衡时,会导致皮肤干燥、粗糙、关节不适等症状,表现为疼痛或僵硬。这些特征都是瓦塔体质升高的典型表现,需要加以平衡,以恢复身体的和谐并缓解症状。
结论
我发现在 SingleStore Notebooks 中使用 SingleStore 矢量数据库来构建阿育吠陀保健多 PDF 代理非常有趣。免费共享层很容易使用,我们看到它可以处理 40 本电子书。使用 SingleStore 免费共享层将此应用程序过渡到生产环境也很容易。


