Microsoft Phi3 Vision:文档OCR数据提取(第2部分)
这是对微软开发的 Phi3 LLM 作为身份证、驾驶执照或健康保险卡等个人文件图像的 OCR 功能进行探索的第二部分。
在第1部分中,将 Phi3 模型应用于制作精良且无瑕疵的文档图像。在这种情况下,文档色彩鲜艳、处理良好、不模糊,亮度和对比度理想。也展示了在这些条件下,Phi3 模型能够以零拍摄提示提取文档数据,而无需进行微调。
在实际应用中,OCR 方法通常用于复印或扫描的文档,这些文档可能会旋转、模糊、太暗或太亮。
在这些情况下,文档的质量比理想质量差,因此模型提取正确数据的能力也可能下降。接下来,我将探讨该模型从身份证文档的低质量图像中提取数据的能力。此外,我将应用一些常见的计算机视觉技术来恢复图像的质量,然后我将再次检查该模型的提取能力是否有所提高。
1) 加载模型
正如第1部分所解释的那样,模型是通过以下脚本从 Huggingface 加载的。然后,我使用函数 model_inference(模型推理)将模型应用到图像上,并根据任务使用自定义提示。
# Import necessary libraries
from PIL import Image
import requests
from transformers import AutoModelForCausalLM
from transformers import AutoProcessor
from transformers import BitsAndBytesConfig
import torch
from IPython.display import display
import time

# Define model ID
model_id = "microsoft/Phi-3-vision-128k-instruct"
# Load processor
processor = AutoProcessor.from_pretrained(model_id, trust_remote_code=True)
# Define BitsAndBytes configuration for 4-bit quantization
nf4_config = BitsAndBytesConfig(
    load_in_4bit=True,
    bnb_4bit_quant_type="nf4",
    bnb_4bit_use_double_quant=True,
    bnb_4bit_compute_dtype=torch.bfloat16,
)
# Load model with 4-bit quantization and map to CUDA
model = AutoModelForCausalLM.from_pretrained(
    model_id,
    device_map="cuda",
    trust_remote_code=True,
    torch_dtype="auto",
    quantization_config=nf4_config,
)
def model_inference(messages, path_image):

    start_time = time.time()

    image = Image.open(path_image)
    # Prepare prompt with image token
    prompt = processor.tokenizer.apply_chat_template(
        messages, tokenize=False, add_generation_prompt=True
    )
    # Process prompt and image for model input
    inputs = processor(prompt, [image], return_tensors="pt").to("cuda:0")
    # Generate text response using model
    generate_ids = model.generate(
        **inputs,
        eos_token_id=processor.tokenizer.eos_token_id,
        max_new_tokens=500,
        do_sample=False,
    )
    # Remove input tokens from generated response
    generate_ids = generate_ids[:, inputs["input_ids"].shape[1] :]
    # Decode generated IDs to text
    response = processor.batch_decode(
        generate_ids, skip_special_tokens=True, clean_up_tokenization_spaces=False
    )[0]

    display(image)
    end_time = time.time()
    print("Inference time: {}".format(end_time - start_time))
    # Print the generated response
    print(response)
2) 标准图像和测试图像上的应用
我考虑了两张不同身份证件的图像。第一张称为标准图像,第二张称为测试图像。这两张图像都是从网上下载的。标准图像在可读性、布局、对比度和亮度方面都是理想的参考。Phi3 模型提取了这两张证件的所有数据。

在标准和测试身份证图像上使用以下提示,我获得了
prompt_cie_front = [{"role": "user", "content": "<|image_1|>\nOCR the text of the image. Extract the text of the following fields and put it in a JSON format: \
'COMUNE DI/ MUNICIPALITY', 'COGNOME /SURNAME', 'NOME/NAME', 'LUOGO E DATA DI NASCITA/\
PLACE AND DATE OF BIRTH', 'SESSO/SEX', 'STATURA/HEIGHT', 'CITADINANZA/NATIONALITY',\
'EMISSIONE/ ISSUING', 'SCADENZA /EXPIRY'. Read the code at the top right and put in in the JSON field 'CODE'"}]
# Download image from URL
path_image = "/home/randellini/llm_images/resources/cie_fronte_standard.jpg"
# inference
model_inference(prompt_cie_front, path_image)
# RESULT OF STANDARD IMAGE
{
  "COMUNE DI/ MUNICIPALITY": "CAIRO MONTENOTTE",
  "COGNOME /Surname": "LAMBERTINI",
  "NOME/NAME": "PAOLO",
  "LUOGO E DATA DI NASCITA/PLACE AND DATE OF BIRTH": "CAIRO MONTENOTTE (SV) 09.09.1956",
  "SESSO/SEX": "M",
  "STATURA/HEIGHT": "176",
  "CITADINANZA/NATIONALITY": "ITA",
  "EMISSIONE/ ISSUING": "30.01.2018",
  "SCADENZA /EXPIRY": "09.09.2028",
  "CODE": "404749"
}
# RESULT OF TEST IMAGE
{
  "COMUNE DI/ MUNICIPALITY": "SERENELLA MARITTIMA",
  "COGNOME /SURNAME": "ROSSI",
  "NOME/NAME": "BIANCA",
  "LUOGO E DATA DI NASCITA/PLACE AND DATE OF BIRTH": "PINO SULLA SPONDA DEL LAGO MAGGIORE (VA) 30.12.1964",
  "SESSO/SEX": "F",
  "STATURA/HEIGHT": "180",
  "CITADINANZA/NATIONALITY": "ITA",
  "EMISSIONE/ ISSUING": "30.05.2012",
  "SCADENZA /EXPIRY": "30.12.2022",
  "CODE": "CA00000AA"
}
只是一点说明。标准图像的代码被遮住了,因此模型会提取右下角的数字。这不是问题,因为标准图像被用作文件布局、缩放和颜色分布的参考。
3) 测试图像转换
为了模拟现实生活中扫描或复印文档质量较低的不同情况,我对测试图像进行了不同的变换。使用 Albumentations 库,我对测试图像进行了旋转、模糊、灰度调整、亮度和对比度改变等处理。
import cv2
import albumentations as A
import argparse

transform = A.Compose([
    A.RandomBrightnessContrast(brightness_limit=0.5, contrast_limit=0.5, p=1),
    A.RandomGamma(p=1),
    A.ShiftScaleRotate(shift_limit=0.065, scale_limit=0.7, rotate_limit=90, p=1),
    A.Blur(blur_limit=7, p=1),
])

to_gray = False # False or True
image = cv2.imread(path_original_image)
image = cv2.cvtColor(image, cv2.COLOR_BGR2RGB)
# add padding
image = cv2.copyMakeBorder(image, top=350, bottom=350, left=200, right=200, borderType=0)
# add transformations
modified_image = transform(image=image)['image']
modified_image = cv2.cvtColor(modified_image, cv2.COLOR_RGB2BGR)
if to_gray:
    modified_image = cv2.cvtColor(modified_image, cv2.COLOR_BGR2GRAY)
# save the image
cv2.imwrite(path_modified_image, modified_image)
用黑色遮罩填充原始图像后,我得到了以下九张不同的图像
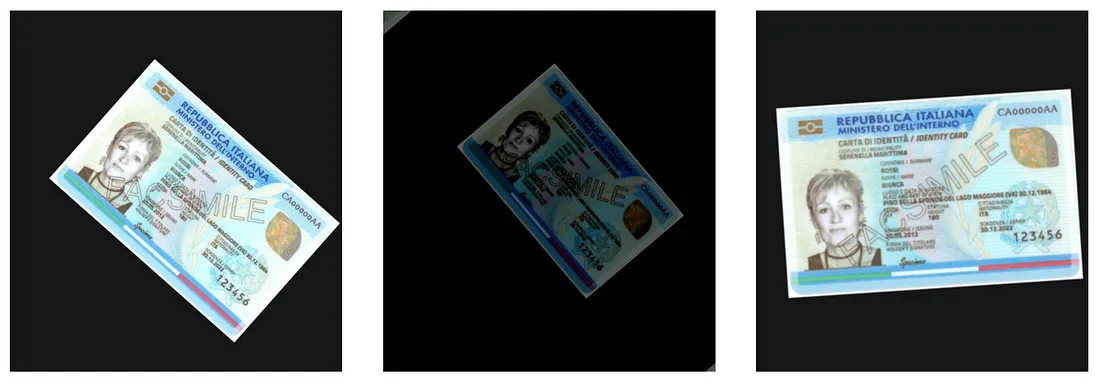
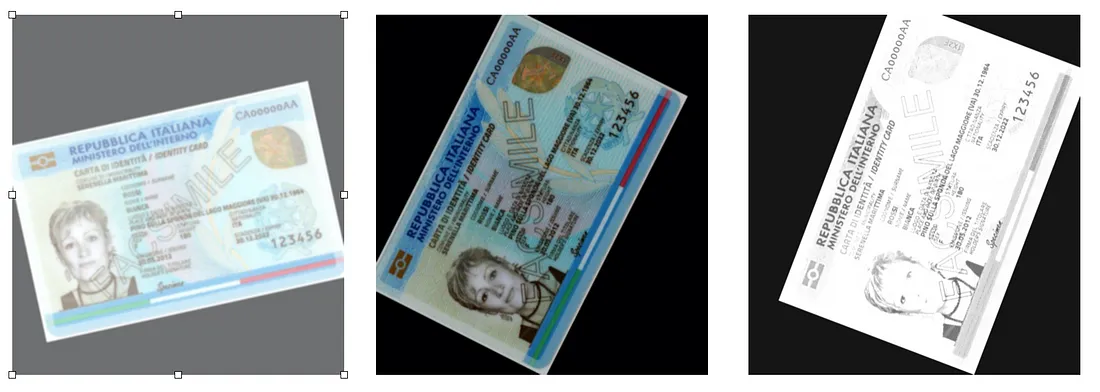
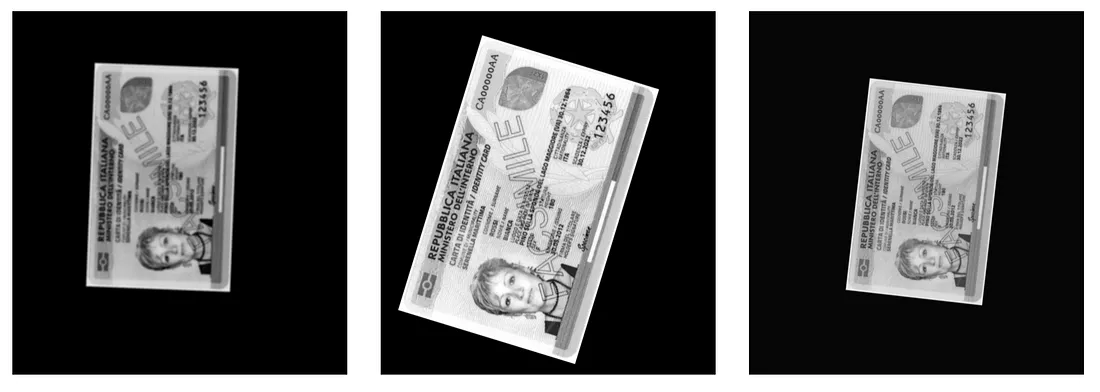
你可以在不更改提示的情况下对修改后的图像应用 Phi3 模型来验证,提取的值是不完整或错误的。为了提取转换后图像字段的正确值,我们必须应用一些计算机视觉技术,使这些图像更好看、更易读。
4) 测试图像的质量恢复
在下文中,我将介绍三种非深度学习计算机视觉技术,我们可以对修改后的图像依次应用这些技术来恢复图像质量,并使其与标准图像保持一致。所有这些技术都可以使用 OpenCV 软件包。
a) SIFT
SIFT 是 Scale-Invariant Feature Transform(尺度不变特征变换)的缩写。其核心在于能够检测出与尺度和方向无关的关键点。有了这种算法,就可以找到参考图像和变换图像的相关关键点。因此,一旦确定了相同的关键点,就可以旋转和缩放第二幅图像,使其与参考图像对齐并调整大小。
import cv2
import numpy as np
import matplotlib.pyplot as plt
import argparse
import os
def load_image(path):
    return cv2.imread(path, cv2.IMREAD_COLOR)
def detect_and_compute_keypoints(image):
    gray = cv2.cvtColor(image, cv2.COLOR_BGR2GRAY)
    sift = cv2.SIFT_create()
    keypoints, descriptors = sift.detectAndCompute(gray, None)
    return keypoints, descriptors
def match_keypoints(descriptors1, descriptors2):
    bf = cv2.BFMatcher()
    matches = bf.knnMatch(descriptors1, descriptors2, k=2)
    # Apply ratio test
    good_matches = []
    for m, n in matches:
        if m.distance < 0.75 * n.distance:
            good_matches.append(m)
    return good_matches

# Metrics and plots
def plot_matches(img1, img2, kp1, kp2, matches, path_save_plot):
    matched_image = cv2.drawMatches(img1, kp1, img2, kp2, matches, None, flags=cv2.DrawMatchesFlags_NOT_DRAW_SINGLE_POINTS)
    plt.imshow(matched_image)
    plt.title("SIFT Feature Matching - number matches " + str(len(matches)))
    plt.savefig(path_save_plot)

def get_matched_points(keypoints1, keypoints2, matches):
    points1 = np.zeros((len(matches), 2), dtype=np.float32)
    points2 = np.zeros((len(matches), 2), dtype=np.float32)
    for i, match in enumerate(matches):
        points1[i, :] = keypoints1[match.queryIdx].pt
        points2[i, :] = keypoints2[match.trainIdx].pt
    return points1, points2
def compute_homography(points1, points2):
    h, mask = cv2.findHomography(points2, points1, cv2.RANSAC)
    return h
def warp_image(image, h, shape):
    height, width = shape[:2]
    warped_image = cv2.warpPerspective(image, h, (width, height))
    return warped_image

if __name__ == "__main__":
    parser = argparse.ArgumentParser()
    parser.add_argument('--path_standard_image', default="resources/cie_fronte_standard.jpg", type=str)
    parser.add_argument('--dir_aligned_images', default="resources/aligned_sift", type=str)
    parser.add_argument('--path_modified_image', type=str)
    opt = parser.parse_args()
    path_standard_image = opt.path_standard_image
    dir_aligned_images = opt.dir_aligned_images
    path_modified_image = opt.path_modified_image
    file_mod_image = path_modified_image.split("/")[-1]
    name_mod_image = file_mod_image.split(".")[0]
    path_save_plot = os.path.join(dir_aligned_images, name_mod_image + "_matches.png")
    path_save_aligned_image = os.path.join(dir_aligned_images, file_mod_image)
    # Load images
    image1 = load_image(path_standard_image)
    image2 = load_image(path_modified_image)
    # Find keypoints and descriptors
    keypoints1, descriptors1 = detect_and_compute_keypoints(image1)
    keypoints2, descriptors2 = detect_and_compute_keypoints(image2)
    # Matching keypoints
    matches = match_keypoints(descriptors1, descriptors2)
    print(f"Number of keypoints in the original image: {len(keypoints1)}")
    print(f"Number of keypoints in the rotated image: {len(keypoints2)}")
    print(f"Number of good matches: {len(matches)}")
    # Plot matching
    plot_matches(image1, image2, keypoints1, keypoints2, matches, path_save_plot)
    # Extract correspondences
    points1, points2 = get_matched_points(keypoints1, keypoints2, matches)
    # Calculate homography
    h = compute_homography(points1, points2)
    # Rotation and transformation of the second image
    aligned_image2 = warp_image(image2, h, image1.shape)
    # Save the second image
    cv2.imwrite(path_save_aligned_image, aligned_image2)
下图左侧显示的是通过 SIFT 算法找到的标准图像和测试图像之间的共同关键点。右边是经过旋转和缩放的测试图像。我们可以注意到,在某些情况下,如图 中的 cie_fronte_mod7.jpg,由于测试图像的质量较低,匹配关键点的数量较少。因此,旋转和缩放后的图像也不是完全对齐和可读的。


b) 去除模糊
旋转和缩放后,图像可能会变得模糊。模糊会使图像变得平滑,从而丢失边缘细节。在这种情况下,我们可以测量模糊的程度,如果模糊程度超过某个阈值,我们就可以去除模糊,使图像不再模糊。
因此,如果模糊量超过了阈值,我们就可以按照脚本中的说明,应用滤波器去除模糊。
import numpy as np
import cv2
import argparse
import os
threshold = 100
'https://pyimagesearch.com/2015/09/07/blur-detection-with-opencv/'

def variance_of_laplacian(image):
 # compute the Laplacian of the image and then return the focus
 # measure, which is simply the variance of the Laplacian
 gray = cv2.cvtColor(image, cv2.COLOR_BGR2GRAY)
 return cv2.Laplacian(gray, cv2.CV_64F).var()

def unblur(image):
 # Create the sharpening kernel
 kernel = np.array([[0, -1, 0], [-1, 5, -1], [0, -1, 0]])
 # Sharpen the image
 unblur_image = cv2.filter2D(image, -1, kernel)
 return unblur_image

if __name__ == "__main__":
 parser = argparse.ArgumentParser()
 parser.add_argument('--path_blur_image', type=str)
 parser.add_argument('--dir_unblurred_image', default="resources/aligned_sift_unblurred", type=str)
 opt = parser.parse_args()
 path_blur_image = opt.path_blur_image
 dir_unblurred_image = opt.dir_unblurred_image
 file_image = path_blur_image.split("/")[-1]
 # load the image
 image = cv2.imread(path_blur_image)
 #calculate the fm for the first time
 fm = variance_of_laplacian(image)
 # loop until fm is bigger then the threshold
 iter = 0
 while fm < threshold:
  # unblur the image
  image = unblur(image)
  iter += 1
  # calculate the focus measure of the new image
  fm = variance_of_laplacian(image)
 # Save the image
 print("iter: {} - fm: {}".format(iter, fm))
 path_unblurred_image = os.path.join(dir_unblurred_image,file_image)
 cv2.imwrite(path_unblurred_image, image)
如下图所示,在某些情况下,模糊去除效果很好,数据的可读性更高。另一方面,有些情况下,如图 中的 cie_fronte_mod7.jpg,虽然能观察到微小的变化,但不足以使数据变得可读。


c) 对比度和亮度调整
去除模糊后,我们可以对修改后的图像进行的第三个清洁操作是改变对比度和亮度,使其值与标准图像的值相一致。我们可以使用以下脚本来完成这项操作。
import cv2
import numpy as np
import argparse
import os

def calculate_brightness_and_contrast(image):
    # Convert image to grayscale
    gray = cv2.cvtColor(image, cv2.COLOR_BGR2GRAY)
    # Calculate brightness (mean)
    brightness = np.mean(gray)
    # Calculate contrast (standard deviation)
    contrast = np.std(gray)
    return brightness, contrast

def adjust_brightness_and_contrast(image, target_brightness, target_contrast):
    # Convert image to grayscale
    gray = cv2.cvtColor(image, cv2.COLOR_BGR2GRAY)
    # Calculate current brightness and contrast
    current_brightness, current_contrast = calculate_brightness_and_contrast(image)
    # Calculate scaling factor and offset
    if current_contrast != 0:
        scaling_factor = target_contrast / current_contrast
    else:
        scaling_factor = 1
    offset = target_brightness - scaling_factor * current_brightness
    # Adjust brightness and contrast
    adjusted_image = cv2.convertScaleAbs(image, alpha=scaling_factor, beta=offset)
    return adjusted_image

if __name__ == "__main__":
    parser = argparse.ArgumentParser()
    parser.add_argument('--path_test_image', type=str)
    parser.add_argument('--path_standard_image', default="resources/cie_fronte_standard.jpg", type=str)
    parser.add_argument('--dir_clean_image', default="resources/cleaned_images", type=str)
    opt = parser.parse_args()
    path_test_image = opt.path_test_image
    path_standard_image = opt.path_standard_image
    dir_clean_image = opt.dir_clean_image
    file_image = path_test_image.split("/")[-1]
    # Load the images
    standard_image = cv2.imread(path_standard_image)
    image_to_adjust = cv2.imread(path_test_image)
    # Calculate brightness and contrast of the standard image
    standard_brightness, standard_contrast = calculate_brightness_and_contrast(standard_image)
    # Adjust the second image
    adjusted_image = adjust_brightness_and_contrast(image_to_adjust, standard_brightness, standard_contrast)
    # Save the adjusted image
    cv2.imwrite(os.path.join(dir_clean_image, file_image), adjusted_image)
如下图所示,起始图像与对比度和亮度与参考图像一致的图像之间的差异很小。此外,在文件数据难以读取的情况下,如图 中的 cie_fronte_mod7.jpg 图像,整体质量并没有得到改善。


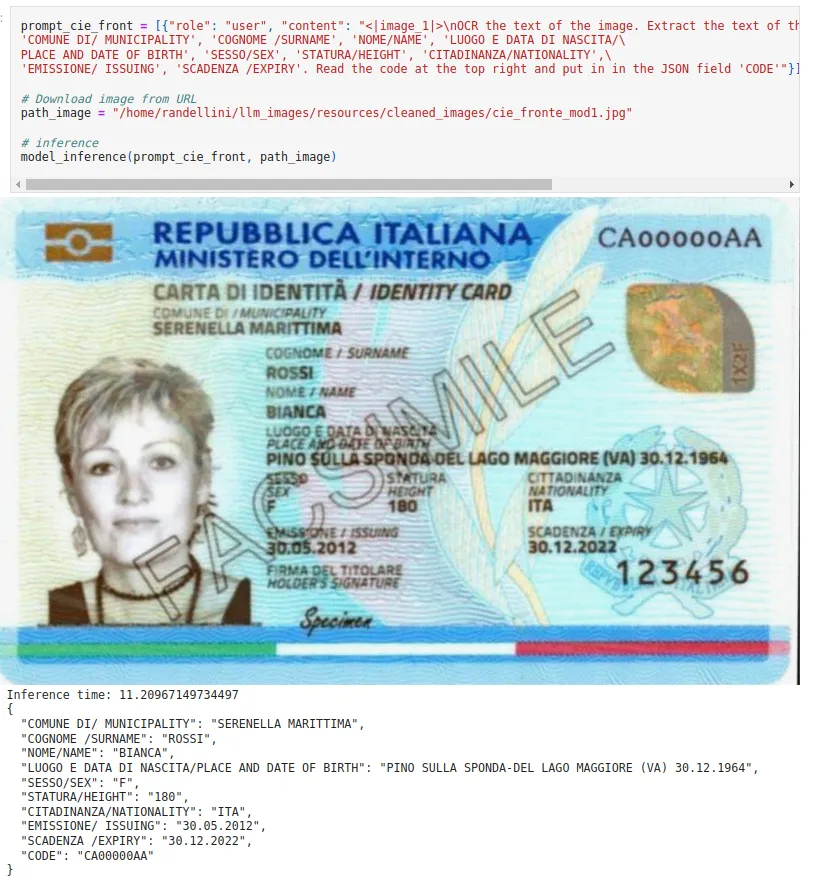
5) 对齐图像上的 Phi3 模型
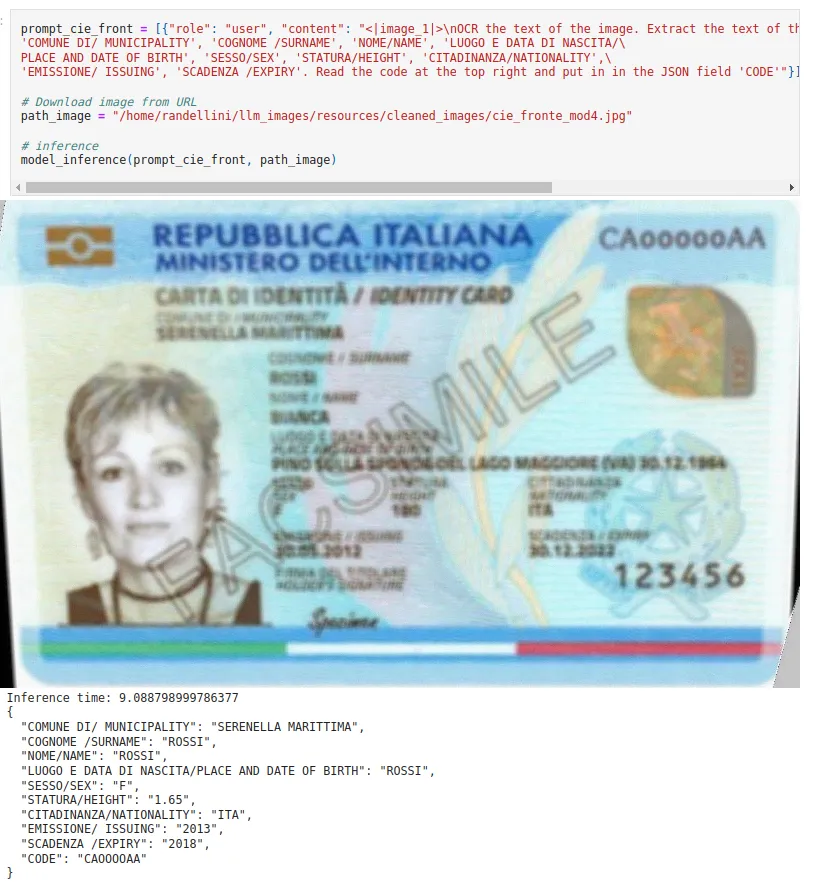
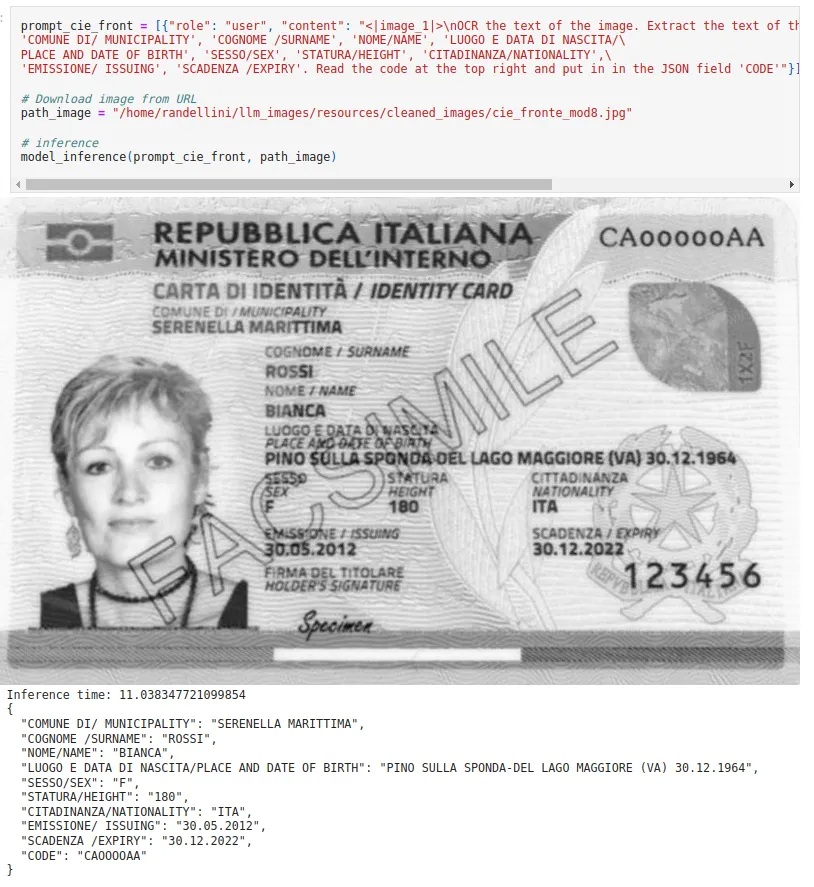
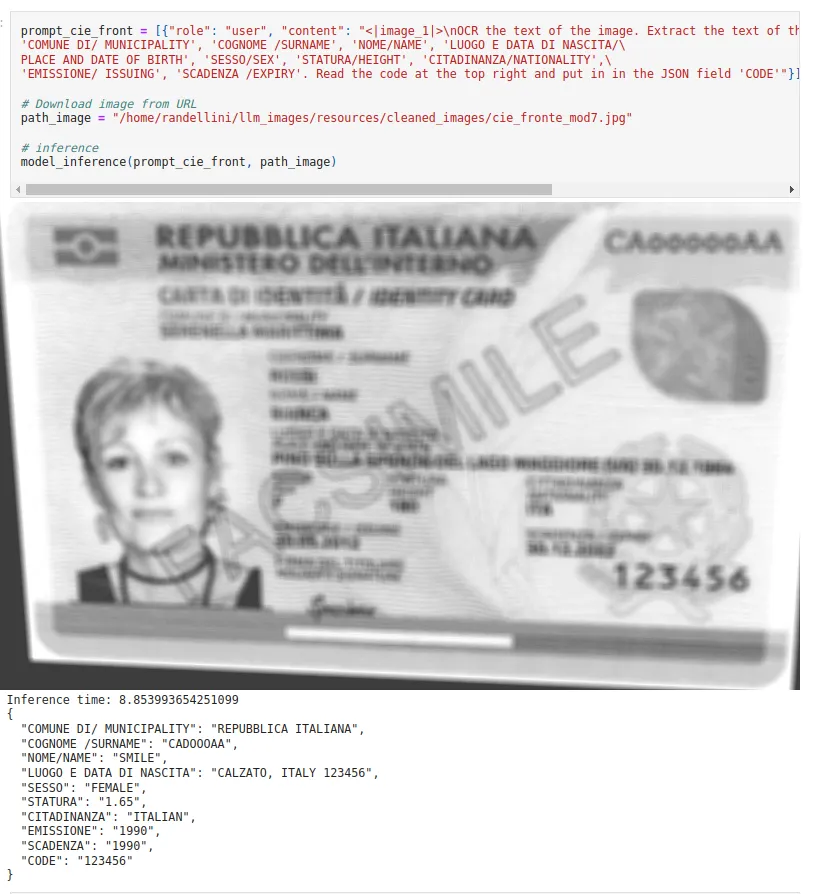
清理完测试图像后,我们就可以检查 Phi3 模型能否提取出正确的数据了。以下是一些例子。我们可以注意到,在图像质量得到恢复的情况下,提取的数值是正确的。然而,在某些情况下,清理过程并不充分。例如,cie_fronte_mod4.jpg 和 cie_fronte_mod7.jpg 图像仍然无法读取,模型无法提取数据。
【相关文章】:Microsoft Phi3 Vision:文档OCR数据提取


