【指南】如何从头开始构建自己的自定义8位量化器
使用 PyTorch 从头开始构建自定义 8 位量化器并量化 facebook/opt-350m 的分步方法。

在这篇文章中,我们将使用我们最喜欢的 PyTorch 从头开始构建一个自定义 8 位量化器。我们将其称为MYQ 8 位(我的量化器),让它听起来更有趣。以下是我们实现目标的分步攻击计划。
- 步骤 1:我们将构建一个 MYQ 8 位量化器类和相关函数。
- 步骤 2:我们将从 Hugging Face 中获取模型。我们将选择名为 facebook/opt-350m 的基础模型,因为这是一个相对较小的模型,因此执行量化和验证结果会更快。
- 步骤 3:我们将使用在步骤 1 中构建的 MYQ 8 位量化器对我们的基础模型执行量化。然后,我们将验证新的量化模型大小并执行推理以观察生成的输出。
- 步骤 4:这是额外的步骤。我将在本文末尾分享 4 位量化器的完整源代码,并解释我用于构建此 4 位量化器的技术。你可以使用该代码并进一步增强它以满足你的用例。
步骤 1:构建 MYQ 8 位量化器类
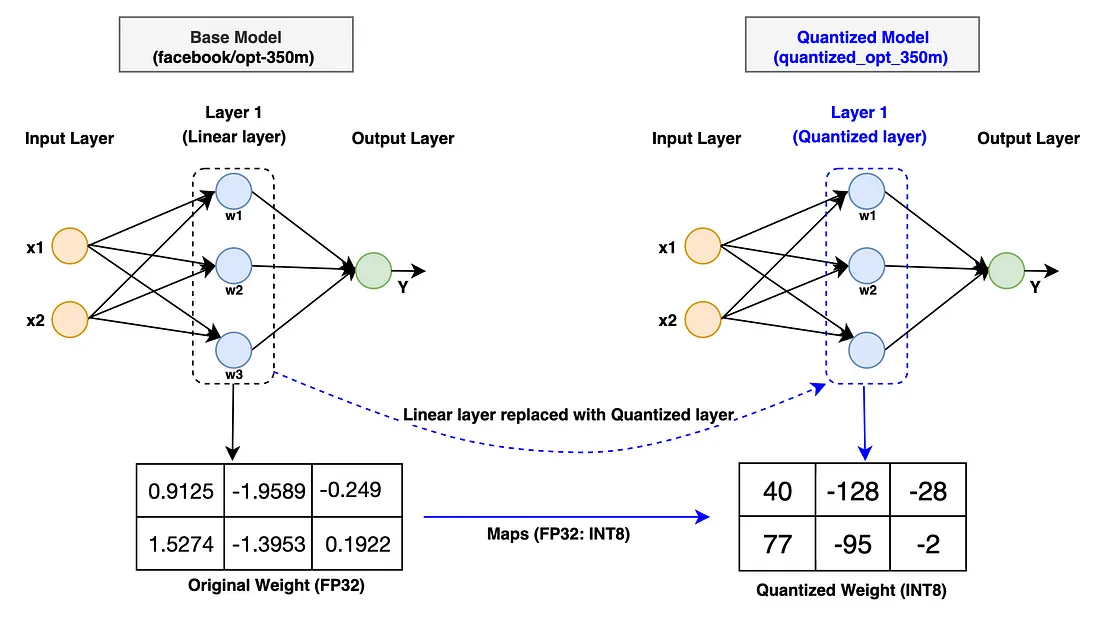
量化算法在深度神经网络内部的粒度级别上如何发挥作用?让我们看看下面的图表来加深我们的理解。

如果你看一下上面的图表,我们可以用一行总结整个过程“用量化模型中的量化层替换基础模型中的线性层”。这样做很简单。让我先用指针解释整个过程,然后我们一起编写代码。
- 我们首先创建一个名为QuantizedLinearLayer的类,该类复制基础模型线性层的所有特征。我们必须这样做,因为我们的目标是稍后用我们的 QuantizedLinearLayer 替换它。
- QuantizedLinearLayer 类需要使用 in_features、out_features 和 bias 进行初始化,就像基础模型中的线性层一样。
- 然后,我们将创建一个前向函数,其工作原理与深度神经网络中的激活函数类似。它实现了 PyTorch 的内置线性函数 (torch.nn. functional.linear),该函数复制了原始基础模型中的线性函数。
- 最后,我们将在 QuantizedLinearLayer 中创建最重要的函数,称为quantize。此函数负责从基础模型中获取 fp16 中的权重并将其转换为 int-8。为简单起见,我们仅量化权重参数,并使用对称线性量化方法来构建我们的量化器。
现在,我们准备编写代码来创建 QuantizedLinearLayer。我在每一行代码上都提供了注释来解释代码,希望这能帮助你更好地理解代码。
# Make sure to install these two libraries
# !pip install transformers
# !pip install -U "huggingface_hub[cli]"  #For hugging face authentication
# First of all, import all the necessary libraries.
import torch
import torch.nn as nn
import torch.nn.functional as F
from transformers import AutoTokenizer, AutoModelForCausalLM, pipeline
# Since we're taking basemodel-facebook/opt-350m from huggingface,
# we must authenticate first. Please create your own token with huggingface
!huggingface-cli login --token hf_THkbLhyIHHmluGkwwnzpXOvR##########
# Define QuantizedLinearLayer class
class QuantizedLinearLayer(nn.Module):
    # As our target is to replace the linear layer from the base model. We must use the same parameters
    # such as in_features, out_features, bias = True, dtype=torch.float32, The dtype is a type of bias
    def __init__(self, in_features, out_features, bias = True, dtype=torch.float32):
        super().__init__()
        # Note that we're using self.register_buffer to store parameter variable value. This is because if we use nn.Parameter, the network will start calculating the gradient.
        # We don't want that as we're not using this for training.
        # weight will be initialized randomly between (-128, 127) which is a range of signed int-8
        self.register_buffer("weight", torch.randint(-128, 127, (out_features, in_features)).to(torch.int8))
        # scale will have dimension and data type same as the output as this will be multiplied to the output of linear layer
        self.register_buffer("scale", torch.randn((out_features), dtype=dtype))
        # bias is an optional parameter, so we only add it if is not none.
        # bias dimension is (1, out_features) as it can later broadcasted during addition.
        if bias:
            self.register_buffer("bias", torch.randn((1, out_features), dtype=dtype))
        else:
            self.bias = None
  # 8-bit quantization function
    def quantize(self, weight):
        # Clone the weight and outcast it to fp32 which is necessary to calculate the scale as both types must be in fp32
        weight_f32 = weight.clone().to(torch.float32)
        # calculating the min and max of int-8 quantized range. qmin=-128, qmax=127
        Qmin = torch.iinfo(torch.int8).min
        Qmax = torch.iinfo(torch.int8).max
        # calculating per channel scale
        # In per channel scale, you'll be calculating the scale for every row. So, you'll store the scale in a tensor in this case.)
        # In per tensor scale, you'll calculate one scale for entire tensor. Per channel will be more accurate but take more memory footprint as it has to store more scale value.
        # weight_f32.abs().max(dim=-1).values -> this give the max-value for original weight value range in fp32.
        scale = weight_f32.abs().max(dim=-1).values/127
        scale = scale.to(weight.dtype)
        # This gives the quantized weight value for the given weight tensor.
        # This formula was derived from symmetric quantization. please read the link I've shared above if you want to learn in detail.
        quantized_weight = torch.clamp(torch.round(weight/scale.unsqueeze(1)), Qmin, Qmax).to(torch.int8)
        self.weight = quantized_weight
        self.scale = scale

    def forward(self, input):
        # This gives the output the same way as the linear function in the base model.
        # The only difference is that the weight value is now the quantized weight value.
        # Hence, this gives less processing by faster calculation and less memory utilization.
        output = F.linear(input, self.weight.to(input.dtype)) * self.scale
        if self.bias is not None:
            output = output + self.bias
        return output
现在,我们已经定义了 QuantizedLinearLayer 类,我们将创建一个函数,用我们的 QuantizedLinearLayer 类替换基础模型 LinearLayer 类。开始吧
def replace_linearlayer(base_model, quantizer_class, exclude_list, quantized=True):
    # Finding only the instance of base_model which has the linear layer
    # Also we have to make sure to exclude those linearlayer that are in the exclude list.
    for name, child in base_model.named_children():
        if isinstance(child, nn.Linear) and not any([x == name for x in exclude_list]):
            old_bias = child.bias
            old_weight = child.weight
            in_features = child.in_features
            out_features = child.out_features
          # This is the stage where we'll initialize the quantizer class with the in_features, out_features, bias and dtype.
          # The base_model parameters values are given to the quantizer class parameters.
            quantizer_layer = quantizer_class(in_features, out_features, old_bias is not None, old_weight.dtype)
          # After the quantizer class is initialized, The replacement takes place as below.
            setattr(base_model, name, quantizer_layer)
          # Now that after replacement, base_model linear layer is now a quantizer layer.
          # We can now call the quantize_layers quantize function to quantize the old_weights of FP16 new quantized weights of int8 type.
            if quantized:
                getattr(base_model, name).quantize(old_weight)
          # If bias is not none, we'll also update bias with the base model bias value
            if old_bias is not None:
                getattr(base_model, name).bias = old_bias
        # If the base model child instance has further sub-components with linear layers, we'll have to quantize them by calling the replace_linear_layer function with the child as base_model now.
        # This will replace all the linear layers with quantized layers that are under the child sub-section.
        else:
            replace_linearlayer(child, quantizer_class, exclude_list, quantized=quantized)
步骤 2:现在我们已经创建了量化器,让我们从hugging face获取基础模型(facebook/opt-350m)。请确保拥有hugging face的账户,并使用自己的授权令牌。过程很简单,而且免费。
# Take note that we'll be downloading the model in bfloat16 instead of its original fp32 datatype.
# This will reduce the size of the base model and our quantization time later.
tokenizer = AutoTokenizer.from_pretrained("facebook/opt-350m")
model = AutoModelForCausalLM.from_pretrained("facebook/opt-350m", torch_dtype=torch.bfloat16)
print("facebook/opt-350m: base model architecture before quantization")
print("-"*50)
print(model)

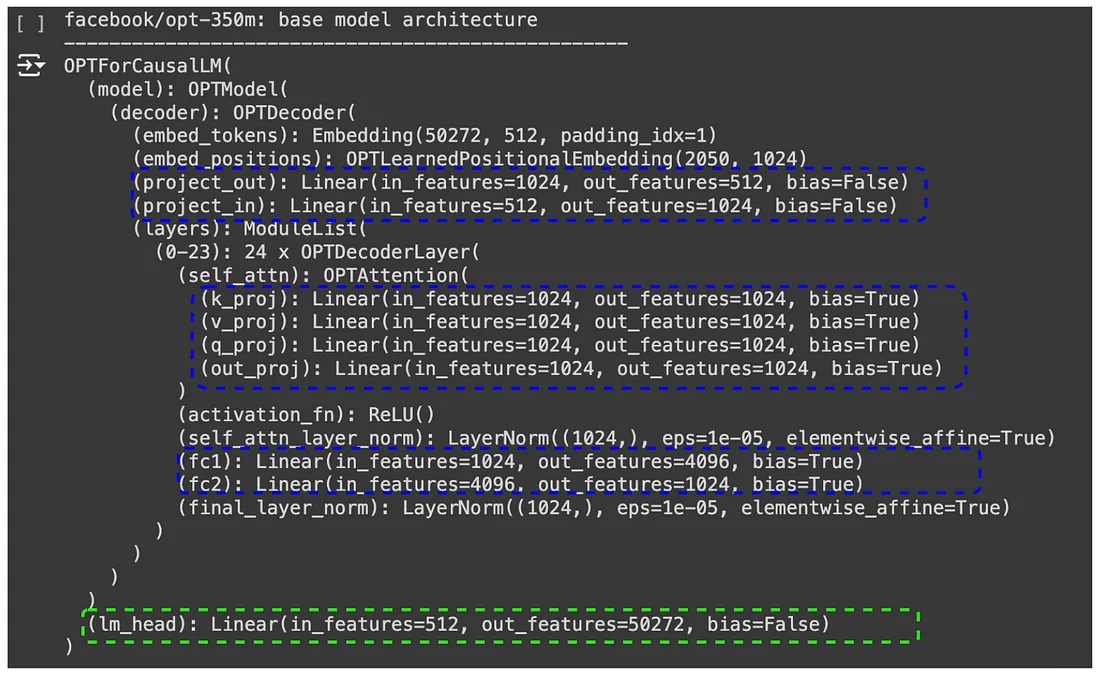
在上述基本模型结构中,蓝色虚线框内的所有线性层都将替换为量化层,而绿色虚线框内的层将被排除在外。LLM 模型由许多相互连接的转换层组成,每一层的输出层都是下一层的输入层。因此,量化最外层可能会影响模型的整体精度。因此,更好的办法是将其排除在外。
让我们检查一下量化前基础模型的大小。其大小为 0.66 GB(662 MB)。
# check the size of this base model before quantization
model_memory_size_before_quantization = model.get_memory_footprint()
print(f"Total memory size before quantization (in GB): {model_memory_size_before_quantization / 1e+9}")

让我们对这个 facebook/opt-350m 基本模型进行推理。
# Let's perform inference on this facebook/opt-350m base model
pipe = pipeline("text-generation", model=model, tokenizer=tokenizer)
pipe("Malaysia is a beautiful country and ", max_new_tokens=50)

步骤 3:现在我们运行 replace_linearlayer 函数。它将完成两项重要任务。
- 它调用量化器类,量化线性层中除排除列表中的权重外的所有权重。
- 然后,它会用量化后的层替换所有线性层,排除列表中的层除外。
让我们编写一段运行 replace_linearlayer 函数的代码。
# model: base_model, QuantizedLinearLayer: quantized layer we've created in step 1, ["lm_head"]: exclude list
# quantized=True: If we set quantized value to False, the quantizer will only replace the linear layer with quantized layer but it won't quantized the weight.
# We'll need this if we're to save the quantized model to say huggingface or other cloud provider.
# Later, any user can download this quantized model and create the base model skeleton in order to load the model.
replace_linearlayer(model, QuantizedLinearLayer, ["lm_head"], quantized=True)
print("facebook/opt-350m: quantized model architecture")
print("-"*50)
print(model)

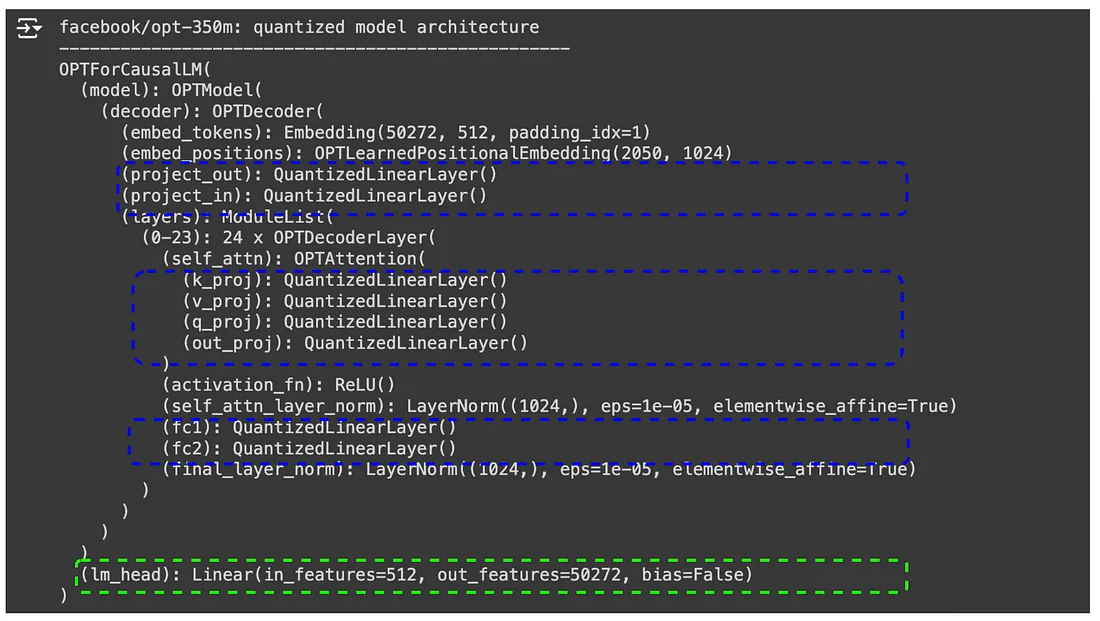
在上面的量化模型架构中,你可以看到蓝色方框中的所有线性层都被替换为量化线性层,而绿色虚线方框中的线性层仍保持不变。
现在让我们检查一下这个量化模型的大小。大小为 0.35 GB(359 MB)。这比基础模型的大小减少了 54%。这真是太棒了。
model_memory_size_after_quantization = model.get_memory_footprint()
print(f"Total memory size after quantization (in GB): {model_memory_size_after_quantization / 1e+9}")

然后,让我们对这个量化模型进行推理。
pipe = pipeline("text-generation", model=model, tokenizer=tokenizer)"text-generation", model=model, tokenizer=tokenizer)
pipe("Malaysia is a beautiful country and ", max_new_tokens=50)
令人惊讶的是,量化模型中的推理给出了相同的精确度。这令人印象深刻。
步骤 4:MYQ 4 位量化器
要建立一个 4 位量化器,除了我们之前完成的所有任务外,你还需要实施一项新技术。这项技术叫做权重打包和权重解包。目前,PyTorch 不支持 4 位、2 位或任何小于 Int-8 的数据。因此,我们必须使用加权打包技术来实现我们的目标。
权重打包: 如果我们要将 4 位编码的权重参数值存储为 int8 数据类型,其内存占用与实际的 8 位编码张量相同。因此,我们必须找到一种方法,让 4 位编码值只分配 4 位内存空间。这样,如果我们用 4 位量化,整个量化模型的内存占用仍然比 8 位量化模型小将近一半。因此,加权打包技术可以帮助我们实现这一目标。在加权打包技术中,我们会将多个 4 位编码值添加到一个 8 位张量中,只要它能满足要求即可。这样,4 位编码值只分配 4 位空间,其余空间则由另一个 4 位编码值利用。
权重解包: 在推理过程中,模型只处理浮点数值。因此,我们必须使用权重拆包技术,将每个打包的权重张量拆分成单独的 4 位编码值,并单独分配给 Int8 数据类型。每个 4 位编码值都有 8 位内存空间,然后我们就可以将它们转换为 fp32 以进行推理。
总结
- 如果你已经编写代码并完成了 8 位量化器的构建,那么你现在应该能够理解 AI 领域出现的任何新量化器的核心算法。你可以轻松地将它们用于其他用例,而无需付出太多努力。
- 在量化数十亿参数以上的 LLM 模型时,主要挑战之一是你需要更大的处理和内存资源。但是,对于 10 亿参数以下的较小模型,我建议你尝试使用 Kaggle Notebook,它现在提供高达 30GB 的 RAM(GPU T4 x 2 加速器),这非常棒。


