如何使用Burr、FastAPI和React构建流媒体代理
在这篇文章中,我们将介绍如何利用 Burr(我是作者)的流式传输功能、FastAPI 的 StreamingResponse 和 React 查询的服务器-发送事件(SSE),构建一个向用户发送流响应的代理聊天机器人。所有这些都是开源工具。
首先,我们将讨论为什么流式传输很重要。然后,我们将介绍我们使用的开源工具。我们将举例说明,并指出你可以用来入门的代码。
为什么是流式传输?
通过网络传输流媒体是上世纪 90 年代的技术,现在已经无处不在(视频游戏、流媒体电视、音乐等),而最近生成式人工智能应用的兴起,也让人们对逐字提供和呈现流文本产生了兴趣。
LLM 是一种有趣的技术(甚至可能很有用),但运行速度相对较慢,而且用户不喜欢等待。幸运的是,我们可以对结果进行流式处理,这样用户就能看到 LLM 正在生成的响应。此外,鉴于 LLM 通常具有机械和呆板的性质,流式处理可以让它们看起来更具交互性,就像它们在思考一样。
适当的实施将允许流式通信跨越多个服务边界,使中间代理能够在流式数据呈现给用户时对其进行扩充/存储。

虽然这些都不是什么火箭科学,但同样的工具(OpenAPI / FastAPI / React + friends 等......)使网络开发变得简单,并在很大程度上实现了标准化,这些工具的支持程度也各不相同,这意味着你经常会有不同于你习惯的多种选择。在框架设计中,流通常是事后才想到的,这导致了各种限制,而你可能在构建到一半时才知道这些限制。
让我们先来了解一下我们用来实现上述堆栈的一些工具,然后通过一个示例进行说明。
开源工具
我们将使用的工具相互之间都有很好的解耦性--如果你愿意,可以交换相同的工具,但仍然可以使用相同的代码。
Burr
Burr 是一个轻量级 Python 库,用于将应用程序构建为状态机。你可以通过一系列动作(这些动作可以是装饰过的函数或对象)来构建应用程序,这些动作会声明来自状态的输入以及来自用户的输入。这些动作指定了自定义逻辑(委托给任何框架),以及如何更新状态的指令。状态是不可变的,因此可以在任何给定的时间点对其进行检查。Burr 负责协调、监控、持久化等)。
@action(reads=["count"], writes=["count"])
def counter(state: State) -> State:
    return state.update(counter=state.get("count", 0) +1)
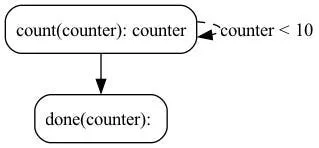
你可以将 Burr 操作作为应用程序的一部分来运行,这样就可以将它们与一系列(可选的)从操作到操作的条件转换串联起来。
from burr.core import ApplicationBuilder, default, expr
app = (
    ApplicationBuilder()
    .with_actions(
        count=count,
        done=done # implementation left out above
    ).with_transitions(
        ("counter", "counter", expr("count < 10")), # Keep counting if the counter is < 10
        ("counter", "done", default) # Otherwise, we're done
    ).with_state(count=0)
    .with_entrypoint("counter") # we have to start somewhere
    .build()
)
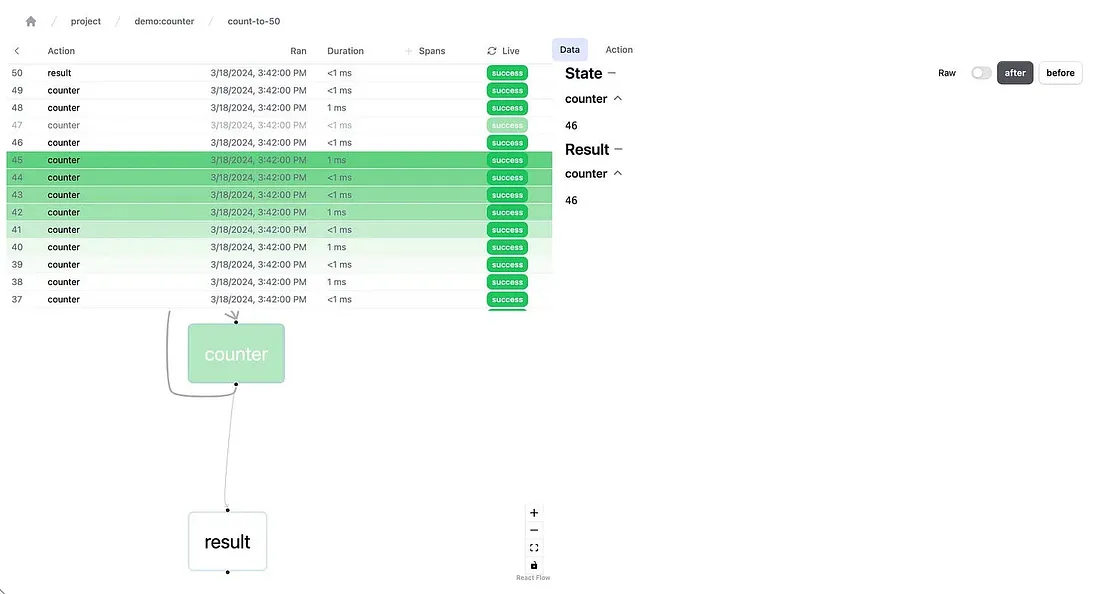
Burr 附带一个用户界面,可用于监控/遥测,以及在执行过程中保持状态/执行任意代码的钩子。
你可以将其可视化为流程图,即图形/状态机:

并使用本地遥测调试器进行监控:

上面的例子只是一个简单的说明,Burr 通常用于代理(如本例)、RAG 应用程序和人在回路中的人工智能界面。
FastAPI
FastAPI 是一个框架,能让你在 REST API 中公开 Python 函数。它的界面非常简单--你只需编写函数,然后对其进行装饰,然后运行脚本--通过 OpenAPI 将其转化为具有自文档端点的服务器。
@app.get("/")
def read_root():
    return {"Hello": "World"}

@app.get("/items/{item_id}")
def read_item(item_id: int, q: Union[str, None] = None):
    return {"item_id": item_id, "q": q}
FastAPI 具有许多优点。它是原生异步的,通过 OpenAPI 提供文档,并且易于在任何云提供商上部署。它与基础设施无关,通常可以横向扩展(只要考虑到状态管理)。
React
React 无需多做介绍,它是一款非常流行的工具,为互联网的大部分应用提供了动力。甚至最近流行的工具(如 next.js/remix)也是基于 React 开发的。我们将使用 React 以及 typescript 和 tailwind,但一般来说,你也可以用自己喜欢的前端工具来替代,并能重复使用本文章的大部分内容。
构建一个简单的代理聊天机器人
让我们来构建一个简单的代理聊天机器人--它之所以是代理机器人,是因为它实际上进行了两次 LLM 调用:
- 确定要查询的模型的调用。我们的模型将有几种 “模式”--生成一首诗、回答一个问题等...
- 调用实际模型(在本例中为提示+模型组合)
对于 OpenAI 应用程序接口来说,这更像是一个玩具示例--他们的模型无所不能,令人印象深刻。尽管如此,这种工具委托模式在各种人工智能系统中都会出现,而且这个例子也可以很容易地推断出来。
Burr中的代理建模
作为状态机建模
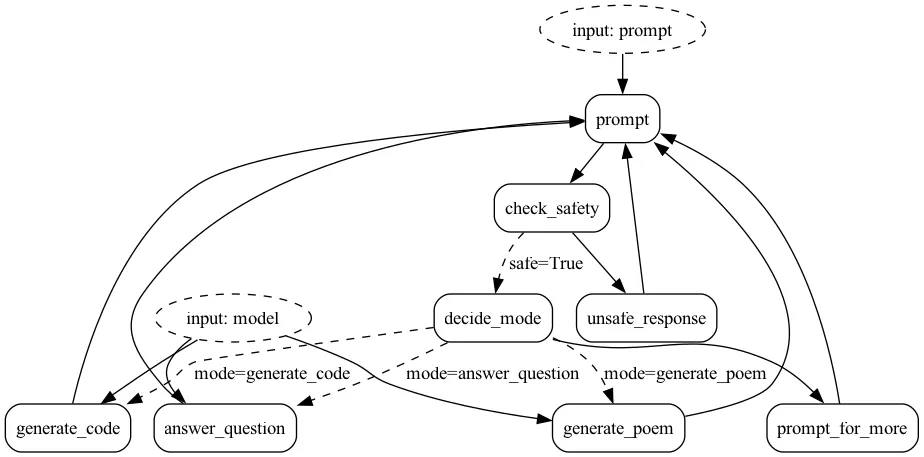
为了充分利用 Burr,我们将代理应用程序建模为状态机。基本逻辑流程如下:

要使用 Burr 进行建模,我们首先要使用流 API 创建相应的操作。然后,我们将把它们作为一个应用程序绑定在一起。
流媒体操作
在 Burr 中,操作既可以使用同步 API,也可以使用异步 API。在本例中,我们将使用异步 API。Burr 中的流式函数也可以与非流式操作混合使用,但为了简化,我们将以流式方式实现所有功能。因此,无论是从 OpenAPI(它有自己的 async 流接口)流式传输,还是返回一个固定的抱歉,我无法回答这个问题,它都将以生成器的形式实现。
对于那些不熟悉生成器的人来说,生成器是一种 Python 结构,它可以对一串值进行高效、懒散的评估。生成器由 yield 关键字创建,它将函数的控制权交还给调用者,直到需要下一个项目为止。异步生成器的功能与此类似,只不过它们也会在 yield 时让出事件循环的控制权。
Burr 中的流操作是以生成器的形式实现的,生成器产生的元组包括:
- 中间结果(本例中为消息中的 delta 标记)
- 最终状态更新(如果已完成)或无(如果仍在生成中
因此,最终生成将表明数据流已完成,并输出最终结果供以后存储/调试。代理 OpenAI 并进行一些自定义提示操作的基本响应如下所示:
@streaming_action(reads=["prompt", "chat_history", "mode"], writes=["response"])
async def chat_response(
    state: State, prepend_prompt: str, model: str = "gpt-3.5-turbo"
) -> AsyncGenerator[Tuple[dict, Optional[State]], None]:
    """A simple proxy.

    This massages the chat history to pass the context to OpenAI,
    streams the result back, and finally yields the completed result
    with the state update.
    """
    client = _get_openai_client()
    # code skipped that prepends a custom prompt and formats chat history
    chat_history_for_openai = _format_chat_history(
        state["chat_history"],
        prepend_final_promprt=prepend_prompt)
    result = await client.chat.completions.create(
        model=model, messages=chat_history_api_format, stream=True
    )
    buffer = []

    async for chunk in result:
        chunk_str = chunk.choices[0].delta.content
        if chunk_str is None:
            continue
        buffer.append(chunk_str)
        yield {"delta": chunk_str}, None

    result = {
        "response": {"content": "".join(buffer), "type": "text", "role": "assistant"},
    }
    yield result, state.update(**result).append(chat_history=result["response"])
在示例中,我们还有一些其他的流式操作--这些操作将代表 “终端 ”操作--当状态机完成这些操作时,将触发工作流暂停。
构建应用程序
要构建应用程序,我们首先要构建一个图。我们将使用 Burr 的图形应用程序接口(Graph API),这样就可以将图形的形状与其他应用程序的关注点分离开来。在网络服务中,图形 API 是一种非常简洁的状态机逻辑表达方式。你可以全局构建一次,然后在各个应用实例中重复使用。图构建器看起来像这样--请注意,它指的是上面的函数 chat_response:
# Constructing a graph from actions (labeled by kwargs) and
# transitions (conditional or default).
graph = (
    GraphBuilder()
    .with_actions(
        prompt=process_prompt,
        check_safety=check_safety,
        decide_mode=choose_mode,
        generate_code=chat_response.bind(
            prepend_prompt="Please respond with *only* code and no other text"
                "(at all) to the following",
        ),
        # more left out for brevity
    )
    .with_transitions(
        ("prompt", "check_safety", default),
        ("check_safety", "decide_mode", when(safe=True)),
        ("check_safety", "unsafe_response", default),
        ("decide_mode", "generate_code", when(mode="generate_code")),
        # more left out for brevity
    )
    .build()
)
最后,我们可以将这些内容添加到应用程序中,这样就可以为服务器交互提供正确的执行方法:
# Here we couple more application concerns (telemetry, tracking, etc…).
app = ApplicationBuilder()
  .with_entrypoint("prompt")
  .with_state(chat_history=[])
  .with_graph(graph)
  .with_tracker(project="demo_chatbot_streaming")
  .with_identifiers(app_id=app_id)
  .build()
)
当我们要运行它时,可以调用 astream_results。它会接收一组停止条件,并返回一个 AsyncStreamingResultContainer(缓存结果并确保调用 Burr 跟踪的生成器),以及触发停止的操作。
# Running the application as you would to test,
# (in a jupyter notebook, for instance).
action, streaming_container = await app.astream_result(
    halt_after=["generate_code", "unsafe_response", ...], # terminal actions
    inputs={
      "prompt": "Please generate a limerick about Alexander Hamilton and Aaron Burr"
    }
)
async for item in streaming_container:
    print(item['delta'], end="")
在Web服务器中公开
既然我们已经有了 Burr 应用程序,我们就需要使用服务器发送事件(SSE)与 FastAPI 的流响应 API 集成。虽然我们不会对 SSE 进行过多研究,但简而言之,SSE 的功能就是单向(服务器 → 客户端)版本的网络套接字。
要在 FastAPI 中使用这些功能,我们需要将端点声明为一个返回流式响应(StreamingResponse)的函数--一个封装了生成器的类。标准是以一种特殊的形式提供流式响应,即 “数据”: <contents> (内容)"。点击此处了解更多原因。虽然这在很大程度上是为了 EventSource API(我们将绕过它,转而使用 fetch 和 getReader()),但我们将保留这种格式以符合标准(这样使用 EventSource API 的人就可以重用这些代码)。
我们单独实现了 _get_application,这是一个通过 ID 获取/加载应用程序的实用程序函数。
该函数将是一个 POST 端点,因为我们正在向服务器添加数据,不过也可以很容易地使用 PUT 端点。
@app.post("/response/{project_id}/{app_id}", response_class=StreamingResponse)
async def chat_response(project_id: str, app_id: str, prompt: PromptInput) -> StreamingResponse:
    """A simple API that wraps our Burr application."""
    burr_app = _get_application(project_id, app_id)
    chat_history = burr_app.state.get("chat_history", [])
    action, streaming_container = await burr_app.astream_result(
        halt_after=chat_application.TERMINAL_ACTIONS, inputs=dict(prompt=prompt.prompt)
    )
    async def sse_generator():
        yield f"data: {json.dumps({'type': 'chat_history', 'value': chat_history})}\n\n"
        async for item in streaming_container:
            yield f"data: {json.dumps({'type': 'delta', 'value': item['delta']})} \n\n"
    return StreamingResponse(sse_generator())
请注意,我们在函数内部定义了一个生成器,用于封装 Burr 结果并将其转换为 SSE 友好输出。这样,我们就可以对结果施加一些结构,我们将在前端使用这些结构。不幸的是,由于 fastAPI 无法对 StreamingResponse 进行严格的类型化,我们必须自己对其进行解析。
此外,在执行之前,我们实际上在一开始就产生了整个状态。虽然严格来说这并不是必须的(我们也可以为聊天历史设置一个单独的应用程序接口),但它会让渲染变得更容易。
构建用户界面
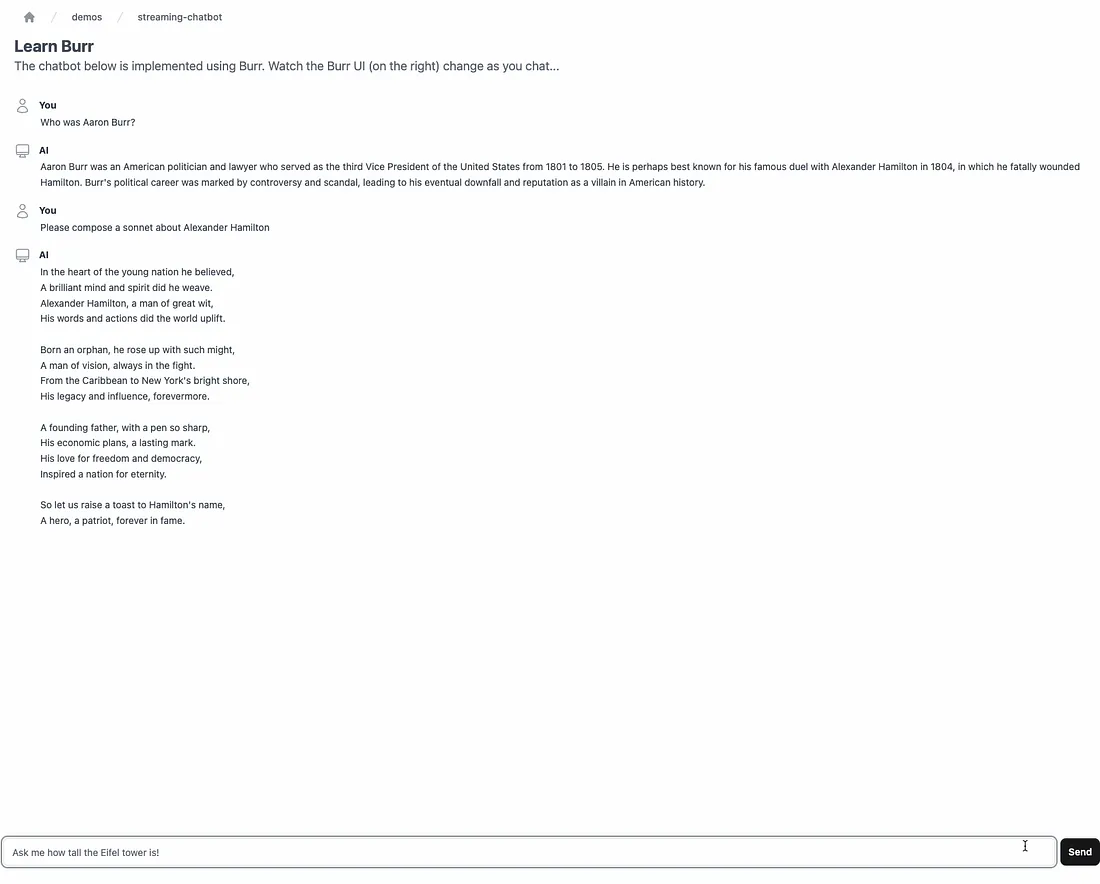
现在我们已经有了服务器、状态机和 LLM,让我们来让它看起来更漂亮吧!这就是一切的关键所在。你可以下载并使用示例中的全部代码,但我们将重点关注点击 “发送 ”时查询 API 的函数。

首先,让我们使用 fetch 来查询我们的 API(显然要根据你的端点进行调整,在本例中,我们将所有 /api 调用代理到另一台服务器......):
// A simple fetch call with getReader()
const response = await fetch(
      `/api/v0/streaming_chatbot/response/${props.projectId}/${props.appId}`,
      {
        method: 'POST',
        headers: { 'Content-Type': 'application/json' },
        body: JSON.stringify({ prompt: currentPrompt })
      }
    );
const reader = response.body?.getReader();
这看起来像一个普通的旧 API 调用,利用了 typescript async API。这将提取一个阅读器对象,帮助我们在收到结果时对其进行流式处理。
让我们定义一些数据类型,以利用上文创建的结构。除了 ChatItem 数据类型(使用 openapi-typescript-codegen 生成),我们还将定义两个类,它们与服务器返回的数据类型相对应。
// Datatypes on the frontend.
// The contract is loose, as nothing in the framework encodes it
type Event = {
  type: 'delta' | 'chat_history';
};
type ChatMessageEvent = Event & {
  value: string;
};
type ChatHistoryEvent = Event & {
  value: ChatItem[];
};
接下来,我们将遍历阅读器并进行解析。这需要在 react 中设置以下状态变量:
- setCurrentResponse/currentResponse
- setDisplayedChatHistory
我们通过读取,在 “data: ”上进行拆分,然后根据事件类型在拆分和解析/反应中循环。
// Loop through, continually getting the stream.
// For each item, parse it as our desired datatype and react appropriately.
while (true) {
    const result = await reader.read();
    if (result.done) {
      break;
    }
    const message = decoder.decode(result.value, { stream: true });
    message
      .split('data: ')
      .slice(1)
      .forEach((item) => {
        const event: Event = JSON.parse(item);
        if (event.type === 'chat_history') {
          const chatMessageEvent = event as ChatHistoryEvent;
          setDisplayedChatHistory(chatMessageEvent.value);
        }
        if (event.type === 'delta') {
          const chatMessageEvent = event as ChatMessageEvent;
          chatResponse += chatMessageEvent.value;
          setCurrentResponse(chatResponse);
        }
      });
}
我们省略了一些清理/错误处理代码(清除、在请求之前/之后初始化状态变量、处理失败等......)--你可以在示例中看到更多内容。
最后,我们可以渲染它(注意,这里指的是在上述代码之外设置/取消设置的附加状态变量,以及一个 ChatMessage 反应组件,它只是显示带有相应图标的聊天信息。
<!-- More to illustrates the example -->
<div className="flex-1 overflow-y-auto p-4 hide-scrollbar" id={VIEW_END_ID}>
  {displayedChatHistory.map((message, i) => (
    <ChatMessage
      message={message}
      key={i}
    />
  ))}
  {isChatWaiting && (
    <ChatMessage
      message={{
        role: ChatItem.role.USER,
        content: currentPrompt,
        type: ChatItem.type.TEXT
      }}
    />
  )}
  {isChatWaiting && (
    <ChatMessage
      message={{
        content: currentResponse,
        type: ChatItem.type.TEXT,
        role: ChatItem.role.ASSISTANT
      }}
    />
  )}
</div>
<!-- Note: We've left out the isChatWaiting and currentPrompt state fields above,
 see StreamingChatbot.tsx for the full implementation. -->
总结
在这篇文章中,我们涉及了很多内容--我们介绍了 Burr、FastAPI 和 React,讨论了如何使用 OpenAI API 构建流式代理聊天机器人,构建了整个堆栈,并一路流式传输数据!虽然你不一定会用到其中的每一种技术,但各个部分都应能独立工作。
要下载并使用此示例,请运行:
pip install "burr[start]"
burr # will open up in a new window


