使用自定义运算符加速AI/ML模型训练
这篇文章是关于分析和优化训练 AI/ML 模型的运行时性能的长篇系列文章的延续。在本篇文章中,我们将讨论一种更先进的优化技术--一种将真正的摇滚明星与简单的业余爱好者区分开来的技术--在 C++ 和 CUDA 中创建一个自定义 PyTorch 运算符。
流行的 ML 框架(如 PyTorch、TensorFlow 和 JAX)通常使用 SW 组件构建,这些组件针对 AI/ML 工作负载运行的底层硬件(如 CPU、GPU 或特定于 AI 的 ASIC,如 Google TPU)进行了优化。但不可避免的是,你可能会发现构成模型的某些计算块的性能不尽人意或未达到最佳状态。通常情况下,根据人工智能/ML 模型的特定需求调整底层代码块(通常称为内核),可以显著提高模型训练和推理的运行速度。这种提速可以通过实现以前不支持的功能(如高级注意力块)、融合单个操作(如 PyTorch 的乘加融合教程)和/或根据当前模型的特定属性优化现有内核来实现。重要的是,执行此类定制的能力取决于人工智能硬件和 ML 框架的支持。虽然我们这篇文章的重点是英伟达™(NVIDIA®)GPU 和 PyTorch 框架,但应该指出的是,其他人工智能 ASIC 和 ML 框架也具有类似的自定义内核定制功能。英伟达™(NVIDIA®)可通过其 CUDA 工具包为其 GPU 开发定制内核。PyTorch 包含专门的 API 和教程,用于公开这一功能并将其集成到模型设计中。
我们在这篇文章中的目的是提请大家注意内核定制的力量和潜力,并展示其在使用动态张量训练模型这一独特挑战中的应用。此外,我们将分享的示例仅用于演示目的。我们并未对这些示例进行优化,也未验证其稳健性、耐用性或准确性。
玩具模型--动态形状张量的挑战
在人工智能模型中,具有动态形状的张量普遍存在,这给性能优化带来了独特而又令人兴奋的挑战。一般来说,人工智能加速器倾向于使用固定形状的张量,而不是动态形状的张量。这不仅能简化内存资源管理,还能为性能优化提供更多机会(例如,使用 torch.compile)。下面的玩具示例演示了这一挑战。
假设我们的任务是为下一代数码相机创建一个人脸检测模型。为了训练这个模型,我们得到了一个包含一百万张 256x256 灰度图像的数据集,以及每张图像的相关真实边界框。当然,每张图像中的人脸数量可能会有很大差异,绝大多数图像只包含 5 张或更少的人脸,只有少数图像包含几十张甚至上百张人脸。我们的模型需要支持所有的变化。具体来说,我们的模型需要支持图像中最多 256 张人脸的检测。
为了应对这一挑战,我们定义了以下可生成边界框和相应损失函数的天真模型。特别是,我们根据目标框的数量对模型输出进行天真截断,而不是执行某种形式的分配算法来匹配边界框预测和地面实况目标。我们(有些武断地)选择了广义相交联合(GIOU)损失。现实世界中的解决方案可能要复杂得多(例如,它将包括对误报进行惩罚的损失部分)。
import torch
import torch.nn as nn
import torch.nn.functional as F
class Net(nn.Module):
    def __init__(self):
        super().__init__()
        conv_layers = []
        for i in range(4):
            conv_layers.append(nn.Conv2d(4 ** i, 4 ** (i + 1), 3,
                                         padding='same'))
            conv_layers.append(nn.MaxPool2d(2, 2))
            conv_layers.append(nn.ReLU())
        self.conv_layers = nn.Sequential(*conv_layers)
        self.lin1 = nn.Linear(256 * 256, 256 * 64)
        self.lin2 = nn.Linear(256 * 64, 256 * 4)
    def forward(self, x):
        x = self.conv_layers(x.float())
        x = self.lin2(F.relu(self.lin1(x.view((-1, 256 * 256)))))
        return x.view((-1, 256, 4))

def generalized_box_iou(boxes1, boxes2):
    # loosly based on torchvision generalized_box_iou_loss code
    epsilon = 1e-5
    area1 = (boxes1[..., 2]-boxes1[..., 0])*(boxes1[..., 3]-boxes1[..., 1])
    area2 = (boxes2[..., 2]-boxes2[..., 0])*(boxes2[..., 3]-boxes2[..., 1])
    lt = torch.max(boxes1[..., :2], boxes2[..., :2])
    rb = torch.min(boxes1[..., 2:], boxes2[..., 2:])
    wh = rb - lt
    inter = wh[..., 0] * wh[..., 1]
    union = area1 + area2 - inter
    iou = inter / union.clamp(epsilon)
    lti = torch.min(boxes1[..., :2], boxes2[..., :2])
    rbi = torch.max(boxes1[..., 2:], boxes2[..., 2:])
    whi = rbi - lti
    areai = (whi[..., 0] * whi[..., 1]).clamp(epsilon)
    return iou - (areai - union) / areai

def loss_fn(pred, targets_list):
    batch_size = len(targets_list)
    total_boxes = 0
    loss_sum = 0.
    for i in range(batch_size):
        targets = targets_list[i]
        num_targets = targets.shape[0]
        if num_targets > 0:
            sample_preds = pred[i, :num_targets]
            total_boxes += num_targets
            loss_sum += generalized_box_iou(sample_preds, targets).sum()
    return loss_sum / max(total_boxes, 1)
由于每张图像的面孔数量不同,损失是针对每个样本单独计算的,而不是一次计算(针对整批图像)。具体来说,CPU 将启动与损失函数相关的 GPU 内核 B 次,其中 B 是所选批次的大小。根据批次的大小,这可能会带来很大的开销,我们将在下文中看到。
在下文中,我们将定义一个数据集,用于生成随机图像和相关的边界框。由于每张图像的面孔数量各不相同,我们需要一个自定义的整理函数来将样本分组:
from torch.utils.data import Dataset, DataLoader
import numpy as np
# A dataset with random images and gt boxes
class FakeDataset(Dataset):
    def __init__(self):
        super().__init__()
        self.size = 256
        self.img_size = [256, 256]
    def __len__(self):
        return 1000000
    def __getitem__(self, index):
        rand_image = torch.randint(low=0, high=256,
                                   size=[1]+self.img_size,
                                   dtype=torch.uint8)

        # set the distribution over the number of boxes to reflect the fact
        # that the vast majority of images have fewer than 10 faces
        n_boxes = np.clip(np.floor(np.abs(np.random.normal(0, 3)))
                                      .astype(np.int32), 0, 255)

        box_sizes = torch.randint(low=1, high=self.size, size=(n_boxes,2))
        top_left = torch.randint(low=0, high=self.size-1, size=(n_boxes, 2))
        bottom_right = torch.clamp(top_left + box_sizes, 0, self.size -1)
        rand_boxes = torch.concat((top_left,bottom_right), dim = 1)
        return rand_image, rand_boxes.to(torch.uint8)
def collate_fn(batch):
    images = torch.stack([b[0] for b in batch],dim=0)
    boxes = [b[1] for b in batch]
    return images, boxes
train_loader = DataLoader(
    dataset = FakeDataset(),
    batch_size=1024,
    pin_memory=True,
    num_workers=16,
    collate_fn=collate_fn
)
通常情况下,每个训练步骤都是从将训练批次从主机(CPU)复制到设备(GPU)开始。当我们的数据样本大小固定时,它们会被成批复制。然而,每张图像的面孔数量不同所带来的影响之一是,每个样本的边界框目标都要单独复制,这就需要更多单独的复制操作。
def data_to_device(data, device):
    if isinstance(data, (list, tuple)):
        return type(data)(
            data_to_device(val, device) for val in data
        )
    elif isinstance(data, torch.Tensor):
        return data.to(device=device, non_blocking=True)
最后,我们确定培训/评估循环。为了便于讨论,我们选择只关注训练循环的前向传递。请注意,我们包含了一个 PyTorch 分析器对象,并使用了显式同步事件(以便于对前向传递的不同部分进行性能评估)。
device = torch.device("cuda:0")"cuda:0")
model = torch.compile(Net()).to(device).train()
# forward portion of training loop wrapped with profiler object
with torch.profiler.profile(
   schedule=torch.profiler.schedule(wait=5, warmup=5, active=10, repeat=1),
   on_trace_ready=torch.profiler.tensorboard_trace_handler('/tmp/perf/'),
   profile_memory=True
) as prof:
    for step, data in enumerate(train_loader):
        with torch.profiler.record_function('copy data'):
            images, boxes = data_to_device(data, device)
            torch.cuda.synchronize(device)
        with torch.profiler.record_function('forward'):
            with torch.autocast(device_type='cuda', dtype=torch.bfloat16):
                outputs = model(images)
            torch.cuda.synchronize(device)
        with torch.profiler.record_function('calc loss'):
            loss = loss_fn(outputs, boxes)
            torch.cuda.synchronize(device)
        prof.step()
        if step > 30:
            break
    # filter and print profiler results
    event_list = prof.key_averages()
    for i in range(len(event_list) - 1, -1, -1):
        if event_list[i].key not in ['forward', 'calc loss', 'copy data']:
            del event_list[i]
    print(event_list.table())
性能分析
在谷歌云 g2-standard-16 虚拟机(配有单个 L4 GPU)、专用深度学习虚拟机镜像和 PyTorch 2.4.0 上运行我们的脚本,会产生以下输出(为便于阅读,我们对输出进行了修剪)。
-------------  ------------  ------------
         Name     CPU total  CPU time avg
-------------  ------------  ------------
    copy data     288.164ms      28.816ms
      forward        1.192s     119.221ms
    calc loss        9.381s     938.067ms
-------------  ------------  ------------
Self CPU time total: 4.018s
Self CUDA time total: 10.107s
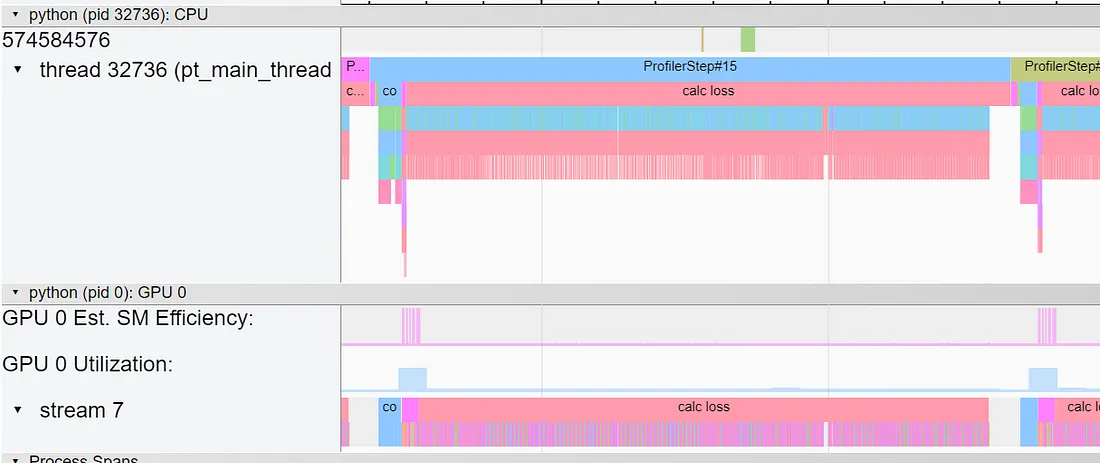
尽管损失函数包含的操作要少得多,但它却完全支配了整个步骤时间。在 TensorBoard 的跟踪视图中,可以清楚地看到重复调用底层 GPU 内核(针对批次中的每个样本)的开销:

通过连接进行优化
减少损耗函数调用次数的方法之一,是使用串联法将每批次的所有有效方框组合在一起,如下图所示。
def loss_with_concat(pred, targets_list):
    bs = len(targets_list)
    all_targets = torch.concat(targets_list, dim = 0)
    num_boxes = [targets_list[i].shape[0] for i in range(bs)]
    all_preds = torch.concat([pred[i,: num_boxes[i]] for i in range(bs)],
                              dim=0)
    total_boxes = sum(num_boxes)
    loss_sum = generalized_box_iou(all_targets, all_preds).sum()
    return loss_sum/max(total_boxes, 1)
优化结果如下。
-------------  ------------  ------------
         Name     CPU total  CPU time avg
-------------  ------------  ------------
    copy data     522.326ms      52.233ms
      forward        1.187s     118.715ms
    calc loss     254.047ms      25.405ms
-------------  ------------  ------------
Self CPU time total: 396.674ms
Self CUDA time total: 1.871s
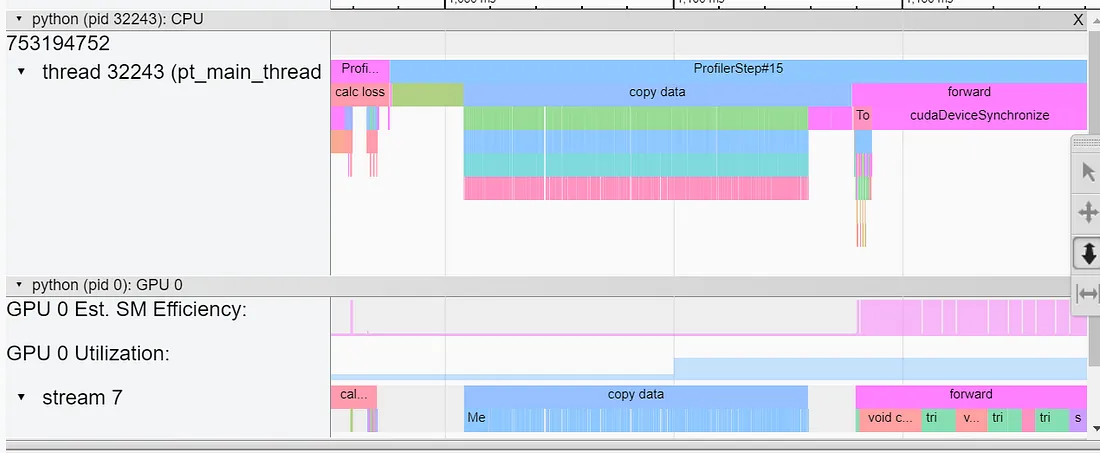
连接优化使损失函数的速度提高了 37 倍(!!)。但请注意,这并没有解决从主机到设备拷贝地面实况样本数据的开销问题。下图是 TensorBoard 的跟踪视图截图:

通过填充进行优化
避免使用动态张量的常用方法是填充。在下面的代码块中,我们修改了 collate 函数,将每个数据样本的地面实况边框填充(用零填充)到最大支持边框数 256。(注意,填充也可以在数据集类中进行)。
def collate_with_padding(batch):
    images = torch.stack([b[0] for b in batch],dim=0)
    padded_boxes = []
    for b in batch:
        p = torch.nn.functional.pad(
                       b[1], (0, 0, 0, 256 - b[1].shape[0]), value = 0)
        padded_boxes.append(p)
    boxes = torch.stack(padded_boxes,dim=0)
    return images, boxes
将样本填充为固定大小的张量后,我们只需调用一次就能复制一批样本的基本事实。这也使我们只需调用一次损失函数就能计算损失。需要注意的是,如下图所示,这种方法需要屏蔽损失结果,这样只有有效的方框才会被考虑在内。
def loss_with_padding(pred, targets):
    mask = (targets[...,3] > 0).to(pred.dtype)
    total_boxes = mask.sum()
    loss = generalized_box_iou(targets, pred)
    masked_loss = loss*mask
    loss_sum = masked_loss.sum()
    return loss_sum/torch.clamp(total_boxes, 1)
运行时的性能结果如下:
-------------  ------------  ------------
         Name     CPU total  CPU time avg
-------------  ------------  ------------
    copy data      57.125ms       5.713ms
      forward        1.315s     131.503ms
    calc loss      18.438ms       1.844ms
-------------  ------------  ------------
Self CPU time total: 11.723ms
Self CUDA time total: 1.378s
请注意,数据拷贝提升了近 10 倍,损失函数性能额外提升了 14 倍。请注意,填充可能会增加 GPU 内存的使用。在我们的案例中,这种增加不到 1%。
虽然损失函数的运行时间有了显著改善,但我们注意到,损失函数中执行的绝大多数计算都被立即屏蔽掉了。我们不禁要问,是否有办法通过避免这些冗余操作来进一步提高性能。在下一节中,我们将探索使用自定义 CUDA 内核的机会。
创建自定义 CUDA 内核
许多教程都会强调创建 CUDA 内核的难度和高门槛。虽然掌握 CUDA 开发和调整内核以最大限度地利用 GPU 确实需要多年的经验以及对 GPU 架构的深入了解,但我们坚信,即使是新手(但雄心勃勃)的 CUDA 爱好者/ML 开发人员也能成功创建自定义 CUDA 内核,并从中受益匪浅。在本节中,我们将以 PyTorch 的 C++/CUDA 扩展(相对简单)为例,用 GIOU 内核来增强 PyTorch。我们将分两个阶段进行: 首先,我们将天真地把所有 GIOU 逻辑移植到 C++/CUDA 中,以评估内核融合对性能的影响。然后,我们将利用新发现的底层控制,添加条件逻辑,减少不必要的算术运算。
开发 CUDA 内核可以让你确定在每个 GPU 线程中执行的核心逻辑,以及如何将这些逻辑分配到底层 GPU 流式多处理器(SM)上。要以最佳方式实现这一点,需要对 GPU 架构有专业的了解,包括不同级别的 GPU 内存、内存带宽、片上加速引擎(如 TensorCores)、每个 SM 支持的并发线程数及其调度方式等等。让事情变得更加复杂的是,这些属性在不同代 GPU 和不同类型的 GPU 中可能会有所不同。
步骤 1 - 内核融合
回顾我们上次实验的跟踪视图,你可能会注意到我们计算损耗的前向传递包括大约 30 个独立的算术运算,这些运算转换为启动和运行一个独立的 CUDA 内核(通过简单计算 cudaLaunchKernel 事件的数量即可看出)。这会以多种方式对性能产生负面影响。例如:
- 每个内核的启动都需要在 CPU 和 GPU 之间进行专门的通信,这是我们一直在努力减少的。
- 每个内核在运行前都需要等待前一个内核完成。有时,这种情况无法避免,但在某些情况下,例如我们的情况,大部分操作都是 "按像素 "执行的,这种情况就可以避免。
- 使用多个独立内核会影响 GPU 内存的使用。
通过内核融合进行优化,可以将这些操作合并到较少数量的内核中,从而减少多个内核的开销。
在下面的代码块中,我们定义了一个内核,在单个边界框预测目标对上执行我们的 GIOU。我们使用 1-D 网格分配线程块,每个线程块大小为 256,每个线程块对应训练批次中的一个样本,每个线程对应样本中的一个边界框。因此,每个线程(由块和线程 ID 组合唯一标识)接收预测(框 1)和目标(框 2),并在 ID 确定的单个边界框上执行 GIOU 计算。与之前一样,边界框的 "有效性 "由目标框的值控制。特别是,只要相应的边框无效,GIOU 就会被明确清零。
#include <torch/extension.h>
#include <cuda.h>
#include <cuda_runtime.h>
namespace extension_cpp {
__global__ void giou_kernel(const float* boxes1,
                            const float* boxes2,
                            float* giou,
                            bool* mask) {
  int idx = blockIdx.x * blockDim.x + threadIdx.x;
  bool valid = boxes2[4*idx+3] != 0;
  mask[idx] = valid;
  const float epsilon = 1e-5;
  const float* box1 = &boxes1[idx * 4];
  const float* box2 = &boxes2[idx * 4];
  // Compute area of each box
  float area1 = (box1[2] - box1[0]) * (box1[3] - box1[1]);
  float area2 = (box2[2] - box2[0]) * (box2[3] - box2[1]);
  // Compute the intersection
  float left = max(box1[0], box2[0]);
  float top = max(box1[1], box2[1]);
  float right = min(box1[2], box2[2]);
  float bottom = min(box1[3], box2[3]);
  float inter_w = right - left;
  float inter_h = bottom - top;
  float inter_area = inter_w * inter_h;
  // Compute the union area
  float union_area = area1 + area2 - inter_area;
  // IoU
  float iou_val = inter_area / max(union_area, epsilon);
  // Compute the smallest enclosing box
  float enclose_left = min(box1[0], box2[0]);
  float enclose_top = min(box1[1], box2[1]);
  float enclose_right = max(box1[2], box2[2]);
  float enclose_bottom = max(box1[3], box2[3]);
  float enclose_w = enclose_right - enclose_left;
  float enclose_h = enclose_bottom - enclose_top;
  float enclose_area = enclose_w * enclose_h;
  float result = iou_val - (enclose_area-union_area)/max(enclose_area, epsilon);
  // Generalized IoU
  giou[idx] = result * valid;
}
at::Tensor giou_loss_cuda(const at::Tensor& a, const at::Tensor& b) {
  TORCH_CHECK(a.sizes() == b.sizes());
  TORCH_CHECK(a.dtype() == at::kFloat);
  TORCH_CHECK(b.dtype() == at::kFloat);
  TORCH_INTERNAL_ASSERT(a.device().type() == at::DeviceType::CUDA);
  TORCH_INTERNAL_ASSERT(b.device().type() == at::DeviceType::CUDA);
  int bs = a.sizes()[0];
  at::Tensor a_contig = a.contiguous();
  at::Tensor b_contig = b.contiguous();
  at::Tensor giou = torch::empty({a_contig.sizes()[0], a_contig.sizes()[1]},
                                  a_contig.options());
  at::Tensor mask = torch::empty({a_contig.sizes()[0], a_contig.sizes()[1]},
                                  a_contig.options().dtype(at::kBool));
  const float* a_ptr = a_contig.data_ptr<float>();
  const float* b_ptr = b_contig.data_ptr<float>();
  float* giou_ptr = giou.data_ptr<float>();
  bool* mask_ptr = mask.data_ptr<bool>();
  // Launch the kernel
  // The number of blocks is set according to the batch size.
  // Each block has 256 threads corresponding to the number of boxes per sample
  giou_kernel<<<bs, 256>>>(a_ptr, b_ptr, giou_ptr, mask_ptr);

  at::Tensor total_boxes = torch::clamp(mask.sum(), 1);
  torch::Tensor loss_sum = giou.sum();
  return loss_sum/total_boxes;
}

// Registers CUDA implementations for giou_loss
TORCH_LIBRARY_IMPL(extension_cpp, CUDA, m) {
  m.impl("giou_loss", &giou_loss_cuda);
}
}
要完成内核创建,我们需要添加相应的 C++ 和 Python 运算符定义。
// Add the C++ definition
m.def(“giou_loss(Tensor a, Tensor b) -> Tensor”);
# define the Python operator
def giou_loss(a: Tensor, b: Tensor) -> Tensor:
    return torch.ops.extension_cpp.giou_loss.default(a, b)
要编译内核,请运行基本目录下的安装脚本(pip install .)。
以下代码块将使用我们新定义的 GIOU CUDA 内核:
def loss_with_kernel(pred, targets):
    pred = pred.to(torch.float32)
    targets = targets.to(torch.float32)
    import extension_cpp
    return extension_cpp.ops.giou_loss(pred, targets)
请注意,我们明确地将数据转换为 torch.float32。这是一个相当昂贵的操作,通过增强我们的 CUDA 内核支持可以轻松避免。我们将此作为一个练习留给读者:)。
使用自定义内核运行脚本的结果如下所示。
-------------  ------------  ------------
         Name     CPU total  CPU time avg
-------------  ------------  ------------
    copy data      56.901ms       5.690ms
      forward        1.327s     132.704ms
    calc loss       6.287ms     628.743us
-------------  ------------  ------------
Self CPU time total: 6.907ms
Self CUDA time total: 1.380s
尽管我们的内核还很稚嫩(而且我们在 CUDA 方面也缺乏经验),但我们还是将损失函数的性能比之前的实验提高了约 3 倍(628 微秒比 1.8 毫秒)。还有更多。如上所述,不费吹灰之力就能进一步提高性能。
步骤2:条件执行
CUDA 提供的线程级控制功能允许我们添加条件语句,从而避免对无效边框进行计算:
__global__ void giou_kernel(const float* boxes1,
                            const float* boxes2,
                            float* giou,
                            bool* mask) {
  int idx = blockIdx.x * blockDim.x + threadIdx.x;
  bool valid = boxes2[4*idx+3] != 0;
  mask[idx] = valid;
  if (valid)
  {
    const float* box1 = &boxes1[idx * 4];
    const float* box2 = &boxes2[idx * 4];
    giou[idx] = compute_giou(box1, box2);
  }
  else
  {
    giou[idx] = 0;
  }
}
就我们的内核而言,对运行时性能的影响可以忽略不计。原因可能是我们的内核相对较小,其运行时间与加载和实例化内核所需的时间相比可以忽略不计。我们的条件执行的影响只有在内核较大时才会显现出来。(我们可以通过让 GIOU 的输出依赖于一个 for 循环来评估条件执行对内核大小的影响。这也是一个练习:)。
-------------  ------------  ------------
         Name     CPU total  CPU time avg
-------------  ------------  ------------
    copy data      57.008ms       5.701ms
      forward        1.318s     131.850ms
    calc loss       6.234ms     623.426us
-------------  ------------  ------------
Self CPU time total: 7.139ms
Self CUDA time total: 1.371s
结果
下表总结了我们的实验结果。

总结
在这篇文章中,我们展示了使用自定义 CUDA 内核对 AI/ML 应用程序运行时性能的潜在影响。我们特别尝试利用 CUDA 的底层控制功能引入条件流,以限制动态输入时的冗余算术运算次数。虽然融合多个内核操作带来的性能提升非常显著,但我们发现我们的内核规模太小,无法从条件执行流程中获益。


