使用Meta的SAM-2模型在多媒体应用中进行对象分割
最近发布的 Meta SAM-2 视频分割模型尤其让我激动不已。视频分割是多媒体应用的基础技术,这一领域的进步将彻底改变我们创建内容和与内容交互的方式。从创建更有创意的视频到启用复杂的视频分析工具,潜在的应用领域非常广泛。
目前已有多种视频分割模型,如 YOLO(You Only Look Once)和 Mask R-CNN,而 SAM-2 则提供了更高水平的准确性和效率。YOLO 以其实时物体检测能力而闻名,而 Mask R-CNN 则通过提供高质量的遮罩而在实例分割方面表现出色。每个模型都有自己的优势,但 SAM-2 的发布带来了令人兴奋的进步,使其更易于使用和配置。
视频分割背景简介
视频分割涉及将视频划分为有意义的片段,通常是通过使用掩码识别和分离每个帧中的对象或感兴趣的区域。这项技术应用广泛,包括:
- 自动驾驶汽车: 分析和理解来自车载摄像头的视频信号。
- 多媒体编辑: 通过分离和处理特定元素来增强视频内容。
- 增强现实(AR): 将虚拟对象无缝集成到现实世界的视频中。
- 安全:在视频监控中实施物体检测。
- 视频压缩: 通过聚焦重要区域改进压缩技术。
传统上,由于视频内容的复杂性和多变性,视频分割一直是一项具有挑战性的任务。然而,人工智能和机器学习(尤其是深度学习模型)的进步大大提高了分割的准确性和效率。
使用 SAM-2 对视频进行分割的步骤
在深入了解代码之前,我们先来看看使用 SAM-2 进行视频分割的整体流程:
- 预处理: 准备视频数据,将其转换为帧。
- 加载模型: 加载 SAM-2 模型并推断单帧。
- 分割: 将模型应用到每个帧,生成分割掩码。
- 后期处理: 将分割后的帧组合成连贯的视频。
这些步骤与 SAM-2 的先进功能相结合,只需最少的人工干预即可实现高质量的分割。
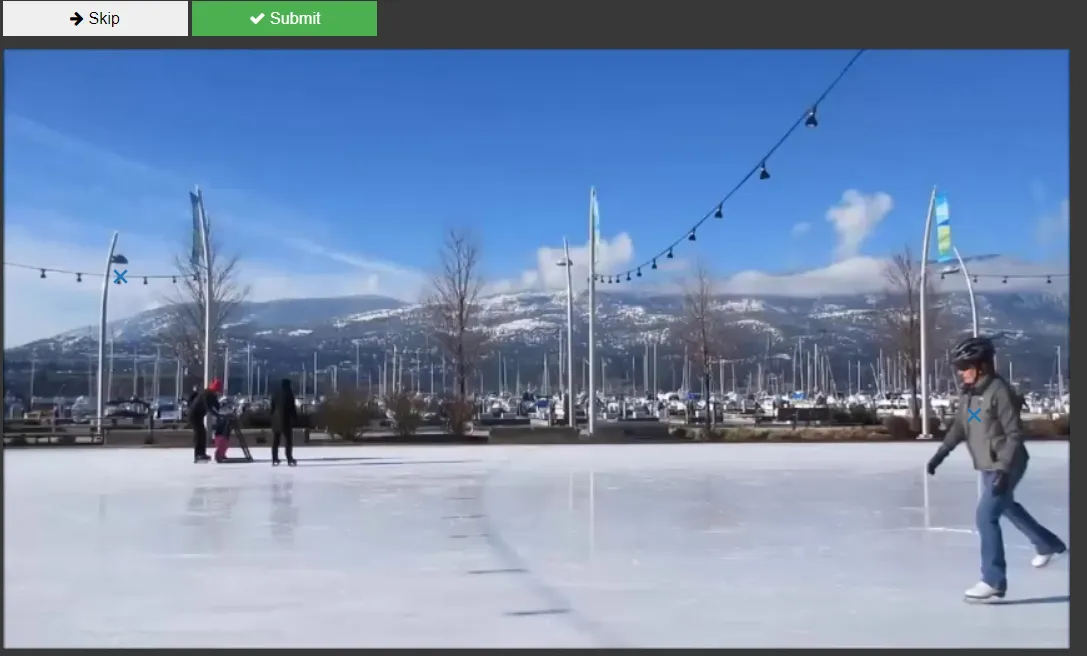
为此,我们将使用来自 Pexels 的示例视频。我们使用的部分是一名女子在屏幕上滑行的画面,如下所示。

实施实例
之前的 SAM 模型用于分割图像中的物体,而 SAM-2 则将视频视为一系列连续的帧,从而将这一功能扩展到视频。它通过推断单帧来创建掩码,然后将掩码传播到视频中的所有帧。
我们将首先导入库、加载模型并将源视频转换为帧。
import os
import torch
import numpy as np
import matplotlib.pyplot as plt
from PIL import Image
import base64
import cv2
from sam2.build_sam import build_sam2_video_predictor
from jupyter_bbox_widget import BBoxWidget
home = os.getcwd()
home
%cd {home}
torch.autocast(device_type="cuda", dtype=torch.bfloat16).__enter__()
if torch.cuda.get_device_properties(0).major >= 8:
    torch.backends.cuda.matmul.allow_tf32 = True
    torch.backends.cudnn.allow_tf32 = True
checkpoint = f"{home}/segment-anything-2/checkpoints/sam2_hiera_large.pt"
model_cfg = "sam2_hiera_l.yaml"
predictor = build_sam2_video_predictor(model_cfg, checkpoint)
!ffmpeg -i f"{home}/input/source.mp4" -q:v 2 -start_number 0 /content/frames/'d.jpg'
video_dir = "./frames"
frame_names = [
p for p in os.listdir(video_dir)
if os.path.splitext(p)[-1] in [".jpg", ".jpeg", ".JPG", ".JPEG"]
]
frame_names.sort(key=lambda p: int(os.path.splitext(p)[0]))
frame_idx = 0
first_image = os.path.join(video_dir, frame_names[frame_idx])现在,我们将把所有帧(帧中的像素)加载到模型的推理状态中。
inference_state = predictor.init_state(video_path=video_dir)
我们将尝试在第一帧中屏蔽一个对象。你可以手动输入目标的坐标,或者使用名为 BBoxWidget 的 Jupyter 小工具点击目标区域并获取坐标。
def encode_image(filepath):
    with open(filepath, 'rb') as f:
        image_bytes = f.read()
    encoded = str(base64.b64encode(image_bytes), 'utf-8')
    return _"data:image/jpg;base64,"+encoded
widget = BBoxWidget(image= encode_image(os.path.join(video_dir, frame_names[frame_idx])))
widget

在你点击的位置(滑冰者的衣服上),你应该会看到一个蓝色的 “x”。
widget.bboxes
# [{'x': 782, 'y': 301, 'width': 0, 'height': 0, 'label': ''}]
我们将所选坐标 [782, 301] 标记为正点击。标签 1 表示正点击(添加一个区域),标签 0 表示负点击(删除一个区域)。
ann_frame_idx = 0
ann_obj_id = 1
points = np.array([[782, 301]], dtype=np.float32)
labels = np.array([1], np.int32)
_, out_obj_ids, out_mask_logits = predictor.add_new_points(
    inference_state=inference_state,
    frame_idx=ann_frame_idx,
    obj_id=ann_obj_id,
    points=points,
    labels=labels,
)
## I did get an inconsistent error here, which I solved using as below
#%cd segment-anything-2
#!pip install ninja -q
#!python setup.py build_ext --inplace
#%cd {home}
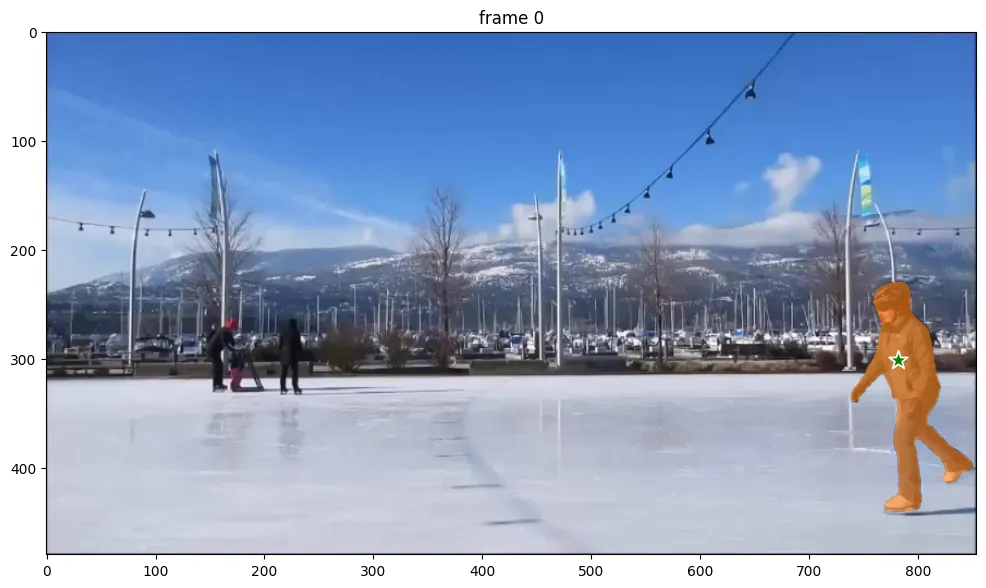
现在,我们将尝试把模型生成的遮罩可视化。
def show_mask(mask, ax, obj_id=None, random_color=False):
    if random_color:
        color = np.concatenate([np.random.random(3), np.array([0.6])], axis=0)
    else:
        cmap = plt.get_cmap("tab10")
        cmap_idx = 0 if obj_id is None else obj_id
        color = np.array([*cmap(cmap_idx)[:3], 0.6])
    h, w = mask.shape[-2:]
    mask_image = mask.reshape(h, w, 1) * color.reshape(1, 1, -1)
    ax.imshow(mask_image)

def show_points(coords, labels, ax, marker_size=200):
    pos_points = coords[labels==1]
    neg_points = coords[labels==0]
    ax.scatter(pos_points[:, 0], pos_points[:, 1], color='green', marker='*', s=marker_size, edgecolor='white', linewidth=1.25)
    ax.scatter(neg_points[:, 0], neg_points[:, 1], color='red', marker='*', s=marker_size, edgecolor='white', linewidth=1.25)
plt.figure(figsize=(12, 8))
plt.title(f"frame {ann_frame_idx}")
plt.imshow(Image.open(os.path.join(video_dir, frame_names[ann_frame_idx])))
show_points(points, labels, plt.gca())
show_mask((out_mask_logits[0] > 0.0).cpu().numpy(), plt.gca(), obj_id=out_obj_ids[0])

我们可以看到,它已成功屏蔽了滑冰者。我们将使用 propagate_in_video API 将遮罩传播到所有帧。
video_segments = {}
for out_frame_idx, out_obj_ids, out_mask_logits in predictor.propagate_in_video(inference_state):
    video_segments[out_frame_idx] = {
        out_obj_id: (out_mask_logits[i] > 0.0).cpu().numpy()
        for i, out_obj_id in enumerate(out_obj_ids)
    }
vis_frame_stride = 15
plt.close("all")
for out_frame_idx in range(0, len(frame_names), vis_frame_stride):
    plt.figure(figsize=(6, 4))
    plt.title(f"frame {out_frame_idx}")
    plt.imshow(Image.open(os.path.join(video_dir, frame_names[out_frame_idx])))
    for out_obj_id, out_mask in video_segments[out_frame_idx].items():
        show_mask(out_mask, plt.gca(), obj_id=out_obj_id)
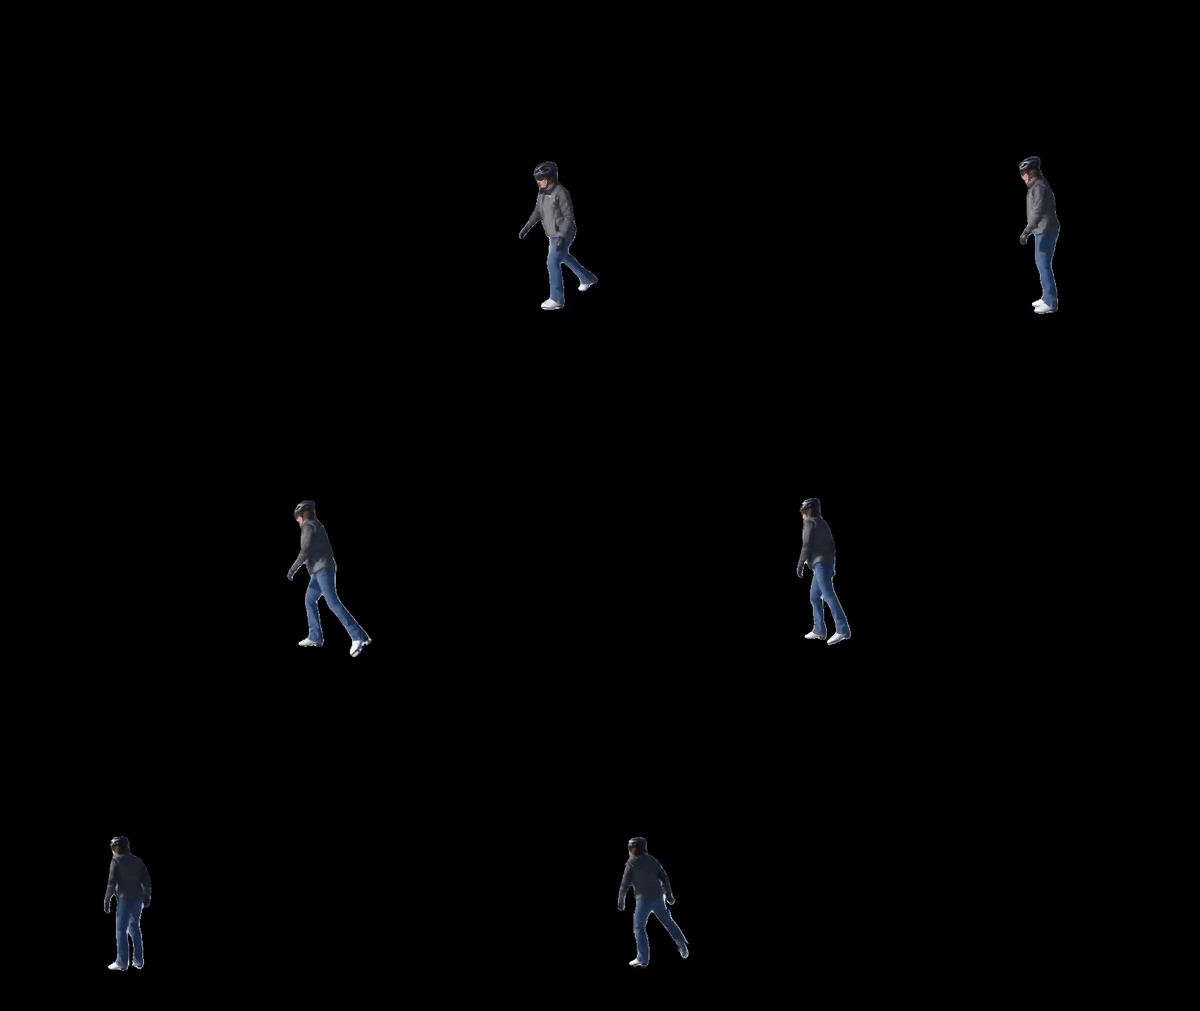
从可视化的样本中可以看出,整个画面的屏蔽效果基本准确。

然后,你可以使用 OpenCV 将遮罩应用于帧,并生成一段仅包含所选对象(在本例中为滑冰者)的视频。
def apply_mask_to_frame(frame, mask, color=(255, 0, 0)):
    mask = mask.squeeze()
    mask = cv2.resize(mask, (frame.shape[1], frame.shape[0]))
    color_mask = np.zeros_like(frame)
    color_mask[mask == 1] = color
    frame_with_mask = masked = cv2.bitwise_and(frame, frame, mask=mask)
    return frame_with_mask
output_video_path = 'output_video.avi'
frame_rate = 30
first_frame = cv2.imread(os.path.join(video_dir, frame_names[0]))
height, width, _ = first_frame.shape
fourcc = cv2.VideoWriter_fourcc(*'XVID')
out = cv2.VideoWriter(output_video_path, fourcc, frame_rate, (width, height))
for out_frame_idx in range(0, len(frame_names)):
    frame_path = os.path.join(video_dir, frame_names[out_frame_idx])
    frame = cv2.imread(frame_path)
    for out_obj_id, out_mask in video_segments[out_frame_idx].items():
        out_mask = np.array(out_mask).astype(np.uint8)
        frame = apply_mask_to_frame(frame, out_mask)
    out.write(frame)
现在我们已经从背景中完全提取出了滑冰者。输出结果为黑色背景。你也可以使用 “MOV ”格式创建完全透明的输出。


