使用Hugging Face Transformers对音频频谱图变换器进行微调
音频分类是利用机器学习理解音频的关键任务之一,也是许多人工智能系统的基石。它为工程领域的测试数据评估、错误和异常检测或预测性维护等行业应用提供了动力。预训练的变换器模型,如音频谱图变换器(AST)[1],为这些应用提供了强大的基础,具有鲁棒性和灵活性。
从头开始训练 AST 模型需要大量数据,而使用已经学习了特定音频特征的预训练模型则更为高效。利用我们使用案例的特定数据对这些模型进行微调,对于将它们用于我们的特定应用至关重要。这一过程可使模型的功能适应我们数据集的独特特征,如类别和数据分布,从而确保结果的相关性。

与 Hugging Face Transformers 库集成的 AST 模型因其易用性和在音频分类任务中的出色表现而备受青睐。本文将通过使用我们自己的数据来演示微调预训练 AST 模型(“MIT/ast-finetuned-audioset-10-10-0.4593”)的整个过程,并使用 ESC50 数据集进行演示。我们将使用 Hugging Face 生态系统中的工具和 PyTorch 作为后台,涵盖从数据准备和预处理到模型配置和训练的所有内容。
本文将指导我们利用 Hugging Face 生态系统中的工具,在自己的音频分类数据集上对 AST 进行微调。
我们将加载数据 (1)、预处理音频 (2)、设置音频增强 (3)、配置并初始化 AST 模型 (4),最后配置并开始训练 (5)。
微调 AST 的分步指南
在开始之前,用 pip 安装所有需要的软件包:
pip install transformers[torch] datasets[audio] audiomentations[torch] datasets[audio] audiomentations
1. 以正确的格式加载数据
首先,我们将使用 Hugging Face Datasets 库来管理数据。该库将帮助我们在训练过程中预处理、存储和访问数据,以及执行波形变换和即时编码成频谱图。
我们的数据应加载到具有以下结构的 Dataset 对象中:
Dataset({
    features: ['audio', 'labels'],'audio', 'labels'],
    num_rows: 1234
})
从Hugging Face Hub加载数据集: 如果本地没有音频数据集,我们可以使用 load_dataset 函数从 Hugging Face Hub 加载一个数据集。
在本文中,我们将加载 ESC50 音频分类数据集进行演示:
from datasets import load_dataset
esc50 = load_dataset("ashraq/esc50", split="train")
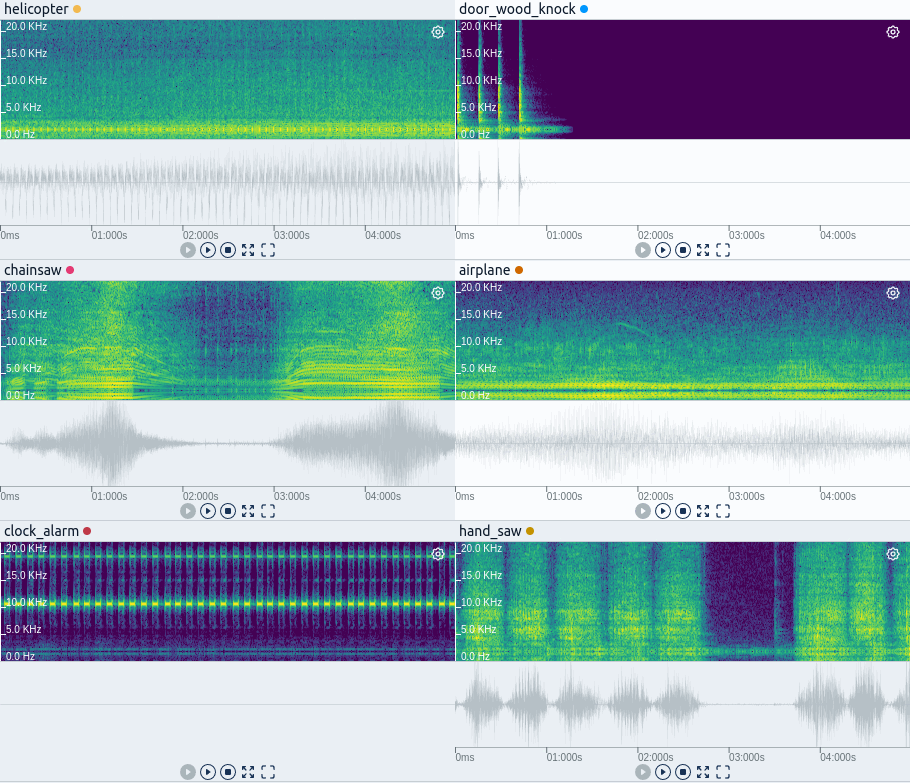
加载本地音频文件和标签: 我们可以使用包含文件路径和标签的字典或 pandas DataFrame 将音频文件和相关标签加载到数据集对象中。如果我们有从类名(字符串)到标签索引(整数)的映射,那么在构建数据集时就可以包含这些信息。
下面是一个实际例子:
from datasets import Dataset, Audio, ClassLabel, Features
# Define class labels
class_labels = ClassLabel(names=["bang", "dog_bark"])
# Define features with audio and label columns
features = Features({
    "audio": Audio(),  # Define the audio feature
    "labels": class_labels  # Assign the class labels
})
# Construct the dataset from a dictionary
dataset = Dataset.from_dict({
    "audio": ["/audio/fold1/7061-6-0-0.wav", "/audio/fold1/7383-3-0-0.wav"],
    "labels": [0, 1],  # Corresponding labels for the audio files
}, features=features)
在本例中:
- 音频特征类自动处理音频文件的加载和处理。
- ClassLabel 可帮助管理分类标签,从而在训练和评估过程中更轻松地处理类别。
检查数据集:数据集加载成功后,每个音频样本都可以通过音频特征类访问,该特征类只在需要时才将数据加载到内存中,从而优化了数据处理。这种高效的管理方式节省了计算资源,加快了训练过程。
为了更好地了解数据结构并确保一切加载正确,我们可以检查数据集中的单个样本:
print(dataset[0])
输出示例:
{'audio': {'path': '/audio/fold1/7061-6-0-0.wav','audio': {'path': '/audio/fold1/7061-6-0-0.wav',
  'array': array([0.00000000e+00, 0.00000000e+00, 0.00000000e+00, ...,
         1.52587891e-05, 3.05175781e-05, 0.00000000e+00]),
  'sampling_rate': 44100},
 'labels': 0}
输出结果将显示音频文件的路径、波形数据阵列和采样率,以及相应的标签。
在下面的步骤中,你可以像我们一样使用准备好的数据集作为演示,也可以继续使用自己的数据集。
2. 预处理音频数据
如果我们的数据集来自 “Hugging Face Hub”,我们就将音频和标签列转换为正确的特征类型:
import numpy as np
from datasets import Audio, ClassLabel
# get target value - class name mappings
df = esc50.select_columns(["target", "category"]).to_pandas()
class_names = df.iloc[np.unique(df["target"], return_index=True)[1]]["category"].to_list()
# cast target and audio column
esc50 = esc50.cast_column("target", ClassLabel(names=class_names))
esc50 = esc50.cast_column("audio", Audio(sampling_rate=16000))
# rename the target feature
esc50 = esc50.rename_column("target", "labels")
num_labels = len(np.unique(esc50["labels"]))
在此代码中:
- 音频铸造: 音频功能处理加载和处理音频文件,将其重新采样到所需的采样率(本例中为 16kHz,ASTFeatureExtractor 的采样率)。
- 类标签转换: ClassLabel 功能可将整数映射为标签,反之亦然。
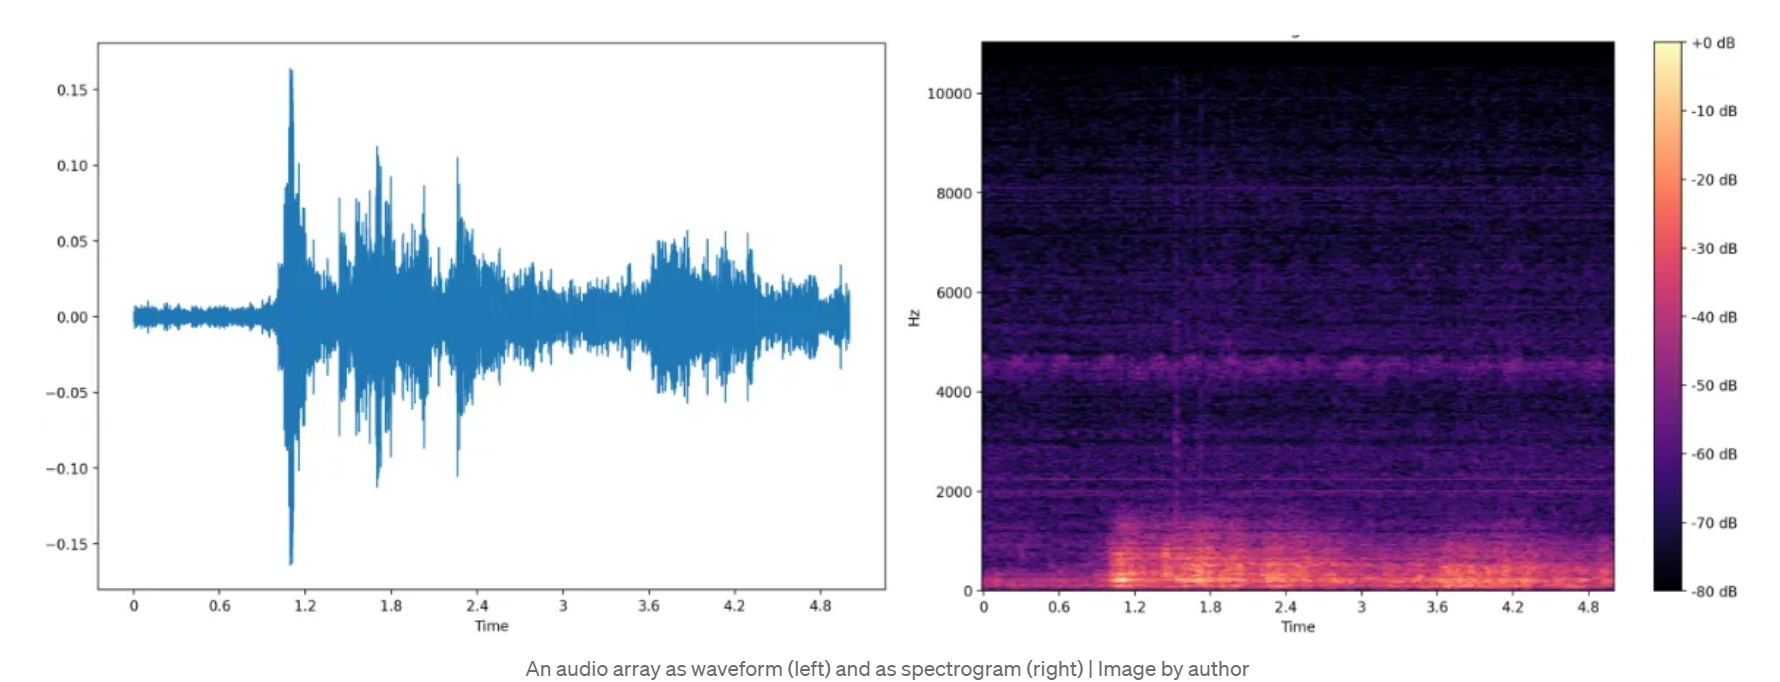
准备 AST 模型输入: AST 模型需要频谱图输入,因此我们需要将波形编码为模型可以处理的格式。这需要使用 ASTFeatureExtractor(ASTFeatureExtractor 根据我们打算在数据集上微调的预训练模型的配置实例化)来实现。
from transformers import ASTFeatureExtractor
# we define which pretrained model we want to use and instantiate a feature extractor
pretrained_model = "MIT/ast-finetuned-audioset-10-10-0.4593"
feature_extractor = ASTFeatureExtractor.from_pretrained(pretrained_model)
# we save model input name and sampling rate for later use
model_input_name = feature_extractor.model_input_names[0]  # key -> 'input_values'
SAMPLING_RATE = feature_extractor.sampling_rate
注意:在特征提取器中,必须根据数据集的值设置标准化的平均值和 std 值。我们可以使用以下代码块来计算这些值:
# calculate values for normalization
feature_extractor.do_normalize = False  # we set normalization to False in order to calculate the mean + std of the dataset
mean = []
std = []
# we use the transformation w/o augmentation on the training dataset to calculate the mean + std
dataset["train"].set_transform(preprocess_audio, output_all_columns=False)
for i, (audio_input, labels) in enumerate(dataset["train"]):
    cur_mean = torch.mean(dataset["train"][i][audio_input])
    cur_std = torch.std(dataset["train"][i][audio_input])
    mean.append(cur_mean)
    std.append(cur_std)
feature_extractor.mean = np.mean(mean)
feature_extractor.std = np.mean(std)
feature_extractor.do_normalize = True
应用变换进行预处理: 我们创建了一个函数,通过将音频数组编码为模型所需的 input_values 格式,对音频数据进行预处理。该函数的设置为动态应用,即在从数据集加载每个样本时,对数据进行即时处理。
def preprocess_audio(batch):
    wavs = [audio["array"] for audio in batch["input_values"]]
    # inputs are spectrograms as torch.tensors now
    inputs = feature_extractor(wavs, sampling_rate=SAMPLING_RATE, return_tensors="pt")

    output_batch = {model_input_name: inputs.get(model_input_name), "labels": list(batch["labels"])}
    return output_batch
# Apply the transformation to the dataset
dataset = dataset.rename_column("audio", "input_values")  # rename audio column
dataset.set_transform(preprocess_audio, output_all_columns=False)
检查转换后的数据: 如果我们现在加载一个样本,它就会被即时转换,编码后的音频将作为 input_values 生成:
{'input_values': tensor([[-1.2776, -1.2776, -1.2776,  ..., -1.2776, -1.2776, -1.2776],'input_values': tensor([[-1.2776, -1.2776, -1.2776,  ..., -1.2776, -1.2776, -1.2776],
         [-1.2776, -1.2776, -1.2776,  ..., -1.2776, -1.2776, -1.2776],
         [-1.2776, -1.2776, -1.2776,  ..., -1.2776, -1.2776, -1.2776],
         ...,
         [ 0.4670,  0.4670,  0.4670,  ...,  0.4670,  0.4670,  0.4670],
         [ 0.4670,  0.4670,  0.4670,  ...,  0.4670,  0.4670,  0.4670],
         [ 0.4670,  0.4670,  0.4670,  ...,  0.4670,  0.4670,  0.4670]]),
 'label': 0}
分割数据集: 作为最后一个数据预处理步骤,我们将数据集分成训练集和测试集,同时利用标签进行分层。这样可以确保两组数据的类分布保持一致。
# split training data
if "test" not in dataset:
    dataset = dataset.train_test_split(test_size=0.2, shuffle=True, seed=0, stratify_by_column="labels")
3. 添加音频增强
增强功能通过在训练数据中引入可变性,在提高机器学习模型的鲁棒性方面发挥着至关重要的作用。这可以模拟不同的录音条件,帮助模型更好地泛化到未见过的数据中。
在深入了解设置之前,下面是一个可视化对比,显示了音频文件的原始频谱图和使用 AddBackgroundNoise 变换的增强版本。
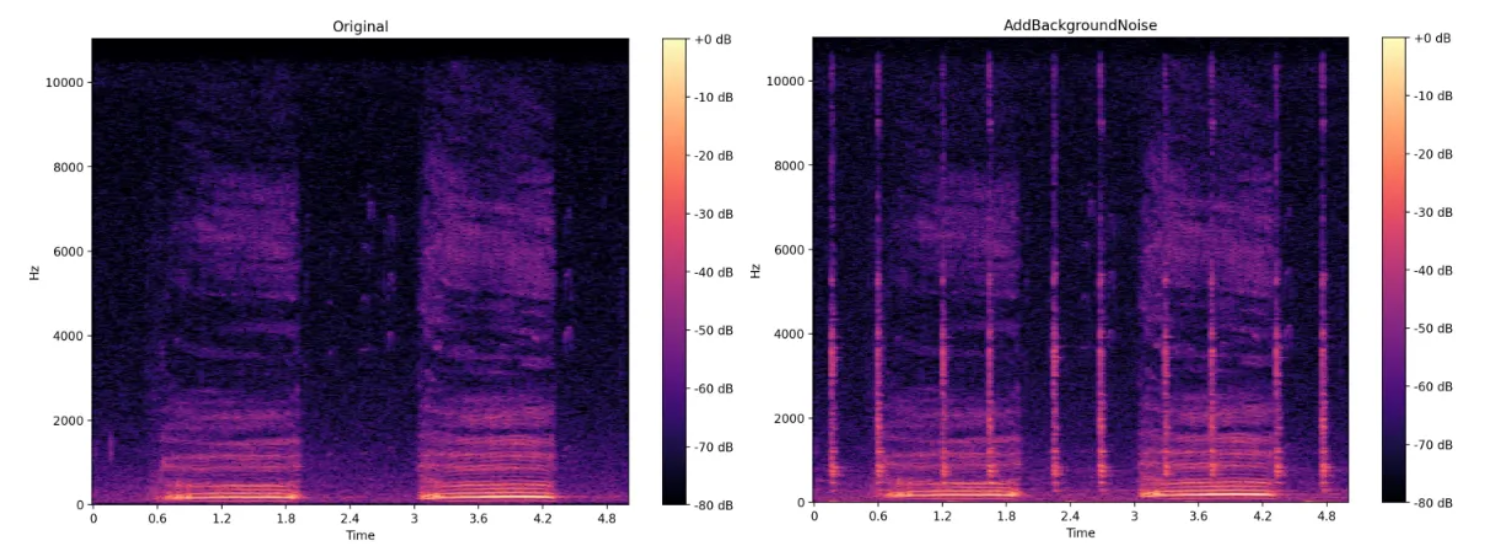
注:增强是一种非常有效的工具,可以提高训练的鲁棒性,减少机器学习模型的过拟合。
但是,必须仔细考虑每种变换的潜在影响。例如,添加噪声可能适合语音数据集,因为它可以模拟现实世界中存在背景噪声的场景。但是,对于声音分类等任务,这种增强可能会导致类混淆,从而导致模型性能低下。
设置音频增强:要创建一组音频增强效果,我们需要使用 Audiomentations 库中的 Compose 类,它允许我们将多个增强效果串联起来。
下面是设置方法:
from audiomentations import Compose, AddGaussianSNR, GainTransition, Gain, ClippingDistortion, TimeStretch, PitchShift
audio_augmentations = Compose([
    AddGaussianSNR(min_snr_db=10, max_snr_db=20),
    Gain(min_gain_db=-6, max_gain_db=6),
    GainTransition(min_gain_db=-6, max_gain_db=6, min_duration=0.01, max_duration=0.3, duration_unit="fraction"),
    ClippingDistortion(min_percentile_threshold=0, max_percentile_threshold=30, p=0.5),
    TimeStretch(min_rate=0.8, max_rate=1.2),
    PitchShift(min_semitones=-4, max_semitones=4),
], p=0.8, shuffle=True)
在此设置中:
- p=0.8 参数规定,“合成 ”序列中的每个增强都有 80% 的几率应用于任何给定的音频样本。这种概率方法可确保训练数据的可变性,防止模型过度依赖任何特定的增强模式,并提高其泛化能力。
- shuffle=True 参数可随机调整增强效果的应用顺序,从而增加了另一层可变性。
将增强技术整合到训练管道中: 我们在预处理音频转换过程中应用这些增强技术,同时将音频数据编码为频谱图。
带有增强功能的新预处理方法如下:
def preprocess_audio_with_transforms(batch):
    # we apply augmentations on each waveform
    wavs = [audio_augmentations(audio["array"], sample_rate=SAMPLING_RATE) for audio in batch["input_values"]]
    inputs = feature_extractor(wavs, sampling_rate=SAMPLING_RATE, return_tensors="pt")

    output_batch = {model_input_name: inputs.get(model_input_name), "labels": list(batch["labels"])}
    return output_batch
# Cast the audio column to the appropriate feature type and rename it
dataset = dataset.cast_column("input_values", Audio(sampling_rate=feature_extractor.sampling_rate))
该函数对每个波形应用已定义的增强,然后使用 ASTFeatureExtractor 将增强后的波形编码为模型输入。
为训练和验证分割设置变换: 最后,我们将这些变换设置为在训练和验证阶段应用:
# with augmentations on the training set
dataset["train"].set_transform(preprocess_audio_with_transforms, output_all_columns=False)
# w/o augmentations on the test set
dataset["test"].set_transform(preprocess_audio, output_all_columns=False)
4. 配置和初始化 AST 以进行微调
为了使 AST 模型适应我们特定的音频分类任务,我们需要调整模型的配置。这是因为我们的数据集与预训练模型的类数不同,而且这些类对应不同的类别。这就需要用一个新的分类器头来替换预训练的分类器头,以解决我们的多类问题。
新分类器头的权重将随机初始化,而模型的其他权重将从预训练版本中加载。这样,我们就能从预训练中学习到的特征中获益,并根据数据进行微调。
下面是如何使用新的分类头设置和初始化 AST 模型:
from transformers import ASTConfig, ASTForAudioClassification
# Load configuration from the pretrained model
config = ASTConfig.from_pretrained(pretrained_model)
# Update configuration with the number of labels in our dataset
config.num_labels = num_labels
config.label2id = label2id
config.id2label = {v: k for k, v in label2id.items()}
# Initialize the model with the updated configuration
model = ASTForAudioClassification.from_pretrained(pretrained_model, config=config, ignore_mismatched_sizes=True)
model.init_weights()
预期输出: 我们会看到一些警告,表明正在重新初始化某些权重,尤其是分类器层中的权重:
Some weights of ASTForAudioClassification were not initialized from the model checkpoint at MIT/ast-finetuned-audioset-10-10-0.4593 and are newly initialized because the shapes did not match:from the model checkpoint at MIT/ast-finetuned-audioset-10-10-0.4593 and are newly initialized because the shapes did not match:
- classifier.dense.bias: found shape torch.Size([527]) in the checkpoint and torch.Size([2]) in the model instantiated
- classifier.dense.weight: found shape torch.Size([527, 768]) in the checkpoint and torch.Size([2, 768]) in the model instantiated
You should probably TRAIN this model on a down-stream task to be able to use it for predictions and inference.
5. 设置指标并开始训练
最后一步,我们将使用Transformers 库配置训练过程,并使用Evaluate 库定义评估指标,以评估模型的性能。
配置训练参数: TrainingArguments 类有助于设置训练过程的各种参数,如学习率、批量大小和历时次数。
from transformers import TrainingArguments
# Configure training run with TrainingArguments class
training_args = TrainingArguments(
    output_dir="./runs/ast_classifier",
    logging_dir="./logs/ast_classifier",
    report_to="tensorboard",
    learning_rate=5e-5,  # Learning rate
    push_to_hub=False,
    num_train_epochs=10,  # Number of epochs
    per_device_train_batch_size=8,  # Batch size per device
    eval_strategy="epoch",  # Evaluation strategy
    save_strategy="epoch",
    eval_steps=1,
    save_steps=1,
    load_best_model_at_end=True,
    metric_for_best_model="accuracy",
    logging_strategy="steps",
    logging_steps=20,
)
定义评估指标: 定义准确率、精确度、召回率和 F1 分数等指标来评估模型的性能。在训练过程中,compute_metrics 函数将处理这些计算。
import evaluate
import numpy as np
accuracy = evaluate.load("accuracy")
recall = evaluate.load("recall")
precision = evaluate.load("precision")
f1 = evaluate.load("f1")
AVERAGE = "macro" if config.num_labels > 2 else "binary"
def compute_metrics(eval_pred):
    logits = eval_pred.predictions
    predictions = np.argmax(logits, axis=1)
    metrics = accuracy.compute(predictions=predictions, references=eval_pred.label_ids)
    metrics.update(precision.compute(predictions=predictions, references=eval_pred.label_ids, average=AVERAGE))
    metrics.update(recall.compute(predictions=predictions, references=eval_pred.label_ids, average=AVERAGE))
    metrics.update(f1.compute(predictions=predictions, references=eval_pred.label_ids, average=AVERAGE))
    return metrics
设置培训师: 使用 Hugging Face 的训练器类来处理训练过程。该类集成了模型、训练参数、数据集和指标。
from transformers import Trainer
# Setup the trainer
trainer = Trainer(
    model=model,
    args=training_args,
    train_dataset=dataset["train"],
    eval_dataset=dataset["test"],
    compute_metrics=compute_metrics,  # Use the metrics function from above
)
一切配置完成后,我们就可以启动培训程序了:
trainer.train()
评估结果
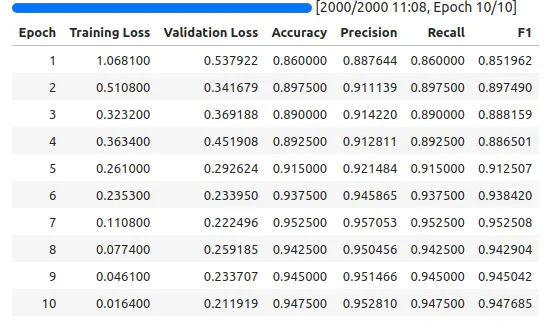
要了解模型的性能并找到潜在的改进领域,就必须评估其在训练和测试数据上的预测结果。在训练过程中,准确率、精确度、召回率和 F1 分数等指标都会记录到 TensorBoard 中,这样我们就可以随时检查模型的进度和性能。
启动 TensorBoard: 要可视化这些指标,请在终端运行以下命令启动 TensorBoard:
tensorboard --logdir="./logs""./logs"
这提供了模型随着时间推移的学习曲线和指标改进的图形表示,有助于在训练过程的早期识别潜在的过度拟合或性能不足。
要想获得更详细的见解,我们可以使用 Renumics 的开源工具 Spotlight 来检查模型的预测结果。Spotlight 使我们能够探索和可视化数据预测,帮助我们识别单个数据点的模式、潜在偏差和错误分类。
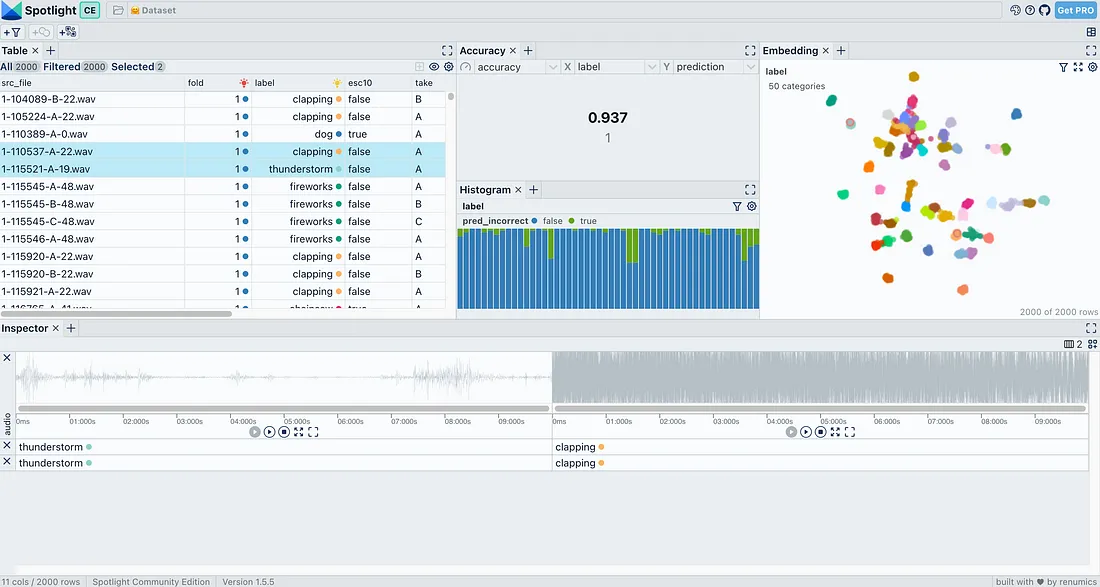
安装和使用 Spotlight:
要开始使用 Spotlight,请使用 pip 安装并加载数据集进行探索:
pip install renumics-spotlight
只需一行代码,即可加载 ESC50 数据集,进行交互式探索:
from renumics import spotlight
spotlight.show(esc50, dtype={"audio": spotlight.Audio})
结论
按照本文教程中概述的步骤,我们就能在任何音频分类数据集上微调音频谱图转换器 (AST)。这包括设置数据预处理、应用有效的音频增强以及为特定任务配置模型。训练完成后,我们可以使用定义的指标对模型的性能进行评估,确保其满足我们的要求。一旦模型经过微调和验证,就可以用于推理。


