构建AI代理:LangGraph的简明指南
在生成式人工智能领域,一种新的模式正在兴起:基于代理的系统。这些系统由自主代理驱动,可以完成复杂的任务、进行协作并做出决策,在未来,人工智能将不仅仅是一个工具,而是一个动态的合作者。实现多代理系统有多种设计模式。今天,我们将探讨两个代理合作完成任务并就结果达成一致的设计模式。
背景: 协作代理设计一瞥
在本文中,我们将介绍一个 LangGraph 实现,在该实现中,两个代理根据所提供的说明协作创建一篇关于某个主题的媒介文章。
代码演练
在本节中,我们将研究实现这种代理协作模式的各部分代码。
代码中的关键要素:
- 代理创建: create_agent 函数用于构建代理,指定其角色、工具和系统级指令。
- 工具节点: 工具节点对象包含代理可用于执行任务的工具列表。
- 代理节点: agent_node 辅助函数封装了单个代理的行为,处理状态信息并调用代理的功能。
- 路由器:路由器功能可根据代理信息的内容动态确定工作流程的下一步。
- 工作流定义: StateGraph 对象定义了工作流,通过条件边连接代理节点和工具节点。
- 执行: 执行编译后的图,以流式事件捕捉代理之间的交互和生成的输出。
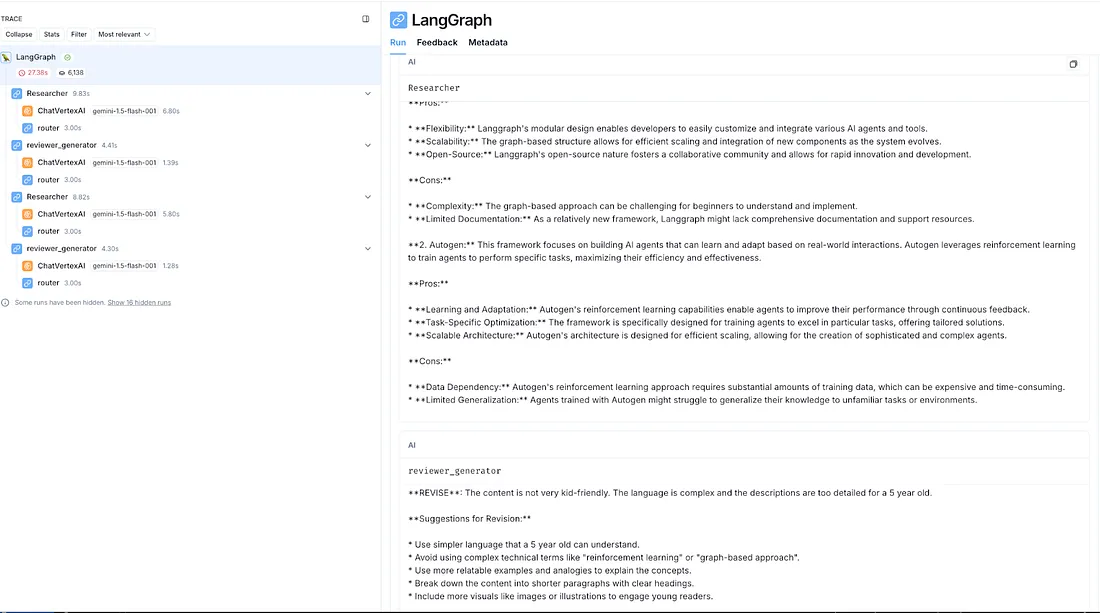
- 验证: LangSmith 控制台的快照,可用于验证和了解工作流的执行结果。
创建代理
第一个辅助函数是 create_agent()。该函数可用于创建遵循一系列指令的代理。这些代理将是我们执行图中的一些重要节点。每个代理的角色和任务将根据创建时传递的 system_message 和工具进行调整。不过请注意,我们也有一个总的系统指令,强调每个代理作为协作者的角色。
def create_agent(llm, tools, system_message: str):
   """Create an agent."""
   prompt = ChatPromptTemplate.from_messages(
       [
           (
               "system",
               "You are a helpful AI assistant, collaborating with other assistants."
               " Use the provided tools to progress towards answering the question."
               " You have access to the following tools: {tool_names}.\n{system_message}",
           ),
           MessagesPlaceholder(variable_name="messages"),
       ]
   )
   prompt = prompt.partial(system_message=system_message)
   prompt = prompt.partial(tool_names=", ".join([tool.name for tool in tools]))
   return prompt | llm.bind_tools(tools)
工具节点
接下来,让我们为代理提供一些工具。在本例中,我们只从一个工具开始: Tavily。这个搜索工具将是他们调查和收集我们感兴趣的主题信息的主要途径。
from langchain_community.tools.tavily_search import TavilySearchResults
from langchain_core.tools import tool
from langgraph.prebuilt import ToolNode

tavily_tool = TavilySearchResults(max_results=5)
tools = [tavily_tool]
tool_node = ToolNode(tools)
代理节点
现在我们定义代理节点。代理节点封装了一个代理(使用 create_agent 创建)并执行特定任务。在本示例中,我们的所有代理都会调用 LLM 并格式化 LLM 响应,以实现一致的状态管理。这些响应决定了后续的操作--要么将消息传递给下一个代理,要么进行工具调用。此外,它们还会返回自己的标识符,使我们能够跟踪消息发送者,并协调严格控制的工作流程。
# Helper function to create a node for a given agent
def agent_node(state, agent, name):
   result = agent.invoke(state)
   # We convert the agent output into a format that is suitable to append to the global state
   if isinstance(result, ToolMessage):
       pass
   else:
       result = AIMessage(**result.dict(exclude={"type", "name"}), name=name)
   return {
       "messages": [result],
       # Since we have a strict workflow, we can
       # track the sender so we know who to pass to next.
       "sender": name,
   }

"""Initiate the LLM on Vertex AI"""
llm = ChatVertexAI(
   model="gemini-1.5-pro-001",
   temperature=1,
   max_tokens=8192,
   max_retries=6,
   stop=None,
)

# Research agent and node
research_agent = create_agent(
   llm,
   [tavily_tool],
   system_message="You are an expert blogger. Your task is to create a medium blog article about the requested topic. You can use the tools at your disposal to perform the task.",
)
research_node = functools.partial(agent_node, agent=research_agent, name="Researcher")

# Reviewer
reviewer_agent = create_agent(
   llm,
   [tavily_tool],
   system_message="You are a content reviewer. You will critically examine the content for factuality, readability and interpretability. You will respond with suggestions to REVISE if you do not like a response and provide detailed review comments on what you did not like in the content. You will respond with FINAL ANSWER if you like the response and provide detailed review comments on what you liked in the content.",
)
article_node = functools.partial(agent_node, agent=reviewer_agent, name="reviewer_generator")
路由器
现在是操作的大脑:我们的路由逻辑。这是我们根据代理告诉我们的信息决定下一步行动的地方。把它想象成指挥信息流的交通控制器。它决定是否调用备份工具、在终点节点结束工作,还是将接力棒传给下一位代理。这一逻辑在 LangGraph 的条件路径中发挥着关键作用,确保一切顺利运行。
def router(state) -> Literal["call_tool", "__end__", "continue"]:
   # This is the router
   sleep(3) # prevent errors due to QPM throttling
   messages = state["messages"]
   last_message = messages[-1]
   if last_message.tool_calls:
       # The previous agent is invoking a tool
       return "call_tool"
   if "FINAL ANSWER" in last_message.content:
       # Any agent decided the work is done
       return "__end__"
   return "continue"
工作流程定义
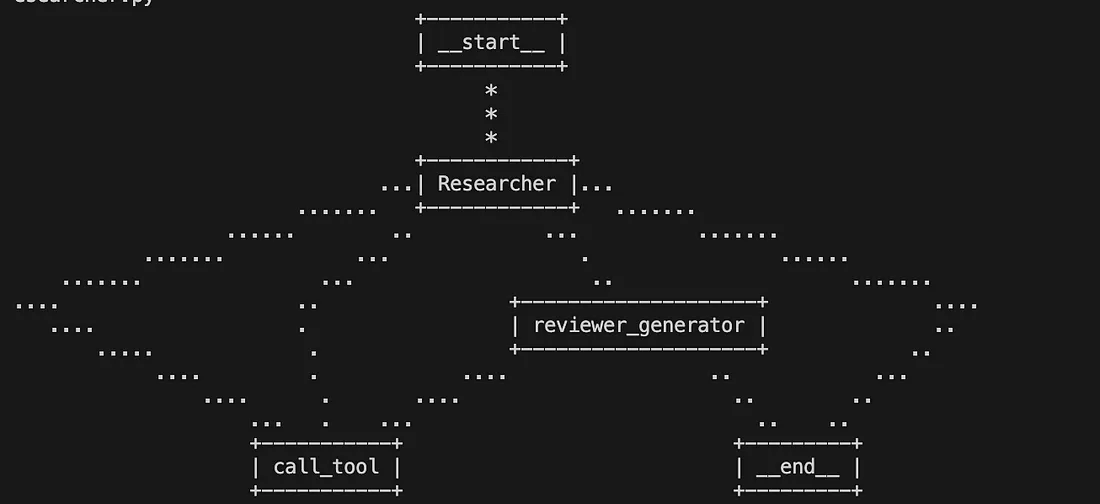
现在,我们根据之前定义的节点构建一个图。这包括在节点之间建立适当的边,并将它们排序为一个连贯的工作流程。由此产生的图形直观地表示了信息流以及各种代理节点和工具之间的依赖关系。
workflow = StateGraph(AgentState)

workflow.add_node("Researcher", research_node)
workflow.add_node("reviewer_generator", article_node)
workflow.add_node("call_tool", tool_node)

workflow.add_conditional_edges(
   "Researcher",
   router,
   {"continue": "reviewer_generator", "call_tool": "call_tool", "__end__": END},
)
workflow.add_conditional_edges(
   "reviewer_generator",
   router,
   {"continue": "Researcher", "call_tool": "call_tool", "__end__": END},
   #{"continue": "Researcher", "__end__": END},
)

workflow.add_conditional_edges(
   "call_tool",
   # Each agent node updates the 'sender' field
   # the tool calling node does not, meaning
   # this edge will route back to the original agent
   # who invoked the tool
   lambda x: x["sender"],
   {
       "Researcher": "Researcher",
       "reviewer_generator": "reviewer_generator",
   },
)
workflow.add_edge(START, "Researcher")
graph = workflow.compile()
try:
   grph = graph.get_graph(xray=True)
   grph.print_ascii()


except Exception as e:
   # This requires some extra dependencies and is optional
   print(traceback.format_exc())
   pass
print_ascii() 函数为我们精心设计的工作流程提供了宝贵的可视化表示。如下图所示,这个 ASCII 渲染的图形是一个基本工具,用于查看我们的业务逻辑和管理代理交互的复杂控制流。

通过这种可视化辅助工具,我们可以全面了解系统架构,便于调试、改进和优化。通过观察节点和边,我们可以追踪数据和控制的路径,确保我们的代理无缝协作,实现他们的目标。
执行
最后,我们调用图,通过用户定义的提示,要求代理创建一个关于不同代理框架的博客
events = graph.stream(
   {
       "messages": [
           HumanMessage(
               content="I need to write an Introductory medium article about Generative AI Agentic frameworks like LangGraph, Autogen and crewai."
               "The article should start with an overview of Agents."
               "The article then needs provide a detailed introduction of the LangGraph, Autogen and crewai. The article should also provide the pro and cons for each of the 3 frameworks. "
               "Provide an overall conclusion section at the end of the article summarizing your understanding across the Agentic frameworks"
           )
       ],
   },
   # Maximum number of steps to take in the graph
   {"recursion_limit": 150},
)
for s in events:
   print(s)
   print("----")
验证
你可以在 LangSmith 控制台上看到你的代理是如何进行幕后协作的。请查看下面的截图,偷窥其中一个工作流程的执行过程!


