【指南】GraphRAG知识图谱构建
今天,我们将深入一个非常令人兴奋的项目--使用 CSV 文件和知识图谱从头开始构建 GraphRAG 应用程序。
想象一下: 你是经营 “公司王子 ”的企业主。为了跟踪订单、发货人、客户和你的各种产品,你依赖 Excel 表。但随着人工智能的不断发展,你开始思考--如果能利用这项技术创建一个智能聊天机器人,即时检索你所需的有关产品、货物、客户和订单的所有信息,会怎么样呢?
现在,换个角度,想象一下你是一名人工智能应用开发人员,负责构建聊天机器人。你可能会想 最好的方法是什么?有这么多方法可供选择,从哪里开始呢?在本文中,我们将采用知识图谱方法,逐步指导你如何构建这个强大的系统。
首先,我们将使用 Python Pandas 从 CSV 文件中提取数据,然后深入学习一些 Cypher 代码来创建节点和关系,最后将数据导入 Neo4j 图数据库。一旦完成,我们将在此知识图谱之上构建一个检索增强生成(RAG)系统,让你可以以前所未有的方式查询产品、订单、客户和发货人数据。
设置和安装
要开始使用,我们首先需要安装一些依赖项和库。
创建项目目录结构
首先,让我们创建项目目录结构。为此,我将使用 VS-code。下面是创建初始设置所需的命令。
$ mkdir northwind_graph_rag
$ cd northwind_graph_rag
$ python3 -m venv venv
$ pip install pandas neo4j python-dotenv ipykernel
在终端中完成这些操作后,就可以打开 VScode,其命令:
$ code .
要使用上述命令,你需要在系统中正确设置代码。如果没有,只需像平常一样用用户界面打开 VScode 即可。
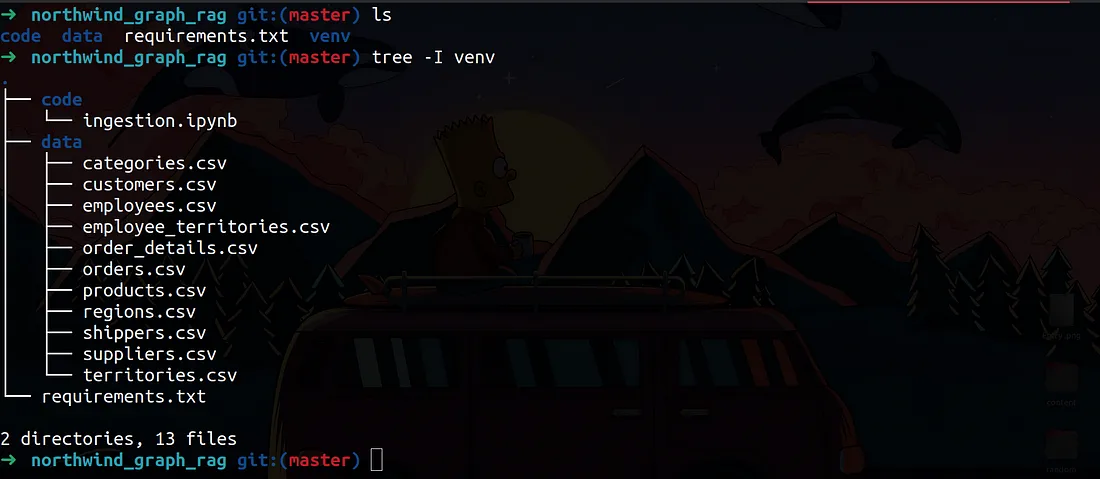
你还需要创建一个数据目录,用于存储所有 CSV 文件。
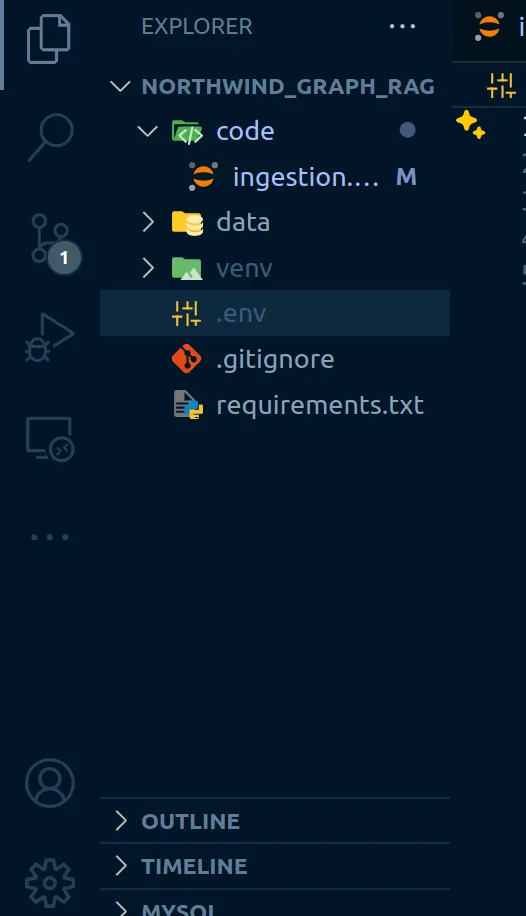
你还需要在项目的根目录下创建另一个文件夹,并将其命名为 code 。我们将在这里存储所有的 Jupyter 笔记本。我们将从一个用于数据摄取的 Jupyter 笔记本开始。将此文件命名为 ingestion.ipynb 。
完成后,你的目录结构应该是这样的:
安装依赖项
要安装依赖项,请在代码目录下打开一个 jupyter 笔记本,并确保在屏幕右上方的 VScode 中选择了一个内核(ipynbKernel)。你需要选择的内核必须是我们创建的虚拟环境文件夹,或者是我们刚刚创建的虚拟环境,这取决于你是如何理解的。这里有一张图片供你参考。查看图片右上方:

选择正确的内核后,我们就可以安装所需的软件包了:
!pip install pandas neo4j python-dotenv
你只需在 ingestion.ipynb 文件中创建一个新单元,并添加上述命令即可。执行该单元即可安装这些软件包。
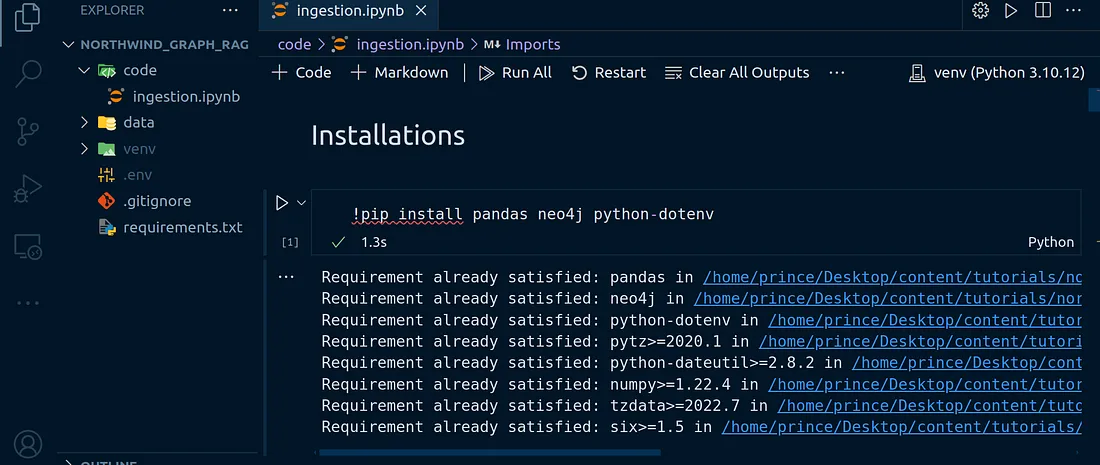
我已经安装了这些依赖项。
数据预处理
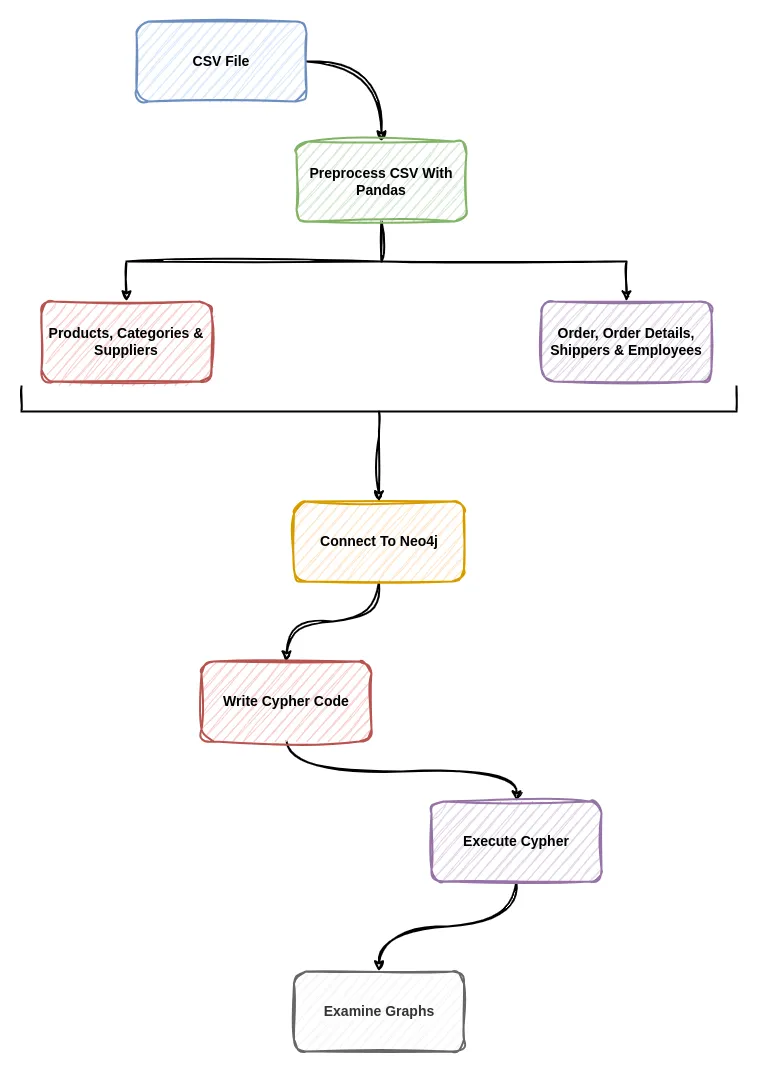
我们要做的第一步是预处理 CSV 文件,为将数据输入知识图谱做好准备。我们将合并表格,清除数据中的 NaN 值等。来看看这张图片:
产品、供应商和产品类别
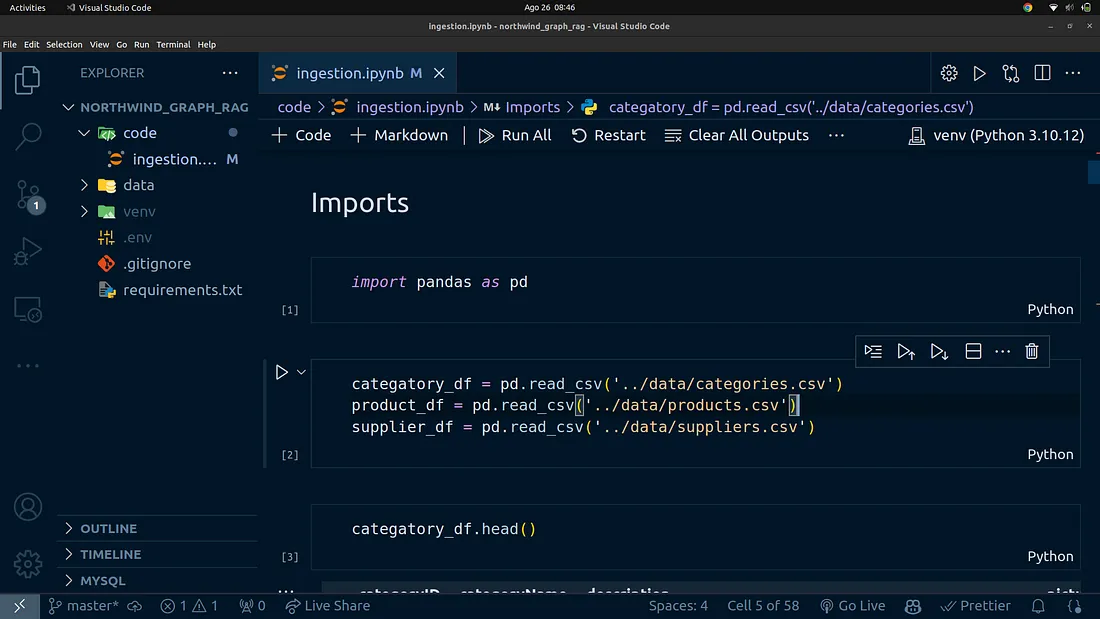
我们将首先处理产品、供应商和产品类别 CSV 文件。第一步是将 CSV 文件加载到 pandas DataFrame 中。
加载数据
要将 CSV 文件中的数据加载到 Pandas DataFrame 中,我们首先要导入必要的库和包。
import pandas as pd
categatory_df = pd.read_csv('../data/categories.csv')
product_df = pd.read_csv('../data/products.csv')
supplier_df = pd.read_csv('../data/suppliers.csv')
使用 Pandas 检查数据和清理数据
既然已经加载了数据,我们就可以继续检查数据,以便更好地理解数据,并清理数据以备使用。
为此,我们将使用下面的代码片段:
categatory_df.head()
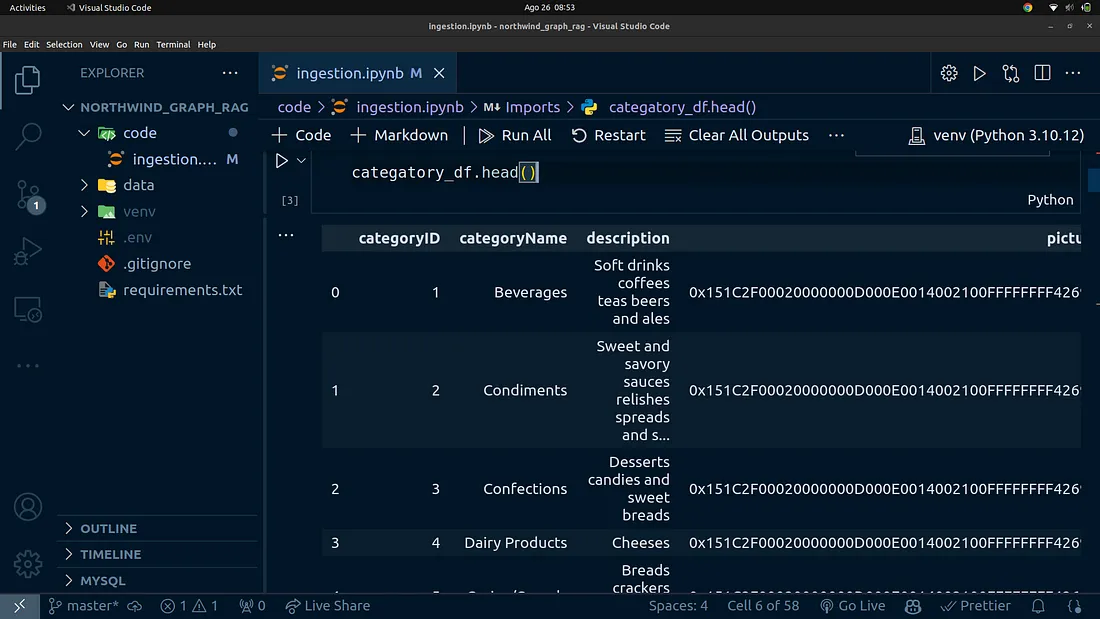
product_df.head()

supplier_df.head()
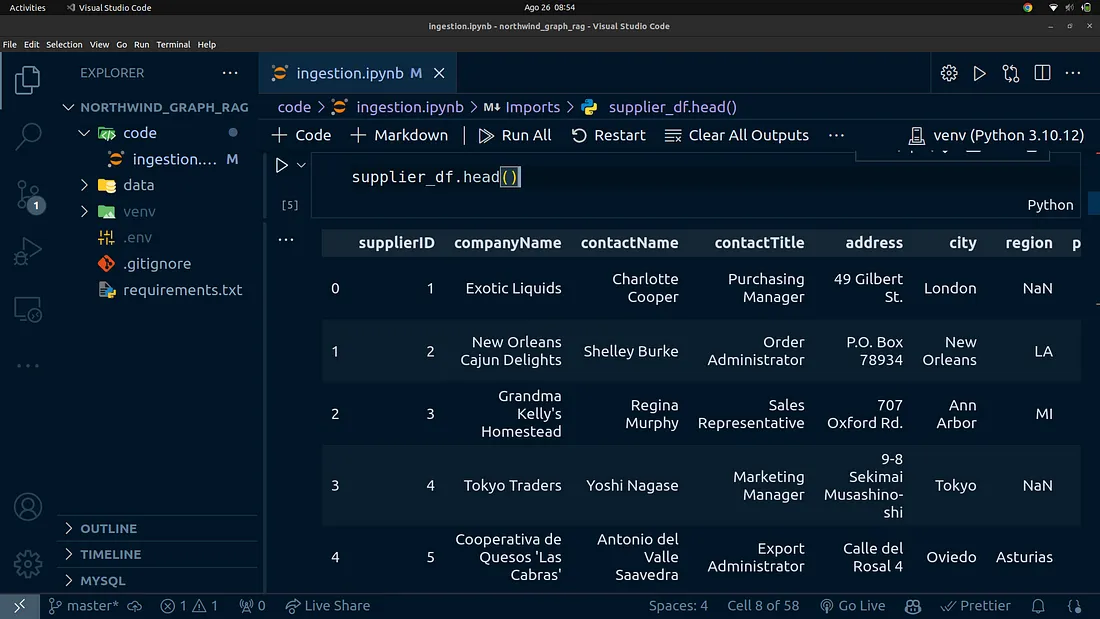
在 Pandas 中组合数据帧
现在我们对数据有了更清晰的了解,可以将数据帧合并为一个数据帧了。
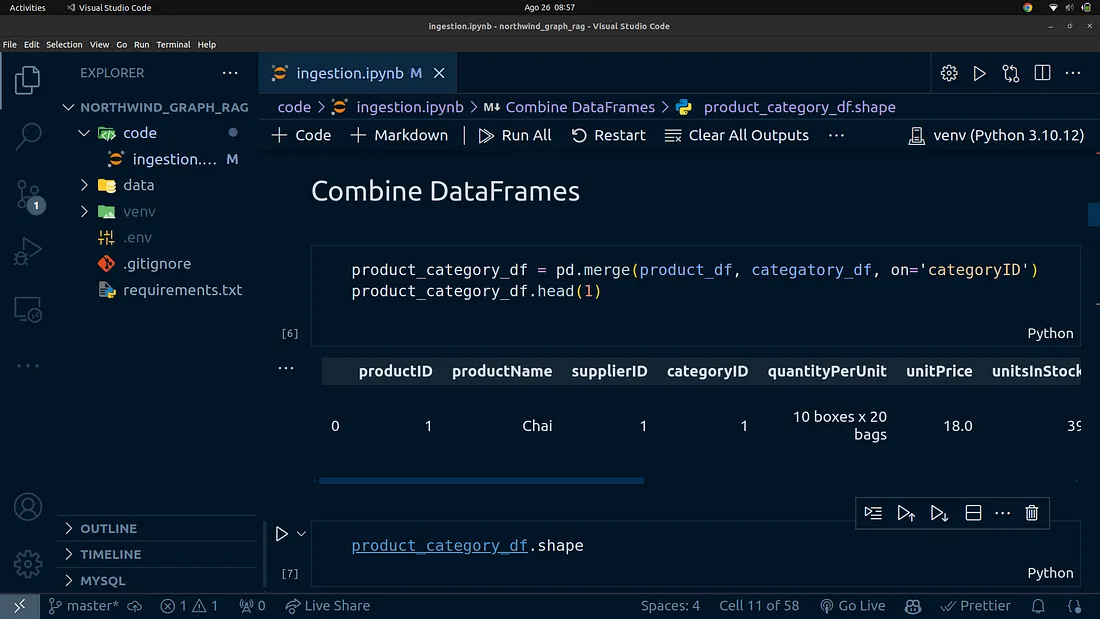
首先,我们将把 product_df 和 category_df 合并为一个数据帧。
product_category_df = pd.merge(product_df, categatory_df, on='categoryID')
product_category_df.head(1)
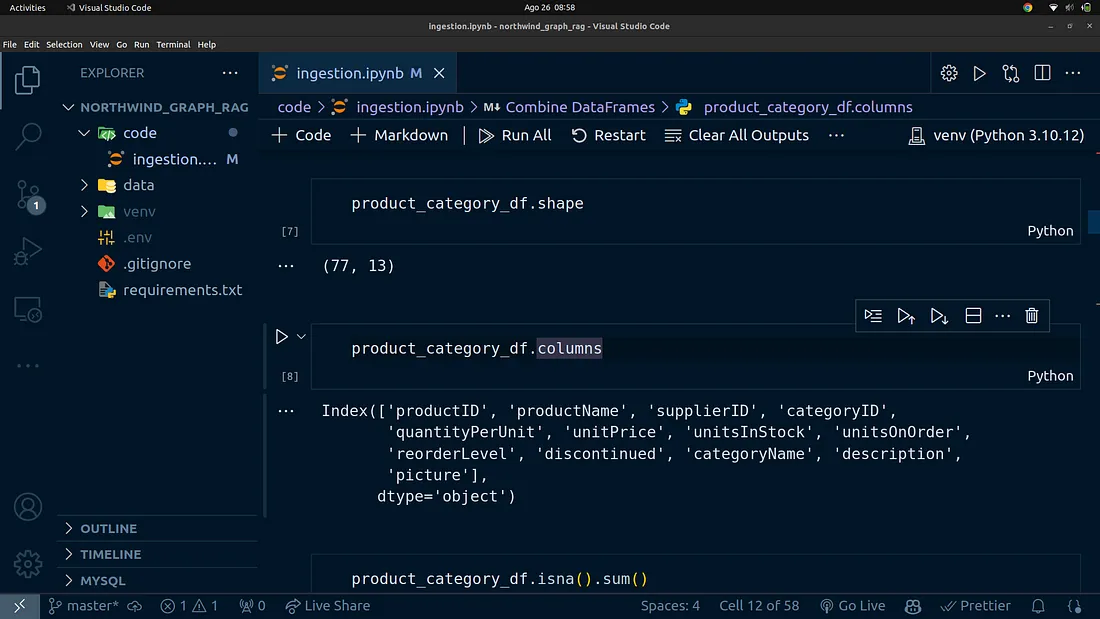
我们可以检查组合数据帧的形状,这将告诉我们数据帧中有多少行和列。
product_category_df.shape
我们还可以使用下面的代码检查有多少列:
product_category_df.columns
现在,让我们检查一下组合数据框中是否有缺失值。为此,你可以使用下面的代码块:
product_category_df.isna().sum()
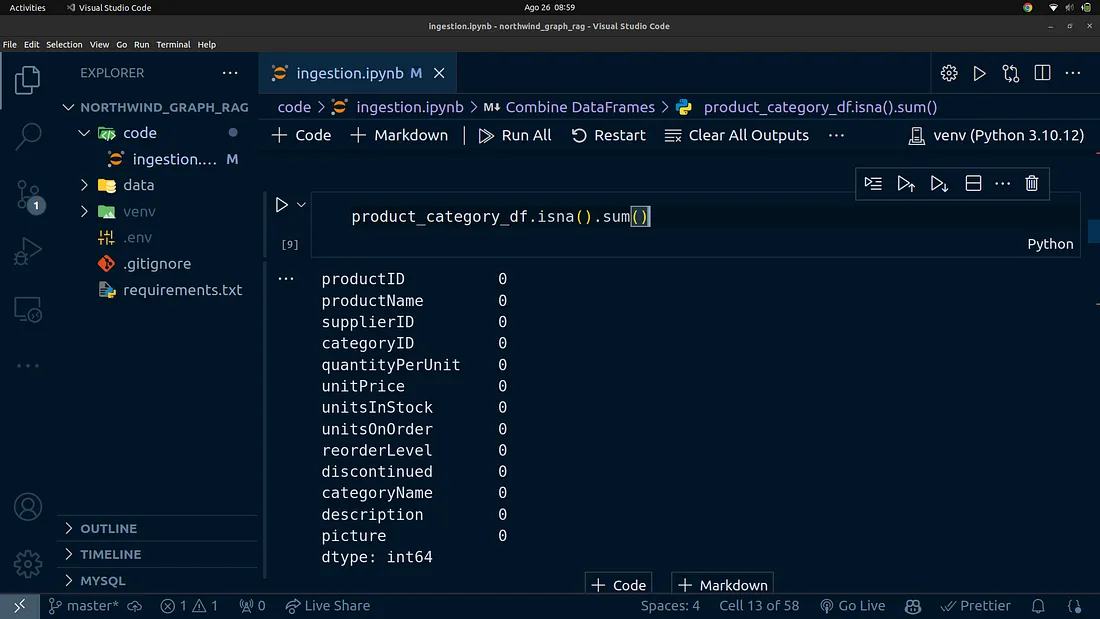
现在,我们可以将 supplier_df 与 product_category_df 数据帧合并。
product_category_supplier_df = pd.merge(
    product_category_df,
    supplier_df,
    on='supplierID',
    how='left'
)
product_category_supplier_df.head(1)
我不会深入介绍数据帧合并在 Pandas 中的工作原理。本文的重点是将数据导入知识图谱,并在此基础上创建 RAG 应用程序。
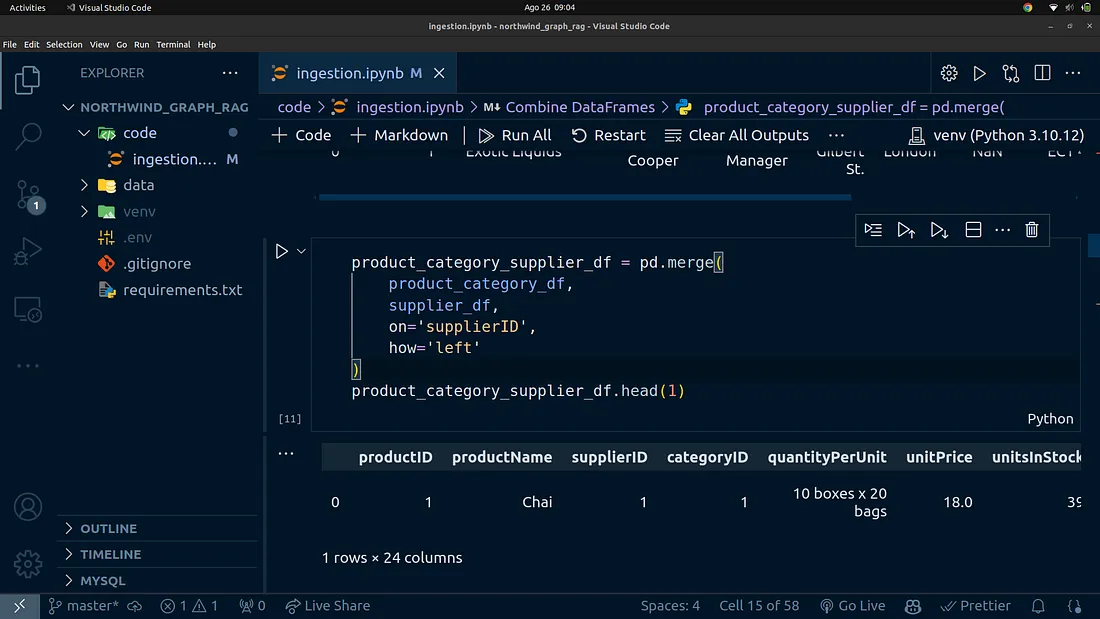
我们可以检查 product_category_supplier_df 的形状,为此请使用下面的代码:
product_category_supplier_df.shape
我们还可以使用
product_category_supplier_df.isna().sum()
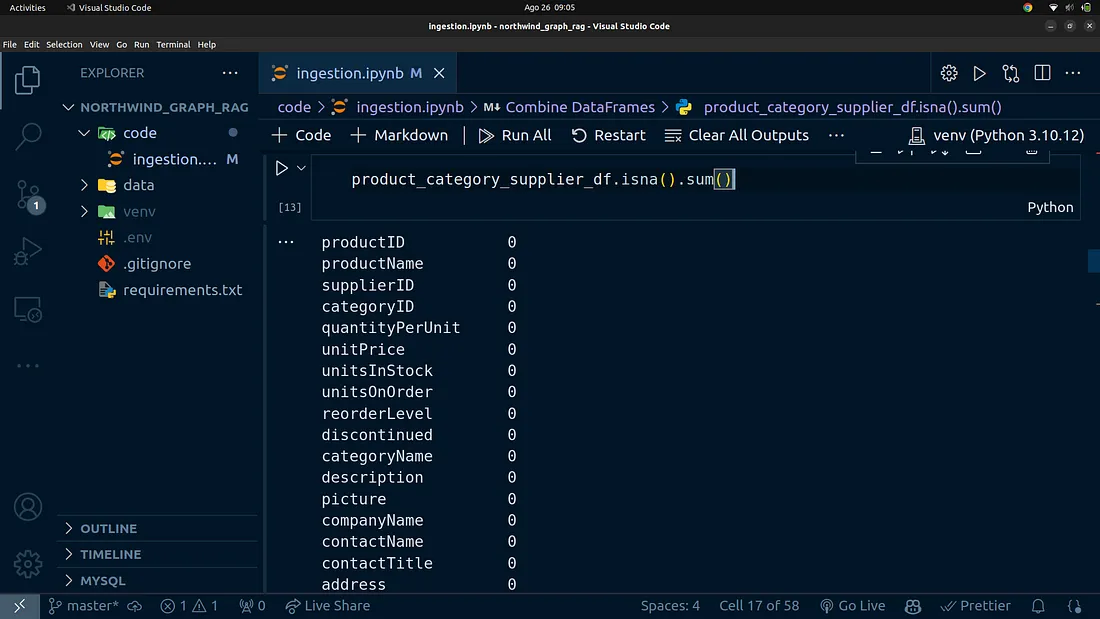
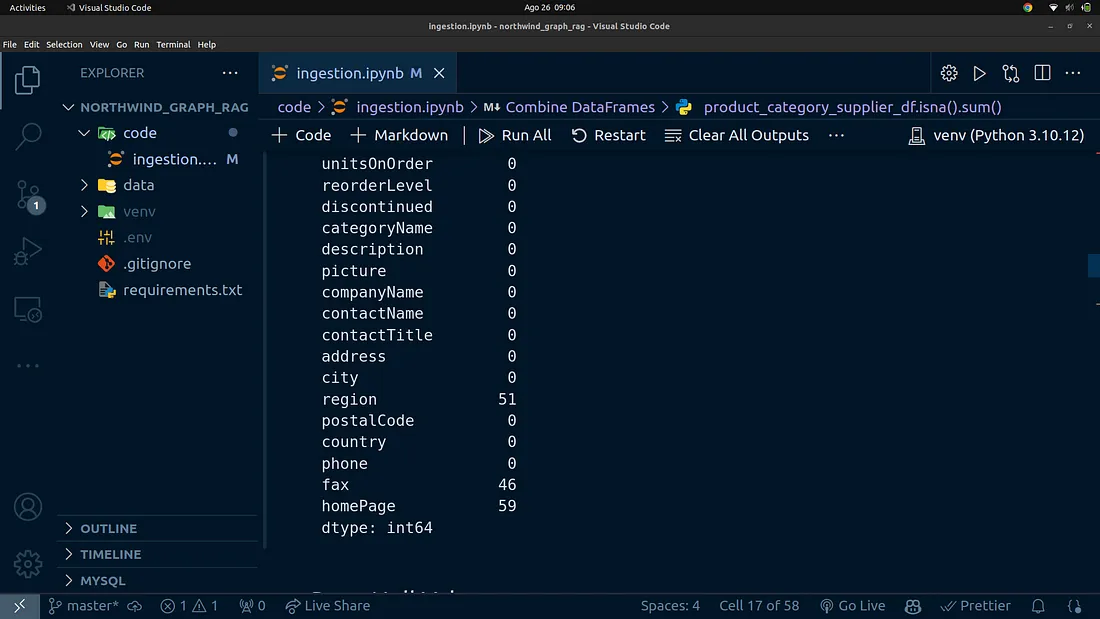
在 Pandas 中处理数据帧中的空值
我们将继续删除合并数据帧中的任何缺失值或空值。从上图中可以看出,区域、传真和 homePage 列都是空值。让我们继续用未知字符串替换丢失的单元格。这可以通过下面的代码块来完成:
product_category_supplier_df["region"] = product_category_supplier_df["region"].replace({pd.NA: "Unknown"})
product_category_supplier_df["fax"] = product_category_supplier_df["fax"].replace({pd.NA: "Unknown"})
product_category_supplier_df["homePage"] = product_category_supplier_df["homePage"].replace({pd.NA: "Unknown"})
product_category_supplier_df.isna().sum()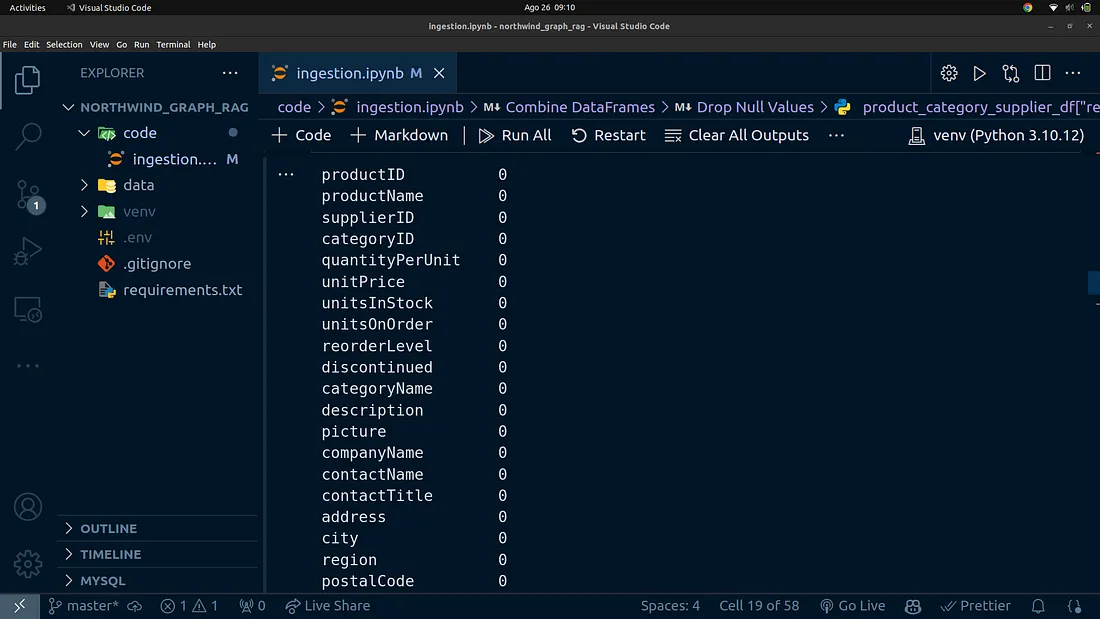
连接 Neo4j 数据库
在本节中,我们将介绍如何连接 Neo4j。首先,我们需要创建一个 Neo4j Aura 云账户。如果你愿意,也可以使用本地托管的 Neo4j 数据库。
为了简单易用,我们将使用 Neo4j Aura 实例。这将使我们所有人都能轻松跟进。
创建 Neo4j Aura 账户
要在 Neo4j Aura 上创建账户。
创建免费的 Neo4j Aura 实例
创建Neo4j Aura账户后,你可以创建一个免费实例,该实例免费提供给你学习和开发原型。
你可以在 Neo4j Aura 控制台创建免费实例。创建实例后,请确保下载凭证文本文件。该文件包含我们用来访问免费实例的凭据。
创建 .env 文件
获得连接到 Neo4j 实例的凭据后,我们需要创建一个 .env 文件,并将凭据添加到该文件中。为此,请在项目根目录下创建一个名为 .env 的文件,并按照以下格式添加凭证:
NEO4J_URI=xxxxxxxxxxx
NEO4J_USERNAME=xxxxxxxxxx
NEO4J_PASSWORD=xxxxxxxxxxxxxxx
AURA_INSTANCEID=xxxxxxxxxxxxxxxxx
AURA_INSTANCENAME=xxxxxxxxxxxxxx
加载环境变量
文件准备就绪后,我们就可以加载环境变量并在代码中使用它们了。为此,我们将使用已安装的 python-dotenv 库。
from dotenv import load_dotenv
import os
%load_ext dotenv
%dotenv
这段代码应将 .env 文件中的环境变量加载到操作系统环境变量中。这样,机密内容就不会暴露在我们的代码中了。
我们可以使用 Python 标准软件包中的 os 模块访问环境变量。我们可以这样做
NEO4J_URI = os.getenv("NEO4J_URI")
NEO4J_USER = os.getenv("NEO4J_USERNAME")
NEO4J_PASSWORD = os.getenv("NEO4J_PASSWORD")
连接到 Neo4j 免费实例
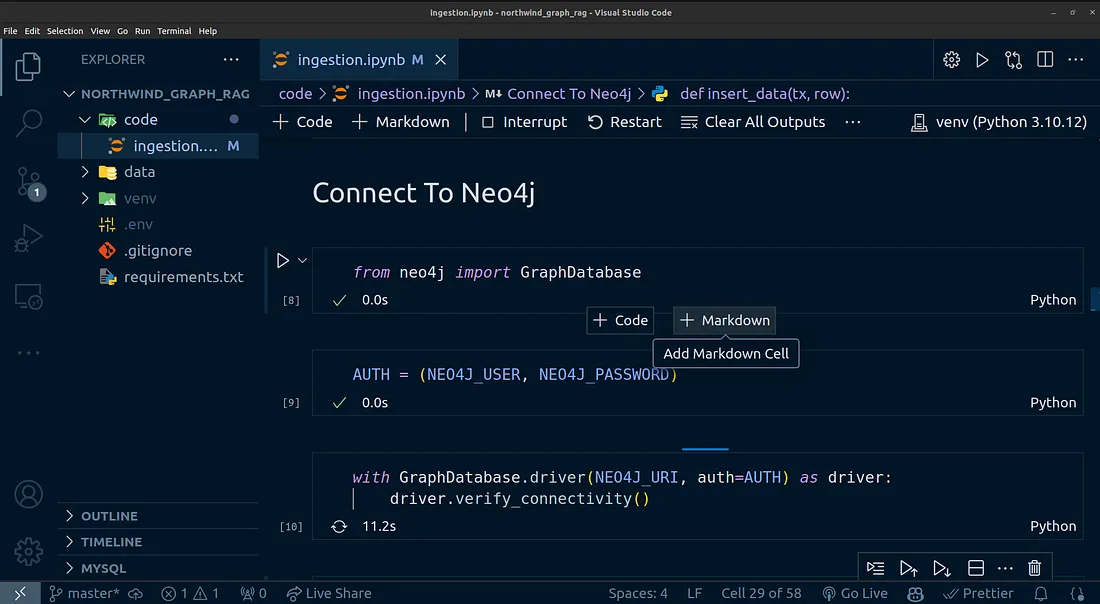
在开始将数据导入 Neo4j 实例之前,第一步是建立与实例的连接。假设你已经安装了必要的软件包并加载了证书,让我们连接到一个免费的 Neo4j 实例。
下面是建立连接的 Python 代码:
from neo4j import GraphDatabase
AUTH = (NEO4J_USER, NEO4J_PASSWORD)
with GraphDatabase.driver(NEO4J_URI, auth=AUTH) as driver:
    driver.verify_connectivity()
将数据输入 Neo4j
现在,我们已经成功连接到数据库,准备将数据插入 Neo4j 上的知识图谱数据库。为此,我们需要编写一些密码代码。下面的代码片段非常简单易懂。我就不解释这段密码代码了。
密码代码如下
def insert_data(tx, row):
    tx.run('''
            CREATE (product:Product {
                productID: $productID,
                productName: $productName,
                supplierID: $supplierID,
                categoryID: $categoryID,
                quantityPerUnit: $quantityPerUnit,
                unitPrice: $unitPrice,
                unitsInStock: $unitsInStock,
                unitsOnOrder: $unitsOnOrder,
                reorderLevel: $reorderLevel,
                discontinued: $discontinued
            })
            MERGE (category:Category {
                categoryID: $categoryID,
                categoryName: $categoryName,
                description: $description,
                picture: $picture
            })
            MERGE (supplier:Supplier {
                supplierID: $supplierID,
                companyName: $companyName,
                contactName: $contactName,
                contactTitle: $contactTitle,
                address: $address,
                city: $city,
                region: $region,
                postalCode: $postalCode,
                country: $country,
                phone: $phone,
                fax: $fax,
                homePage: $homePage
            })
            CREATE (product)-[:PART_OF]->(category)
            CREATE (product)-[:SUPPLIED_BY]->(supplier)
            ''', row)
数据输入代码
要将数据插入知识图谱数据库,我们需要执行以下代码。
with driver.session() as session:
    for _, row in product_category_supplier_df.iterrows():
        session.write_transaction(insert_data, row.to_dict())
上述代码只需遍历每一行,然后调用函数 insert_data,并传入每一行的字典格式。
执行该代码后,我们就将产品、供应商和产品类别节点插入了 Neo4j。
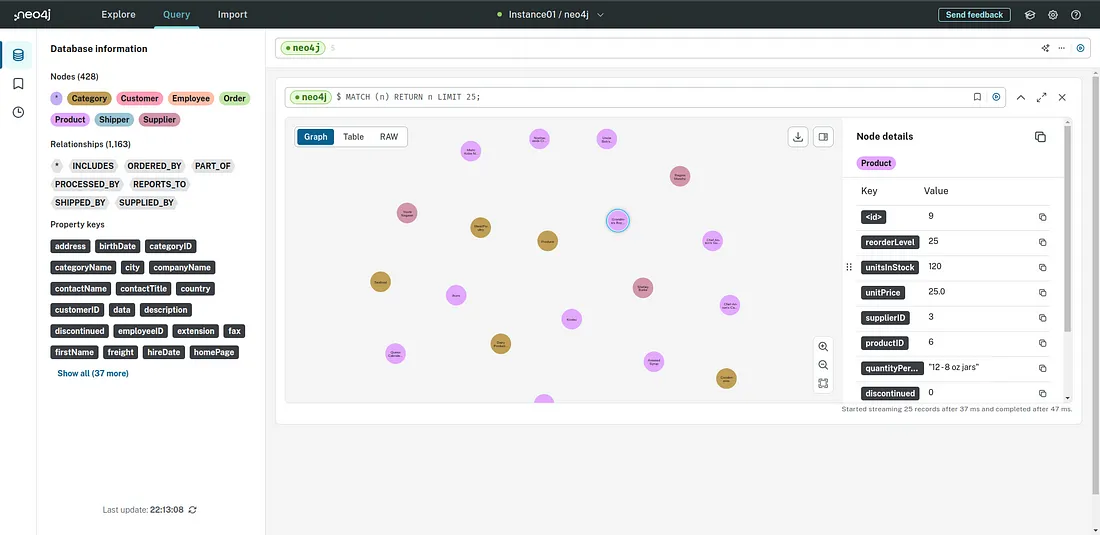
完成这些工作后,我们就可以继续编写一些密码查询来检查 Neo4j 中的数据了。下面是一些可以使用的基本密码查询。
MATCH (n:Product) RETURN n;
MATCH (n: Category) RETURN n;
MATCH (n:Supplier) RETURN n;
MATCH (n) RETURN n;
输入订单、订单详情、发货人、员工和客户节点
回到开头的图表,到目前为止,我们已经完成了左侧的工作。在本节中,我们可以完成图表右侧的工作。请看
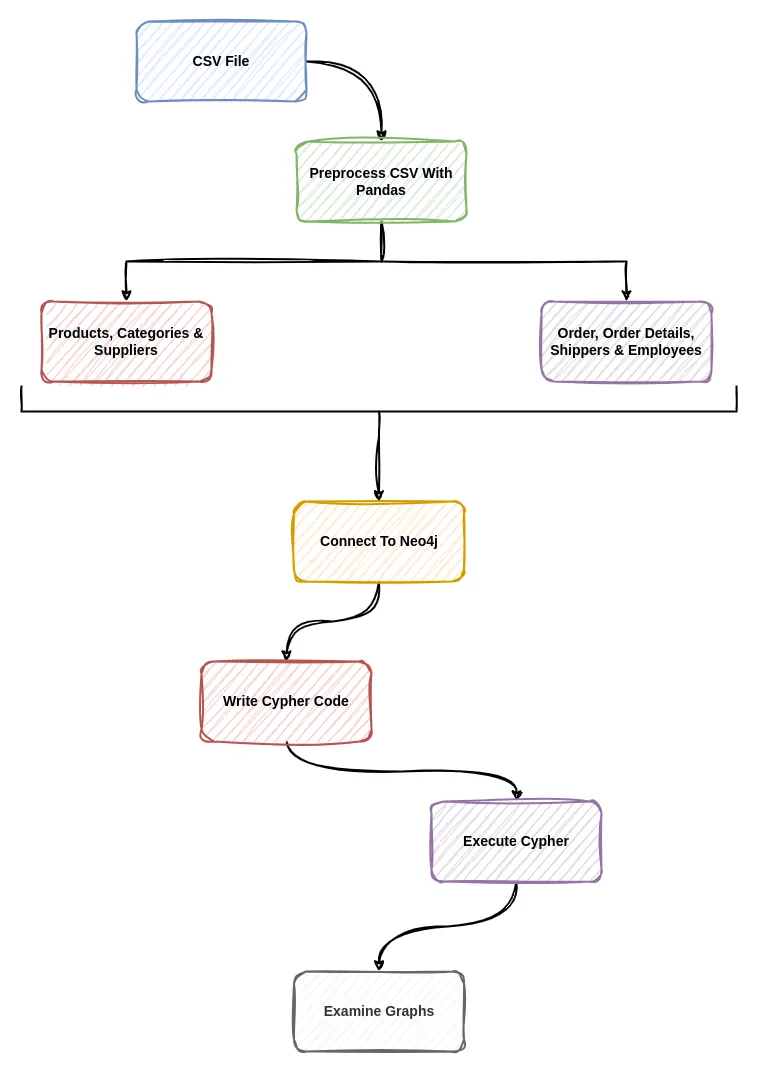
由于我们要做的功能基本相同,所以我将只介绍代码。
# Read the data into Pandas DataFrame
orders_df = pd.read_csv('../data/orders.csv')
order_details_df = pd.read_csv('../data/order_details.csv')
customer_df = pd.read_csv('../data/customers.csv')
shipper_df = pd.read_csv('../data/shippers.csv')
employee_df = pd.read_csv('../data/employees.csv')

# Merge the order and order details tables
orders_order_details_df = pd.merge(
    orders_df,
    order_details_df,
    on='orderID',
    how='left'
)

# Combine the resulting table with the customer table
orders_order_details_customer_df = pd.merge(orders_order_details_df, customer_df, on='customerID', how='left')

# Mere the resulting table from above with the shipper dataframe
orders_order_details_customer_shipper_df = pd.merge(
    orders_order_details_customer_df,
    shipper_df,
    left_on='shipVia',
    right_on="shipperID",
    how='left'
)

# Finally merge with the employee dataframe
orders_order_details_customer_shipper_employee_df = pd.merge(
    orders_order_details_customer_shipper_df,
    employee_df,
    left_on='employeeID',
    right_on='employeeID',
    how='left'
)

# Replace NaN with 'Unknown'
orders_order_details_customer_shipper_employee_df.replace({pd.NA: "Unknown"}, inplace=True)

# Change to integer
orders_order_details_customer_shipper_employee_df["reportsTo"] = orders_order_details_customer_shipper_employee_df["reportsTo"].astype('Int64')
# Create vice president node first since some nodes point to it.
vice_president = orders_order_details_customer_shipper_employee_df[orders_order_details_customer_shipper_employee_df["title"] == "Vice President"]
从上面来看,我首先创建的是副总裁节点,因为有些节点依赖于副总裁,基本上我们有一些员工节点要向副总裁报告。这种关系是 reports_to 关系。因此,副总经理节点需要先于其他节点存在,因为副总经理除了向自己报告外,不向其他任何员工报告,但其他员工向他/她报告。
现在我们可以编写一些cypher代码,将数据插入到Neo4j数据库中:
def create_manager(tx, row):
    tx.run("""
        MERGE (e:Employee {
            employeeID: $employeeID,
            lastName: $lastName,
            firstName: $firstName,
            title: $title,
            titleOfCourtesy: $titleOfCourtesy,
            birthDate: $birthDate,
            hireDate: $hireDate,
            address: $address_y,
            city: $city_y,
            region: $region_y,
            postalCode: $postalCode_y,
            country: $country_y,
            homePhone: $homePhone,
            extension: $extension,
            photo: $photo,
            notes: $notes,
            photoPath: $photoPath
    })
    """, row)
编写代码,将数据插入数据库:
with driver.session() as session:
    for _, row in vice_president.iterrows():
        session.write_transaction(create_manager, row.to_dict())
现在我们可以编写将数据插入数据库的密码代码了
def insert_data(tx, row):
    tx.run("""
    CREATE (o:Order {
        orderID: $orderID,
        orderDate: $orderDate,
        requiredDate: $requiredDate,
        shippedDate: $shippedDate,
        shipVia: $shipVia,
        freight: $freight,
        shipName: $shipName,
        shipAddress: $shipAddress,
        shipCity: $shipCity,
        shipRegion: $shipRegion,
        shipPostalCode: $shipPostalCode,
        shipCountry: $shipCountry
    })
    WITH o
    MATCH (p:Product { productID: $productID })
    WITH p, o
    MERGE (c:Customer {
        customerID: $customerID,
        companyName: $companyName_x,
        contactName: $contactName,
        contactTitle: $contactTitle,
        address: $address_x,
        city: $city_x,
        region: $region_x,
        postalCode: $postalCode_x,
        country: $country_x,
        phone: $phone_x,
        fax: $fax
    })
    WITH c, p, o
    MERGE (s:Shipper {
        shipperID: $shipperID,
        companyName: $companyName_y,
        phone: $phone_y
    })
    WITH s, c, p, o
    MERGE (e:Employee {
        employeeID: $employeeID,
        lastName: $lastName,
        firstName: $firstName,
        title: $title,
        titleOfCourtesy: $titleOfCourtesy,
        birthDate: $birthDate,
        hireDate: $hireDate,
        address: $address_y,
        city: $city_y,
        region: $region_y,
        postalCode: $postalCode_y,
        country: $country_y,
        homePhone: $homePhone,
        extension: $extension,
        photo: $photo,
        notes: $notes,
        photoPath: $photoPath
    })
    WITH e, s, c, p, o
    MATCH (m:Employee { employeeID: $reportsTo }) // Assuming reportsTo is the ID of the manager
    WITH m, e, s, c, p, o
    MERGE (e)-[:REPORTS_TO]->(m)
    MERGE (o)-[:INCLUDES]->(p)
    MERGE (o)-[:ORDERED_BY]->(c)
    MERGE (o)-[:SHIPPED_BY]->(s)
    MERGE (o)-[:PROCESSED_BY]->(e)
    """, parameters=row)
为简单起见,我只插入前 250 条记录:
with driver.session() as session:
    for _, row in orders_order_details_customer_shipper_employee_df[:250].iterrows():
        session.write_transaction(insert_data, row.to_dict())
一旦运行成功,我们就可以使用 Neo4j 控制台检查创建的知识图谱。
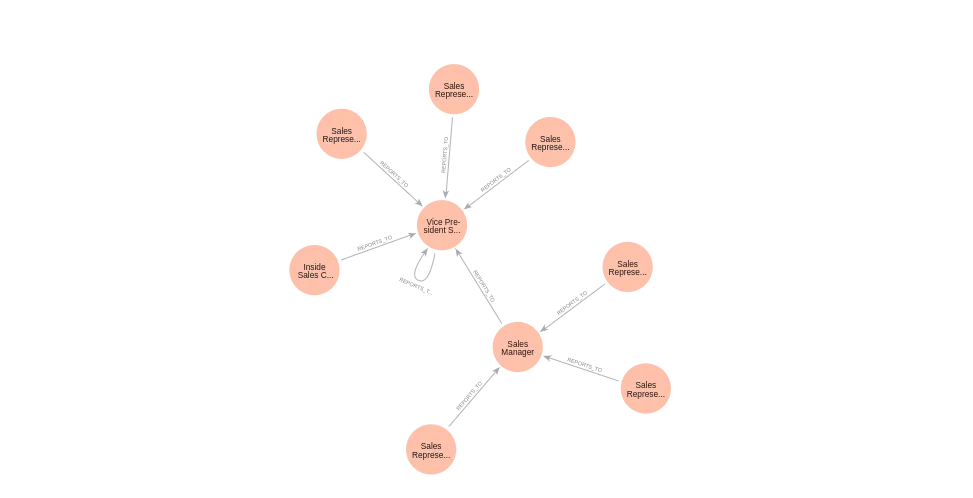
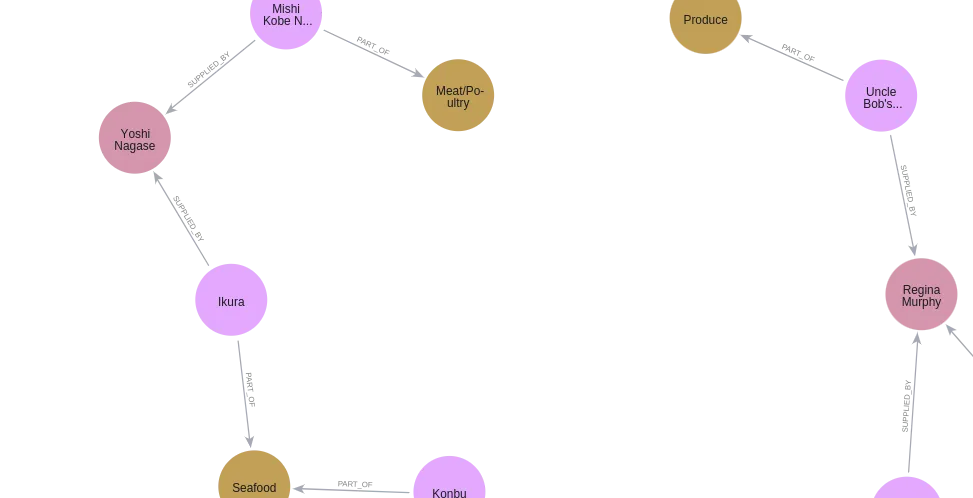
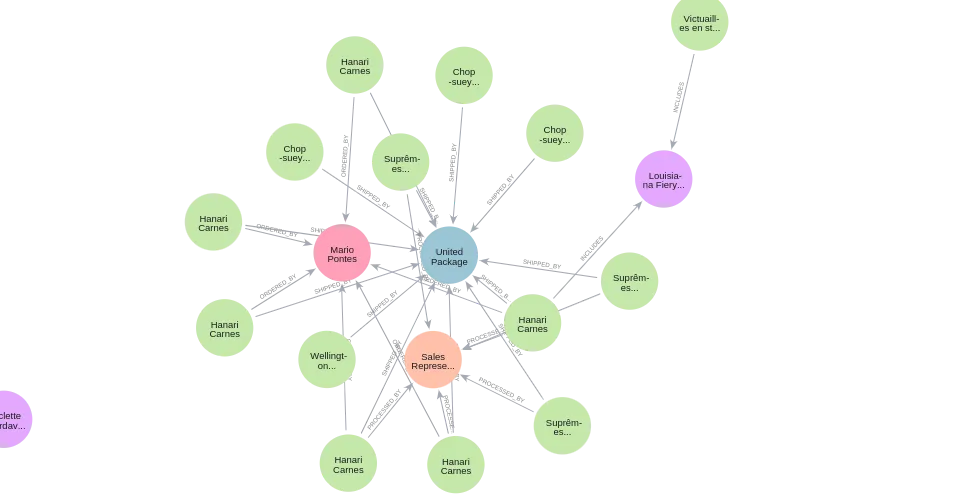
结论
恭喜你完成了本教程!我们已经成功地从 CSV 文件集合中构建了一个基础知识图谱,向强大的数据驱动应用程序迈出了第一步。


