利用PyMuPDF4LLM构建多模态LLM应用
在许多人工智能和 LLM(大语言模型)应用中,从 PDF 文件中提取文本是至关重要的一步,通常也是极具挑战性的一步。高质量的文本提取在改善下游流程(如标记化、嵌入创建或在矢量数据库中建立索引)中发挥着关键作用,从而提高应用程序的整体性能。PyMuPDF 因其简单、高速和可靠的文本提取质量而成为这项任务的常用库。
在本文中,我们将探讨 Artifex最近推出的一个名为 PyMuPDF4LLM 的免费库。这个新库旨在简化从 PDF 中提取文本的过程,专为 LLM 和检索增强生成(RAG)应用而开发。它提供两种关键格式:
- pymupdf4llm.to_markdown(): 提取 Markdown 格式的内容。
- pymupdf4llm.LlamaMarkdownReader(): 将内容提取为 LlamaIndex 文档对象。
我们将重点关注 to_markdown,因为它包含多个超参数,可以实现图像提取等功能,使其既适用于文本应用,也适用于多模态应用。
主要功能
全套超参数可在 API 文档中找到。我们将详细介绍其中的几个参数,PyMuPDF4LLM 的主要功能可归纳如下:
- 文本提取: 提取 Markdown 格式的内容。
- 分块: 支持在提取的内容中添加元数据、表格和图片列表。
- 图像提取: 提供定义图像大小、分辨率和格式的选项。
- 图片嵌入:在 Markdown 输出中直接嵌入图片。
- 单词提取:可从 PDF 中精确提取单词。
文本提取
这是流程的第一步。如下图所示,文本被提取为 Markdown 格式,并可指定要提取文档的哪些页面。
!pip install -qq pymupdf4llm
import pymupdf4llm
md_text = pymupdf4llm.to_markdown(doc="/content/document.pdf",
                                  pages = [0, 1, 2])
输出文本
#### Provided proper attribution is provided, Google hereby grants permission
to reproduce the tables and figures in this paper solely for use in
journalistic or scholarly works.\n\n## Attention Is All You Need\n\n\n**
Ashish Vaswani[∗]**\nGoogle Brain\n```\navaswani@google.com\n\n```\n**
Llion Jones[∗]**\nGoogle Research\n```\n llion@google.com\n\n```\n\n**
Noam Shazeer[∗]**\nGoogle Brain\n```\nnoam@google.com\n\n```\n\n
分块
这就是有趣的地方。对于 LLM 应用程序来说,纯 Markdown 文本并不理想--元数据在提高模型的准确性和性能方面起着至关重要的作用。如下图所示,可以提取大量信息,包括文档创建日期、文件路径、图像坐标和目录 (TOC),所有这些都可以丰富应用程序的上下文。
md_text = pymupdf4llm.to_markdown(doc="/content/document.pdf",
                                  pages = [0, 1, 2],
                                  page_chunks = True)
下面的输出是通过添加page_chunks选项提取的多个数据块之一。
输出块
{'metadata': {'format': 'PDF 1.5',
'title': '',
'author': '',
'subject': '',
'keywords': '',
'creator': 'LaTeX with hyperref',
'producer': 'pdfTeX-1.40.25',
'creationDate': 'D:20240410211143Z',
'modDate': 'D:20240410211143Z',
'trapped': '',
'encryption': None,
'file_path': '/content/document.pdf',
'page_count': 15,
'page': 3},
'toc_items': [[2, 'Encoder and Decoder Stacks', 3], [2, 'Attention', 3]],
'tables': [],
'images': [{'number': 0,
'bbox': (196.5590057373047,
72.00198364257812,
415.43902587890625,
394.4179992675781),
'transform': (218.8800048828125,
0.0,
-0.0,
322.416015625,
196.5590057373047,
72.00198364257812),
'width': 1520,
'height': 2239,
'colorspace': 3,
'cs-name': 'DeviceRGB',
'xres': 96,
'yres': 96,
'bpc': 8,
'size': 264957}],
'graphics': [],
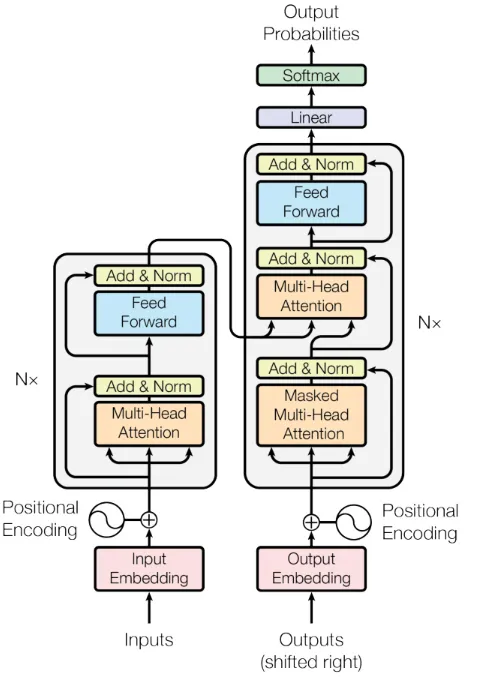
'text': '\n\nFigure 1: The Transformer - model architecture.\n\nThe Transformer follows this overall architecture using stacked self-attention and point-wise, fully\nconnected layers for both the encoder and decoder, shown in the left and right halves of Figure 1,\nrespectively.\n\n**3.1** **Encoder and Decoder Stacks**\n\n
**Encoder:** The encoder is composed of a stack of N = 6 identical'
'words': []}] 目录 (toc_items) 的提取格式为 [lvl、title、pagenumber],其中lvl为层次级别(标题为 1,副标题为 2、3......,取决于索引级别)。
提取图片
在前面的示例中,虽然我们可以看到相关字段的图像,但没有提取图像。要提取图像,必须将write_images参数设置为True。此外,还可以选择其他参数,如图像格式、dpi(分辨率)或保存提取图像的文件路径。
md_text = pymupdf4llm.to_markdown(doc="/content/document.pdf",
                                  pages = [0, 1, 2],
                                  page_chunks = True,
                                  write_images = True,
                                  image_path = "/content/images",
                                  image_format = "jpg",
                                  dpi = 200)
这样,图片就会保存在指定的文件夹中,并在相应语块的文本标记符中的相应字段中添加包含图片路径的占位符。该占位符包含文档名称、页码和图片编号。
输出图片
'graphics': [],
'text': '\n\nFigure 1:
The Transformer - model architecture.\n\nThe Transformer follows
this overall architecture using stacked self-attention and point-wise,'
在上述输出中,提取的图像如下所示。从文件中提取图像的功能使其能够用于多模态 LLM 应用程序,增加了一层额外的功能和多样性。

此外,你还可以使用embed_images参数将图片作为 base64 编码字符串直接嵌入 Markdown 文本中。这种方法将图片整合到 Markdown 文件中,但会增加文件大小,而且无法单独保存图片。
表格提取
与识别图片并将其坐标包含在 JSON 字典中的方式类似,每个识别出的表格也会将其坐标添加到相应的块中。
输出表格
'toc_items': [[2, 'English Constituency Parsing', 9]],
  'tables': [{'bbox': (108.0,
     129.87200927734375,
     508.73699951171875,
     384.1730041503906),
    'rows': 8,
    'columns': 3}],
  'images': [],
  'graphics': [],
  'text': 'Table 3: Variations on the Transformer architecture. Unlisted values are identical to those of the base\nmodel. All metrics are on the English-to-German translation development set, newstest2013. Listed\nperplexities are per-wordpiece, according to our byte-pair encoding, and should not be compared to\nper-word perplexities
文字提取
既然我们已经提取了文本、表格和图片,那么我们的 LLM 应用程序就有了额外的元数据。为了进一步丰富元数据,我们可以使用extract_words参数。这将包括一个按阅读顺序排列的单词列表,该列表与表格和图片一样,与每个特定块相关联,并配有坐标。这包括表格单元和页面多列中的单词,如下图所示。

md_text = pymupdf4llm.to_markdown(doc="/content/document.pdf",
                                  pages = [5, 6, 7],
                                  page_chunks = True,
                                  write_images = True,
                                  image_path = "/content/images",
                                  image_format = "jpg",
                                  dpi = 200,
                                  extract_words = True)
与前面的输出结果一样,我们可以在相应的词块字段中看到单词的序列。
输出词序
'graphics': [],
  'text': 'Table 1: Maximum path lengths,'
  'words': [(107.69100189208984,
    71.19241333007812,
    129.12155151367188,
    81.05488586425781,
    'Table',
    0,
    0,
    0),
   (131.31829833984375,
    71.19241333007812,
    138.9141845703125,
    81.05488586425781,
    '1:',
    0,
    0,
    1),
   (144.78195190429688,
    71.19241333007812,
    185.4658203125,
    81.05488586425781,
    'Maximum',
    0,
    0,
    2),
   (187.65281677246094,
    71.19241333007812,
    204.46530151367188,
    81.05488586425781,
    'path',
    0,
    0,
    3),
有了这种文档结构,我们不仅可以用纯 Markdown,还可以用图像、表格和文字及其各自的坐标来丰富我们的矢量数据库,同时还可以控制一些图像参数,如分辨率或格式。这种方法大大增强了任何需要从 PDF 中获取信息并要求高精度响应的应用。
笔记本电脑: 多模式应用
那么,一旦我们能够提取带有元数据和图像的丰富文本,我们能用 PyMuPDF4LLM 做什么呢?LLM 应用程序可以执行各种任务,但如果可以包含文本和图像,就可以使用多模态模型来提高应用程序的性能。
让我们创建一个笔记本,展示如何使用 Llama Index 作为框架、Qdrant 作为向量存储,将 PyMuPDF4LLM 用于多模态应用程序。
该应用程序遵循以下步骤。这是一个简单的 RAG(Retrieval Augmented Generation,检索增强生成)架构工作流,但在矢量数据库中添加了一个图像集合(除文本集合外),以便能够检索图像。需要熟悉这种工作流程及其常用库:
- 安装库和依赖项:pymupdf4llm、llamaindex 和 openai 图像剪辑嵌入
- 使用 pymupdf4llm 加载文档
- 文档对象定制:根据 pymupdf4llm 提取的信息选择元数据
- 在矢量存储中创建集合:文本应用程序将只有一个文本集合,但在这种情况下,我们将添加带有图像嵌入的第二个集合
- 编制索引:这一步需要在向量存储区内编制文本和图像索引
- 内容检索:通过用户查询,我们将找出最相似的文本块和图片
第 1 步:安装库并定义环境变量
首先,我们需要安装几个库,如 pymupdf4llm、llama index、qdrant 和 clip embeddings,以便为我们的图像生成 embeddings。此外,我们还需要一个用于 LLM 模型的 OPENAI_KEY。
!pip install -qq pymupdf4llm
!pip install -qq llama-index
!pip install -qq llama-index-vector-stores-qdrant
!pip install -qq git+https://github.com/openai/CLIP.git
!pip install -qq llama-index-embeddings-clip
!pip install -qq llama-index qdrant-client
os.environ["OPENAI_API_KEY"] = userdata.get('OPENAI_API_KEY')第 2 步:加载文件
然后,我们加载文档,生成块并提取 jpg 格式的图像,以便进一步处理。为简化起见,我们不会选择上面讨论的所有选项,但可以根据应用需求进一步定制。
# Perform the markdown conversion
docs = pymupdf4llm.to_markdown(doc="/content/document.pdf",
                                  page_chunks = True,
                                  write_images = True,
                                  image_path = "/content/images",
                                  image_format = "jpg")
第 3 步:自定义文档对象
Llama 索引需要一个文档对象。这些文档可以包含有用的元数据,并为每个块创建字典,有助于检索步骤。
因此,我们将根据从pymupdf4llm 中提取的数据定制文档对象。文本将是主要内容,作为元数据,我们选择toc_items、图片、页面和文件路径。这可以根据应用进一步扩展和定制,但正如我们所看到的,拥有丰富的内容可以让我们从第一步开始就强化流程,而这正是高效 LLM 应用的关键所在。
llama_documents = []
for document in docs:
    # Extract just the 'metadata' field and convert certain elements as needed
    metadata = {
        "file_path": document["metadata"].get("file_path"),
        "page": str(document["metadata"].get("page")),
        "images": str(document.get("images")),
        "toc_items": str(document.get("toc_items")),

    }
    # Create a Document object with just the text and the cleaned metadata
    llama_document = Document(
        text=document["text"],
        metadata=metadata,
        text_template="Metadata: {metadata_str}\n-----\nContent: {content}",
    )
    llama_documents.append(llama_document)
第 4 步:创建矢量存储
一旦我们的文档格式符合要求,图像也已提取,我们就可以用 Qdrant 创建两个集合,一个用于图像,另一个用于文本。
如前所述,这些集合将分别存储文本和图像嵌入,但一旦用户进行查询,就会同时检索这两个集合。
# Initialize Qdrant client
client = qdrant_client.QdrantClient(location=":memory:")
# Create a collection for text data
client.create_collection(
    collection_name="text_collection",
    vectors_config=VectorParams(size=1536, distance=Distance.COSINE)
)
# Create a collection for image data
client.create_collection(
    collection_name="image_collection",
    vectors_config=VectorParams(size=512, distance=Distance.COSINE)
)
# Initialize Collections
text_store = QdrantVectorStore(
    client=client, collection_name="text_collection"
)
image_store = QdrantVectorStore(
    client=client, collection_name="image_collection"
)
第 5 步:创建多模态索引
现在我们的矢量存储已经准备就绪,可以在集合中存储图片和文本了。为此,Llama 索引提供了多模态矢量存储索引(MultiModalVectorStoreIndex),我们必须在其中定义文本和图片的路径,并在文本集合中生成 TextNodes,在图片集合中生成 ImageNodes。
storage_context = StorageContext.from_defaults(
    vector_store=text_store, image_store=image_store
)
# context images
image_path = "/content/images"
image_documents = SimpleDirectoryReader(image_path).load_data()
index = MultiModalVectorStoreIndex.from_documents(
    llama_documents + image_documents,
    storage_context=storage_context)
这些节点代表我们预先定义的数据块,如果我们想让数据块更小,LlamaIndex 也允许这种可能性。为简化起见,我们将保持 pymupdf4llm 提取的数据块的大小。
第 6 步:检索内容
最后一步是提出一个问题,检查我们管道的效率。通过以下代码,我们将提取 1 个 TextNode 和 1 个 ImageNode。
# Set query and retriever
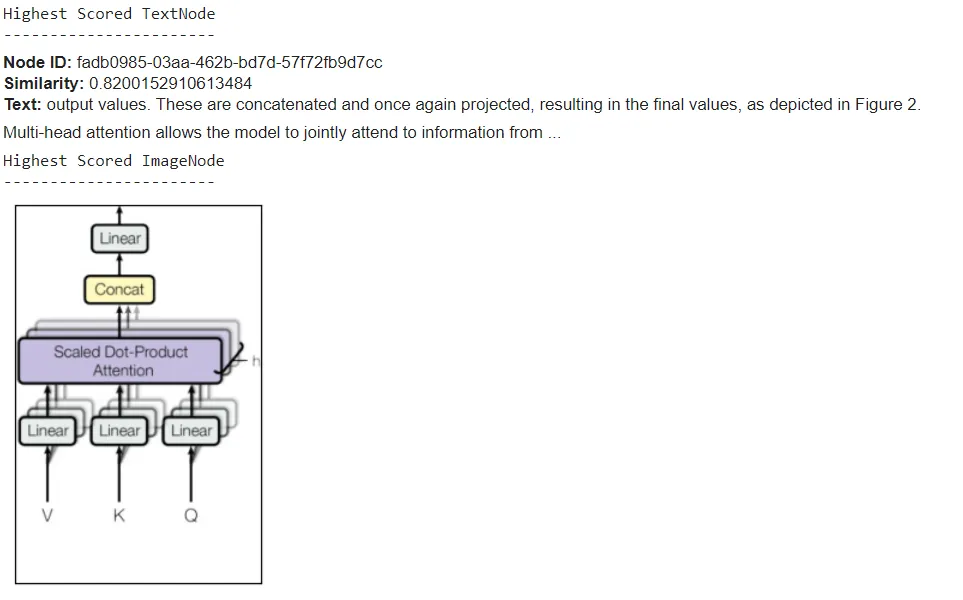
query = "Could you provide an image of the Multi-Head Attention?"
retriever = index.as_retriever(similarity_top_k=1, image_similarity_top_k=1)
retrieval_results = retriever.retrieve(query)
以下代码片段有助于直观显示图像和文本得分最高的节点。
import matplotlib.pyplot as plt
from PIL import Image
def plot_images(image_paths):
    images_shown = 0
    plt.figure(figsize=(16, 9))
    for img_path in image_paths:
        if os.path.isfile(img_path):
            image = Image.open(img_path)
            plt.subplot(2, 3, images_shown + 1)
            plt.imshow(image)
            plt.xticks([])
            plt.yticks([])
            images_shown += 1
            if images_shown >= 9:
                break

retrieved_image = []
for res_node in retrieval_results:
    if isinstance(res_node.node, ImageNode):
        print("Highest Scored ImageNode")
        print("-----------------------")
        retrieved_image.append(res_node.node.metadata["file_path"])
    else:
        print("Highest Scored TextNode")
        print("-----------------------")
        display_source_node(res_node, source_length=200)
我们看到结果令人满意,因为我们在文本节点中得到了图 2 的参考信息,这与我们从图像节点中得到的信息相同。

结论
在这篇文章中,我们利用pymupdf4llm的强大功能构建了一个简单的 RAG 管道,从文档中提取元数据和图像,从而改进了应用程序的功能。只需一行代码,就能提取所有相关数据,大大加快了管道创建过程。
Artifex 这款新型 LLM 工具的独特功能与LlamaMarkdownReader和 LlamaIndex 等其他集成相结合,为通过缩短开发时间来改进 LLM 应用程序开辟了新的可能性。


