深入文本分析:文本聚类与主题建模的实践指南(3)
在之前的文章中,我们探索了如何使用嵌入、降维和聚类算法从文本数据集(44,949 篇 arXiv NLP 论文摘要)创建聚类。我们还介绍了用于主题建模的模块化框架BERTopic ,并演示了如何使用基于类的TF-IDF等传统方法为每个聚类生成有意义的关键字。
在本文中,我们将更进一步,将表示模型和生成模型集成到主题建模管道中。要从头开始了解主题建模,请参阅本文的第 1 部分和第 2 部分。这些方法使我们能够通过编码语义含义来改进关键字选择,甚至可以使用大型语言模型 (LLM) 自动生成主题标签。让我们深入了解一下。

添加表示模型
表示模型细化提取的关键词,以确保它们与每个集群中文档的语义一致。
1. KeyBERT 启发式表示
BERTopic 库中的这个表示块允许我们计算集群中所有文档的平均嵌入向量,并根据关键字与关键字向量的余弦相似度对关键字进行排名。与文档在语义上更一致的关键字在排名中会更高。下图为我们提供了 KeyBERTInspired 如何执行此过程的概览。

2.最大边际相关性(MMR)
MMR 使所选关键词多样化,确保每个关键词都提供独特的信息。这减少了冗余,例如重复的术语,如
通过 c-TF-IDF 和 KeyBERTInspired 方法生成的主题表示通常包含冗余术语。一个明显的例子是,语义相似的词(如summary、summarization和 )summarized出现在同一个主题表示中。
为了解决这种冗余问题,我们可以利用最大边际相关性 (MMR)。这种方法有助于创建更多样化的主题表示,同时保持与源文档的相关性。MMR 的工作原理是首先创建潜在关键词的嵌入,然后根据多样性参数逐一选择它们,该参数控制所选关键词之间的差异程度。
添加生成模型
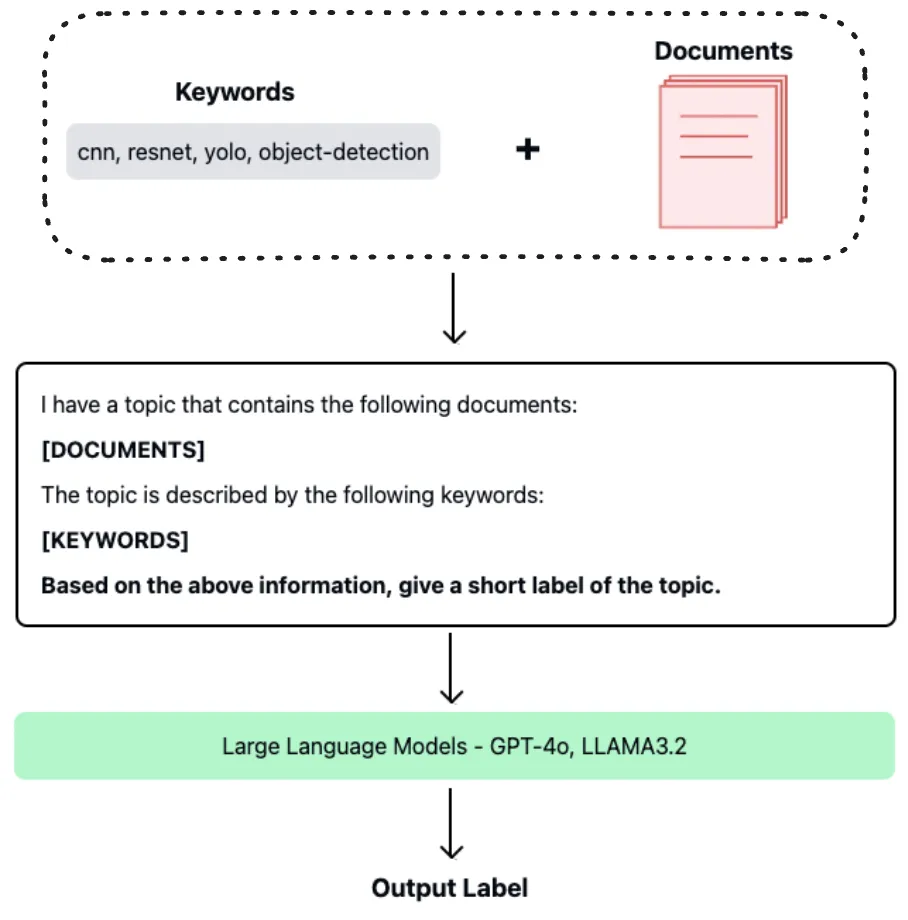
我们的方法同时利用了开源和闭源大型语言模型 (LLM) — 具体来说,分别是Ollama和OpenAI。虽然 OpenAI 的模型可能优于 Ollama,但比较两者有助于我们评估它们的相对有效性。核心机制依赖于提示工程,我们将文档及其重新排序的关键字动态输入到精心制作的提示模板中。此过程可以自动生成适当的主题标签。下图说明了此工作流程。

最终管道
为了确保每个人都能跟上,让我们从头开始,从头到尾完成完整的代码实现。
步骤 1:安装依赖项
pip install sentence-transformers xformers bertopic datasets openai datamapplot plotly
步骤2:加载数据集
# Load data from huggingface
from datasets import load_dataset
dataset = load_dataset("maartengr/arxiv_nlp")["train"]
# Extract metadata
abstracts = dataset["Abstracts"]
titles = dataset["Titles"]
步骤 3:生成嵌入
使用sentence-transformers库中的stella_en_400M_v5模型。
from sentence_transformers import SentenceTransformer
# Create an embedding for each abstract
embedding_model = SentenceTransformer('dunzhang/stella_en_400M_v5', trust_remote_code=True)
embeddings = embedding_model.encode(abstracts, show_progress_bar=True)
步骤4:降维
使用UMAP将高维嵌入表示降维至10维。
from umap import UMAP
# We reduce the input embeddings from 1024 dimenions to 10 dimenions
umap_model = UMAP(
    n_components=10, min_dist=0.0, metric='cosine', random_state=42
)
reduced_embeddings = umap_model.fit_transform(embeddings)
步骤 5:聚类
使用上一步获得的简化嵌入,使用HDBSCAN形成聚类。
from hdbscan import HDBSCAN
# We fit the model and extract the clusters
hdbscan_model = HDBSCAN(
    min_cluster_size=50, metric='euclidean', cluster_selection_method='eom'
).fit(reduced_embeddings)
clusters = hdbscan_model.labels_
步骤 6:使用 BERTopic 进行主题建模
在 BERTopic 中结合嵌入、降维和聚类。
from bertopic import BERTopic
# Train our model with our previously defined models
topic_model = BERTopic(
    embedding_model=embedding_model,
    umap_model=umap_model,
    hdbscan_model=hdbscan_model,
    verbose=True
).fit(abstracts, embeddings)
步骤 7:集成表征模型——微调表示
KeyBERT 启发
import pandas as pd
from copy import deepcopy
original_topics = deepcopy(topic_model.topic_representations_)
def topic_differences(model, original_topics, nr_topics=5):
    """Show the differences in topic representations between two models """
    df = pd.DataFrame(columns=["Topic", "Original", "Updated"])
    for topic in range(nr_topics):
        # Extract top 5 words per topic per model
        og_words = " | ".join(list(zip(*original_topics[topic]))[0][:5])
        new_words = " | ".join(list(zip(*model.get_topic(topic)))[0][:5])
        df.loc[len(df)] = [topic, og_words, new_words]

    return df

from bertopic.representation import KeyBERTInspired
# Update our topic representations using KeyBERTInspired
representation_model = KeyBERTInspired()
topic_model.update_topics(abstracts, representation_model=representation_model)
# Show topic differences
topic_differences(topic_model, original_topics)
输出:

通过KeyBERT启发的方法进行的重新排序过程在关键词排序上产生了可观察到的差异。然而,结果中仍然存在冗余。例如,主题3包含了语义上相似的变体,如summary(总结)、summarization(概述)和summarized(被总结的)。这种冗余将通过实施最大边缘相关性(Maximal Marginal Relevance,简称MMR)来解决,我们将在下一步中看到这一点。
MMR
from bertopic.representation import MaximalMarginalRelevance
# Update our topic representations to MaximalMarginalRelevance
representation_model = MaximalMarginalRelevance(diversity=0.5)
topic_model.update_topics(abstracts, representation_model=representation_model)

# Show topic differences
topic_differences(topic_model, original_topics)
输出:

结果表明,使用MMR表示模型可以减少冗余同时保持相关性,从而使主题关键词更加多样化。
步骤8:整合生成模型
开源模型 - Llama3.1 8B
必须在你的系统上安装Ollama。在终端中,输入以下命令以使用Llama3.1:
ollama run llama3.1:8b
Ollama提供了与OpenAI Chat Completions API格式的内置兼容性。我们将按如下方式使用它:
import openai
from bertopic.representation import OpenAI
prompt = """
I have a topic that contains the following documents:
[DOCUMENTS]
The topic is described by the following keywords: [KEYWORDS]
Based on the information above, extract a short topic label in the following format:
topic: <short topic label>
"""
client = openai.OpenAI(
    base_url = 'http://localhost:11434/v1',
    api_key='ollama', # required, but unused
)
# Update our topic representations using llama3.1
representation_model = OpenAI(
    client,
    model="llama3.1",
    exponential_backoff=True,
    chat=True,
    prompt=prompt
)
topic_model.update_topics(abstracts, representation_model=representation_model)
# Show topic differences
topic_differences(topic_model, original_topics)
输出:

闭源——OpenAI GPT-4o
import openai
from bertopic.representation import OpenAI
prompt = """
I have a topic that contains the following documents:
[DOCUMENTS]
The topic is described by the following keywords: [KEYWORDS]
Based on the information above, extract a short topic label in the following format:
topic: <short topic label>
"""
client = openai.OpenAI(api_key='API_KEY')
# Update our topic representations using GPT-4o-mini
representation_model = OpenAI(
    client,
    model="gpt-4o",
    exponential_backoff=True,
    chat=True,
    prompt=prompt
)
topic_model.update_topics(abstracts, representation_model=representation_model)
# Show topic differences
topic_differences(topic_model, original_topics)
输出:

GPT-4o和Llama3.1:8b的关键见解解释:
术语范围:
GPT-4o使用了更多具体且技术性的短语,如“开放领域”、“神经”和“冒犯性语言”。
Llama3.1:8b则选择了更广泛、更通用的术语。
上下文焦点:
GPT-4o经常强调领域特定的细微差别(例如,“深度学习”、“冒犯性语言”)。
Llama3.1:8b则对概念进行概括,使主题对非专业人士来说可能更易理解。
风格差异:
GPT-4o提供的标题稍长且更具描述性,为特定受众提供清晰性。
Llama3.1:8b的标题则保持简洁明了。
受众定位:
GPT-4o更适合那些喜欢具体性的技术或学术受众。
Llama3.1:8b可能吸引更广泛的受众,包括那些寻求简化或高层级信息的人。
这两种模型服务于不同的细分市场。选择哪种模型取决于成本、数据隐私、技术细节和受众期望之间的权衡。如果你已经本地安装了Llama3.1:8b,那么它是一个用于原型制作和一般用途的出色工具。然而,对于需要极高精度或特定领域语言的边缘情况,GPT-4o仍然具有优势。
检查聚类主题
快速检查主题
我们将探索更新后的“Name”列。
topic_model.get_topic_info()
输出:

从输出结果中,我们可以看到我们如何显著地改进了主题名称,不再仅仅使用关键词作为聚类标签。
可视化检查
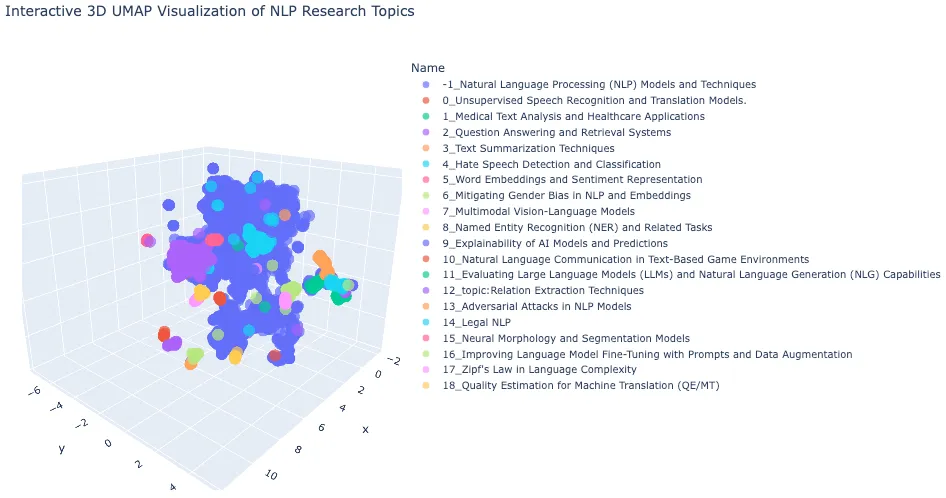
在本文中,我们将重点关注如何探索3D图。这段代码与前一节相同,但我们将只查看前20个聚类。
# Import necessary libraries
import pandas as pd
import plotly.express as px
from umap import UMAP
# Step 1: Dimensionality Reduction
# Reduce high-dimensional embeddings (1024D) to 3D space for visualization
# UMAP is chosen for its ability to preserve both local and global structure
reduced_embeddings_3d = UMAP(
    n_components=3,    # Target 3 dimensions for 3D visualization
    min_dist=0.0,      # Minimum distance between points, 0.0 for tighter clusters
    metric='cosine',   # Cosine similarity is well-suited for text embeddings
    random_state=42    # Set seed for reproducibility
).fit_transform(embeddings)
# Step 2: Create DataFrame with 3D Coordinates
# Transform UMAP output into a pandas DataFrame for easier manipulation
df_3d = pd.DataFrame(
    reduced_embeddings_3d,
    columns=["x", "y", "z"]  # Name dimensions for clarity
)
df_3d["title"] = titles                         # Add document titles
df_3d["cluster"] = [str(c) for c in clusters]   # Add cluster labels
# Step 3: Prepare DataFrames for Merging
# Convert data types to ensure consistent joining
topic_df = topic_model.get_topic_info()[:20]         # Get topic modeling results
topic_df['Topic'] = topic_df['Topic'].astype(int)
df_3d['cluster'] = df_3d['cluster'].astype(int)
# Step 4: Merge Topic Information with Coordinates
# Combine topic information with 3D coordinates using inner join
merged_df = topic_df.merge(
    df_3d,
    left_on='Topic',
    right_on='cluster',
    how='inner'
)
# Step 5: Select Relevant Columns
# Keep only necessary columns for visualization
columns_to_keep = ['Name', 'x', 'y', 'z', 'title']
final_df = merged_df[columns_to_keep]
# Step 6: Create Interactive 3D Visualization
# Use Plotly Express for an interactive 3D scatter plot
fig = px.scatter_3d(
    final_df,
    x='x',
    y='y',
    z='z',
    color='Name',      # Color points by topic name
    title='Interactive 3D UMAP Visualization of NLP Research Topics',
    opacity=0.7,       # Set partial transparency for better visibility
    color_continuous_scale='viridis',  # Use viridis color palette
    size_max=0.5,      # Control point size
    hover_data=['title']  # Show document title on hover
)
# Step 7: Customize Plot Layout
# Adjust plot dimensions and enable legend
fig.update_layout(
    width=1200,
    height=700,
    showlegend=True
)
# Display the interactive plot
fig.show()
输出:

语义可解释性:使用大型语言模型(LLMs)来生成主题名称,可以确保标签直观且与聚类的实际内容相一致。
邻近性反映关系:在3D空间中距离较近的主题具有语义上的重叠。例如,词嵌入和情感表示(主题5)可能靠近涉及自然语言处理(NLP)模型或嵌入的主题。
研究粒度:有些主题反映了广泛的研究领域(如“1_NLP模型和技术”),而其他主题则深入探讨了特定主题(如“17_语言复杂性中的齐普夫定律”)。
离群值代表广泛研究:离群聚类(-1)被命名为“自然语言处理(NLP)模型和技术”,表明它代表了一个广泛的研究领域。这意味着这些文档涵盖了与NLP相关的一般或多样化主题,因此更难将它们分配到特定的聚类中。
清晰度提高:LLM生成的名称将基于关键词的标签转变为有意义的描述,使聚类更易于理解。
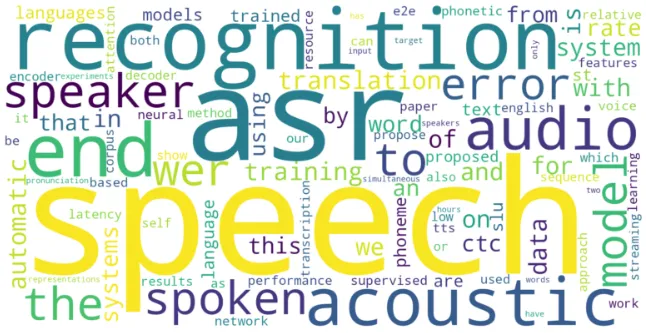
我们还可以看到每个聚类中最重要的n个单词。让我们选择主题0,并将top_n_words设置为100。
topic_model.update_topics(abstracts, top_n_words=100)
from wordcloud import WordCloud
import matplotlib.pyplot as plt
def create_wordcloud(model, topic):
    plt.figure(figsize=(10,5))
    text = {word: value for word, value in model.get_topic(topic)}
    wc = WordCloud(background_color="white", max_words=1000, width=1600, height=800)
    wc.generate_from_frequencies(text)
    plt.imshow(wc, interpolation="bilinear")
    plt.axis("off")
    plt.show()
# Show wordcloud
create_wordcloud(topic_model, topic=0)
输出:

在这个案例中,主题0的词云突出显示了诸如“speech”(语音)、“recognition”(识别)和“asr”(自动语音识别)等词汇,这表明该主题聚焦于语音识别系统。
结论
这一系列文章为我们提供了执行文本聚类和主题建模的实用技术。我们探索了在无监督学习中使用大型语言模型(生成式和表征式)的方法。与监督方法不同,文本聚类能够在没有先验标签的情况下,根据语义内容对文本进行分组。
该流程包括将文本转换为嵌入表示、应用降维技术以及对降维后的嵌入进行聚类。虽然手动检查聚类有助于解释,但BERTopic通过主题建模自动化了这一过程。它使用由c-TF-IDF增强的词袋方法来根据词汇与聚类的相关性进行加权。
主题表示已通过使用KeyBERTInspired和最大边缘相关性(MMR)进行了进一步的微调。此外,结合使用llama3.1:8b和gpt-4o的生成式大型语言模型,通过生成描述性主题标签来增强可解释性。这些技术的结合提高了分析大型文本数据集时的自动化程度、清晰度和可用性。


