【指南】如何构建Graph RAG应用程序
本文将全面介绍如何构建一个简单的图检索增强生成(Graph RAG)应用。什么是RAG?RAG,即检索增强生成,是指检索相关信息来增强发送给大语言模型的提示,从而生成响应。图检索增强生成是指使用知识图谱作为检索部分的一种RAG。
基本概念是,不要将你的提示直接发送给未在你的数据上训练过的大语言模型,而是可以用大语言模型准确回答你的提示所需的相关信息来补充你的提示。我经常用的一个例子是,将职位描述和我的简历复制到ChatGPT中来写求职信。如果我给大语言模型提供我的简历和我申请的职位描述,它就能对我的提示“给我写一封求职信”提供更相关的响应。由于知识图谱是为了存储知识而构建的,因此它们是存储内部数据并为大语言模型提示补充额外上下文的完美方式,从而提高响应的准确性和上下文理解。
这项技术有非常多的应用,比如客户服务机器人、药物发现、生命科学中的自动化监管报告生成、人力资源领域的人才招聘和管理、法律研究和写作,以及财富顾问助手。由于图检索增强生成(我在这里使用的术语)具有广泛的适用性和提高大语言模型工具性能的潜力,因此其受欢迎程度一直在飙升。下面是一张基于谷歌搜索显示的随时间变化的兴趣图表。
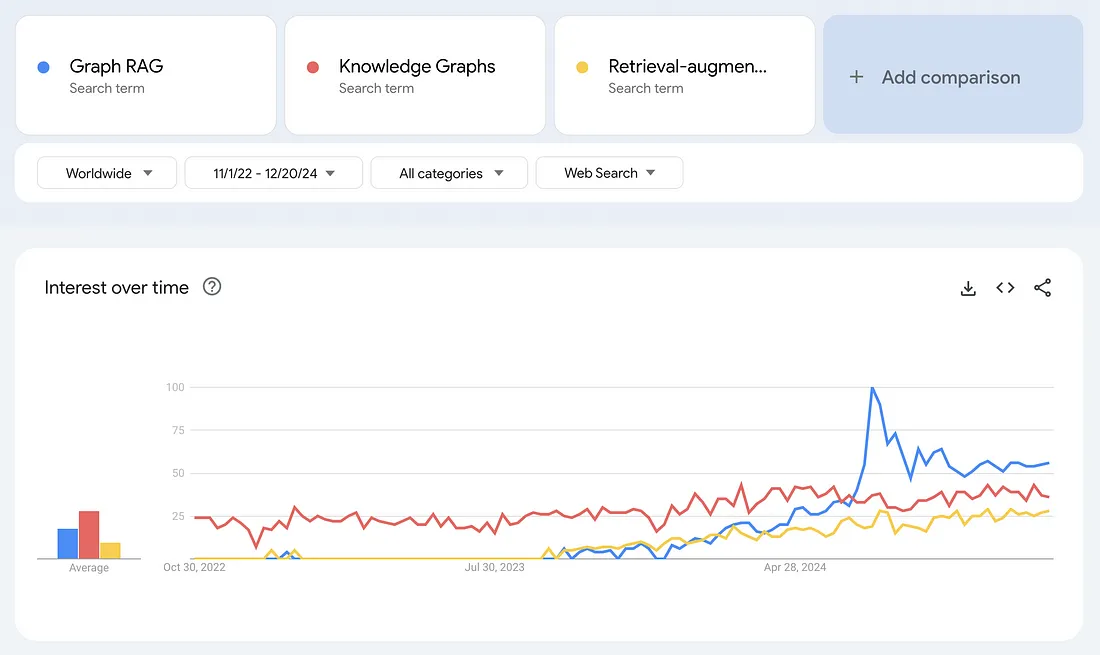
图检索增强生成(Graph RAG)的搜索兴趣激增,甚至超过了知识图谱和检索增强生成等术语。请注意,谷歌趋势衡量的是相对搜索兴趣,而不是绝对搜索次数。2024年7月,图检索增强生成的搜索量激增,恰逢微软宣布其GraphRAG应用将在GitHub上推出的那一周。
然而,图检索增强生成所引发的兴奋不仅仅局限于微软。2024年7月,三星收购了知识图谱公司RDFox。虽然宣布收购的文章没有明确提及图检索增强生成,但2024年11月发表在《福布斯》上的一篇文章中,三星发言人表示:“我们计划开发个性化人工智能的主要技术之一——知识图谱技术,并将其与生成式人工智能有机结合,以支持用户特定服务。”
2024年10月,领先的图数据库公司和语义网公司Ontotext(PoolParty知识图谱策展平台的制造商)合并成立了Graphwise。根据新闻稿,此次合并旨在“推动图检索增强生成这一类别的发展,使其更加普及”。
尽管图检索增强生成所引发的一些热议可能来自更广泛的聊天机器人和生成式人工智能的兴奋情绪,但它确实反映了知识图谱在解决复杂现实问题方面的真正演进。一个例子是LinkedIn应用图检索增强生成来改善其客户服务技术支持。由于该工具能够检索相关数据(如之前解决过的类似工单或问题)来为大语言模型提供信息,因此响应更加准确,平均解决时间从40小时缩短至15小时。
本文将通过一个相当简单但我认为具有说明性的例子,来介绍图检索增强生成在实际工作中的运作方式。最终成果是一个非技术用户可以与之交互的应用程序。我将使用来自PubMed的医学期刊文章数据集。这个应用程序的想法是,医学领域的人员可以使用它来进行文献综述。然而,同样的原则可以应用于许多用例,这正是图检索增强生成如此令人兴奋的原因。
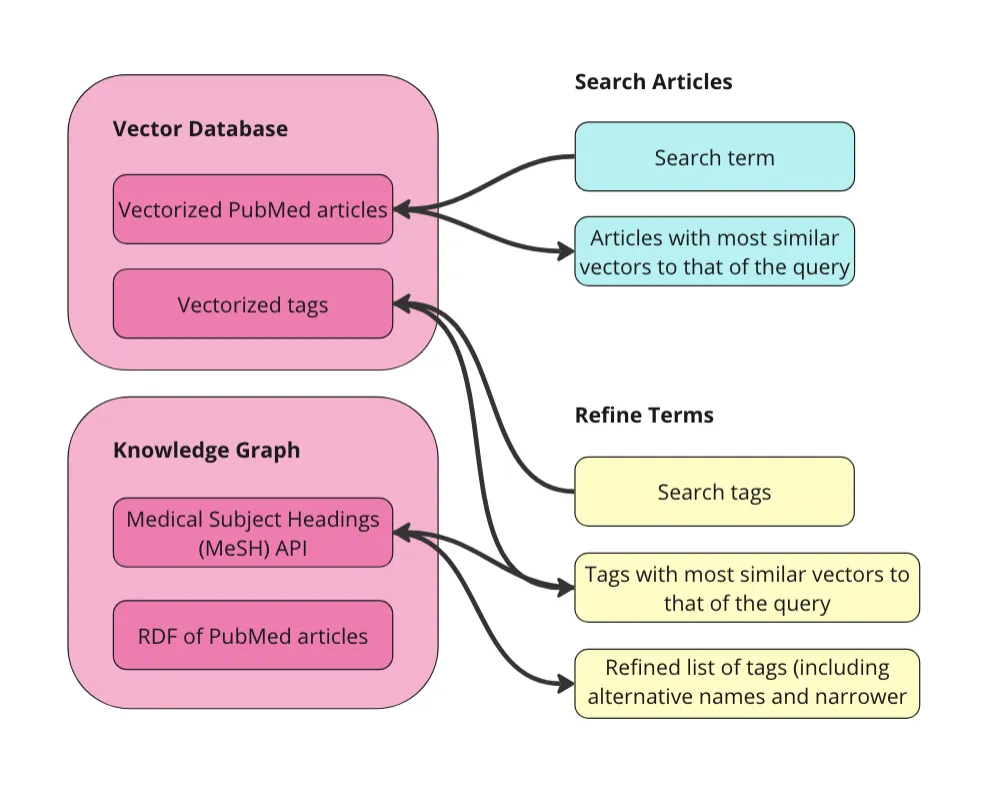
该应用程序的结构以及本文的结构如下:
第一步是准备数据。我将在下面解释详细信息,但总体目标是对原始数据进行向量化处理,并将其单独转换为RDF图。只要我们在向量化之前将URI与文章相关联,我们就可以在文章图和文章向量空间之间进行导航。然后,我们可以:
- 搜索文章:利用向量数据库的强大功能,根据搜索词对相关文章进行初步搜索。我将使用向量相似性来检索与搜索词向量最相似的文章。
- 细化术语:探索医学主题词表(MeSH)生物医学词汇,以选择要用于过滤第一步中文章的术语。这个受控词汇包含医学术语、替代名称、更狭义的概念以及许多其他属性和关系。
- 过滤和总结:使用MeSH术语对文章进行过滤,以避免“上下文污染”。然后,将剩余的文章与额外的提示(如“以要点形式总结”)一起发送给大语言模型。
在开始之前,关于这个应用程序和教程的一些说明:
本设置仅使用知识图谱来管理元数据。这之所以可能,是因为我的数据集中的每篇文章都已经用丰富的受控词汇表中的术语进行了标注。我利用图谱来构建结构和语义,利用向量数据库进行基于相似性的检索,确保每种技术都发挥其最佳作用。向量相似性可以告诉我们“食管癌”在语义上与“口腔癌”相似,但知识图谱可以告诉我们“食管癌”和“口腔癌”之间关系的详细信息。
我为这个应用程序使用的数据是来自PubMed的医学期刊文章集合(下文将详细介绍数据)。我选择这个数据集是因为它既有结构(表格形式),又包含每篇文章的摘要文本,并且已经用与成熟受控词汇表(MeSH)对齐的主题术语进行了标注。由于这些是医学文章,因此我将这个应用程序称为“医学领域的图检索增强生成(Graph RAG for Medicine)”。但这种结构可以应用于任何领域,并不特定于医学领域。
我希望这个教程和应用程序能够展示的是,通过将知识图谱融入检索步骤,可以提高检索增强生成应用程序在准确性和可解释性方面的结果。我将展示知识图谱如何通过两种方式提高检索增强生成应用程序的准确性:一是为用户提供过滤上下文的方法,以确保仅向大语言模型提供最相关的信息;二是使用领域专家维护和管理的具有密集关系的领域特定受控词汇表来进行过滤。
这个教程和应用程序没有直接展示的是知识图谱增强检索增强生成应用程序的另外两个重要方式:治理、访问控制和法规合规性;以及效率和可扩展性。在治理方面,知识图谱不仅可以过滤相关内容以提高准确性,还可以强制执行数据治理政策。例如,如果用户没有访问某些内容的权限,那么这些内容可以被排除在他们的检索增强生成管道之外。在效率和可扩展性方面,知识图谱可以帮助确保检索增强生成应用程序不会束之高阁。虽然创建一个令人印象深刻的一次性检索增强生成应用程序很容易(这实际上是本教程的目的),但许多公司都面临着大量缺乏连贯框架、结构或平台的孤立概念验证(POC)泛滥的问题。这意味着许多这样的应用程序不会存活太久。由知识图谱驱动的元数据层可以打破数据孤岛,为有效构建、扩展和维护检索增强生成应用程序提供必要的基础。为这些文章的元数据标签使用像MeSH这样丰富的受控词汇表,是确保这个图检索增强生成应用程序可以与其他系统集成并降低其成为孤岛风险的一种方式。
步骤1:准备数据
我将使用来自PubMed存储库的50,000篇研究文章的数据集(许可CC0:公共领域)。该数据集包含文章的标题、摘要以及用于元数据标签的字段。这些标签来自医学主题词表(MeSH)受控词汇表词库。PubMed文章实际上只是文章的元数据——每篇文章都有摘要,但我们没有全文。数据已经是表格格式,并且已用MeSH术语进行了标注。
我们可以直接对这个表格数据集进行向量化处理。我们可以在向量化之前将其转换为图(RDF),但我在这个应用程序中没有这样做,我也不知道这对于这种数据是否会改善最终结果。对原始数据进行向量化处理最重要的是,我们首先为每个文章添加唯一资源标识符(URI)。URI是用于导航RDF数据的唯一ID,对于我们在向量和图谱中的实体之间来回切换是必要的。此外,我们将在向量数据库中为MeSH术语创建一个单独的集合。这将允许用户搜索相关术语,而无需事先了解这个受控词汇表。以下是我们准备数据的示意图。
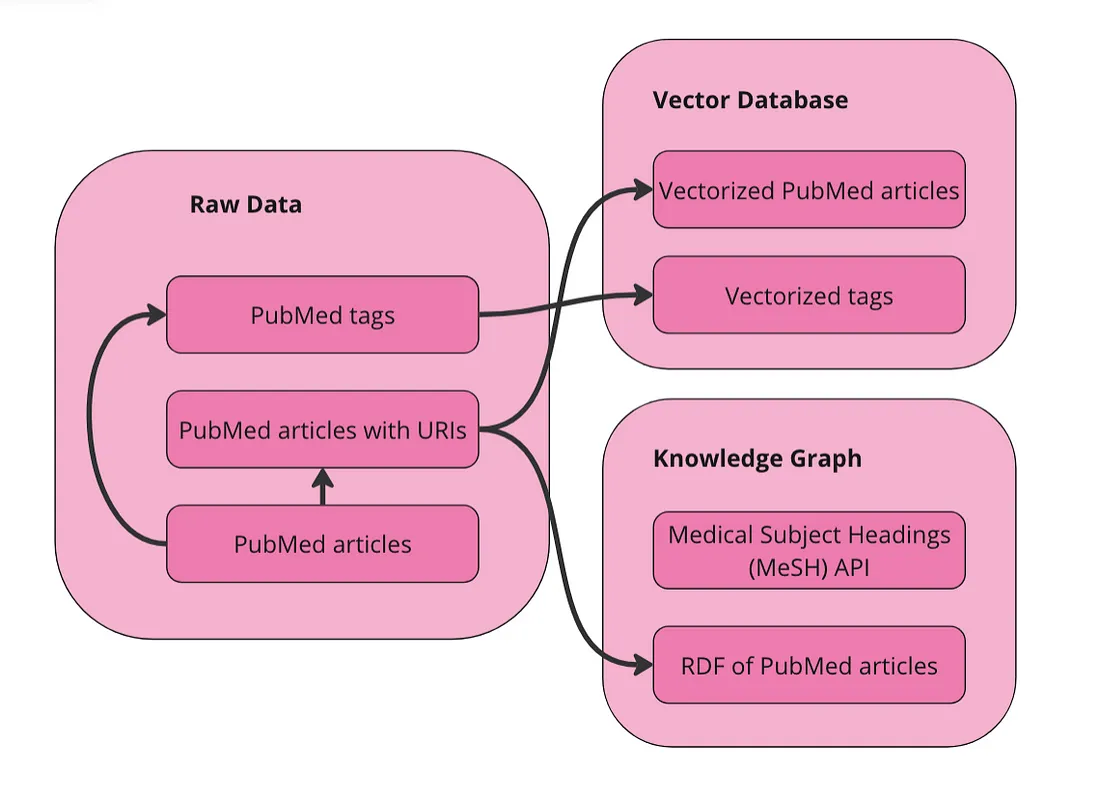
在我们的向量数据库中有两个集合用于查询:文章和术语。我们的数据还以RDF格式的图表形式表示。由于MeSH提供了API,我将直接查询该API以获取术语的替代名称和更具体的概念。
在Weaviate中向量化数据
首先,导入所需的包并设置Weaviate客户端:
import weaviate
from weaviate.util import generate_uuid5
from weaviate.classes.init import Auth
import os
import json
import pandas as pd
client = weaviate.connect_to_weaviate_cloud(
    cluster_url="XXX",  # Replace with your Weaviate Cloud URL
    auth_credentials=Auth.api_key("XXX"),  # Replace with your Weaviate Cloud key
    headers={'X-OpenAI-Api-key': "XXX"}  # Replace with your OpenAI API key
)
读取PubMed期刊文章。我在使用Databricks运行这个笔记本,所以根据你的运行环境,你可能需要对此进行更改。这里的目标只是将数据加载到一个pandas DataFrame中。
df = spark.sql("SELECT * FROM workspace.default.pub_med_multi_label_text_classification_dataset_processed").toPandas()如果你在本地运行这个,只需执行:
df = pd.read_csv("PubMed Multi Label Text Classification Dataset Processed.csv")然后对数据进行一些清理:
import numpy as np
# Replace infinity values with NaN and then fill NaN values
df.replace([np.inf, -np.inf], np.nan, inplace=True)
df.fillna('', inplace=True)
# Convert columns to string type
df['Title'] = df['Title'].astype(str)
df['abstractText'] = df['abstractText'].astype(str)
df['meshMajor'] = df['meshMajor'].astype(str)
现在我们需要为每篇文章创建一个URI,并将其作为新列添加进去。这很重要,因为URI是我们可以将文章的向量表示与文章的知识图表表示连接起来的方式。
import urllib.parse
from rdflib import Graph, RDF, RDFS, Namespace, URIRef, Literal

# Function to create a valid URI
def create_valid_uri(base_uri, text):
    if pd.isna(text):
        return None
    # Encode text to be used in URI
    sanitized_text = urllib.parse.quote(text.strip().replace(' ', '_').replace('"', '').replace('<', '').replace('>', '').replace("'", "_"))
    return URIRef(f"{base_uri}/{sanitized_text}")

# Function to create a valid URI for Articles
def create_article_uri(title, base_namespace="http://example.org/article/"):
    """
    Creates a URI for an article by replacing non-word characters with underscores and URL-encoding.
    Args:
        title (str): The title of the article.
        base_namespace (str): The base namespace for the article URI.
    Returns:
        URIRef: The formatted article URI.
    """
    if pd.isna(title):
        return None
    # Replace non-word characters with underscores
    sanitized_title = re.sub(r'\W+', '_', title.strip())
    # Condense multiple underscores into a single underscore
    sanitized_title = re.sub(r'_+', '_', sanitized_title)
    # URL-encode the term
    encoded_title = quote(sanitized_title)
    # Concatenate with base_namespace without adding underscores
    uri = f"{base_namespace}{encoded_title}"
    return URIRef(uri)
# Add a new column to the DataFrame for the article URIs
df['Article_URI'] = df['Title'].apply(lambda title: create_valid_uri("http://example.org/article", title))
我们还想创建一个包含所有用于标记文章的MeSH术语的DataFrame。这在我们以后想要搜索相似的MeSH术语时会很有帮助。
# Function to clean and parse MeSH terms
def parse_mesh_terms(mesh_list):
    if pd.isna(mesh_list):
        return []
    return [
        term.strip().replace(' ', '_')
        for term in mesh_list.strip("[]'").split(',')
    ]
# Function to create a valid URI for MeSH terms
def create_valid_uri(base_uri, text):
    if pd.isna(text):
        return None
    sanitized_text = urllib.parse.quote(
        text.strip()
        .replace(' ', '_')
        .replace('"', '')
        .replace('<', '')
        .replace('>', '')
        .replace("'", "_")
    )
    return f"{base_uri}/{sanitized_text}"
# Extract and process all MeSH terms
all_mesh_terms = []
for mesh_list in df["meshMajor"]:
    all_mesh_terms.extend(parse_mesh_terms(mesh_list))
# Deduplicate terms
unique_mesh_terms = list(set(all_mesh_terms))
# Create a DataFrame of MeSH terms and their URIs
mesh_df = pd.DataFrame({
    "meshTerm": unique_mesh_terms,
    "URI": [create_valid_uri("http://example.org/mesh", term) for term in unique_mesh_terms]
})
# Display the DataFrame
print(mesh_df)
将文章DataFrame向量化:
from weaviate.classes.config import Configure

#define the collection
articles = client.collections.create(
    name = "Article",
    vectorizer_config=Configure.Vectorizer.text2vec_openai(),  # If set to "none" you must always provide vectors yourself. Could be any other "text2vec-*" also.
    generative_config=Configure.Generative.openai(),  # Ensure the `generative-openai` module is used for generative queries
)
#add ojects
articles = client.collections.get("Article")
with articles.batch.dynamic() as batch:
    for index, row in df.iterrows():
        batch.add_object({
            "title": row["Title"],
            "abstractText": row["abstractText"],
            "Article_URI": row["Article_URI"],
            "meshMajor": row["meshMajor"],
        })
现在将MeSH术语向量化:
#define the collection
terms = client.collections.create(
    name = "term",
    vectorizer_config=Configure.Vectorizer.text2vec_openai(),  # If set to "none" you must always provide vectors yourself. Could be any other "text2vec-*" also.
    generative_config=Configure.Generative.openai(),  # Ensure the `generative-openai` module is used for generative queries
)
#add ojects
terms = client.collections.get("term")
with terms.batch.dynamic() as batch:
    for index, row in mesh_df.iterrows():
        batch.add_object({
            "meshTerm": row["meshTerm"],
            "URI": row["URI"],
        })
此时,你可以直接对向量化数据集运行语义搜索、相似度搜索和检索增强生成(RAG)。
将数据转换为知识图谱
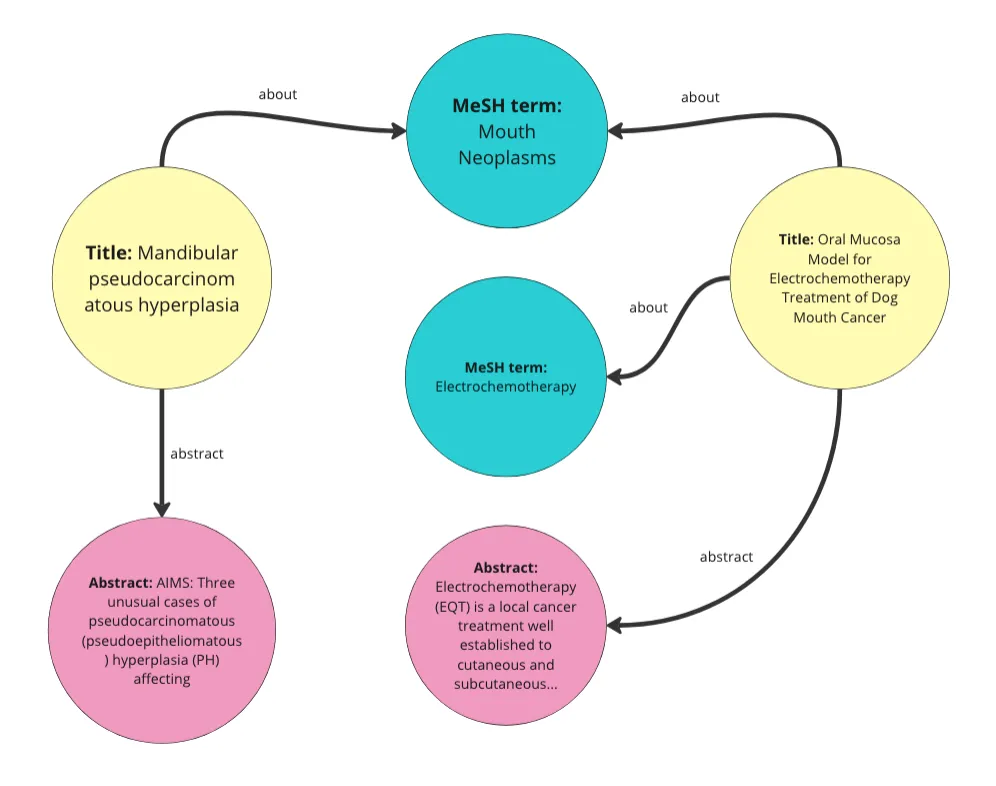
基本上,我们将数据中的每一行转换为知识图谱中的一个“文章”实体。然后,我们为这些文章中的每一篇添加标题、摘要和MeSH术语的属性。同时,我们还将每个MeSH术语转换为实体。这段代码还为每篇文章添加了一个随机日期作为“发布日期”属性,以及一个1到10之间的随机数作为“访问量”属性。在这个演示中,我们不会使用这些属性。以下是我们从数据创建的图的可视化表示。
以下是如何遍历DataFrame并将其转换为RDF数据的方法:
from rdflib import Graph, RDF, RDFS, Namespace, URIRef, Literal
from rdflib.namespace import SKOS, XSD
import pandas as pd
import urllib.parse
import random
from datetime import datetime, timedelta
import re
from urllib.parse import quote
# --- Initialization ---
g = Graph()
# Define namespaces
schema = Namespace('http://schema.org/')
ex = Namespace('http://example.org/')
prefixes = {
    'schema': schema,
    'ex': ex,
    'skos': SKOS,
    'xsd': XSD
}
for p, ns in prefixes.items():
    g.bind(p, ns)
# Define classes and properties
Article = URIRef(ex.Article)
MeSHTerm = URIRef(ex.MeSHTerm)
g.add((Article, RDF.type, RDFS.Class))
g.add((MeSHTerm, RDF.type, RDFS.Class))
title = URIRef(schema.name)
abstract = URIRef(schema.description)
date_published = URIRef(schema.datePublished)
access = URIRef(ex.access)
g.add((title, RDF.type, RDF.Property))
g.add((abstract, RDF.type, RDF.Property))
g.add((date_published, RDF.type, RDF.Property))
g.add((access, RDF.type, RDF.Property))
# Function to clean and parse MeSH terms
def parse_mesh_terms(mesh_list):
    if pd.isna(mesh_list):
        return []
    return [term.strip() for term in mesh_list.strip("[]'").split(',')]
# Enhanced convert_to_uri function
def convert_to_uri(term, base_namespace="http://example.org/mesh/"):
    """
    Converts a MeSH term into a standardized URI by replacing spaces and special characters with underscores,
    ensuring it starts and ends with a single underscore, and URL-encoding the term.
    Args:
        term (str): The MeSH term to convert.
        base_namespace (str): The base namespace for the URI.
    Returns:
        URIRef: The formatted URI.
    """
    if pd.isna(term):
        return None  # Handle NaN or None terms gracefully

    # Step 1: Strip existing leading and trailing non-word characters (including underscores)
    stripped_term = re.sub(r'^\W+|\W+$', '', term)

    # Step 2: Replace non-word characters with underscores (one or more)
    formatted_term = re.sub(r'\W+', '_', stripped_term)

    # Step 3: Replace multiple consecutive underscores with a single underscore
    formatted_term = re.sub(r'_+', '_', formatted_term)

    # Step 4: URL-encode the term to handle any remaining special characters
    encoded_term = quote(formatted_term)

    # Step 5: Add single leading and trailing underscores
    term_with_underscores = f"_{encoded_term}_"

    # Step 6: Concatenate with base_namespace without adding an extra underscore
    uri = f"{base_namespace}{term_with_underscores}"
    return URIRef(uri)
# Function to generate a random date within the last 5 years
def generate_random_date():
    start_date = datetime.now() - timedelta(days=5*365)
    random_days = random.randint(0, 5*365)
    return start_date + timedelta(days=random_days)
# Function to generate a random access value between 1 and 10
def generate_random_access():
    return random.randint(1, 10)
# Function to create a valid URI for Articles
def create_article_uri(title, base_namespace="http://example.org/article"):
    """
    Creates a URI for an article by replacing non-word characters with underscores and URL-encoding.
    Args:
        title (str): The title of the article.
        base_namespace (str): The base namespace for the article URI.
    Returns:
        URIRef: The formatted article URI.
    """
    if pd.isna(title):
        return None
    # Encode text to be used in URI
    sanitized_text = urllib.parse.quote(title.strip().replace(' ', '_').replace('"', '').replace('<', '').replace('>', '').replace("'", "_"))
    return URIRef(f"{base_namespace}/{sanitized_text}")
# Loop through each row in the DataFrame and create RDF triples
for index, row in df.iterrows():
    article_uri = create_article_uri(row['Title'])
    if article_uri is None:
        continue

    # Add Article instance
    g.add((article_uri, RDF.type, Article))
    g.add((article_uri, title, Literal(row['Title'], datatype=XSD.string)))
    g.add((article_uri, abstract, Literal(row['abstractText'], datatype=XSD.string)))

    # Add random datePublished and access
    random_date = generate_random_date()
    random_access = generate_random_access()
    g.add((article_uri, date_published, Literal(random_date.date(), datatype=XSD.date)))
    g.add((article_uri, access, Literal(random_access, datatype=XSD.integer)))

    # Add MeSH Terms
    mesh_terms = parse_mesh_terms(row['meshMajor'])
    for term in mesh_terms:
        term_uri = convert_to_uri(term, base_namespace="http://example.org/mesh/")
        if term_uri is None:
            continue

        # Add MeSH Term instance
        g.add((term_uri, RDF.type, MeSHTerm))
        g.add((term_uri, RDFS.label, Literal(term.replace('_', ' '), datatype=XSD.string)))

        # Link Article to MeSH Term
        g.add((article_uri, schema.about, term_uri))
# Path to save the file
file_path = "/Workspace/PubMedGraph.ttl"
# Save the file
g.serialize(destination=file_path, format='turtle')
print(f"File saved at {file_path}")
好的,现在我们有了数据的向量化版本和数据的图形(RDF)版本。每个向量都有一个与之关联的URI,该URI对应于知识图谱中的一个实体,因此我们可以在数据格式之间来回切换。
构建应用程序
我决定使用Streamlit来为这个图形检索增强生成(RAG)应用程序构建界面。、
- 搜索文章:首先,用户使用搜索词搜索文章。这完全依赖于向量数据库。用户的搜索词被发送到向量数据库,并返回向量空间中与该词最接近的十篇文章。
- 细化术语:其次,用户决定使用哪些MeSH术语来过滤返回的结果。由于我们还对MeSH术语进行了向量化,因此可以让用户输入自然语言提示以获取最相关的MeSH术语。然后,我们允许用户扩展这些术语以查看它们的替代名称和更具体的概念。用户可以根据过滤条件选择任意数量的术语。
- 过滤与总结:第三,用户将选定的术语作为过滤器应用于最初的十篇期刊文章。由于PubMed文章被标记了MeSH术语,因此我们可以这样做。最后,我们让用户输入一个额外的提示,与过滤后的期刊文章一起发送到大型语言模型(LLM)。这是RAG应用程序的生成步骤。
让我们一步一步地来介绍这些步骤。以下是结构:
-- app.py (a python file that drives the app and calls other functions as needed)
-- query_functions (a folder containing python files with queries)
  -- rdf_queries.py (python file with RDF queries)
  -- weaviate_queries.py (python file containing weaviate queries)
-- PubMedGraph.ttl (the pubmed data in RDF format, stored as a ttl file)
搜索文章
首先,我们要实现的是Weaviate的向量相似度搜索。由于我们的文章已经向量化,我们可以将搜索词发送到向量数据库,并获取相似的文章作为结果返回。
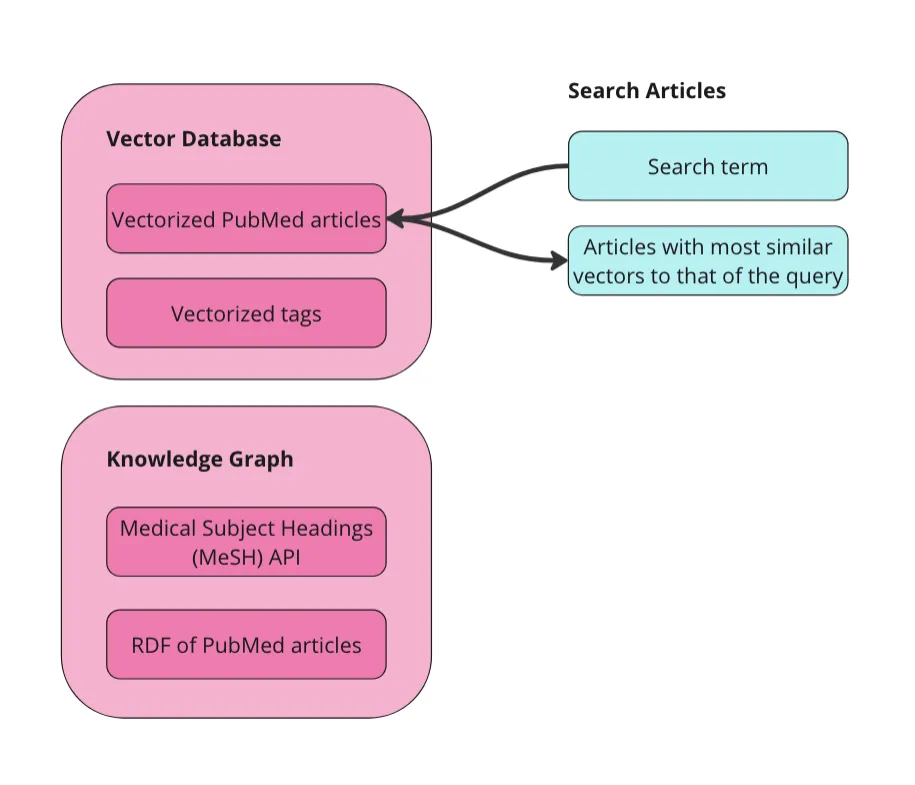
在app.py中,搜索向量数据库中相关期刊文章的主要函数是:
# --- TAB 1: Search Articles ---
with tab_search:
    st.header("Search Articles (Vector Query)")
    query_text = st.text_input("Enter your vector search term (e.g., Mouth Neoplasms):", key="vector_search")
    if st.button("Search Articles", key="search_articles_btn"):
        try:
            client = initialize_weaviate_client()
            article_results = query_weaviate_articles(client, query_text)
            # Extract URIs here
            article_uris = [
                result["properties"].get("article_URI")
                for result in article_results
                if result["properties"].get("article_URI")
            ]
            # Store article_uris in the session state
            st.session_state.article_uris = article_uris
            st.session_state.article_results = [
                {
                    "Title": result["properties"].get("title", "N/A"),
                    "Abstract": (result["properties"].get("abstractText", "N/A")[:100] + "..."),
                    "Distance": result["distance"],
                    "MeSH Terms": ", ".join(
                        ast.literal_eval(result["properties"].get("meshMajor", "[]"))
                        if result["properties"].get("meshMajor") else []
                    ),
                }
                for result in article_results
            ]
            client.close()
        except Exception as e:
            st.error(f"Error during article search: {e}")
    if st.session_state.article_results:
        st.write("**Search Results for Articles:**")
        st.table(st.session_state.article_results)
    else:
        st.write("No articles found yet.")
这个函数使用weaviate_queries中存储的查询来建立Weaviate客户端(initialize_weaviate_client)并搜索文章(query_weaviate_articles)。然后,我们在表格中显示返回的文章,以及它们的摘要、距离(与搜索词的接近程度)和它们被标记的MeSH术语。
在weaviate_queries.py中查询Weaviate的函数如下所示:
# Function to query Weaviate for Articles
def query_weaviate_articles(client, query_text, limit=10):
    # Perform vector search on Article collection
    response = client.collections.get("Article").query.near_text(
        query=query_text,
        limit=limit,
        return_metadata=MetadataQuery(distance=True)
    )
    # Parse response
    results = []
    for obj in response.objects:
        results.append({
            "uuid": obj.uuid,
            "properties": obj.properties,
            "distance": obj.metadata.distance,
        })
    return results
如你所见,我在这里将结果限制为十个,只是为了简化操作,但你可以更改这一设置。这只是使用Weaviate中的向量相似度搜索来返回相关结果。
应用程序的最终结果如下所示:
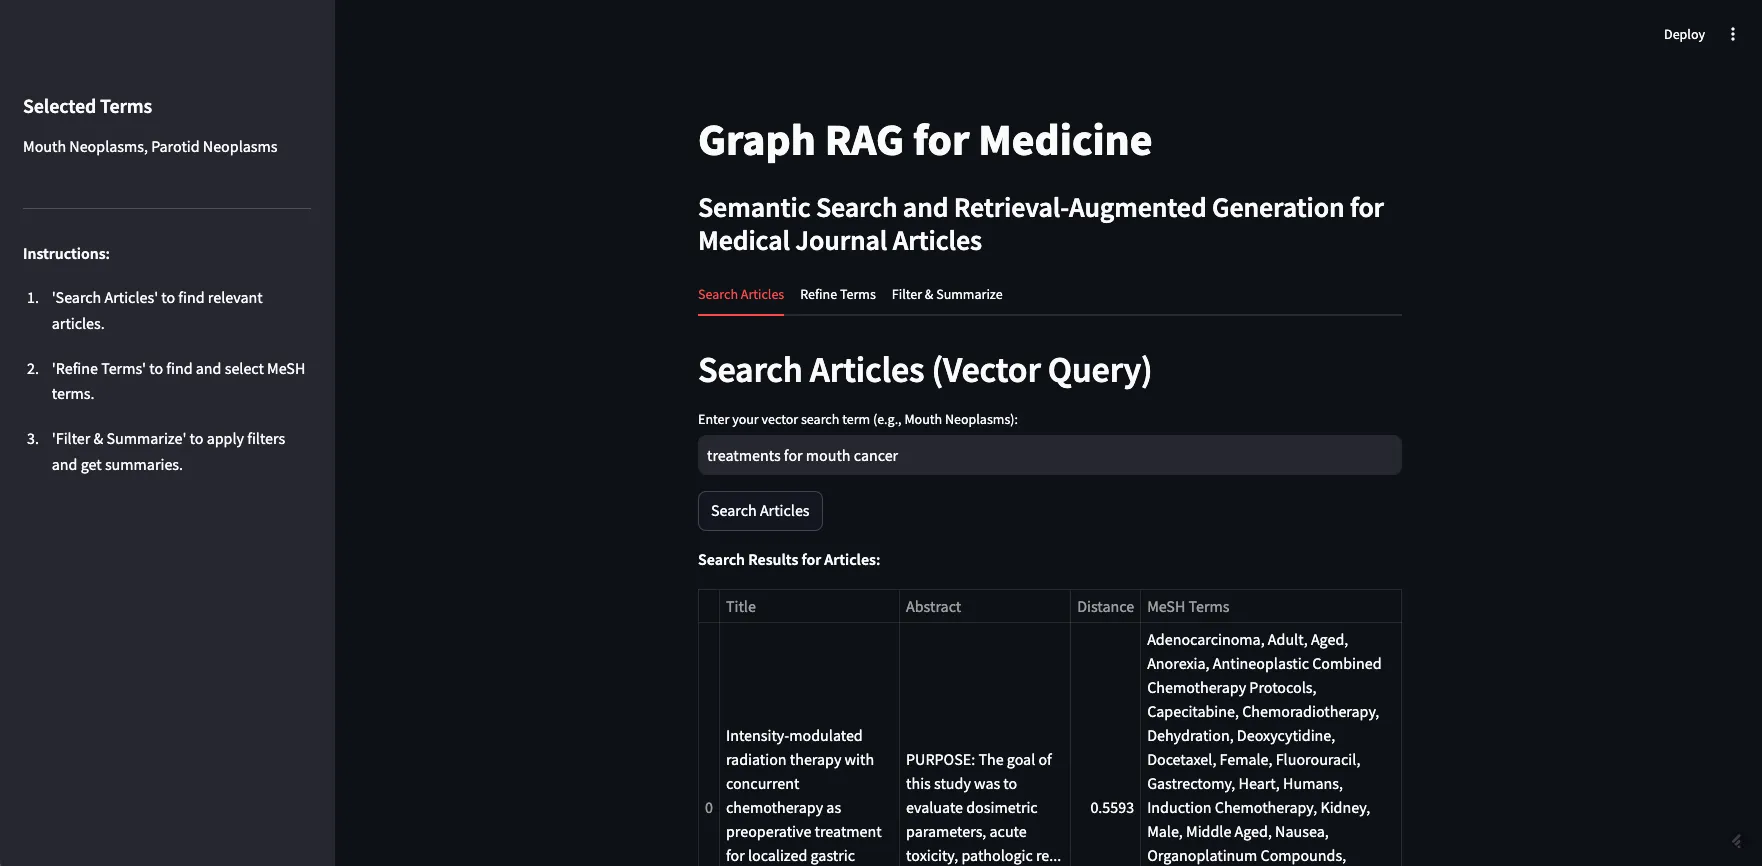
作为演示,我将搜索“口腔癌的治疗方法”一词。如你所见,返回了10篇相关文章,大部分都与搜索词相关。这展示了基于向量的检索的优势和劣势。
其优势在于,我们可以轻松地在数据上构建语义搜索功能。如上所述,我们所做的只是设置客户端并将数据发送到向量数据库。一旦数据被向量化,我们就可以进行语义搜索、相似度搜索,甚至检索增强生成(RAG)。
如前所述,基于向量的检索的劣势在于它们是黑箱操作,并且在处理事实性知识时存在困难。在我们的示例中,大多数文章都是关于某种癌症的某种治疗或疗法。其中一些文章专门讨论口腔癌,有些是关于口腔癌的亚型,如牙龈癌(牙龈癌)和腭癌(腭癌)。但也有一些文章是关于鼻咽癌(上咽喉癌)、下颌癌(颌骨癌)和食管癌(食管癌)的。这些(上咽喉、颌骨或食管)都不被认为是口腔癌。可以理解的是,一篇关于鼻咽癌特定放射疗法的文章可能会被认为与“口腔癌的治疗方法”这一提示相似,但如果你只寻找口腔癌的治疗方法,那么它可能并不相关。如果我们直接将这十篇文章插入到提示中,并要求大型语言模型(LLM)“总结不同的治疗方案”,那么我们将会得到错误的信息。
RAG的目的是为LLM提供一组非常具体的额外信息,以更好地回答你的问题——如果这些信息不准确或不相关,那么可能会导致LLM给出误导性的回答。这通常被称为“上下文污染”。上下文污染尤其危险的地方在于,回答在事实上并不一定不准确(LLM可能准确地总结了我们提供的治疗方案),也不一定基于不准确的数据(假定期刊文章本身是准确的),它只是使用了错误的数据来回答你的问题。在这个例子中,用户可能会读到如何治疗错误类型的癌症,这似乎非常糟糕。
细化术语
知识图谱(KG)可以通过细化向量数据库的结果来提高回答的准确性,并降低上下文污染的可能性。下一步是选择要用于过滤文章的MeSH术语。首先,我们在术语集合上再次对向量数据库进行向量相似度搜索。这是因为用户可能不熟悉MeSH受控词汇。在上面的示例中,我搜索了“口腔癌的治疗方法”,但“口腔癌”不是MeSH中的术语——他们使用“Mouth Neoplasms”。我们希望用户能够在不了解MeSH术语的情况下开始探索它们——无论使用什么元数据来标记内容,这都是一种良好的实践。
获取相关MeSH术语的函数与之前的Weaviate查询几乎完全相同。只需将Article替换为term:。
# Function to query Weaviate for MeSH Terms
def query_weaviate_terms(client, query_text, limit=10):
    # Perform vector search on MeshTerm collection
    response = client.collections.get("term").query.near_text(
        query=query_text,
        limit=limit,
        return_metadata=MetadataQuery(distance=True)
    )
    # Parse response
    results = []
    for obj in response.objects:
        results.append({
            "uuid": obj.uuid,
            "properties": obj.properties,
            "distance": obj.metadata.distance,
        })
    return results
在应用程序中,它看起来是这样的:
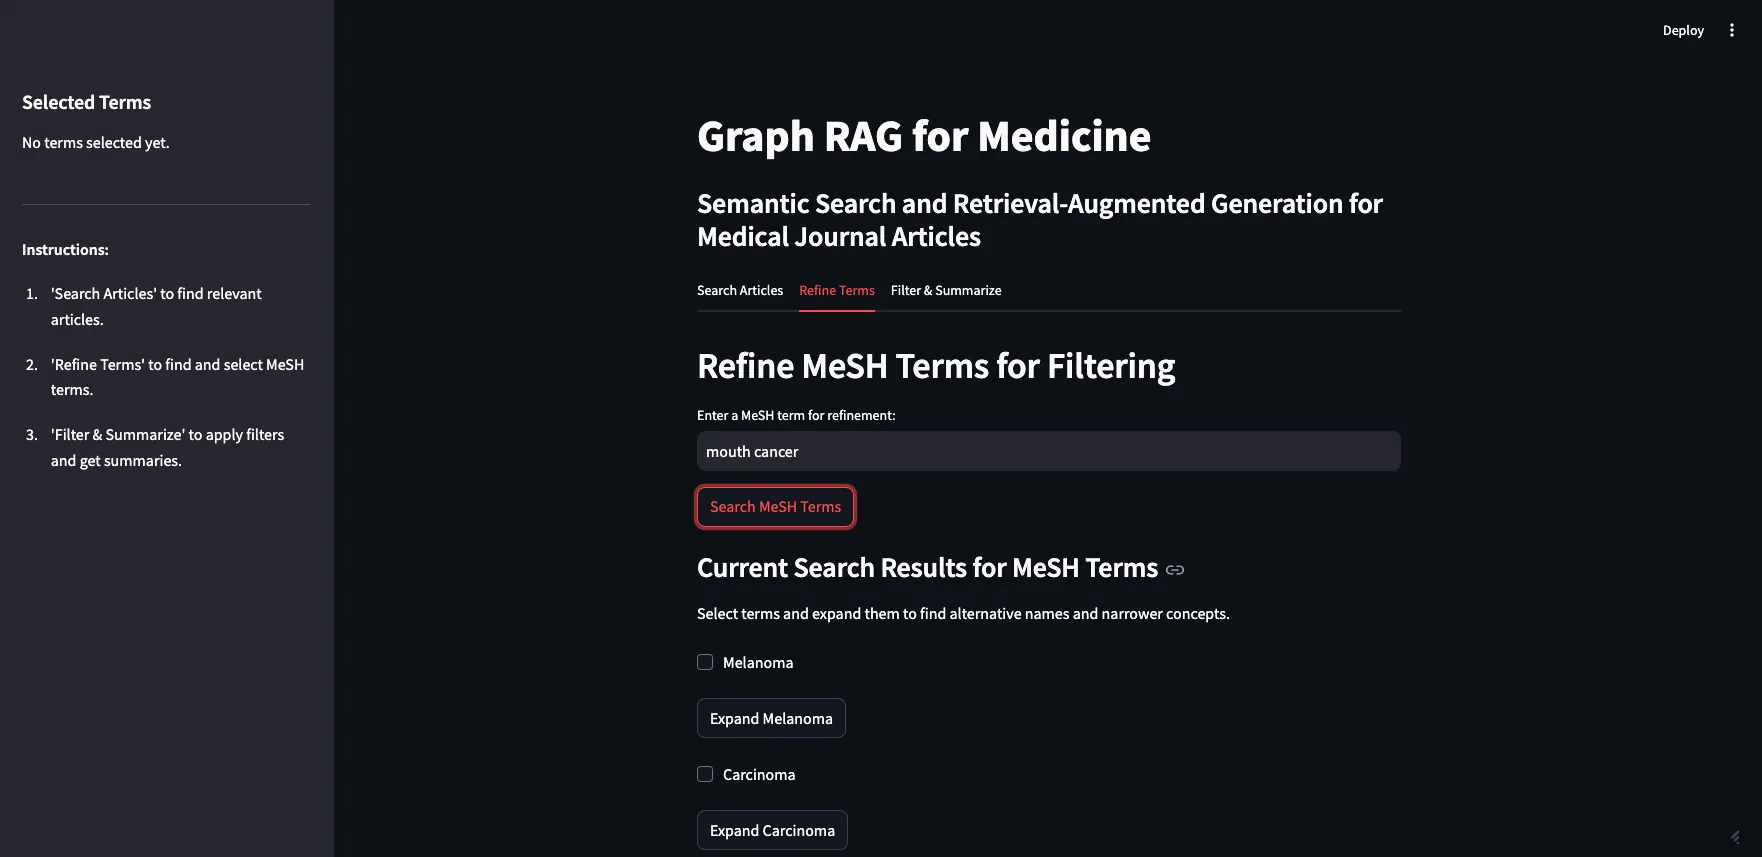
如你所见,我搜索了“口腔癌”,并返回了最相似的术语。没有返回“口腔癌”这个词,因为它不是MeSH中的术语,但“Mouth Neoplasms(口腔肿瘤)”在列表中。
下一步是允许用户展开返回的术语,以查看替代名称和更具体的概念。这需要查询MeSH API。由于多种原因,这是这个应用程序中最棘手的部分。最大的问题是,Streamlit要求所有内容都有一个唯一的ID,但MeSH术语可能会重复——如果返回的概念之一是另一个概念的子项,那么当你展开父项时,子项就会出现重复。我认为我已经解决了大部分主要问题,应用程序应该可以正常工作,但在这个阶段可能还有一些bug需要发现。
我们依赖的函数位于rdf_queries.py中。我们需要一个函数来获取术语的替代名称:
# Fetch alternative names and triples for a MeSH term
def get_concept_triples_for_term(term):
    term = sanitize_term(term)  # Sanitize input term
    sparql = SPARQLWrapper("https://id.nlm.nih.gov/mesh/sparql")
    query = f"""
    PREFIX rdf: <http://www.w3.org/1999/02/22-rdf-syntax-ns#>
    PREFIX rdfs: <http://www.w3.org/2000/01/rdf-schema#>
    PREFIX meshv: <http://id.nlm.nih.gov/mesh/vocab#>
    PREFIX mesh: <http://id.nlm.nih.gov/mesh/>
    SELECT ?subject ?p ?pLabel ?o ?oLabel
    FROM <http://id.nlm.nih.gov/mesh>
    WHERE {{
        ?subject rdfs:label "{term}"@en .
        ?subject ?p ?o .
        FILTER(CONTAINS(STR(?p), "concept"))
        OPTIONAL {{ ?p rdfs:label ?pLabel . }}
        OPTIONAL {{ ?o rdfs:label ?oLabel . }}
    }}
    """
    try:
        sparql.setQuery(query)
        sparql.setReturnFormat(JSON)
        results = sparql.query().convert()
        triples = set()
        for result in results["results"]["bindings"]:
            obj_label = result.get("oLabel", {}).get("value", "No label")
            triples.add(sanitize_term(obj_label))  # Sanitize term before adding
        # Add the sanitized term itself to ensure it's included
        triples.add(sanitize_term(term))
        return list(triples)
    except Exception as e:
        print(f"Error fetching concept triples for term '{term}': {e}")
        return []
我们还需要函数来获取给定术语的更具体(子)概念。我有两个函数可以实现这一点——一个用于获取术语的直接子项,另一个递归函数用于返回给定深度的所有子项。
# Fetch narrower concepts for a MeSH term
def get_narrower_concepts_for_term(term):
    term = sanitize_term(term)  # Sanitize input term
    sparql = SPARQLWrapper("https://id.nlm.nih.gov/mesh/sparql")
    query = f"""
    PREFIX rdf: <http://www.w3.org/1999/02/22-rdf-syntax-ns#>
    PREFIX rdfs: <http://www.w3.org/2000/01/rdf-schema#>
    PREFIX meshv: <http://id.nlm.nih.gov/mesh/vocab#>
    PREFIX mesh: <http://id.nlm.nih.gov/mesh/>
    SELECT ?narrowerConcept ?narrowerConceptLabel
    WHERE {{
        ?broaderConcept rdfs:label "{term}"@en .
        ?narrowerConcept meshv:broaderDescriptor ?broaderConcept .
        ?narrowerConcept rdfs:label ?narrowerConceptLabel .
    }}
    """
    try:
        sparql.setQuery(query)
        sparql.setReturnFormat(JSON)
        results = sparql.query().convert()
        concepts = set()
        for result in results["results"]["bindings"]:
            subject_label = result.get("narrowerConceptLabel", {}).get("value", "No label")
            concepts.add(sanitize_term(subject_label))  # Sanitize term before adding
        return list(concepts)
    except Exception as e:
        print(f"Error fetching narrower concepts for term '{term}': {e}")
        return []
# Recursive function to fetch narrower concepts to a given depth
def get_all_narrower_concepts(term, depth=2, current_depth=1):
    term = sanitize_term(term)  # Sanitize input term
    all_concepts = {}
    try:
        narrower_concepts = get_narrower_concepts_for_term(term)
        all_concepts[sanitize_term(term)] = narrower_concepts
        if current_depth < depth:
            for concept in narrower_concepts:
                child_concepts = get_all_narrower_concepts(concept, depth, current_depth + 1)
                all_concepts.update(child_concepts)
    except Exception as e:
        print(f"Error fetching all narrower concepts for term '{term}': {e}")
    return all_concepts
第2步的另一个重要部分是允许用户选择术语并将其添加到“选定术语”列表中。这些术语将显示在屏幕左侧的侧边栏中。这一步有很多可以改进的地方,比如:
- 没有提供清除所有选项的方法,但如有需要,你可以清除缓存或刷新浏览器。
- 没有提供“选择所有更具体概念”的功能,这将非常有用。
- 没有提供添加过滤规则的选项。目前,我们只是假设文章必须包含术语A或术语B或术语C等。最终的排名是基于文章被标记的术语数量。
这是应用程序中的样子:
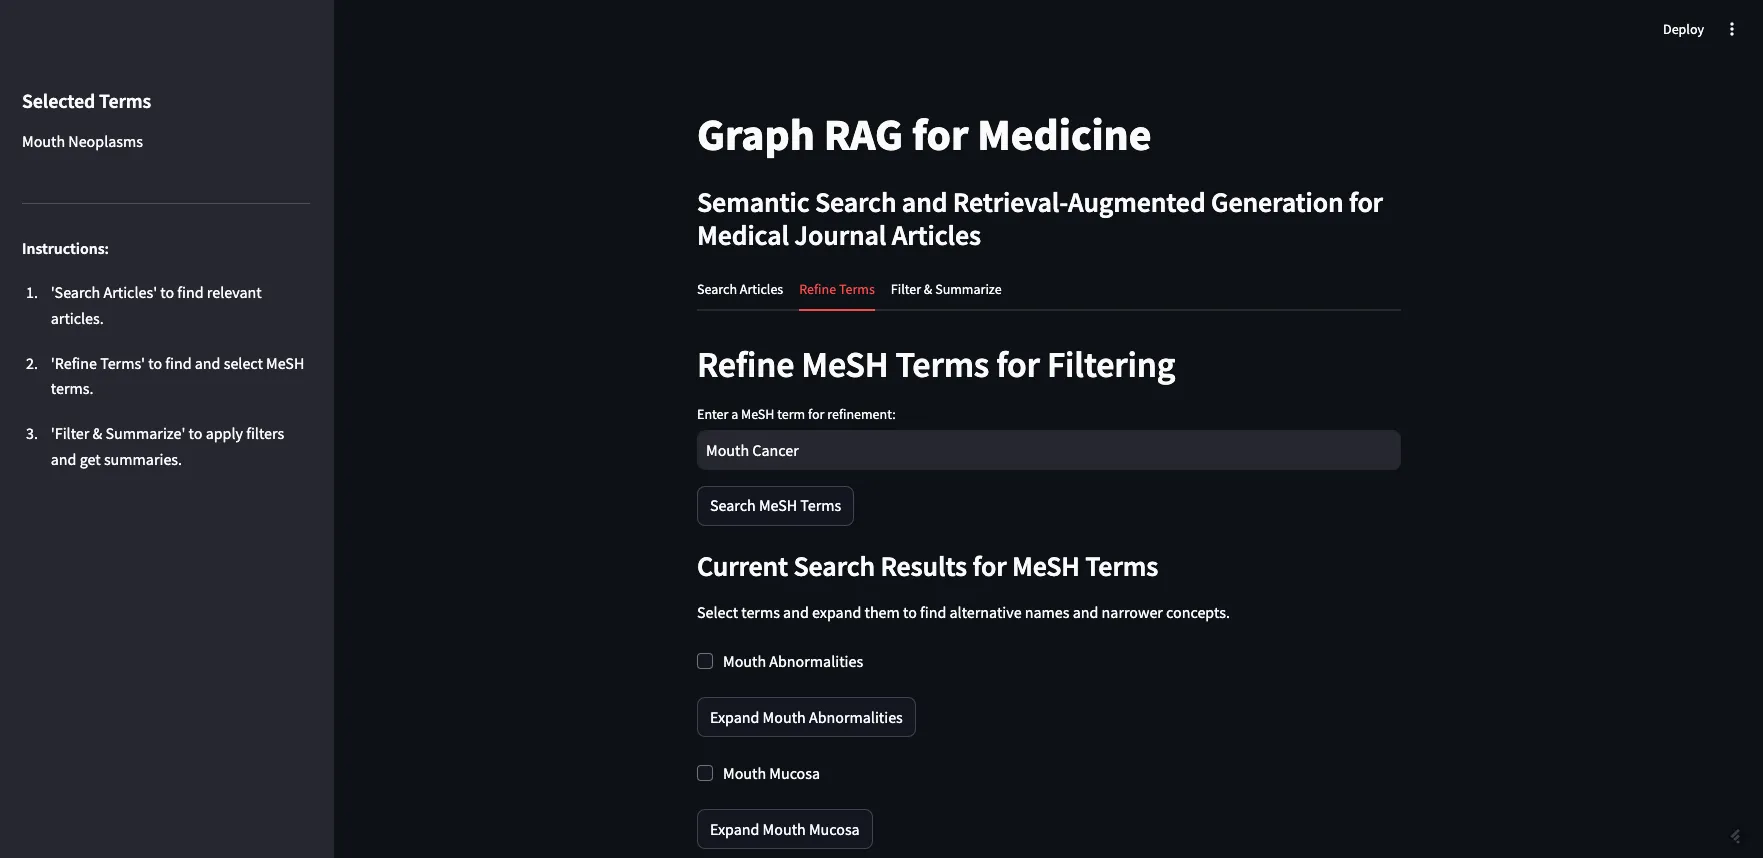
我可以展开“Mouth Neoplasms(口腔肿瘤)”以查看其替代名称,在这种情况下是“Cancer of Mouth(口腔癌)”,以及所有更具体的概念。如你所见,大多数更具体的概念都有自己的子项,你也可以展开这些子项。为了本次演示的目的,我将选择“口腔肿瘤”的所有子项。
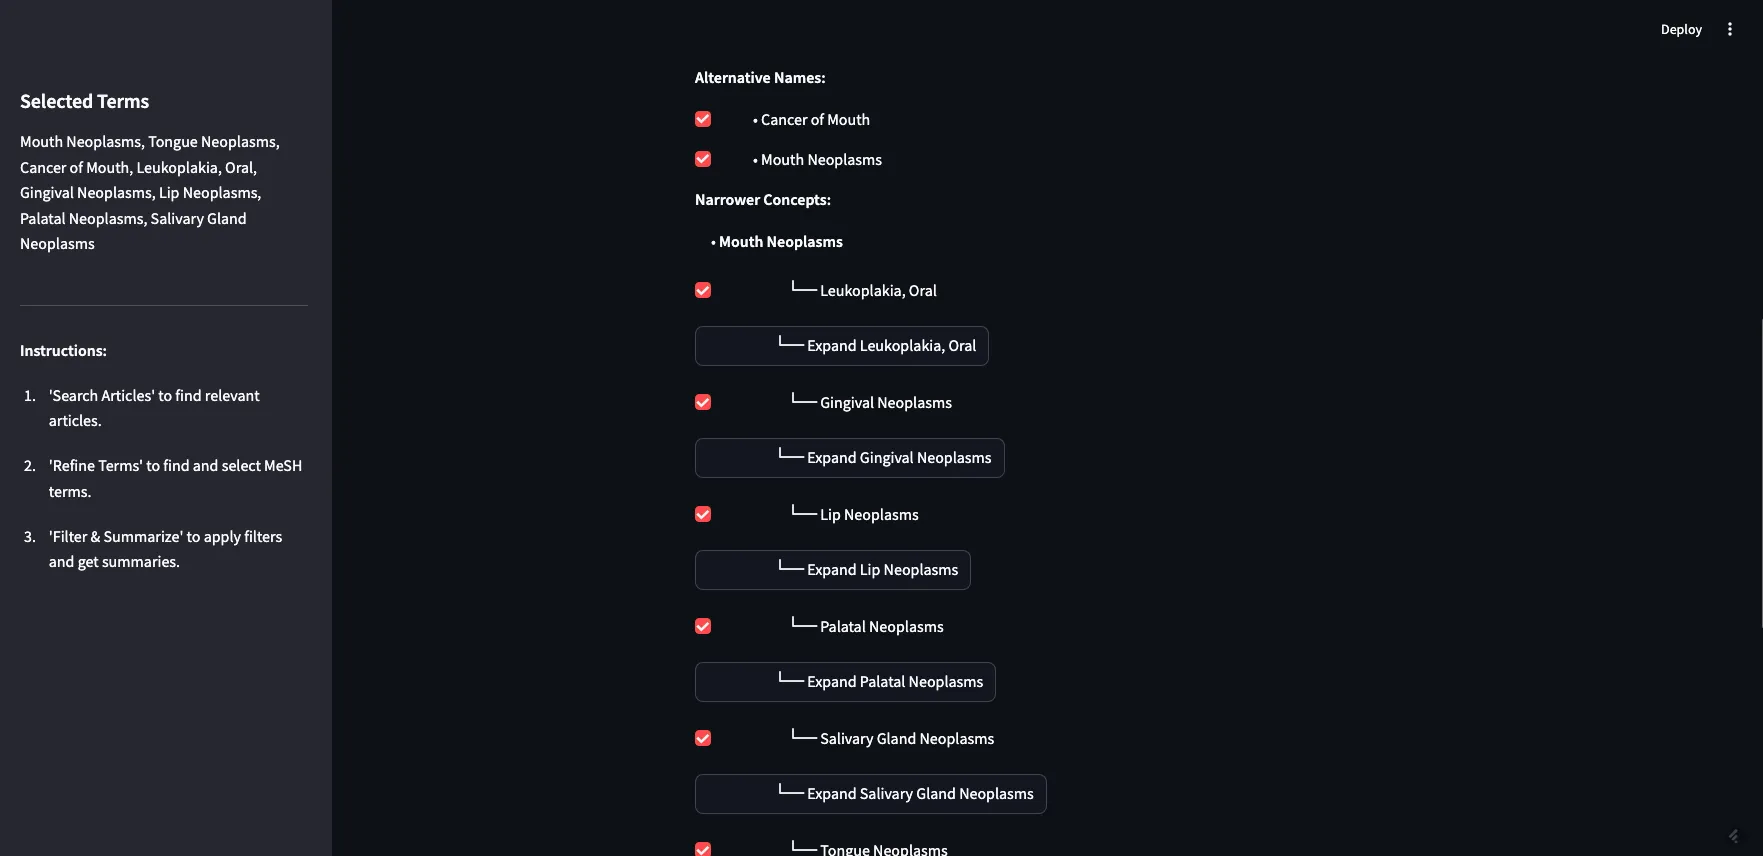
这一步之所以重要,不仅是因为它允许用户过滤搜索结果,还因为它为用户提供了一种探索MeSH图谱本身并从中学习的方式。例如,用户可以在这里了解到鼻咽肿瘤并不是口腔肿瘤的一个子集。
过滤与总结
现在你已经有了文章和过滤术语,你可以应用过滤并总结结果。在这一步,我们将第一步返回的10篇原始文章与精炼后的MeSH术语列表结合起来。我们允许用户在将提示发送给大型语言模型(LLM)之前,为其添加额外的上下文。
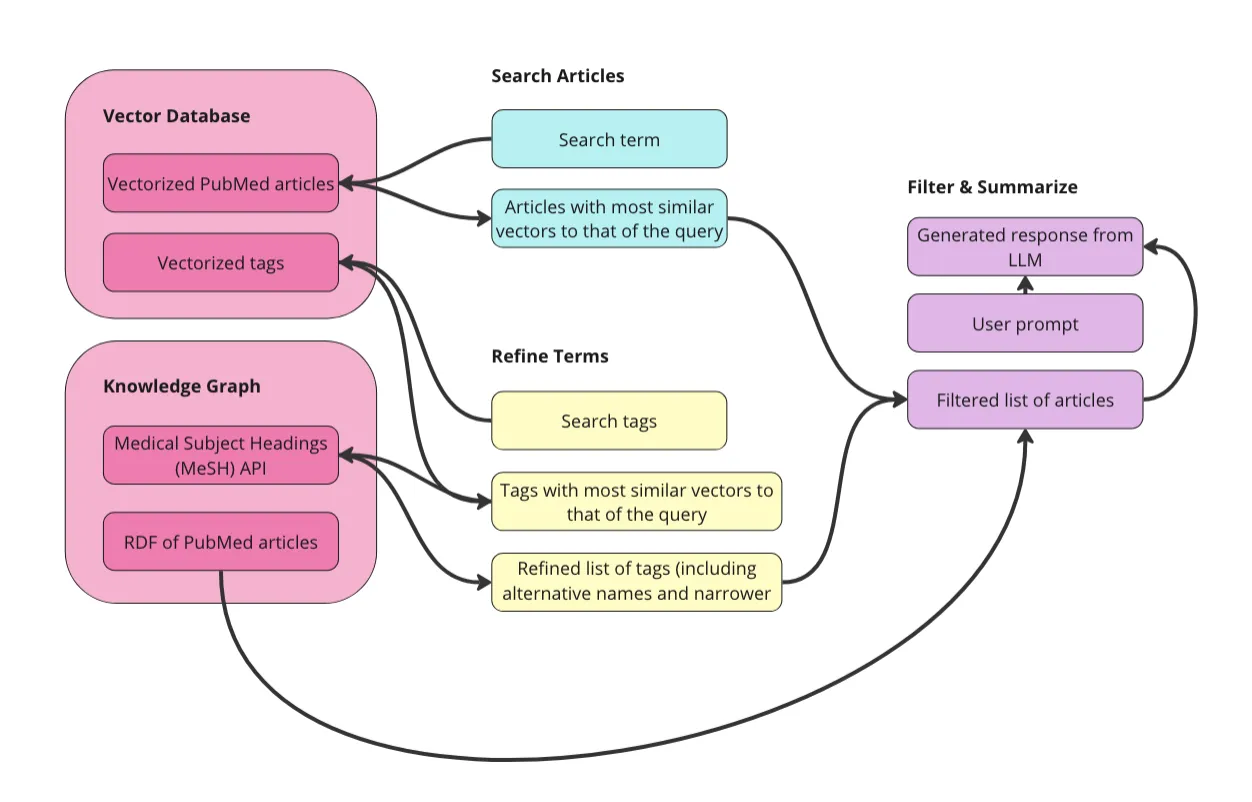
我们进行这种过滤的方式是,首先需要从原始搜索结果中获取10篇文章的URI。然后,我们可以查询我们的知识图谱,找出哪些文章被标记了相关的MeSH术语。此外,我们还保存了这些文章的摘要,以供下一步使用。在这里,我们可以基于访问控制或其他用户控制的参数(如作者、文件类型、发布日期等)进行过滤。我在这个应用程序中没有包含这些功能,但我确实添加了访问控制和发布日期的属性,以防我们以后想在这个用户界面中添加这些功能。
以下是app.py中的代码样子:
  if st.button("Filter Articles"):
            try:
                # Check if we have URIs from tab 1
                if "article_uris" in st.session_state and st.session_state.article_uris:
                    article_uris = st.session_state.article_uris
                    # Convert list of URIs into a string for the VALUES clause or FILTER
                    article_uris_string = ", ".join([f"<{str(uri)}>" for uri in article_uris])
                    SPARQL_QUERY = """
                    PREFIX schema: <http://schema.org/>
                    PREFIX ex: <http://example.org/>
                    SELECT ?article ?title ?abstract ?datePublished ?access ?meshTerm
                    WHERE {{
                      ?article a ex:Article ;
                               schema:name ?title ;
                               schema:description ?abstract ;
                               schema:datePublished ?datePublished ;
                               ex:access ?access ;
                               schema:about ?meshTerm .
                      ?meshTerm a ex:MeSHTerm .
                      FILTER (?article IN ({article_uris}))
                    }}
                    """
                    # Insert the article URIs into the query
                    query = SPARQL_QUERY.format(article_uris=article_uris_string)
                else:
                    st.write("No articles selected from Tab 1.")
                    st.stop()
                # Query the RDF and save results in session state
                top_articles = query_rdf(LOCAL_FILE_PATH, query, final_terms)
                st.session_state.filtered_articles = top_articles
                if top_articles:
                    # Combine abstracts from top articles and save in session state
                    def combine_abstracts(ranked_articles):
                        combined_text = " ".join(
                            [f"Title: {data['title']} Abstract: {data['abstract']}" for article_uri, data in
                             ranked_articles]
                        )
                        return combined_text

                    st.session_state.combined_text = combine_abstracts(top_articles)
                else:
                    st.write("No articles found for the selected terms.")
            except Exception as e:
                st.error(f"Error filtering articles: {e}")
这使用了rdf_queries.py文件中的query_rdf函数。该函数如下所示:
# Function to query RDF using SPARQL
def query_rdf(local_file_path, query, mesh_terms, base_namespace="http://example.org/mesh/"):
    if not mesh_terms:
        raise ValueError("The list of MeSH terms is empty or invalid.")
    print("SPARQL Query:", query)
    # Create and parse the RDF graph
    g = Graph()
    g.parse(local_file_path, format="ttl")
    article_data = {}
    for term in mesh_terms:
        # Convert the term to a valid URI
        mesh_term_uri = convert_to_uri(term, base_namespace)
        #print("Term:", term, "URI:", mesh_term_uri)
        # Perform SPARQL query with initBindings
        results = g.query(query, initBindings={'meshTerm': mesh_term_uri})
        for row in results:
            article_uri = row['article']
            if article_uri not in article_data:
                article_data[article_uri] = {
                    'title': row['title'],
                    'abstract': row['abstract'],
                    'datePublished': row['datePublished'],
                    'access': row['access'],
                    'meshTerms': set()
                }
            article_data[article_uri]['meshTerms'].add(str(row['meshTerm']))
        #print("DEBUG article_data:", article_data)
    # Rank articles by the number of matching MeSH terms
    ranked_articles = sorted(
        article_data.items(),
        key=lambda item: len(item[1]['meshTerms']),
        reverse=True
    )
    return ranked_articles[:10]
如你所见,此函数还将MeSH术语转换为URI,以便我们可以使用图谱进行过滤。在将术语转换为URI时,请务必小心,并确保它与其他函数保持一致。
这是应用程序中的样子:
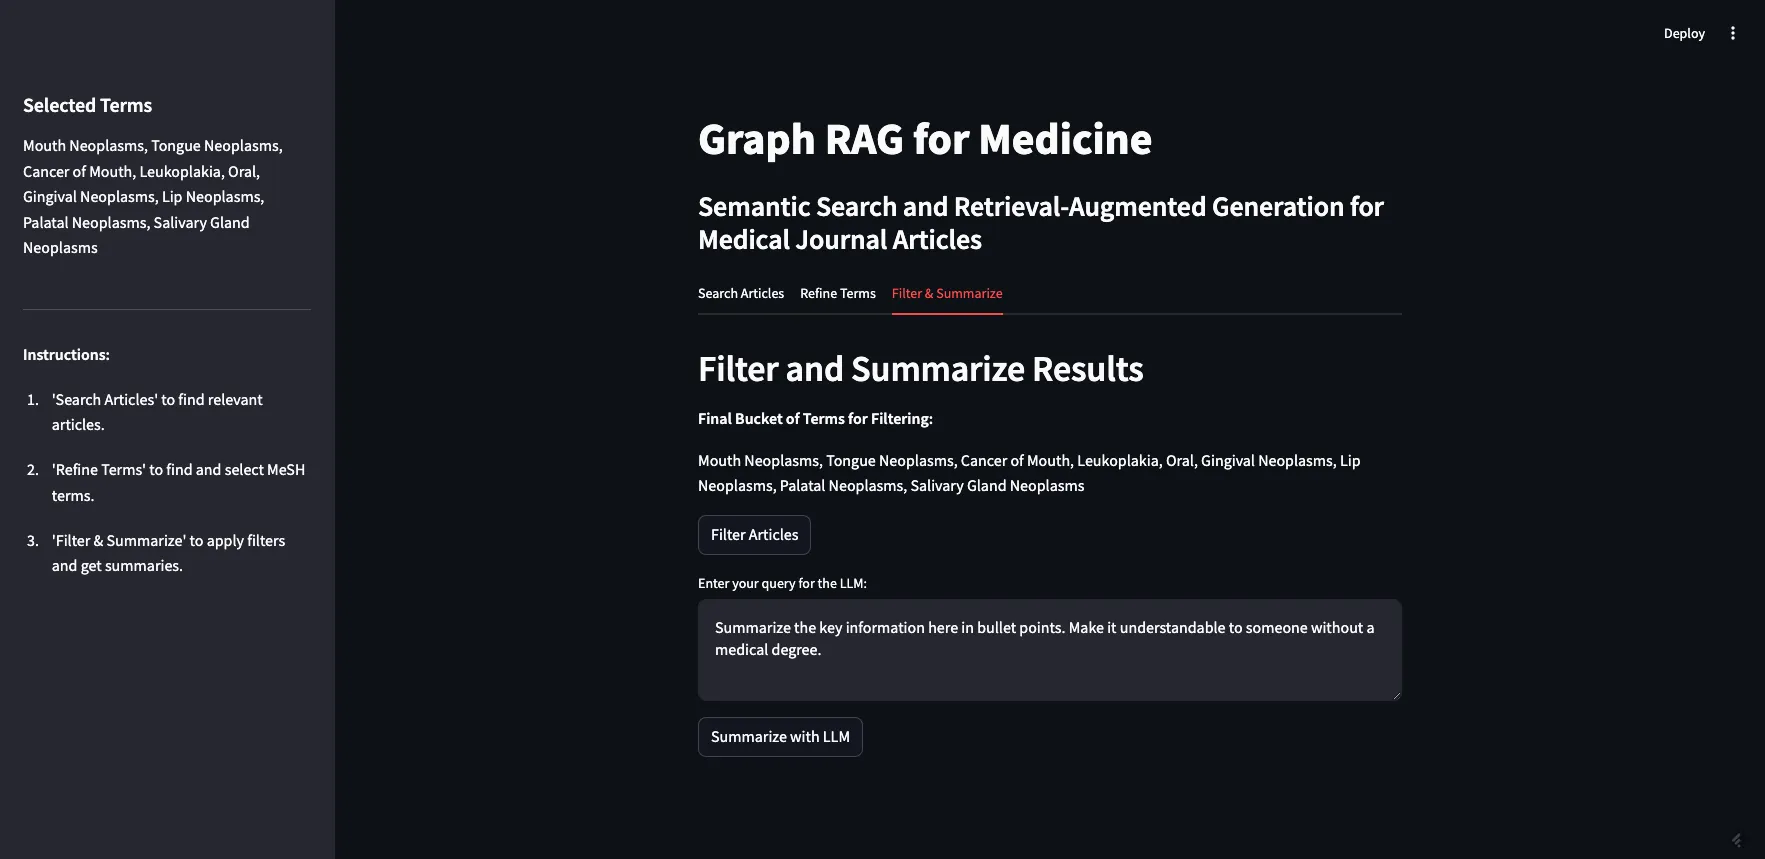
如你所见,我们从前一步中选定的两个MeSH术语在这里显示。如果我点击“过滤文章”,它将使用我们在第二步中的过滤条件来过滤原始的10篇文章。文章将连同其完整的摘要和标记的MeSH术语一起返回(见下图)。
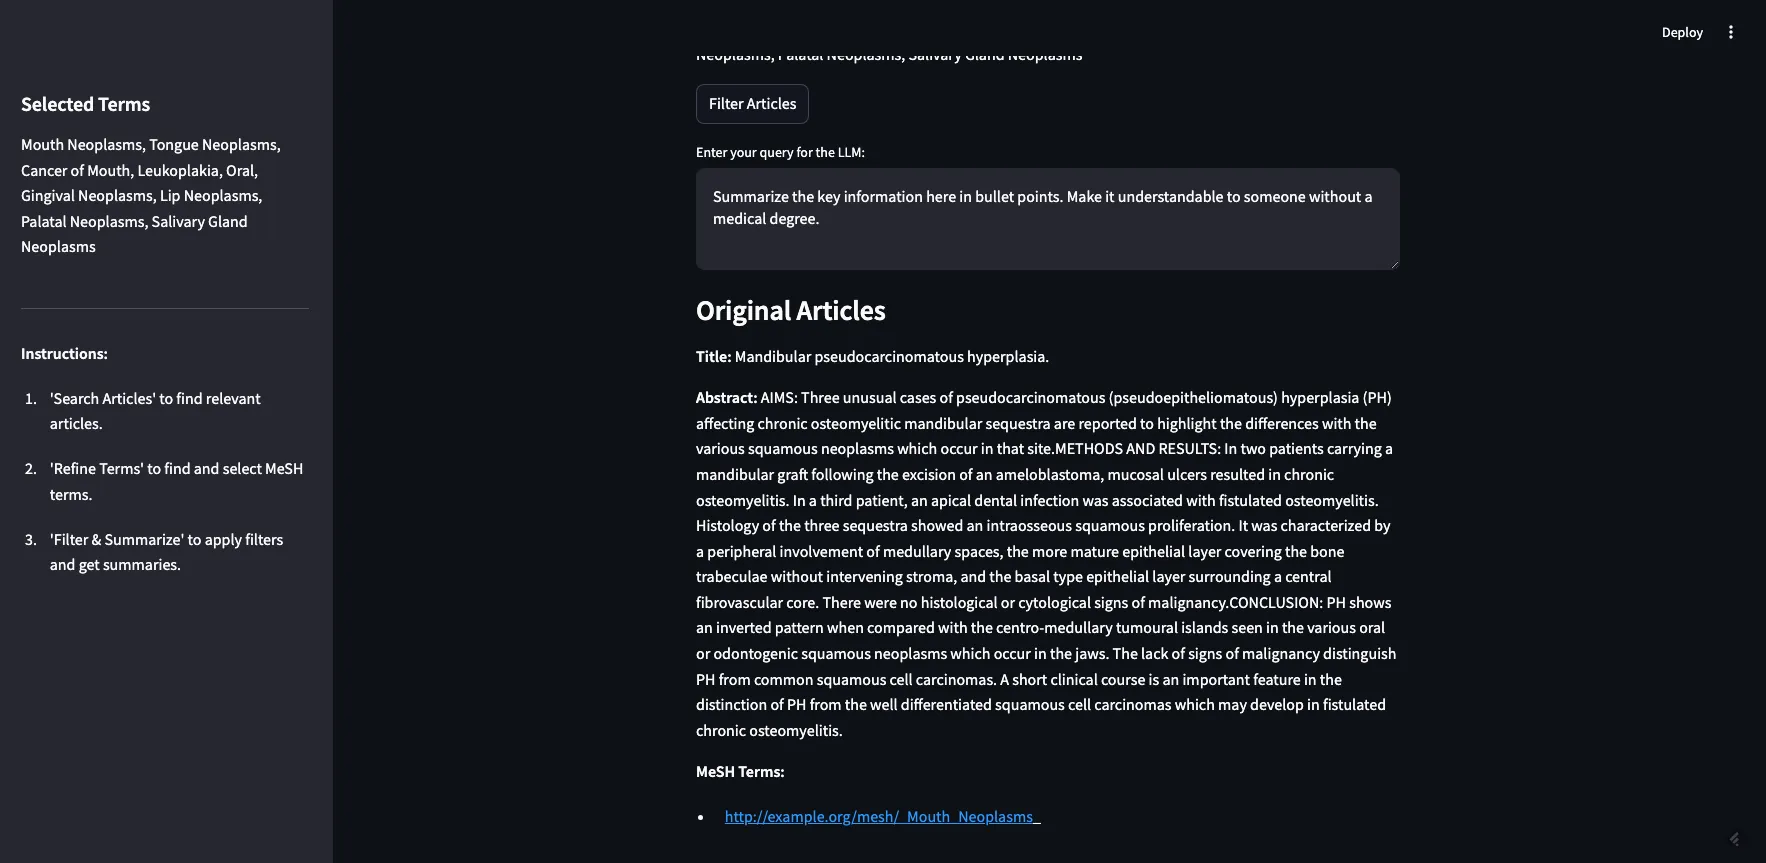
返回了5篇文章。其中2篇被标记为“口腔肿瘤”,1篇被标记为“牙龈肿瘤”,2篇被标记为“腭肿瘤”。
现在,我们已经有了经过精炼的文章列表,准备用来生成回复,我们可以进入最后一步。我们想把这些文章发送给大型语言模型(LLM)来生成回复,但我们也可以在提示中添加额外的上下文。我有一个默认的提示:“用项目符号总结这里的关键信息。让没有医学学位的人也能理解。”为了这次演示,我将调整提示以反映我们最初的搜索词:

结果如下:
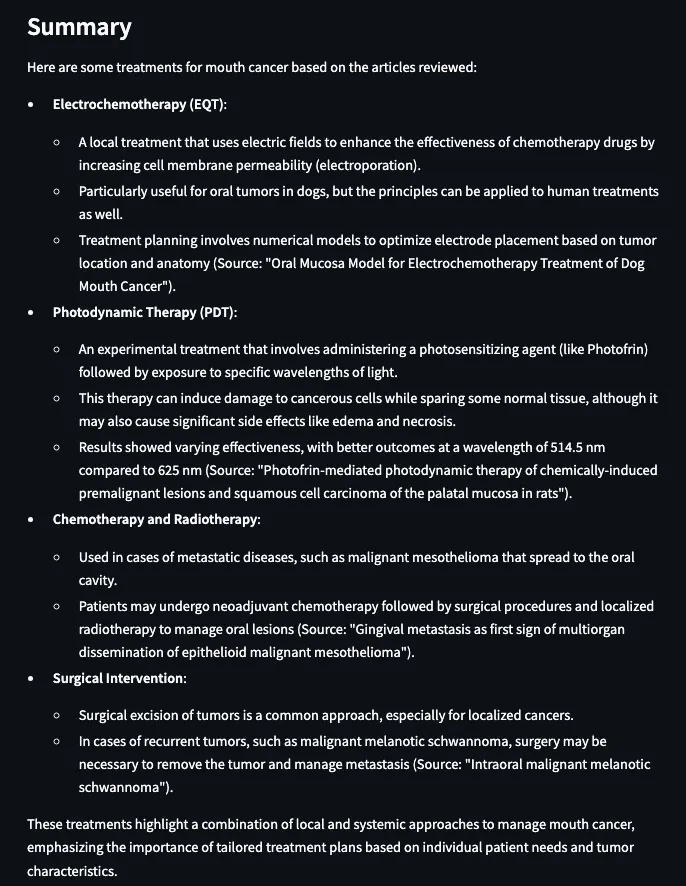
在我看来,结果更好了,主要是因为我知道我们总结的文章大概是关于口腔癌治疗方法的。数据集并不包含实际的期刊文章,只有摘要。所以这些结果只是摘要的摘要。这可能有一定的价值,但如果我们要构建一个真正的应用程序,而不仅仅是一个演示,那么在这一步我们就可以加入文章的全文。或者,这也是用户/研究人员自己阅读这些文章的时候,而不是完全依赖大型语言模型来总结。
结论
本文展示了如何将向量数据库和知识图谱结合起来,以显著增强检索增强生成(RAG)应用。通过利用向量相似性进行初步搜索,并利用结构化的知识图谱元数据进行过滤和组织,我们可以构建一个系统,该系统能够提供准确、可解释且特定于领域的结果。整合医学主题词表(MeSH)这一成熟的受控词汇表,突出了领域专业知识在元数据管理中的强大作用,这确保了检索步骤能够满足应用程序的独特需求,同时保持与其他系统的互操作性。这种方法并不局限于医学领域——其原则可以应用于任何结构化数据和文本信息共存的领域。
本文强调了利用每种技术的长处的重要性。向量数据库在基于相似性的检索方面表现出色,而知识图谱在提供上下文、结构和语义方面则大放异彩。此外,扩展RAG应用需要一个元数据层来打破数据孤岛并强制执行治理策略。以领域特定的元数据和健全的治理为基础进行周密的设计,是构建既准确又可扩展的RAG系统的途径。


