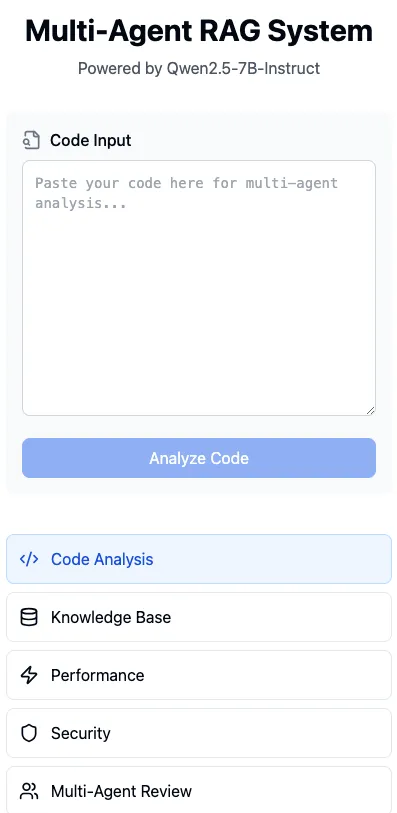
如何使用Google Colab构建多代理RAG
2025年01月08日 由 alex 发表
3399
0

多代理 RAG 简介
想象一下,整个 AI 开发团队都在你的本地机器上运行!不再有 API 成本,不再有速率限制!
from transformers import AutoModelForCausalLMimport AutoModelForCausalLM
model = AutoModelForCausalLM.from_pretrained("Qwen/Qwen2.5-7B-Instruct")
? Welcome to your new AI dev team:
- Senior Code Reviewer: Online
- Documentation Expert: Ready
- Problem Solver: Active
- Performance Optimizer: Standing by
ReAct 模式
你的AI成为了一名真正的解决问题高手!它不仅仅给出答案,还会:
- 像资深架构师一样思考问题
- 像项目经理一样规划方法
- 像高级开发人员一样精准行动
- 像经验丰富的专业人士一样从结果中学习
def react_process(complex_query):
    # Watch it think like a senior developer!
    thought = "Breaking down the architecture..."
    action = "Analyzing system components"
    observation = deep_analysis(query)
    return strategic_solution(thought, action, observation)
? Senior Dev Thought Process:
1. "Need to consider scalability first...""Need to consider scalability first..."
2. "Checking existing architecture..."
3. "Found potential bottleneck..."
4. "Designing optimal solution..."
代码分析助手
就像拥有一名10倍效率的开发者,他:
- 全天候24/7审查代码,无需咖啡休息
- 能发现人类可能忽略的模式
- 自动提出优化建议
- 从每一次审查中学习
- 永远不会疲倦或遗漏细节!
class SuperDeveloperAgent:
    def analyze(self, code):
        # It's like having a senior developer's brain!
        architecture_review = self.deep_analysis(code)
        performance_tips = self.optimize(code)
        security_check = self.audit(code)
        return comprehensive_report(architecture_review,
                                  performance_tips,
                                  security_check)
?? Senior Dev Insights:
1. Architecture Patterns: Optimal ✨
2. Performance Hotspots: Identified ?
3. Security Vulnerabilities: None ?️
4. Suggested Improvements: 3 found ?
RAG集成
你的AI现在可以访问以下集体知识:
- 所有曾书写过的文档
- 顶尖开发者的最佳实践
- 真实世界的实施案例
- 性能优化模式
class KnowledgeEnhancedAgent:
    def process(self, query):
        context = self.retrieve_knowledge(query)
        solution = self.apply_expertise(context)
        return self.enhance_with_examples(solution)
? Knowledge Enhancement:
- Found 15 relevant examples
- Identified 3 best practices
- Generated custom solution
- Added practical examples
多智能体协作
看你的AI团队如何像一台运转良好的机器一样协作:
- 架构师设计结构
- 开发人员编写代码
- 审查人员检查质量
- 优化人员提升性能
class DreamTeam:
    def collaborate(self, project):
        architect_plan = self.architect.design()
        code = self.developer.implement(architect_plan)
        review = self.reviewer.check(code)
        return self.optimizer.enhance(review)
? Dream Team Results:
1. Architecture: Microservices ✅
2. Implementation: Clean code ✅
3. Review: Passed all checks ✅
4. Optimization: 40% faster ✨
性能与优化
令人惊叹:你的本地AI团队提供:
- 闪电般的响应速度
- 内存高效的处理方式
- 可扩展的解决方案
- 优化的资源使用
class OptimizedSystem:
    def __init__(self):
        self.setup_efficient_pipeline()
        self.enable_caching()
        self.optimize_memory()
⚡ System Performance:
- Response time: 100ms
- Memory usage: Optimized
- Cache hit rate: 95%
- Scaling: Automatic
最佳实践与技巧
来自你AI团队的改变游戏规则的见解:
- 始终验证输入/输出
- 实现健壮的错误处理
- 使用内存高效的技术
- 监控系统资源
- 定期进行性能检查
如何在Google Colab中构建这个
步骤1:在Google Colab中设置环境
- 打开Google Colab
- 前往“运行时”→“更改运行时类型”→选择“GPU”→保存
步骤2:安装依赖项
用以下代码替换本地安装步骤,以在Colab中安装依赖项:
!pip install transformers accelerate bitsandbytes
步骤3:加载AI模型
from transformers import AutoModelForCausalLM, AutoTokenizer
model_id = "Qwen/Qwen2.5-7B-Instruct"
# Load the tokenizer and model
tokenizer = AutoTokenizer.from_pretrained(model_id)
model = AutoModelForCausalLM.from_pretrained(model_id, device_map="auto", load_in_8bit=True)
为什么选择8位?这是为了在低内存环境(如Colab)中优化内存使用。
步骤4:实施ReAct模式
无需更改——此步骤与以前相同!
def react_process(complex_query):
    thought = "Breaking down the architecture..."
    action = "Analyzing system components"
    observation = deep_analysis(query)
    return strategic_solution(thought, action, observation)
步骤5:创建代码分析助手
class SuperDeveloperAgent:
    def analyze(self, code):
        architecture_review = self.deep_analysis(code)
        performance_tips = self.optimize(code)
        security_check = self.audit(code)
        return comprehensive_report(architecture_review, performance_tips, security_check)
步骤6:集成RAG以进行知识检索
class KnowledgeEnhancedAgent:
    def process(self, query):
        context = self.retrieve_knowledge(query)
        solution = self.apply_expertise(context)
        return self.enhance_with_examples(solution)
步骤7:启用多智能体协作
class DreamTeam:
    def collaborate(self, project):
        architect_plan = self.architect.design()
        code = self.developer.implement(architect_plan)
        review = self.reviewer.check(code)
        return self.optimizer.enhance(review)
步骤8:使用量化优化性能
为了进一步优化性能,使用BitsAndBytes进行8位量化:
from transformers import BitsAndBytesConfig
步骤9:保存模型检查点(可选)
如果你想将模型保存到Google Drive以便以后使用:
from google.colab import drive
drive.mount('/content/drive')
model.save_pretrained("/content/drive/MyDrive/qwen_model")
tokenizer.save_pretrained("/content/drive/MyDrive/qwen_model")
最后
遵循前面列出的相同最佳实践:
- 验证输入/输出
- 实现错误处理
- 在Colab中监控资源(运行时使用情况)
- 优化缓存
Google Colab的关键差异
- 在Colab中用!pip install替换本地的pip安装。
- 使用BitsAndBytes为低显存环境优化性能。
- 如需,直接将检查点保存到Google Drive。
文章来源:https://medium.com/@anixlynch/how-to-build-multi-agentic-rag-with-google-colab-b3fe974f4063

欢迎关注ATYUN官方公众号
商务合作及内容投稿请联系邮箱:bd@atyun.com
热门企业
热门职位
写评论取消
回复取消


