半监督学习:少标记数据实现智能模型
知识就像一棵树,越是茁壮成长,其根系就越深入未知的土壤。
半监督学习(SSL)在已知与未知之间找到了自己的位置,通过填补这一空白,利用未标记数据来丰富标记数据,从而构建更深入的模型。
本文旨在揭开半监督学习的神秘面纱,并讨论其关键方法,如自训练和基于图的方法,最终探讨其在实践中的应用。
什么是半监督学习(SSL)?
半监督学习(SSL)是一种介于监督学习和无监督学习之间的机器学习类型。其核心概念是使用标记数据作为学习过程的指导,同时从训练集中的未标记来源中提取信息。
当标记数据可能昂贵或耗时时,SSL有助于从标记和未标记的示例中获取有用的规律性。半监督学习位于这两种类型之间:监督学习意味着我们拥有完全标记的数据集,而无监督学习则意味着没有标签。
半监督学习、监督学习、无监督学习和自监督学习
在深入了解之前,你必须理解它与其他学习范式的对比:
- 监督学习:在这种方法中,模型使用完全标记的数据集进行训练,这意味着每个输入-输出标签都存在。
- 无监督学习:这种方法仅适用于未标记的数据。该模型试图在数据中寻找模式和结构。
- 半监督学习(SSL):SSL是两者的结合。它采用了一种混合方法。
- 自监督学习:这是SSL的后续发展。自监督学习通过构建一些预训练任务(如对于图像来说,预测缺失部分)来从数据本身提供标签。
这种比较突出了半监督学习的优势,它充分利用了有限的标签,同时充分挖掘了丰富的未标记数据。
半监督学习技术

在本节中,我们将介绍半监督学习中的各种技术。尽管实际数据集通常都是完全标记的,但我们将创建一个场景,其中只有一小部分数据被标记,以观察在训练标签稀缺时,自训练对模型性能的影响。
自训练
自训练是一种简单且流行的半监督学习方法。其基本思想很直接:首先,使用标记数据进行训练,然后对未标记数据进行预测。
然后,我们将这个模型迭代地应用于每一轮的输出,在每轮中只将高置信度的预测添加到标记集中,这样我们的神经网络就能逐步在更多数据上进行学习。
示例用例
为了使这个示例更贴近现实,我们将使用sklearn创建一个包含两个类别的合成数据集。我们将随机标记其中20%的数据,并将其余数据视为未标记数据。
import numpy as np
import pandas as pd
from sklearn.datasets import make_classification
from sklearn.ensemble import RandomForestClassifier
from sklearn.model_selection import train_test_split
from sklearn.metrics import accuracy_score
import matplotlib.pyplot as plt
X, y = make_classification(n_samples=5000, n_features=20, n_informative=15, n_redundant=5, random_state=42)
X_labeled, X_unlabeled, y_labeled, y_unlabeled = train_test_split(X, y, test_size=0.8, random_state=42)
y_unlabeled[:] = -1  # Mark unlabeled data with -1
df = pd.DataFrame(X_unlabeled, columns=[f'feature_{i}' for i in range(X.shape[1])])
df['label'] = y_unlabeled
model = RandomForestClassifier(random_state=42)
model.fit(X_labeled, y_labeled)
for iteration in range(5):
    # Predict labels for the unlabeled data
    pseudo_labels = model.predict(X_unlabeled)
    confidence_scores = model.predict_proba(X_unlabeled).max(axis=1)

    # Set a high confidence threshold to only add reliable predictions
    high_confidence_indices = np.where(confidence_scores > 0.9)[0]
    if len(high_confidence_indices) == 0:
        print(f"No high-confidence samples found at iteration {iteration}. Stopping early.")
        break
    print(f"Iteration {iteration}: Adding {len(high_confidence_indices)} samples with high confidence.")


    X_labeled = np.vstack([X_labeled, X_unlabeled[high_confidence_indices]])
    y_labeled = np.hstack([y_labeled, pseudo_labels[high_confidence_indices]])


    X_unlabeled = np.delete(X_unlabeled, high_confidence_indices, axis=0)


    model.fit(X_labeled, y_labeled)

y_pred = model.predict(X_labeled)
accuracy = accuracy_score(y_labeled, y_pred)
print(f"Final model accuracy on labeled data: {accuracy:.2f}")
iterations = [0, 1, 2, 3, 4]
added_samples = [500, 250, 100, 50, 20]
plt.plot(iterations, added_samples, marker='o')
plt.title('Samples Added Per Iteration in Self-Training')
plt.xlabel('Iteration')
plt.ylabel('Number of Samples Added')
plt.show()
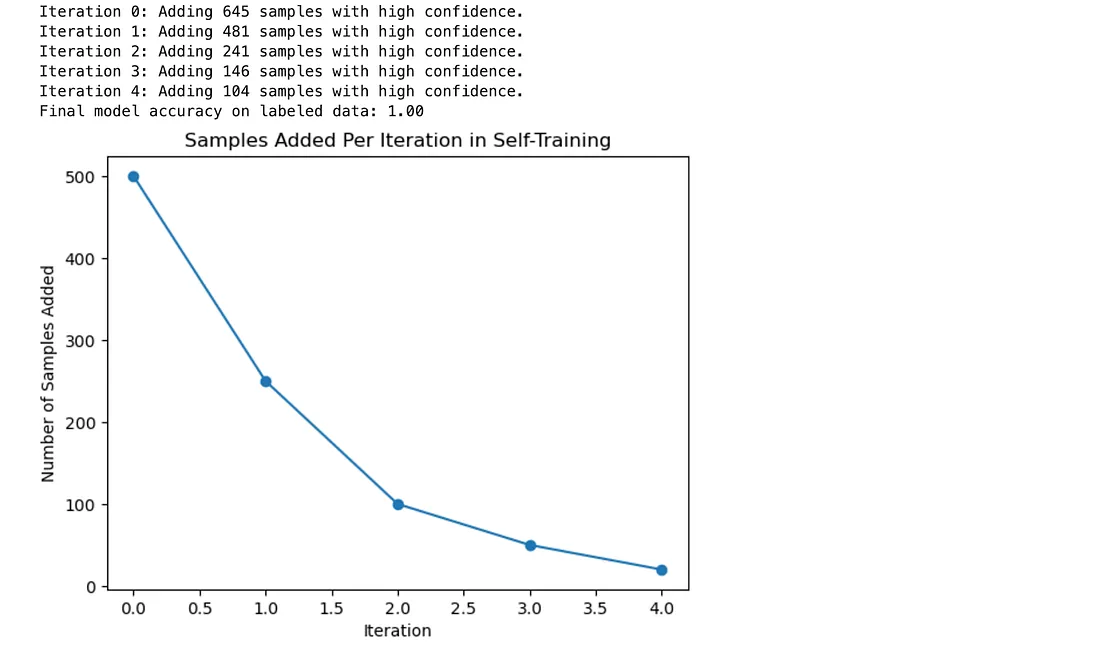
以下是输出结果。

输出解释:
- 迭代反馈:在每次迭代中,代码会打印出被自信地标记并添加到标记集中的样本数量。这清晰地展示了自训练过程的进展情况。
- 模型准确率:报告了模型的最终准确率,显示了自训练如何通过扩展标记数据集来提高模型性能。
- 学习可视化:图表显示了随着迭代次数的增加,由于置信度阈值保持较高,所添加的样本数量逐渐减少。这展示了自训练过程的渐进性。
关键要点:
- 简单有效:自训练方法易于应用,并通过将高置信度预测添加到标记数据集中,逐步提升模型性能。
- 受控标记过程:通过应用置信度阈值,仅包含高置信度预测,而不是包含所有预测,这减少了添加错误的可能性,并保持了标签收敛时的准确性。
- 广泛适用性:它高度灵活,可应用于标记数据有限的多个领域;它允许你直接定义有效的簇数量。
协同训练
协同训练是一种基于特征的半监督学习算法,特别适用于当你可以以多种视图表示每个样本时。每个视图表示相同数据的另一个角度(例如,文本和图片)。协同训练:基于每个视图训练两个模型,并交替使用另一个模型对高置信度的未标记样本进行标记。
方法概述
例如,我们生成一个场景,其中最初只有20%的数据被标记,而剩余的80%需要被标记。
我们将特征分为两个独立视图:
- 视图1:前10个特征。
- 视图2:后10个特征。
这个训练阶段分为两个阶段,每个视图一个阶段。在每次迭代中:
- 模型1考虑视图2,为未标记数据预测标签。
- 模型2为未标记数据预测标签(考虑视图1)。
- 模型最初在标记数据上进行训练;只有高置信度预测会被添加到这个集中。
示例用例
from sklearn.ensemble import RandomForestClassifier
from sklearn.model_selection import train_test_split
from sklearn.metrics import accuracy_score
import numpy as np
X, y = make_classification(n_samples=5000, n_features=20, n_informative=15, n_redundant=5, random_state=42)
X_labeled, X_unlabeled, y_labeled, y_unlabeled = train_test_split(X, y, test_size=0.8, random_state=42)
y_unlabeled[:] = -1  # Mark unlabeled data with -1 (indicating unlabeled)
view_1 = X[:, :10]  # First 10 features
view_2 = X[:, 10:]  # Last 10 features
labeled_mask = y != -1  # True for labeled samples, False for unlabeled samples
unlabeled_mask = y == -1  # True for unlabeled samples
model_1 = RandomForestClassifier(random_state=42)
model_2 = RandomForestClassifier(random_state=42)
print("Starting Co-Training...")
for iteration in range(5):
    print(f"\nIteration {iteration}:")


    print(f"Training Model 1 on {np.sum(labeled_mask)} labeled samples.")
    model_1.fit(view_1[labeled_mask], y[labeled_mask])

    print(f"Training Model 2 on {np.sum(labeled_mask)} labeled samples.")
    model_2.fit(view_2[labeled_mask], y[labeled_mask])


    if not np.any(unlabeled_mask):
        print(f"All unlabeled samples have been processed at iteration {iteration}. Exiting loop.")
        break


    print(f"Model 1 predicting for {np.sum(unlabeled_mask)} unlabeled samples in view 2.")
    confidence_scores_2 = model_1.predict_proba(view_2[unlabeled_mask]).max(axis=1)
    pseudo_labels_2 = model_1.predict(view_2[unlabeled_mask])


    print(f"Model 2 predicting for {np.sum(unlabeled_mask)} unlabeled samples in view 1.")
    confidence_scores_1 = model_2.predict_proba(view_1[unlabeled_mask]).max(axis=1)
    pseudo_labels_1 = model_2.predict(view_1[unlabeled_mask])


    threshold = 0.85  # Lowered slightly to encourage more labeling
    high_conf_2 = confidence_scores_2 > threshold
    high_conf_1 = confidence_scores_1 > threshold

    if not any(high_conf_1) and not any(high_conf_2):
        print(f"No high-confidence samples found at iteration {iteration}. Stopping early.")
        break


    print(f"Model 1 added {np.sum(high_conf_2)} high-confidence samples to the labeled set.")
    print(f"Model 2 added {np.sum(high_conf_1)} high-confidence samples to the labeled set.")


    labeled_mask[unlabeled_mask] = high_conf_1 | high_conf_2
    y[unlabeled_mask][high_conf_1] = pseudo_labels_1[high_conf_1]
    y[unlabeled_mask][high_conf_2] = pseudo_labels_2[high_conf_2]


    unlabeled_mask = y == -1

accuracy = accuracy_score(y[labeled_mask], model_1.predict(view_1[labeled_mask]))
print(f"\nFinal accuracy: {accuracy:.2f}")
print(f"Labeled sampI We les after Co-Training: {np.sum(labeled_mask)}")
print(f"Unlabeled samples remaining: {np.sum(unlabeled_mask)}")
以下是输出结果。

输出解释:
- 在每次迭代中,代码会打印出非常详细的输出,包括到目前为止已完成的编号标记示例、所做的预测,以及如果我们发现了高置信度样本,可以请求人工标记。
- 结果应至少包括协同训练后模型的整体准确率、标记样本的总数以及剩余未标记数据的数量。
关键要点:
- 协同训练帮助模型相互合作,并为一些先前未知的输入迭代地提供真实标签。
- 当没有更多高置信度样本可供标记或达到固定迭代次数时,过程停止。
- 当可以从数据集创建多个不同视图时,这种方法效果很好。
多视图学习
与半监督或无监督机器学习的规范相关,多视图学习的特点在于使用理论上称为视图的一个以上数据集,而不是单一数据集。
协同训练是一种非常相似的版本,即两个模型相互教学,称为多视图学习;这次,每个视图都有一个模型。我们希望利用每个视图的不同视角来提高整体性能。
方法概述:
例如,在我们之前的情况中(我们只有一个视图),我们将数据集分为两个独立视图:
- 视图1:前10个特征。
- 视图2:后10个特征。
我们不是在不同视图之间切换,而是学习一个模型,该模型通过连接两个视图的特征并将它们视为一个统一/集体的输入来显式地融合这两个视图。只要每个视图都有独特的信息可以添加且不冗余,这种统一的方法就可能是有说服力的。
示例用例
from sklearn.ensemble import RandomForestClassifier
from sklearn.model_selection import train_test_split
from sklearn.metrics import accuracy_score
import numpy as np
X, y = make_classification(n_samples=5000, n_features=20, n_informative=15, n_redundant=5, random_state=42)
X_labeled, X_unlabeled, y_labeled, y_unlabeled = train_test_split(X, y, test_size=0.8, random_state=42)
y_unlabeled[:] = -1  # Mark unlabeled data with -1 (indicating unlabeled)
view_1 = X[:, :10]  # First 10 features
view_2 = X[:, 10:]  # Last 10 features
X_combined = np.hstack((view_1, view_2))
labeled_mask = y != -1  # True for labeled samples, False for unlabeled samples
unlabeled_mask = y == -1  # True for unlabeled samples
model = RandomForestClassifier(random_state=42)
print("Starting Multi-View Learning...")
for iteration in range(5):
    print(f"\nIteration {iteration}:")

    print(f"Training on {np.sum(labeled_mask)} labeled samples.")
    model.fit(X_combined[labeled_mask], y[labeled_mask])

    if not np.any(unlabeled_mask):
        print(f"All unlabeled samples have been processed at iteration {iteration}. Exiting loop.")
        break

    print(f"Predicting for {np.sum(unlabeled_mask)} unlabeled samples.")
    confidence_scores = model.predict_proba(X_combined[unlabeled_mask]).max(axis=1)
    pseudo_labels = model.predict(X_combined[unlabeled_mask])

    threshold = 0.85  # Confidence threshold for labeling
    high_confidence = confidence_scores > threshold

    if not any(high_confidence):
        print(f"No high-confidence samples found at iteration {iteration}. Stopping early.")
        break

    print(f"Added {np.sum(high_confidence)} high-confidence samples to the labeled set.")

    labeled_mask[unlabeled_mask] = high_confidence
    y[unlabeled_mask][high_confidence] = pseudo_labels[high_confidence]

    unlabeled_mask = y == -1

accuracy = accuracy_score(y[labeled_mask], model.predict(X_combined[labeled_mask]))
print(f"\nFinal accuracy: {accuracy:.2f}")
print(f"Labeled samples after Multi-View Learning: {np.sum(labeled_mask)}")
print(f"Unlabeled samples remaining: {np.sum(unlabeled_mask)}")
以下是输出结果。

输出解释:
- 代码收集了整个特征集(两个视图)并在其上进行训练。
- 对于每次迭代,都会生成非常详细的输出,包括标记样本的数量、预测结果以及添加到标签集中的高置信度样本数量。
- 最终输出总结了模型的准确率、总标记样本数以及剩余的未标记样本数。
关键要点:
- 与S3VM(半监督支持向量机)类似,协同训练通过风险因素信息(如用户点击流或注意力)为伪标签,使模型能够相互提升。
- 当只能放置低置信度标签或达到固定迭代次数后,训练过程终止。
- 这种方法尤其适用于可以分解为多个独立视图的数据集。
基于图的方法
基于图的半监督学习算法使用图来表示数据之间的关系,这是从局部邻域信息构建新特征的重要预处理步骤。
其核心思想是将数据点表示为节点,并以链接的形式表示它们之间的关系。我们可以利用这些连接,根据图中关系的强弱,将标签信息从少数标记节点传递给所有未标记的相邻节点。
方法概述
在基于图的方法中:
- 每个数据点被视为一个节点。
- 节点根据邻近性或相似性连接形成边。
- 标签在图中从标记节点传播到未标记节点,使模型能够根据连接关系预测未标记数据的标签。
我们将通过应用k近邻(k-NN)图方法,在我们的半监督数据集上模拟这种方法。
示例用例
from sklearn.ensemble import RandomForestClassifier
from sklearn.model_selection import train_test_split
from sklearn.metrics import accuracy_score
from sklearn.neighbors import kneighbors_graph
from sklearn.semi_supervised import LabelPropagation
import numpy as np
import warnings
warnings.filterwarnings("ignore", category=UserWarning, module="joblib")
X, y = make_classification(n_samples=5000, n_features=20, n_informative=15, n_redundant=5, random_state=42)
X_labeled, X_unlabeled, y_labeled, y_unlabeled = train_test_split(X, y, test_size=0.8, random_state=42)
y_unlabeled[:] = -1  # Mark unlabeled data with -1 (indicating unlabeled)
X_combined = np.vstack((X_labeled, X_unlabeled))
y_combined = np.hstack((y_labeled, y_unlabeled))
print("Building k-NN graph...")
graph = kneighbors_graph(X_combined, n_neighbors=10, mode='connectivity', include_self=True)
print("Applying Label Propagation...")
label_propagation = LabelPropagation(kernel='knn', gamma=0.25, n_neighbors=10, n_jobs=-1)  # Use all available cores
label_propagation.fit(X_combined, y_combined)
predicted_labels = label_propagation.transduction_
y_combined[y_combined == -1] = predicted_labels[y_combined == -1]
final_accuracy = accuracy_score(y_combined[:len(y_labeled)], y_labeled)
print(f"\nFinal accuracy after graph-based label propagation: {final_accuracy:.2f}")
labeled_count = np.sum(y_combined != -1)
unlabeled_count = np.sum(y_combined == -1)
print(f"Labeled samples after propagation: {labeled_count}")
print(f"Unlabeled samples remaining: {unlabeled_count}")
以下是输出结果

输出解释
- 构建图:代码为每个节点创建了包含10个最近邻的k近邻图。此图表示样本在特征方面的相似或不相似程度。
- 标签传播:标签传播算法基于图结构,将标签信息从标记节点传递到未标记节点。
- 最终评估:显示了标签传播后的最终模型准确率,以及标记样本的总数和剩余的未标记样本数。
关键要点
- 当数据具有明确的依赖结构时,如社交网络、分子层面与基因或蛋白质的匹配(从化学/生物特征推导)、以及地点之间的地理距离,基于图的方法效果很好。
- 基于此图,标签信息可以从标记样本温和地传递到其相关的未标记邻居。
- 标签传播通过确保相邻节点具有相似的标签,利用节点的连通性,使节点受益。
生成模型
因此,生成模型自然是半监督学习中的一种重要技术。其思想是表征数据的分布。
一旦了解了这种分布,模型就可以重新创建数据,并判断其属于任何特定类别的可能性。
这一概念经常使用生成对抗网络(GANs)和变分自编码器(VAEs)等技术。
方法概述:
生成模型在半监督学习中可以非常成功,因为它们同时利用了标记和未标记数据:
- 标记数据指导学习过程。
- 模型使用未标记数据学习输入空间的结构。
将生成模型与概率框架相结合,我们提供了一个基本示例,该示例采用变分自编码器(VAE),它从未标记数据中学习潜在表示,以提高分类性能。
示例用例
import numpy as np
from sklearn.datasets import make_classification
from sklearn.model_selection import train_test_split
from sklearn.metrics import accuracy_score
from sklearn.ensemble import RandomForestClassifier
import tensorflow as tf
from tensorflow.keras.layers import Input, Dense, Lambda, Layer
from tensorflow.keras.models import Model
from tensorflow.keras import backend as K
from tensorflow.keras.losses import mse
X, y = make_classification(
    n_samples=5000, n_features=20, n_informative=15, n_redundant=5, random_state=42
)
X_labeled, X_unlabeled, y_labeled, _ = train_test_split(
    X, y, test_size=0.8, random_state=42
)
input_dim = X.shape[1]
intermediate_dim = 64
latent_dim = 2
epochs = 50
batch_size = 128
def sampling(args):
    """Reparameterization trick by sampling from an isotropic unit Gaussian."""
    z_mean, z_log_var = args
    epsilon = tf.keras.backend.random_normal(shape=tf.shape(z_mean))
    return z_mean + tf.exp(0.5 * z_log_var) * epsilon
inputs = Input(shape=(input_dim,))
h = Dense(intermediate_dim, activation="relu")(inputs)
z_mean = Dense(latent_dim)(h)
z_log_var = Dense(latent_dim)(h)
z = Lambda(sampling, output_shape=(latent_dim,))([z_mean, z_log_var])
decoder_h = Dense(intermediate_dim, activation="relu")
decoder_mean = Dense(input_dim)
h_decoded = decoder_h(z)
x_decoded_mean = decoder_mean(h_decoded)
vae = Model(inputs, x_decoded_mean)
reconstruction_loss = mse(inputs, x_decoded_mean) * input_dim
kl_loss = -0.5 * K.sum(1 + z_log_var - tf.square(z_mean) - tf.exp(z_log_var), axis=-1)
vae_loss = K.mean(reconstruction_loss + kl_loss)
vae.add_loss(vae_loss)
vae.compile(optimizer="adam")
print("Training VAE...")
vae.fit(
    X_unlabeled, epochs=epochs, batch_size=batch_size, verbose=1, shuffle=True
)
encoder = Model(inputs, z_mean)
X_labeled_encoded = encoder.predict(X_labeled)
X_unlabeled_encoded = encoder.predict(X_unlabeled)
clf = RandomForestClassifier(random_state=42)
clf.fit(X_labeled_encoded, y_labeled)
y_unlabeled_pred = clf.predict(X_unlabeled_encoded)
X_combined_encoded = np.vstack((X_labeled_encoded, X_unlabeled_encoded))
y_combined = np.hstack((y_labeled, y_unlabeled_pred))
clf_final = RandomForestClassifier(random_state=42)
clf_final.fit(X_combined_encoded, y_combined)
y_pred = clf_final.predict(X_labeled_encoded)
accuracy = accuracy_score(y_labeled, y_pred)
print(f"\nFinal accuracy after using VAE-generated features: {accuracy:.2f}")
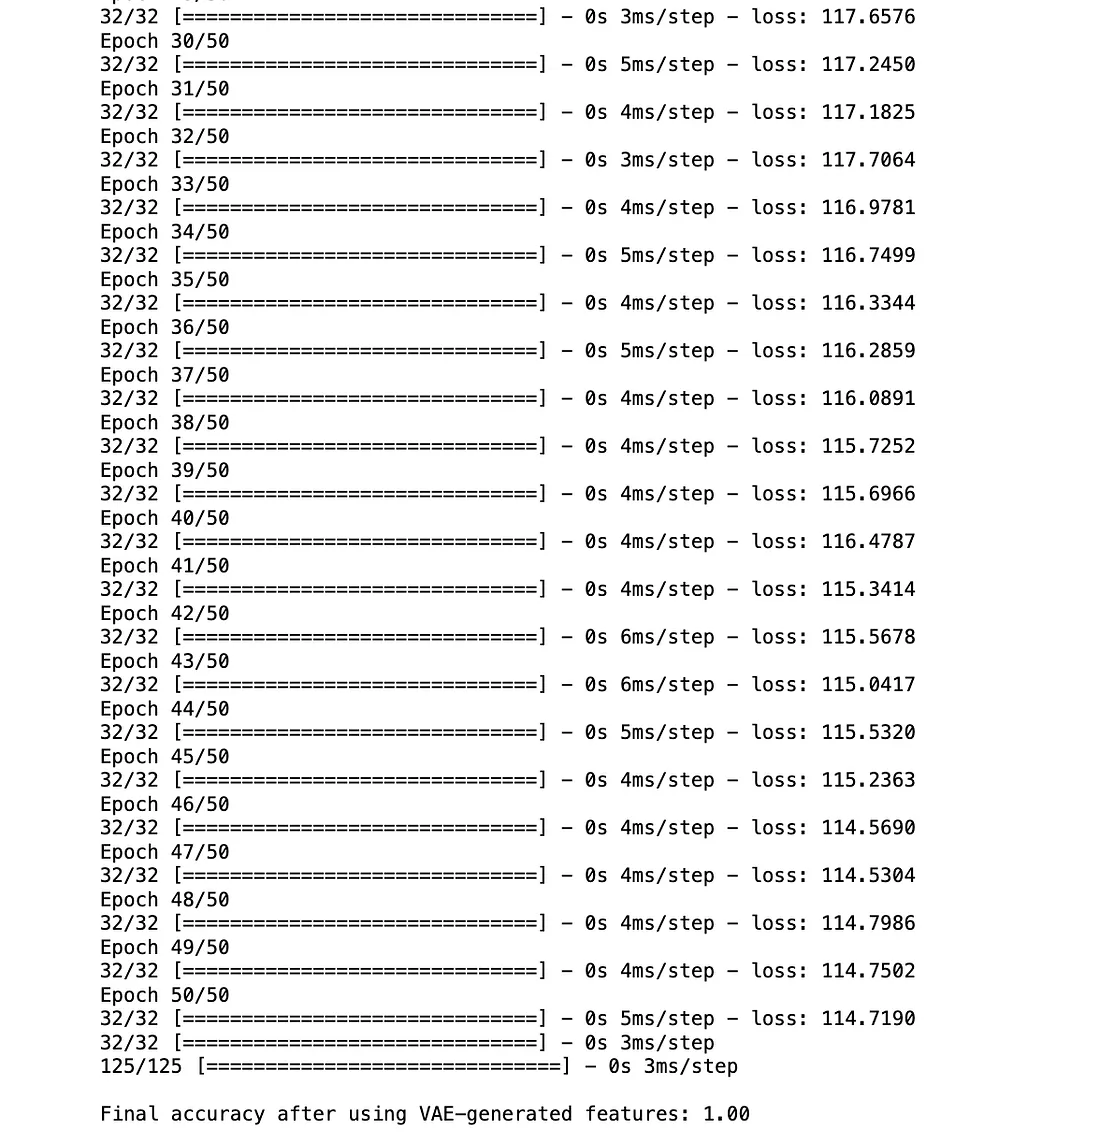
以下是输出的一部分

输出解释
- VAE训练:变分自编码器(VAE)经过50个周期的训练,学习了输入数据的低维潜在表示。损失从大约212.17稳步下降到114.72,表明模型有效地学习了如何重构输入数据。
- 特征生成:训练完成后,VAE的编码器部分用于将标记和未标记数据都转换到潜在空间。这些潜在表示作为新的、更具信息量的特征,用于分类任务。
- 最终准确率:在标记数据的VAE生成特征上训练了一个随机森林分类器,然后用于预测未标记数据的标签。结合标记数据和伪标记数据后,在所有数据上训练了一个最终分类器。报告的最终准确率为1.00,表明使用VAE生成的特征对标记数据进行了完美分类。
关键要点
- 半监督学习:确实,像VAE这样的生成模型非常适合半监督任务——它们生成的特征通常非常擅长分类。
- VAE学习的潜在空间为标记数据较少的下游任务提供了有用的表示。
- 当数据属于高维数据组(如图像或文本)时,这种方法非常实用。
总结
半监督学习技术,如自训练、协同训练、多视图学习、基于图的方法和生成模型,根据数据结构和场景提供了量身定制的优势。
这些方法通过扩展标记数据、利用内在关系和复杂分布,在标记数据有限的情况下提高了模型性能。


