使用Deepseek构建你的首个AI邮件代理
介绍
大型语言模型(LLM)已经存在一段时间了,主要擅长于下一个词预测。然而,AI智能体的引入增加了一层额外的智能,使这些模型能够执行更复杂、多步骤的任务,超越了简单的文本生成。
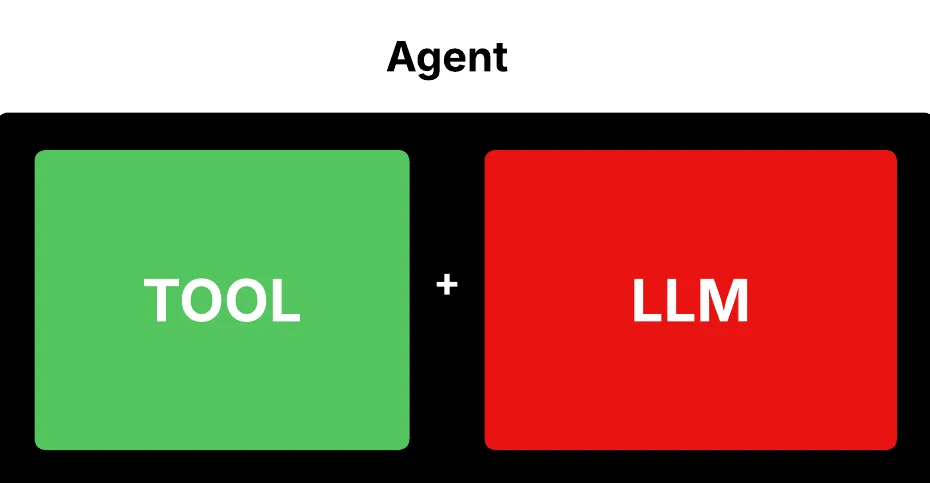
从根本上说,一个真正的AI智能体不仅仅局限于简单地串联LLM生成的提示——它集成了专用工具来处理复杂、多步骤的任务。相反,它是一个由两个主要组件组成的系统:
智能体 = [ 工具 + LLM ]

这意味着,虽然大型语言模型(如Deepseek或ChatGPT)负责自然语言处理,但我们还会针对特定用例集成专用工具。
在这篇文章中,我将指导你如何使用Deepseek、LangChain和LangGraph创建一个AI邮件智能体。这个项目将自动化邮件分类、摘要生成和回复撰写,从而简化你的邮件工作流程。
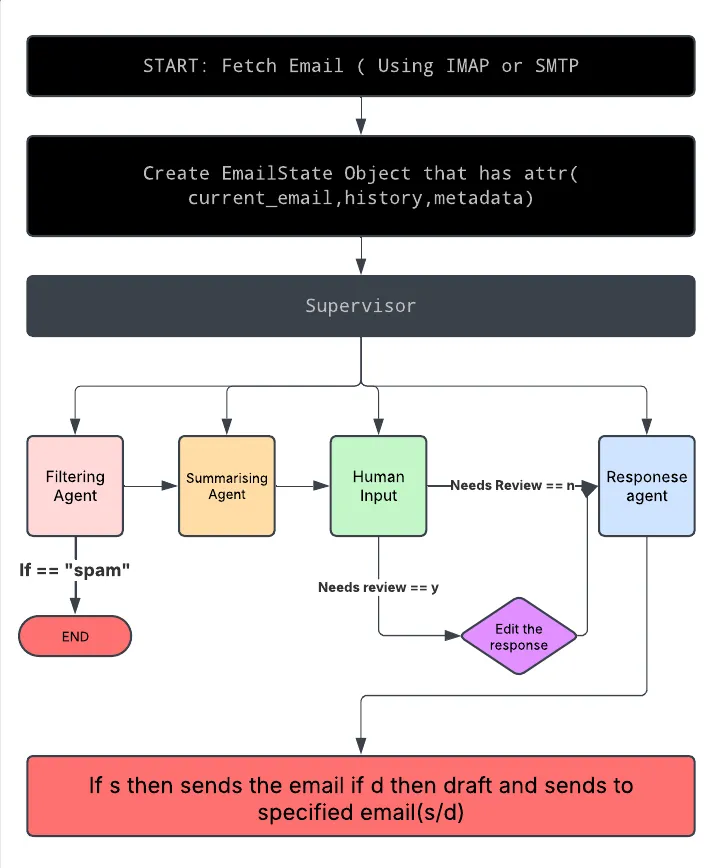
这个智能体工作流程采用了主从层级结构,其中一个中央监督器(使用LangGraph构建)将各种智能体(通过LangChain实现)组织成一个流畅的管道。
项目概述和架构
我们正在构建一个AI驱动的邮件智能体,它能够:
- 实时获取邮件。
- 将邮件分类为垃圾邮件、紧急邮件、需要审查的邮件和信息性邮件。
- 为每封邮件生成摘要。
- 利用摘要撰写适当的回复。
- 根据用户输入发送或草拟回复。
虽然Deepseek API是至关重要的组件,但我们还需要其他工具来构建这个系统。使用的三个主要工具是LangChain、LangGraph和IMAP服务器。
工具的工作原理
LangGraph提供了一个结构化的有向图框架,其中每个节点代表一个特定任务,如过滤、摘要生成或回复撰写。边定义了数据在这些节点之间的流动方式。
LangGraph支持动态路由,这意味着它可以应用条件逻辑来确定下一步。例如,如果一封邮件被分类为垃圾邮件,管道可以自动终止进一步处理,从而确保效率。
LangChain通过模块化方法简化了LLM驱动应用程序的创建。我们管道中的每个组件,如摘要生成或回复撰写,都是一个独立的模块。这些模块被无缝地组织在一起,确保数据流畅动和易于维护。
IMAP允许我们的系统连接到远程邮件服务器,对用户进行身份验证,并获取邮件进行处理。它支持实时邮件检索和加载基于JSON的测试数据。
邮件处理管道

开始:获取邮件
使用IMAP实时检索邮件,或从JSON文件加载邮件以进行测试和开发。
创建EmailState对象
初始化一个对象,用于跟踪当前邮件、维护处理步骤的历史记录,并存储元数据。
作为流经管道的所有数据的容器。
过滤节点
分析邮件的主题和正文。
将邮件分类为垃圾邮件、紧急邮件、信息性邮件或需要审查的邮件。
如果被标记为垃圾邮件,管道会提前终止以优化资源使用。
摘要节点
生成邮件内容的简短摘要。
将摘要传递给响应节点进行处理。
响应节点
使用摘要和其他邮件详细信息来撰写合适的回复。
根据邮件的上下文生成初始自动回复。
人工审查节点
如果生成的回复不确定或被标记为需要审查,用户可以手动编辑或完善它。
IMAP集成
从IMAP服务器实时获取邮件,或从JSON加载测试数据。
支持选择性邮件检索,以确保管道执行顺畅。
发送或草拟决定
用户选择是立即发送回复还是将其保存为草稿。
如果选择发送:
— 通过SMTP发送邮件。
如果选择草拟:
— 保存回复,并可选择转发到Gmail地址。
结束:所有邮件已处理
标记一批邮件处理完毕后管道的结束。
确认所有操作已记录。
有了管道概述,接下来让我们深入实现这一架构的代码。
代码的工作原理
虽然我不会详细介绍整个代码库,但我会解释在这个工作流程创建中起关键作用的组件。
response_agent.py
响应智能体负责根据提供的摘要生成邮件回复。定义了generate_response函数,该函数接收一个邮件对象、其摘要以及收件人和发件人的姓名。该函数使用LangChain中的PromptTemplate函数构建提示,确保包含所有所需的邮件详细信息。
# response_agent.py
# Construct the prompt using email details and a summary to guide the LLM in generating a formal response.
from langchain.prompts import PromptTemplate
from config import DEEPSEEK_API_KEY  # Import the key from your config
from langchain_openai import ChatOpenAI
from utils.formatter import clean_text, format_email
from email.utils import parseaddr

def generate_response(email: dict, summary: str, recipient_name: str, your_name: str) -> str:
    prompt_template = PromptTemplate(
        input_variables=["sender", "subject", "content", "summary", "user_name","recipient_name"],
        template=(
            "You are an email assistant. Do not use placeholders like [User's Name]"
            "You are an email assistant. Do not include any greeting or signature lines in your response.\n\n"
            "Email Details:\n"
            "From: {sender}\n"
            "Subject: {subject}\n"
            "Content: {content}\n"
            "Summary: {summary}\n\n"

            "Reply in a formal tone."
        )
    ) # template for replying

    prompt = prompt_template.format(
        sender=recipient_name,  # Use the recipient's name (supplied manually)
        subject=email.get("subject", ""),
        content=email.get("body", ""),
        summary=summary,
        user_name=your_name
    )
在这里,导入了必要的库,并创建了一个函数来生成回复,同时明确定义了邮件组件的数据类型。使用PromptTemplate函数构建一个包含所有必需占位符的模板,大型语言模型(LLM)将根据提供的指令填充这些占位符。
最后,使用prompt_template中的占位符来构建提示。
这里有一个有趣的技巧——你需要让库误以为你正在使用OpenAI的API密钥,而实际上将整个API请求重定向到Deepseek服务器。
# response_agent.py
model = ChatOpenAI(
        base_url="https://api.deepseek.com/v1",
        model="deepseek-chat",
        temperature=0.5,
        openai_api_key=DEEPSEEK_API_KEY
    )

    response = model.invoke(prompt) # makes the model go into action
    response_text = response.content if hasattr(response, "content") else str(response)

    # Pass recipient_name (for greeting) and your_name (for signature)
    formatted_response = format_email(email.get("subject", ""), recipient_name, response_text, your_name)
    return formatted_response.strip()
这种结构为构建其他智能体(如过滤、响应生成和人工审查智能体)提供了基础。
supervisor.py
现在,我们来看看监督器,它在管道中协调所有这些智能体一起工作。
from core.state import EmailState
from agents import filtering_agent, summarization_agent, response_agent, human_review_agent
from langgraph.graph import START , END, StateGraph
"""Originally, each node function was written to expect two parameters—an email and a state.
However, the LangGraph framework is designed to pass only one argument (the state) to each node."""
# Bringing all the states together with a supervisor helps to manage the flow of the email processing.
def supervisor_langgraph(email: dict, state: EmailState,user_name : str,recipient_name:str) -> EmailState:
    """
    Processes an individual email using a LangGraph workflow.
    Each step (filtering, summarization, response generation) is a node.
    Conditional edges are used to exit early for spam or to continue processing.
    """

    state.current_email = email

    def filtering_node(state: EmailState) -> EmailState: # filtering node from the filtering agent
        current_email = state.current_email
        print('filtering node started for email id : %s' % current_email.get("id", "unknown"))
        classification = filtering_agent.filter_email(current_email)
        current_email["classification"] = classification
        state.metadata[current_email.get("id", "unknown")] = classification
        return state

    def summarization_node(state: EmailState) -> EmailState:
        email = state.current_email
        summary = summarization_agent.summarize_email(email)
        email["summary"] = summary
        return state

    def response_node(state: EmailState) -> EmailState:
        email = state.current_email
        response = response_agent.generate_response(email, email.get("summary", ""),recipient_name,user_name) # The response agent uses the summary to generate a response.
        # If the classification indicates review or the response is uncertain, let a human intervene
        if email.get("classification") == "needs_review" or "?" in response:
            response = human_review_agent.review_email(email, response)
        email["response"] = response
        state.history.append({
            "email_id": email.get("id", "unkonwn"),
            "response": response
        })
        return state

    graph_builder = StateGraph(EmailState)     # now building tther graph from all the states

    # addimng the nodes in the graph
    graph_builder.add_node("filtering", filtering_node)
    graph_builder.add_node("summarization", summarization_node)
    graph_builder.add_node("response", response_node)


    # building conditional wortking with filtering now that it is not spam if spam then dustbin is the way
    def post_filtering(state_update: EmailState):
        email = state.current_email
        if email.get("classification") == "spam":
            return END
        else:
            return "summarization"

    graph_builder.add_conditional_edges("filtering", post_filtering, {"summarization": "summarization", END: END})

    # This creates a direct edge (connection) from the "summarization" node to the "response" node.
    # if reaches summary node then must move to response node
    graph_builder.add_edge("summarization", "response")

    graph_builder.add_edge("response", END) # if respone comes then end to all please

    # Set the entry point to the filtering node.
    graph_builder.set_entry_point("filtering")

    # Compile the graph.
    graph = graph_builder.compile()

    # Invoke the graph with the current state.
    final_state = graph.invoke(state)
    return final_state
在这里,我们定义了一个监督器函数,它作为中央控制器,集成所有智能体并为每个智能体创建相应的节点(例如,response_node)。
我们使用LangGraph构建一个基于图的工作流,其中每个处理步骤都表示为一个节点。这是通过graph_builder.add_node实现的,它系统地向管道中添加过滤、摘要和响应生成节点。
此外,我们建立了条件边以简化执行。例如,如果过滤节点将邮件分类为“垃圾邮件”,则管道会提前终止,直接导向结束状态。
graph = graph_builder.compile()函数确保所有节点和条件路径都正确结构化,而graph.invoke(state)则执行完整的工作流,根据定义的逻辑处理邮件。
main.py
main.py脚本作为AI邮件智能体的入口点,汇集了所有必要的组件——智能体、监督器逻辑和用户交互。它管理邮件的检索、处理和响应生成,同时还处理用户输入以决定发送或草拟邮件。
from agents import filtering_agent, summarization_agent, response_agent, human_review_agent
from langgraph.graph import START, END, StateGraph
from core.email_imap import fetch_imap_emails
from core.email_sender import send_email, send_draft_to_gmail
from utils.logger import get_logger
from config import IMAP_USERNAME, IMAP_PASSWORD, IMAP_SERVER
from core.supervisor import supervisor_langgraph
from core.state import EmailState

logger = get_logger(__name__) # initialising logger for terminal logging
def process_email_action(email, your_name): # decision to send or draft email
    action = input("Do you want to (s)end the email or (d)raft it to Gmail? (s/d): ").strip().lower()
    if action == "s":
        if send_email(email, your_name):
            logger.info("Email sent successfully.")
        else:
            logger.warning("Failed to send email.")
    elif action == "d": # if draft then enter email
        gmail_address = input("Please enter your Gmail address for drafts: ")
        if send_draft_to_gmail(email, your_name, gmail_address):
            logger.info("Draft sent to Gmail successfully.")
        else:
            logger.warning("Failed to send draft to Gmail.")
    else:
        logger.warning("Invalid option. No action taken.")
def main():
    logger.info("Starting main function.")

    # Prompt for your own name (for signature) and for the recipient's name.
    your_name = input("Please enter your name (for signature): ")
    recipient_name = input("Please enter the recipient's name: ")

    # Use IMAP to fetch live emails
    emails = fetch_imap_emails(IMAP_USERNAME, IMAP_PASSWORD, IMAP_SERVER)
    logger.debug(f"Fetched {len(emails)} emails from IMAP.")

    if not emails:
        logger.info("No emails found.")
        return

    latest_emails = emails[-5:] # this tells to chose the last 5 emails

    print("\nSelect an email to process:")
    for idx, email in enumerate(latest_emails):
        print(f"{idx + 1}. {email['subject']}")

    choice = int(input("Enter the number of the email you want to choose: ")) - 1
    if choice < 0 or choice >= len(latest_emails):
        print("Invalid choice. Exiting.")
        return

    selected_email = latest_emails[choice]

    # Create state and process the email through the workflow
    state = EmailState()
    state.emails = [selected_email]
    state.current_email = selected_email
    # Pass your signature (your_name) to the supervisor pipeline
    state = supervisor_langgraph(selected_email, state, your_name,recipient_name)

    print("\nGenerated Response:\n")
    print(selected_email.get("response", "No response generated."))

    changes = input("Do you want to make changes to the response? (y/n): ").strip().lower()
    if changes == "y":
        modified_response = input("Enter the modified response: ")
        selected_email["response"] = modified_response

    # Now process the final action (send vs. draft)
    process_email_action(selected_email, your_name)

    logger.info("All emails processed.")
    logger.debug(f"Final State: {state}")
if __name__ == "__main__":
    main()
main.py函数首先使用IMAP获取服务器上的最新邮件。
然后,它显示最新的5封邮件,并提示用户选择一封进行处理。一旦选择了邮件,它将通过supervisor_langgraph进行传递,该流程会对邮件进行分类、生成摘要并制定适当的回复。
在最终确定之前,脚本允许人工审查和修改,使用户能够根据需要完善AI生成的回复。
最后,用户可以选择通过SMTP发送回复或将其保存为Gmail中的草稿,从而确保高效处理邮件的灵活性。
从而有效地将回复发送到目标邮件。
运行和理解代码
1. 配置环境:
- 在项目根目录下打开.env文件。
- 提供你的IMAP凭据(用户名、密码、服务器、端口)以及用于大型语言模型(LLM)的API令牌。
- 如果你更喜欢使用OpenAI而不是Deepseek,请在每个调用LLM的智能体代码中相应地更新库配置。
2. 安装所需的库:
- 通过运行以下命令确保你拥有所有必要的依赖项:
pip install -r requirements.txttxt- 此命令下载并安装项目所需的所有库。
3. 使用IMAP进行实时邮件处理:
- 为了处理实时邮件,建议使用IMAP。代码设计为获取你的实时邮件。
- 默认情况下,IMAP函数仅显示最后5封邮件(在main.py中使用latest_emails = emails[-5:])。
- 如果你希望查看更多邮件,可以更改此参数。
4. 选择操作——发送或存为草稿:
- 当系统提示时,按s立即发送邮件,或按d将其保存为草稿。
- 为了测试,如果你想体验草稿功能,只需输入你自己的电子邮件地址。系统将把草稿发送给你以供审阅。
通过遵循这些步骤,你可以快速设置、运行和自定义电子邮件助手智能体,以满足你的邮件处理需求。
结论
此项目展示了如何利用Deepseek以及LangChain和LangGraph创建一个模块化、高效的AI邮件智能体。


