黑客技术:欺骗人工智能步骤详解
但是由深度学习算法提供的系统应该能够避免人为的干扰,对吧?黑客怎么可能越过一个在TB级数据上训练的神经网络呢?
可惜,事实证明即使是最先进的深度神经网络也很容易被欺骗。有一些技巧,可以让你强制它们预测你想要的结果:
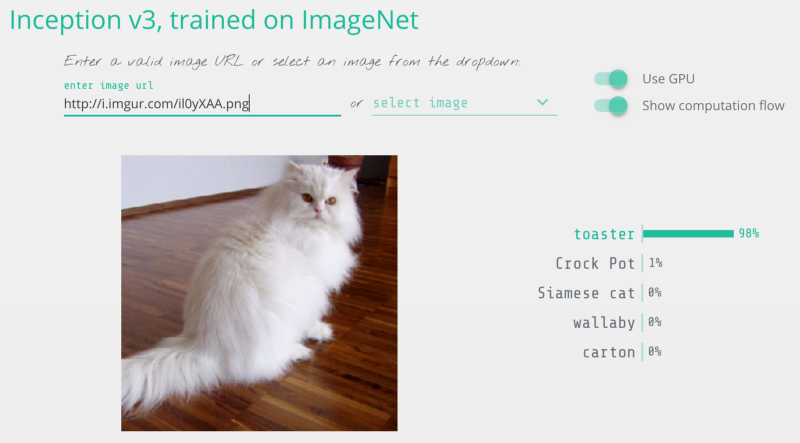
我修改了这张猫图片,所以它被认为是烤面包机
因此,在你发行由深层神经网络驱动的新系统之前,让我们详细了解如何攻击这些系统。
用于审查神经网络
我们假设我们经营像Ebay这样的拍卖网站。在我们的网站上,我们想防止人们出售违禁物品,比如动物。
如果你有数百万用户,执行这些规定是很困难的。我们可以聘请数百人手动审查每一个拍卖清单,但这样做成本很高。相反,我们可以使用深度学习自动检查违禁物品的拍卖照片,并标记它们。
这是一个典型的图像分类问题。为了构建这个,我们将训练一个深度卷积神经网络来区分违禁物品,然后我们将通过它管理我们网站上的所有照片。
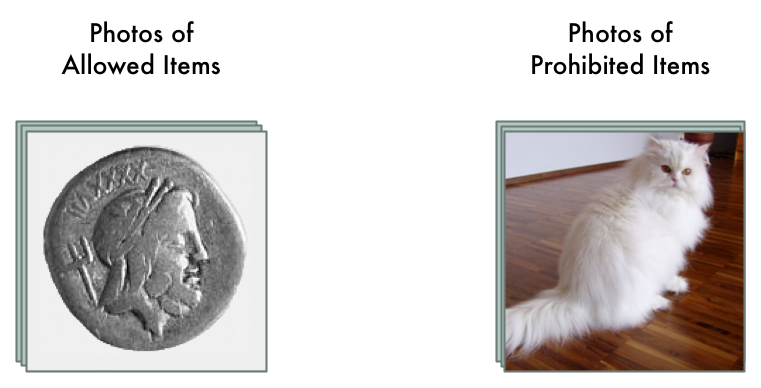
首先,我们需要一个来自过去拍卖列表的数千张图像的数据集。我们包含允许物品和禁止物品的图像,以便我们可以训练神经网络来告诉他们:
然后训练神经网络,我们使用标准的反向传播算法。这是一个我们在训练图片中过关的算法,传递该图片的预期结果,然后通过神经网络中的每一层,调整一下它们的权重,使它们在为这张图片产生正确输出的方面做得更好一点:
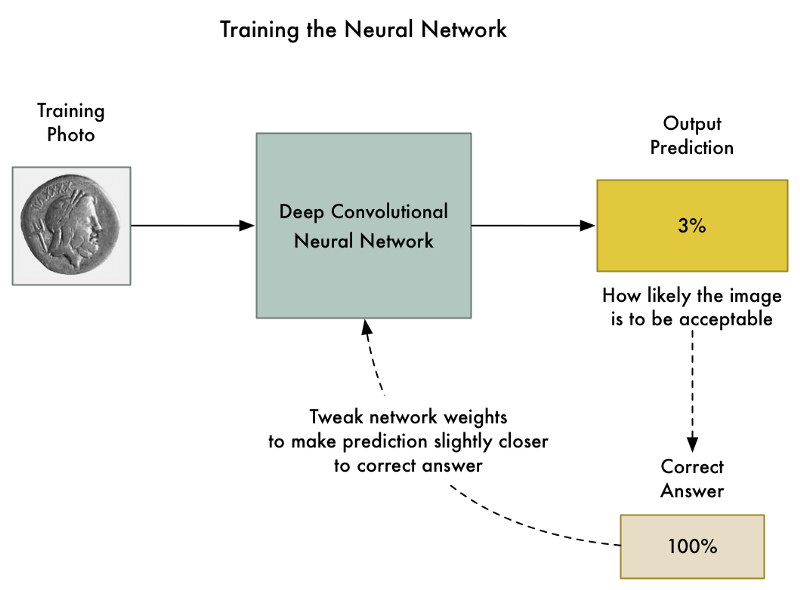
我们将数千张照片重复上千次,直到模型以可靠的准确性可靠地产生正确的结果。
最终我们得到能够可靠地分类图像的神经网络:
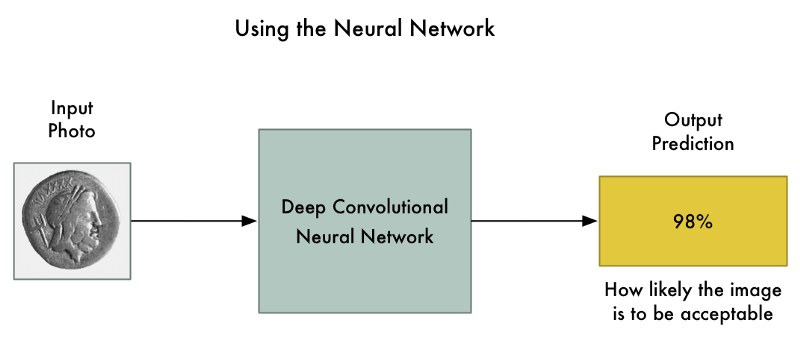
但事实上并不如他们看起来那么可靠
卷积神经网络是对整个图像进行分类时考虑整个图像的强大模型。它们可以识别复杂的形状和图案,无论图形出现在图像什么地方。在许多图像识别任务中,它们拥有等同甚至超过人类的表现。
有了像这么好的模型,将图像中的几个像素变得为更暗或更亮应该不会对最终的预测产生很大的影响的,对吧?当然这也许会稍微改变最终的可能性,但绝不能将图像的识别结果从“被禁止”转换成“被允许”。
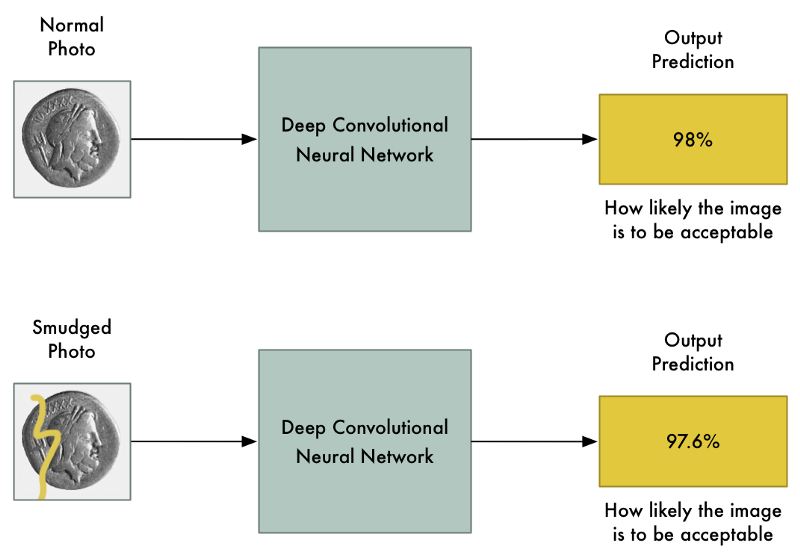 我们希望的是:输入照片的细微变化只会对最终的预测造成很小的改变。
但是在2013年的著名论文“神经网络的有趣特性”中,他被发现并总是这样。如果你准确地知道要改变哪个像素,以及要改变多少,你可以有意强迫神经网络预测给定图片的错误输出,并且不会改变图片的外观。
这意味着我们可以有意制作一张明显是禁止物品但完全欺骗了神经网络的图片:

为什么是这样呢?机器学习分类器的工作原理是试图在事物之间找到一条分界线。以下是一个简单的二维分类器的曲线图,它学会了将绿点(接受)与红点(禁止)分开:
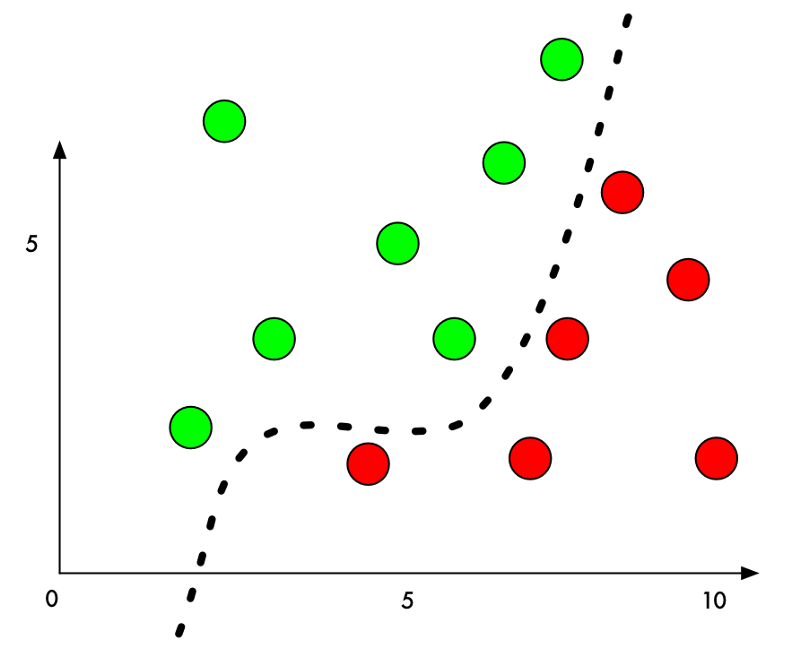
现在,分类器的精度达到100%。它看到这条线完美地将所有绿点与红点分开了。
但是,如果我们想欺骗它把一个红点错误的分类成绿点呢?我们可以将红点推向绿点区域的最低限度是多少?
如果我们把边界旁边的红点的Y值增加一丁点,那么我们刚好将它们推到绿色领域:
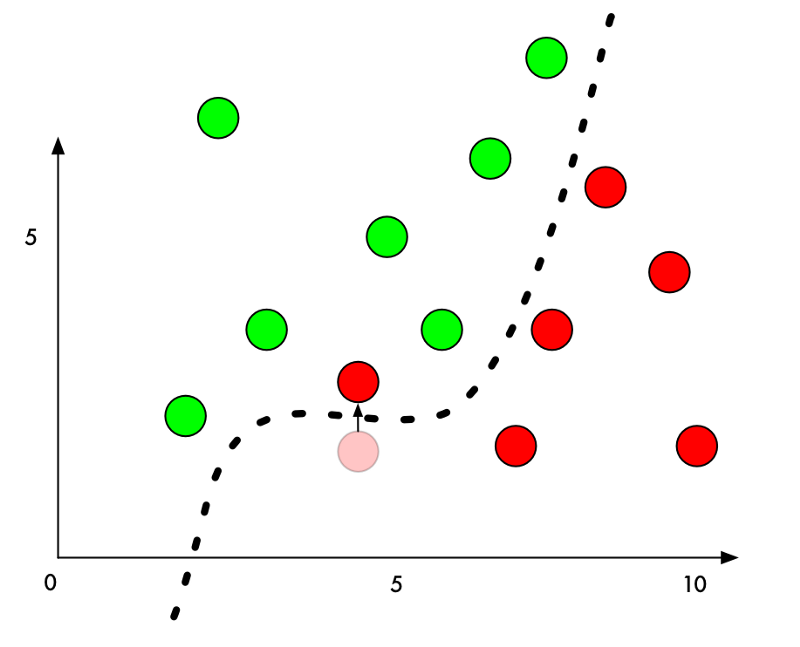
所以要欺骗一个分类器,我们只需要知道从哪个方向来推动这个点,以便把它放在一边。如果我们改变的过于明显,我们会尽可能少点移动这个点,这样看起来像是无意间的错误。
在具有深度神经网络的图像分类中,我们分类的每个“点”都是由数千个像素组成的整个图像。这给了我们数千个可能合适的值,让我们可以调整和推动这个点越过分界线。如果我们确信我们以对人类不太明显的方式调整图像中的像素,我们就可以在图片看起来没被篡改的情况下欺骗分类器。
换句话说,我们可以取得一个真实物体的图片然后稍微调整一些像素,使得这个图像完全被神经网络视为别的东西 - 并且我们可以完全掌握它被检测成什么样的物体:

把一只猫变成烤面包机,来自Keras.js web-based demo的图像检测结果
如何欺骗神经网络
我们已经讨论了训练神经网络以分类照片的基本过程:
- 插入一个训练图像。
- 检查神经网络的预测,看看距离正确结果有多远。
- 使用反向传播调整神经网络中每个层的权重,使最终预测更接近正确结果。
- 重复步骤1-3几千次并使用几千种不同的训练照片。
但是,如果不调整神经网络的层的权重,而是调整输入图像本身,直到我们得到我们想要的结果呢?
所以让我们拿先前训练的神经网络再次进行“训练”。不过这次让我们使用反向传播来调整输入图像而不是调整神经网络层:
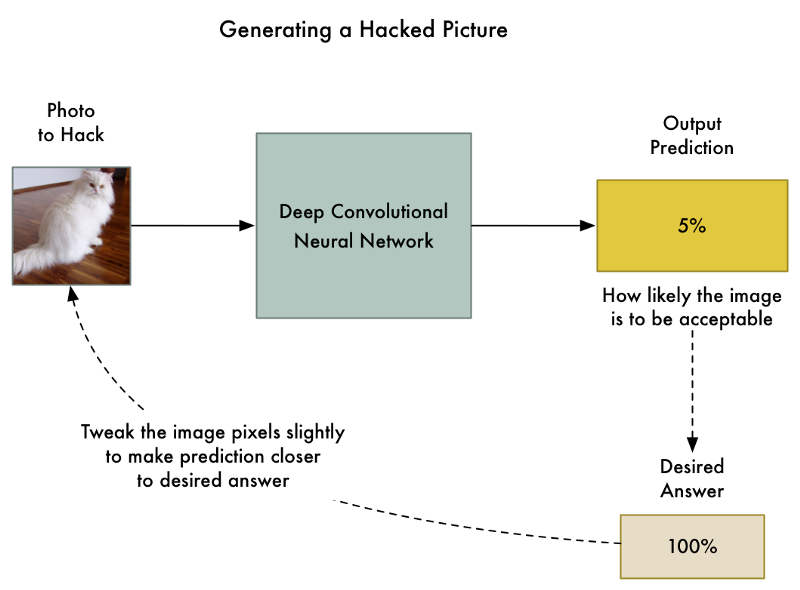
这里是新的算法:
- 插入我们想要的破解的图像。
- 检查神经网络的预测,看看距离我们想要获得这张照片的结果有多远。
- 使用反向传播调整我们的照片,使最终的预测更接近我们想要的结果。
- 使用相同的照片重复步骤1-3几千次,直到网络给我们想要的结果。
最后,我们将获得一个欺骗神经网络并且不改变神经网络本身任何东西的图像。
唯一的问题是,不加限制地允许任何单个像素进行调整,图像的改动可能会非常剧烈,以至于肉眼可见。它们会出现变色的斑点区域或波浪区域:
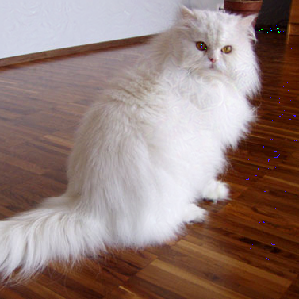
没有限制调整像素的黑客图像。你能在墙上看到波浪形,在猫周围看到变色的斑点。
为了防止这些明显的失真,我们可以为我们的算法添加一个简单的约束。我们可以声明,黑客图像中没有一个像素可以从原始图像中变化超过一小部分 - 比如0.01%。这迫使我们的算法以一种既能欺骗神经网络又不会让图像看起来与原始图像不同的方式来调整图像。
以下是我们添加完约束后生成图像的样子:
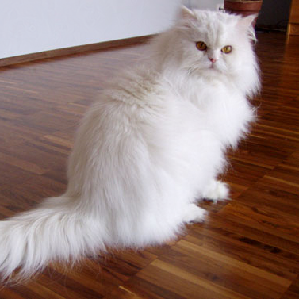
限制了可以改变多少单个像素后生成的黑客图像。
即使这个图像看起来和我们看的一样,照样能够欺骗神经网络!
让我们看看如何编码实现它
为了方便编写,我们首先需要一个预先训练的神经网络来进行欺骗。不进行从头开始的训练,而是使用Google创建已经好的。
Keras是一种流行的深度学习框架,它带有几个预先训练好的神经网络。我们将使用经过预先训练的Google Inception v3深层神经网络,检测1000种不同种类的对象。
这里是Keras的基本代码,使用这个神经网络识别图片中的内容。在运行之前,请确认你安装了Python 3和Keras:
import numpy as np

from keras.preprocessing import image

from keras.applications import inception_v3


# Load pre-trained image recognition model

model = inception_v3.InceptionV3()


# Load the image file and convert it to a numpy array

img = image.load_img("cat.png", target_size=(299, 299))

input_image = image.img_to_array(img)


# Scale the image so all pixel intensities are between [-1, 1] as the model expects

input_image /= 255.

input_image -= 0.5

input_image *= 2.


# Add a 4th dimension for batch size (as Keras expects)

input_image = np.expand_dims(input_image, axis=0)


# Run the image through the neural network

predictions = model.predict(input_image)


# Convert the predictions into text and print them

predicted_classes = inception_v3.decode_predictions(predictions, top=1)

imagenet_id, name, confidence = predicted_classes[0][0]

print("This is a {} with {:.4}% confidence!".format(name, confidence * 100))
运行后,它正确地检测了这个图像,将它归类为波斯猫:
$ python3 predict.py

This is a Persian_cat with 85.7% confidence!
现在让我们调整图像欺骗神经网络直到让它认为这只猫是烤面包机。
Keras内置没有训练输入图像的方法,只能训练神经网络层。所以我不得不手动编写训练步骤。
以下是代码:
import numpy as np

from keras.preprocessing import image

from keras.applications import inception_v3

from keras import backend as K

from PIL import Image


# Load pre-trained image recognition model

model = inception_v3.InceptionV3()


# Grab a reference to the first and last layer of the neural net

model_input_layer = model.layers[0].input

model_output_layer = model.layers[-1].output


# Choose an ImageNet object to fake

# The list of classes is available here: https://gist.github.com/ageitgey/4e1342c10a71981d0b491e1b8227328b

# Class #859 is "toaster"

object_type_to_fake = 859


# Load the image to hack

img = image.load_img("cat.png", target_size=(299, 299))

original_image = image.img_to_array(img)


# Scale the image so all pixel intensities are between [-1, 1] as the model expects

original_image /= 255.

original_image -= 0.5

original_image *= 2.


# Add a 4th dimension for batch size (as Keras expects)

original_image = np.expand_dims(original_image, axis=0)


# Pre-calculate the maximum change we will allow to the image

# We'll make sure our hacked image never goes past this so it doesn't look funny.

# A larger number produces an image faster but risks more distortion.

max_change_above = original_image + 0.01

max_change_below = original_image - 0.01


# Create a copy of the input image to hack on

hacked_image = np.copy(original_image)


# How much to update the hacked image in each iteration

learning_rate = 0.1


# Define the cost function.

# Our 'cost' will be the likelihood out image is the target class according to the pre-trained model

cost_function = model_output_layer[0, object_type_to_fake]


# We'll ask Keras to calculate the gradient based on the input image and the currently predicted class

# In this case, referring to "model_input_layer" will give us back image we are hacking.

gradient_function = K.gradients(cost_function, model_input_layer)[0]


# Create a Keras function that we can call to calculate the current cost and gradient

grab_cost_and_gradients_from_model = K.function([model_input_layer, K.learning_phase()], [cost_function, gradient_function])


cost = 0.0


# In a loop, keep adjusting the hacked image slightly so that it tricks the model more and more

# until it gets to at least 80% confidence

while cost < 0.80:

    # Check how close the image is to our target class and grab the gradients we

    # can use to push it one more step in that direction.

    # Note: It's really important to pass in '0' for the Keras learning mode here!

    # Keras layers behave differently in prediction vs. train modes!

    cost, gradients = grab_cost_and_gradients_from_model([hacked_image, 0])


    # Move the hacked image one step further towards fooling the model

    hacked_image += gradients * learning_rate


    # Ensure that the image doesn't ever change too much to either look funny or to become an invalid image

    hacked_image = np.clip(hacked_image, max_change_below, max_change_above)

    hacked_image = np.clip(hacked_image, -1.0, 1.0)


    print("Model's predicted likelihood that the image is a toaster: {:.8}%".format(cost * 100))


# De-scale the image's pixels from [-1, 1] back to the [0, 255] range

img = hacked_image[0]

img /= 2.

img += 0.5

img *= 255.


# Save the hacked image!

im = Image.fromarray(img.astype(np.uint8))

im.save("hacked-image.png")
运行后,它会吐出一个会欺骗神经网络的图像:
$ python3 generated_hacked_image.py

Model's predicted likelihood that the image is a toaster: 0.00072%

[ .... a few thousand lines of training .... ]

Model's predicted likelihood that the image is a toaster: 99.4212%
注意:如果你没有GPU,可能需要几个小时的时间。如果你有正确配置了Keras和CUDA的GPU,则运行时间不超过两分钟。
现在我们来测试一下这个黑客图像:
$ python3 predict.py

This is a toaster with 98.09% confidence!
我们成功了!我们已经欺骗神经网络让它认为这只猫是烤面包机!
黑客图像可以做什么?
创建了一个黑客图像被称为“生成对抗实例”。我们有意制作一个数据,让机器学习模型分类错误。这是一个巧妙的花招,但为什么这在现实世界中很重要呢?
研究表明,这些黑客图像有一些令人惊讶的属性:
- 即使被打印在纸上黑客图像仍然可以欺骗神经网络!因此,你可以使用这些黑客图像来欺骗物理摄像机或扫描仪,而不仅仅是欺骗直接上传图像文件的系统。
- 欺骗了一个神经网络的图像往往也能欺骗设计完全不同的其他神经网络,如果他们接受了相似的数据训练。
所以我们可以用这些黑客图片做很多事情!
但我们创建这些图像仍然有很大的局限性-我们的攻击需要直接访问神经网络本身。因为我们实际上是“训练”神经网络进行,所以我们需要一个副本。而在现实世界中,没有公司会让你下载他们训练有素的神经网络的代码,所以这或许意味着我们无法攻击他们,对吧?
然而并不是!研究人员最近发现,你可以通过探测另一个神经网络的运转训练一个自己的神经网络替代品以此镜像这个网络。然后,你可以使用你的替代品神经网络来生成通用的欺骗原来神经网络的黑客图像!这被称为黑箱攻击(black-box attack)。
黑箱攻击的应用场景。一些合理的例子如:
- 将自驾车视为绿灯,这样可能导致车祸!
- 欺骗内容过滤系统,让非法的内容通过。
- 欺骗ATM支票扫描仪,让它认为支票上的笔迹说明的数量,比实际支票上写的更大(即使你被抓住,也可以合理的推诿!)
而这些攻击方法不仅限于图像。你可以使用同样的方法来欺骗可用于其他类型数据的分类器。例如,你可以欺骗病毒扫描程序将你的病毒识别成安全代码!


