Deep Photo Styletransfer的一种纯Tensorflow实现,教你如何转换图片风格
2017年08月14日 由 yining 发表
256119
0
通过深度学习,一秒钟让你的照片高大上,这是康奈尔大学和 Adobe 的工程师合作的一个新项目,通过卷积神经网络把图片进行风格迁移。项目已开源,名字叫「Deep Photo Style Transfer」。
本文这个项目将介绍Deep Photo Styletransfer的一种纯Tensorflow实现,如果你想找到torch实现的话,地址:https://github.com/luanfujun/deep-photo-styletransfer。
这个实现支持L-BFGS-B(这是原作者所使用的)和Adam算法,以防当Tensorflow升级到更高版本时,Scipy优化器接口不兼容。
由于Tensorflow的自动微分(automatic differentiation),这一实现可能会变得更简单一些。此外,由于另一种存储库(repository)计算方法——Matting Laplacian稀疏矩阵,实现也没有对MATLAB存在依赖。
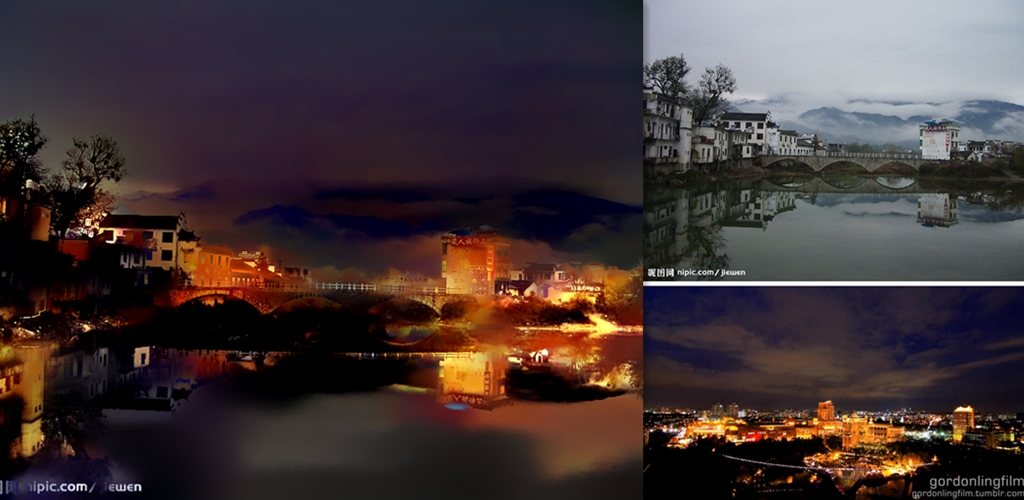
下面是将照片风格转移成另一张照片的例子。

免责声明:
本软件仅供学术和非商业用途使用。
依赖关系
建议使用Anaconda Python,因为你只需要手动安装Tensorflow和PyCUDA。CUDA你可以选择性的安装,但它确实是值得推荐的。
在VGG Tensorflow中采用了Tensorflow的VGG-19模型,在类接口上几乎没有修改。VGG-19模型权重存储为.npy文件,可以在这里下载。下载后,将weight file复制到./project/vgg19目录。
基本用法
你需要指定内容图像的路径,样式图像,内容图像分割,样式图像分割,然后运行命令。
例:
--style_option指定了三种不同的样式传输方式。--style_option 0是生成分段的中间结果,就像是torch中的neuralstyle_seg.lua文件。--style_option 1使用这个中间结果来生成最后的结果,比如torch中的deepmatting_seg.lua文件。--style_option 2将这两个步骤组合为一个行命令来直接生成最终结果。
运行python deep_photostyle.py –help来查看所有选项的列表。
这个存储库(repository)不提供图像分割脚本,只使用来自torch版本的分割图像。使用的Mask颜色也和它们一样。你可以指定分割模型和Mask颜色来定制你自己的图像风格转变。
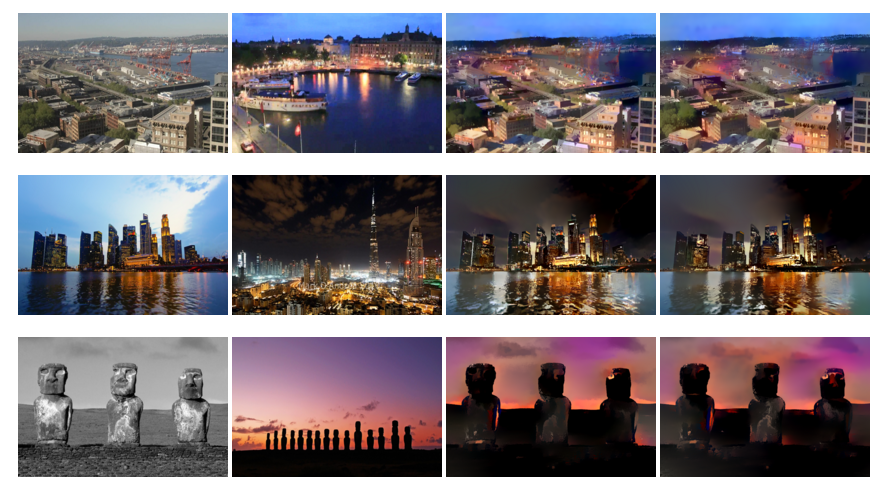
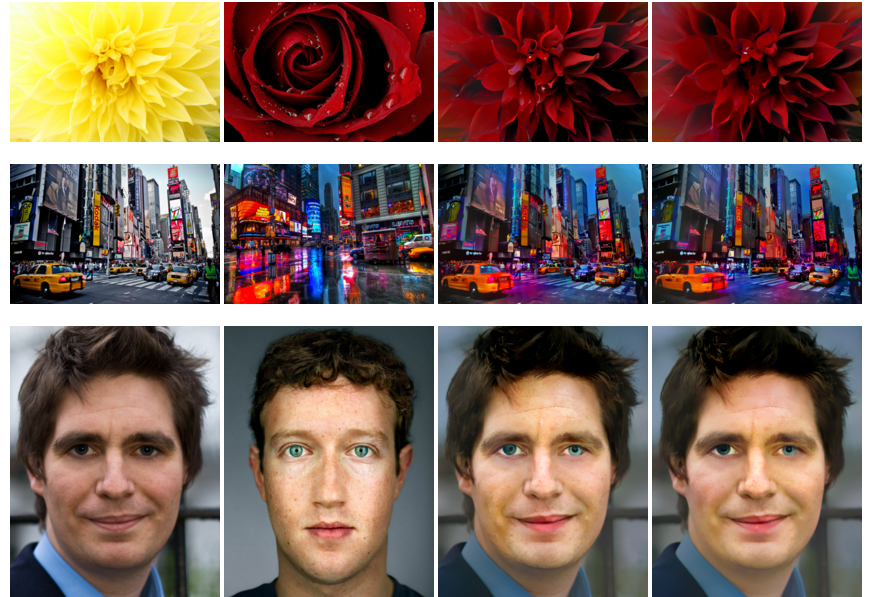
这些都是Tensorflow算法的结果(从左到右是输入、风格、torch结果和Tensorflow结果)。


如果你发现这段代码对你的研究有用,请引用:
本文这个项目将介绍Deep Photo Styletransfer的一种纯Tensorflow实现,如果你想找到torch实现的话,地址:https://github.com/luanfujun/deep-photo-styletransfer。
这个实现支持L-BFGS-B(这是原作者所使用的)和Adam算法,以防当Tensorflow升级到更高版本时,Scipy优化器接口不兼容。
由于Tensorflow的自动微分(automatic differentiation),这一实现可能会变得更简单一些。此外,由于另一种存储库(repository)计算方法——Matting Laplacian稀疏矩阵,实现也没有对MATLAB存在依赖。
下面是将照片风格转移成另一张照片的例子。

图片出处:见水印
免责声明:
本软件仅供学术和非商业用途使用。
设置
依赖关系
- Tensorflow
- Numpy
- Pillow
- Scipy
- PyCUDA (用于平滑的局部仿射(local affine),在CUDA 8.0上进行测试)
建议使用Anaconda Python,因为你只需要手动安装Tensorflow和PyCUDA。CUDA你可以选择性的安装,但它确实是值得推荐的。
下载VGG-19模型权重
在VGG Tensorflow中采用了Tensorflow的VGG-19模型,在类接口上几乎没有修改。VGG-19模型权重存储为.npy文件,可以在这里下载。下载后,将weight file复制到./project/vgg19目录。
使用
基本用法
你需要指定内容图像的路径,样式图像,内容图像分割,样式图像分割,然后运行命令。
python deep_photostyle.py --content_image_path --style_image_path --content_seg_path --style_seg_path --style_option 2 例:
python deep_photostyle.py --content_image_path ./examples/input/in11.png --style_image_path ./examples/style/tar11.png --content_seg_path ./examples/segmentation/in11.png --style_seg_path ./examples/segmentation/tar11.png --style_option 2其它选项
--style_option指定了三种不同的样式传输方式。--style_option 0是生成分段的中间结果,就像是torch中的neuralstyle_seg.lua文件。--style_option 1使用这个中间结果来生成最后的结果,比如torch中的deepmatting_seg.lua文件。--style_option 2将这两个步骤组合为一个行命令来直接生成最终结果。
运行python deep_photostyle.py –help来查看所有选项的列表。
图像分割
这个存储库(repository)不提供图像分割脚本,只使用来自torch版本的分割图像。使用的Mask颜色也和它们一样。你可以指定分割模型和Mask颜色来定制你自己的图像风格转变。
例子
这些都是Tensorflow算法的结果(从左到右是输入、风格、torch结果和Tensorflow结果)。


- 我们的Tensorflow实现基本上遵循了torch代码。
- 我们使用martinbenson的python代码来计算Matting Laplacian。
引用
如果你发现这段代码对你的研究有用,请引用:
@misc{YangPhotoStyle2017,

  author = {Yang Liu},

  title = {deep-photo-style-transfer-tf},

  publisher = {GitHub},

  organization={Alibaba-Zhejiang University Joint Research Institute of Frontier Technologies},

  year = {2017},

  howpublished = {\url{https://github.com/LouieYang/deep-photo-styletransfer-tf}}

}

欢迎关注ATYUN官方公众号
商务合作及内容投稿请联系邮箱:bd@atyun.com
热门企业
热门职位
写评论取消
回复取消


