Text2Text微调T5和使用Streamlit构建演示的完整指南
我一直想尝试一下Streamlit和Hugging Face Spaces。如果你还不了解它们看如下:
1. Streamlit是一个Python库,它允许数据科学家轻松创建小型交互式演示,以便其他人可以测试他们的机器学习模型或查看他们的数据分析。你可以查看Streamlit Gallery,了解这个库可以做什么。此外,你还可以将你的Streamlit应用部署到Streamlit Cloud上,这样可以方便地与他人共享你的应用,并且你可以获得免费的CPU资源来运行应用。
2. Hugging Face Spaces是一个服务,你可以在其中部署你的Streamlit或Gradio应用程序,以便方便地共享它们。它提供了免费的CPU资源,与Streamlit Cloud类似。然而,当你在Hugging Face Spaces上部署一个应用程序并使用Hugging Face Hub上上传的机器学习模型时,每个人都可以看到它们是链接在一起的。
为了测试它们,我决定对一个简单但并不太流行的任务进行预训练模型的微调,该任务是根据文章的文本内容为其生成候选标题。
在本文中,我们将要做以下事情:
1. 找到包含文章文本内容和标题的合适数据集。
2. 选择适合我们任务的评估指标。
3. 在Colab上微调一个预训练模型,使用TensorBoard在验证集上监控所选择的评估指标,并将模型的检查点保存在Google Drive上(以便在Colab断开连接的情况下可以恢复训练)。
4. 将模型上传到Hugging Face Hub,以供其他人使用。
5. 使用Streamlit构建一个交互式演示,并将其部署到Hugging Face Spaces。
选择用于标题生成任务的数据集
我通常会在Google Dataset Search或Kaggle上寻找数据集。已经有很多包含许多报纸文章的数据集可用,但是对于本教程,我想专注于我们通常在Medium上找到的那种文章类型:不那么新闻性,更多是指南性的文章。
由于我找不到同时包含文章文本内容和标题的Medium文章数据集,所以我通过使用Python库newspaper来抓取网站并解析网页来创建了一个数据集。然后,我将其上传到Kaggle,取名为“190k+ Medium Articles dataset”,这样每个人都可以使用它,并附带一个简单的数据探索的公开笔记本。
数据中的每一行都代表在Medium上发布的不同文章。对于每篇文章,你有以下特征:
1. title [string]:文章的标题。
2. text [string]:文章的文本内容。
3. url [string]:与文章相关联的URL。
4. authors [list of string]:文章的作者。
5. timestamp [string]:文章的发布日期和时间。
6. tags [list of string]:与文章相关的标签列表。
为标题生成任务选择评估指标
从文章的文本内容生成标题的任务是一个文本到文本的生成任务:我们有一个输入文本,希望生成一些输出文本。
常见的文本到文本生成任务包括机器翻译,通常使用BLEU分数进行评估,并侧重于词语精确性,以及文本摘要,通常使用ROUGE分数进行评估,并侧重于词语召回率。
我认为标题生成与文本摘要密切相关,因为标题应该让读者了解文章的主题,同时还应该引起读者的兴趣,使他们对文章感到好奇。因此,我决定使用ROUGE分数来评估我的模型。
模型训练
现在让我们通过Colab来进行编码!我们将要做以下工作:
1. 将Google Drive连接到Colab,以在Colab会话之间获得持久存储。
2. 从Kaggle下载Medium数据集。
3. 加载数据集。
4. 将数据集分割为训练集、验证集和测试集。
5. 对T5模型进行预处理。
6. 准备Hugging Face Trainer。
7. 启动TensorBoard。
8. 微调T5模型。
9. 尝试模型。
10. 在测试集上评估模型。
首先,我们安装一些库:
!pip install datasets transformers rouge_score nltk我们使用Hugging Face的transformers库来下载预训练模型并进行微调,使用Hugging Face的datasets库来加载和预处理数据集,使用rouge-score库来计算ROUGE分数,并使用nltk库来进行常见的NLP预处理功能。
将Google Drive连接到Colab
在Colab笔记本中,提供了在Colab中加载和保存来自外部源的数据的方法。我们对“将Google Drive挂载为本地目录”部分感兴趣:通过在我们的笔记本中执行以下代码,你将被提示允许笔记本从你的Google Drive中读取数据。
from google.colab import drive
drive.mount('/content/drive')
然后,你可以在drive/MyDrive目录中找到你的Google Drive数据。在本文的后面部分,我们将把模型检查点保存在一个专门创建的drive/MyDrive/Models目录中。
从Kaggle下载Medium数据集
我们将使用kaggle命令行实用程序下载我们的数据集,该实用程序已经在Google Colab上预先安装。要使用kaggle命令,我们需要通过API密钥将其连接到我们的Kaggle帐户。以下是创建API密钥的说明,非常简单。完成后,你应该有一个kaggle.json文件。
接下来,你需要将kaggle.json文件上传到你的Colab实例。
最后,我们需要指示kaggle命令行实用程序使用你的kaggle.json文件。你可以执行kaggle命令创建隐藏目录.kaggle(同时还会抛出一个错误,因为它找不到.kaggle目录中的kaggle.json文件)。然后,使用cp kaggle.json ~/.kaggle/kaggle.json命令将文件复制到该目录中。
现在,我们可以下载数据集了!首先,我们需要获取数据集名称,该名称是在数据集URL中kaggle.com/datasets/之后的所有内容。我们的数据集URL是kaggle.com/datasets/fabiochiusano/medium-articles,因此数据集名称是fabiochiusano/medium-articles。执行命令kaggle datasets download -d fabiochiusano/medium-articles,然后你应该在当前目录中找到medium-articles.zip文件。
加载数据集
让我们导入必要的库。
import transformers
from datasets import load_dataset, load_metric
我们使用datasets包中的load_dataset函数加载数据集。
medium_datasets = load_dataset("csv", data_files="medium-articles.zip")
# DatasetDict({
#    train: Dataset({
#        features: ['title', 'text', 'url', 'authors', 'timestamp', 'tags'],
#        num_rows: 192368
#    })
# })
将数据集拆分为训练集、验证集和测试集
作为一种常见的做法,我们将数据集分为:
1. 训练集:用于训练模型参数的数据。
2. 验证集:用于超参数调整或提前停止以避免过拟合的数据。
3. 测试集:用于检查我们在新数据上可以预期的性能。
我们可以使用数据集对象的train_test_split方法来完成这项任务,如下所示。
datasets_train_test = medium_datasets["train"].train_test_split(test_size=3000)
datasets_train_validation = datasets_train_test["train"].train_test_split(test_size=3000)
medium_datasets["train"] = datasets_train_validation["train"]
medium_datasets["validation"] = datasets_train_validation["test"]
medium_datasets["test"] = datasets_train_test["test"]
# DatasetDict({
#    train: Dataset({
#        features: ['title', 'text', 'url', 'authors', 'timestamp', 'tags'],
#        num_rows: 186368
#    })
#    validation: Dataset({
#        features: ['title', 'text', 'url', 'authors', 'timestamp', 'tags'],
#        num_rows: 3000
#    })
#    test: Dataset({
#        features: ['title', 'text', 'url', 'authors', 'timestamp', 'tags'],
#        num_rows: 3000
#    })
# })
确定三个数据集的大小通常取决于许多因素,例如整个数据集的大小、你希望花费多少时间训练或评估模型,以及你希望模型评估的精度如何。由于我们在Colab的免费GPU上训练了一个相当大的模型,我决定使用较小的验证集和测试集来加快速度。尽管如此,我们将看到最终的模型仍然能够产生出很好的标题。
medium_datasets["train"] = medium_datasets["train"].shuffle().select(range(100000))
medium_datasets["validation"] = medium_datasets["validation"].shuffle().select(range(1000))
medium_datasets["test"] = medium_datasets["test"].shuffle().select(range(1000))
# DatasetDict({
#    train: Dataset({
#        features: ['title', 'text', 'url', 'authors', 'timestamp', 'tags'],
#        num_rows: 100000
#    })
#    validation: Dataset({
#        features: ['title', 'text', 'url', 'authors', 'timestamp', 'tags'],
#        num_rows: 1000
#    })
#    test: Dataset({
#        features: ['title', 'text', 'url', 'authors', 'timestamp', 'tags'],
#        num_rows: 1000
#    })
# })
对T5模型进行预处理
Hugging Face为我们提供了一个完整的笔记本示例,展示了如何对T5模型进行文本摘要的微调。对于每个Transformer模型,我们首先需要对文本训练数据进行分词:文章内容和标题。
让我们实例化T5-base模型的tokenizer。
import nltk
nltk.download('punkt')
import string
from transformers import AutoTokenizer
model_checkpoint = "t5-base"
tokenizer = AutoTokenizer.from_pretrained(model_checkpoint)
在将分词器应用于数据之前,让我们筛选掉一些糟糕的样本(即标题长度少于20个字符且文本内容长度少于500个字符的文章)。
medium_datasets_cleaned = medium_datasets.filter(
    lambda example: (len(example['text']) >= 500) and
    (len(example['title']) >= 20)
)
然后,我们定义一个preprocess_data函数,该函数以一批样本作为输入,并输出一个要添加到样本中的新特征的字典。preprocess_data函数执行以下操作:
1. 从每个样本中提取“text”特征(即文章的文本内容),修复文章中的换行,并删除没有结束标点符号(即副标题)的行。
2. 在每个文章文本前添加文本“summarize: ”,这对于在摘要任务上对T5进行微调是必需的。
3. 对文章文本应用T5分词器,创建model_inputs对象。该对象是一个字典,每篇文章都包含一个input_ids和一个attention_mask数组,分别包含令牌id和注意力掩码。
4. 对文章标题应用T5分词器,创建labels对象。在这种情况下,该对象也是一个字典,每篇文章都包含一个input_ids和一个attention_mask数组,分别包含令牌id和注意力掩码。请注意,此步骤在tokenizer.as_target_tokenizer()上下文管理器中完成:这通常是因为在某些text2text任务中,输入和标签必须使用不同的分词器进行分词(例如,在两种语言之间进行翻译时,每种语言都有自己的分词器)。据我所知,在文本摘要中,标签与输入使用相同的分词器进行分词,因此上下文管理器是可选的。
5. 返回一个包含输入的令牌id和注意力掩码以及标签的令牌id的字典。
prefix = "summarize: "
max_input_length = 512
max_target_length = 64
def clean_text(text):
  sentences = nltk.sent_tokenize(text.strip())
  sentences_cleaned = [s for sent in sentences for s in sent.split("\n")]
  sentences_cleaned_no_titles = [sent for sent in sentences_cleaned
                                 if len(sent) > 0 and
                                 sent[-1] in string.punctuation]
  text_cleaned = "\n".join(sentences_cleaned_no_titles)
  return text_cleaned
def preprocess_data(examples):
  texts_cleaned = [clean_text(text) for text in examples["text"]]
  inputs = [prefix + text for text in texts_cleaned]
  model_inputs = tokenizer(inputs, max_length=max_input_length, truncation=True)
  # Setup the tokenizer for targets
  with tokenizer.as_target_tokenizer():
    labels = tokenizer(examples["title"], max_length=max_target_length,
                       truncation=True)
  model_inputs["labels"] = labels["input_ids"]
  return model_inputs
请注意:们将输入截断为512个令牌。虽然T5能够处理更长的输入,但内存需求随输入大小的增加呈二次增长,而这是我在Colab会话中可以使用的最大尺寸。512个令牌大约对应于682个英文单词,这大致相当于一个普通人在两分钟内阅读的数量。大多数Medium文章的阅读时间在四到七分钟之间,因此我们目前可能会丢失对我们任务有用的信息。尽管如此,许多文章在开头几段中都会阐述其主题,因此在大多数情况下可以生成出很好的标题。
preprocess_data函数可以通过map方法应用于所有数据集。
tokenized_datasets = medium_datasets_cleaned.map(preprocess_function,
                                                 batched=True)
# DatasetDict({
#    train: Dataset({
#        features: ['title', 'text', 'url', 'authors', 'timestamp', 'tags',
#                   'input_ids', 'attention_mask', 'labels'],
#        num_rows: 85602
#    })
#    validation: Dataset({
#        features: ['title', 'text', 'url', 'authors', 'timestamp', 'tags',
#                   'input_ids', 'attention_mask', 'labels'],
#        num_rows: 860
#    })
#    test: Dataset({
#        features: ['title', 'text', 'url', 'authors', 'timestamp', 'tags',
#                   'input_ids', 'attention_mask', 'labels'],
#        num_rows: 844
#    })
# })
准备Hugging Face训练器
现在我们可以用预处理过的数据对T5进行微调了!让我们导入一些必要的类来训练text2text模型。
from transformers import AutoModelForSeq2SeqLM, DataCollatorForSeq2Seq,
  Seq2SeqTrainingArguments, Seq2SeqTrainer
接下来,我们需要创建一个Seq2SeqTrainingArguments对象,该对象包含了一些训练参数,这些参数将定义模型的训练方式。请参考Trainer文档了解每个参数的含义。
batch_size = 8
model_name = "t5-base-medium-title-generation"
model_dir = f"drive/MyDrive/Models/{model_name}"
args = Seq2SeqTrainingArguments(
    model_dir,
    evaluation_strategy="steps",
    eval_steps=100,
    logging_strategy="steps",
    logging_steps=100,
    save_strategy="steps",
    save_steps=200,
    learning_rate=4e-5,
    per_device_train_batch_size=batch_size,
    per_device_eval_batch_size=batch_size,
    weight_decay=0.01,
    save_total_limit=3,
    num_train_epochs=1,
    predict_with_generate=True,
    fp16=True,
    load_best_model_at_end=True,
    metric_for_best_model="rouge1",
    report_to="tensorboard"
)
这里解释了一些传递给Seq2SeqTrainingArguments对象的参数:
1. predict_with_generate:必须设置为True才能计算生成式指标,如ROUGE和BLEU。
2. fp16:是否使用fp16 16位(混合)精度训练,而不是32位训练。可以加快训练速度。
3. report_to:要将日志写入的集成列表。
请注意,输出目录位于Google Drive中,并且我们指定了rouge1作为定义最佳模型的指标。
然后,我们使用分词器实例化一个DataCollatorForSeq2Seq对象。数据收集器是通过使用数据集元素列表作为输入来形成批次的对象,并在某些情况下应用一些处理。在本例中,同一批次中的所有输入和标签将被填充到批次中的各自最大长度。输入的填充使用通常的[PAD]令牌,而标签的填充使用id为-100的特殊令牌,该特殊令牌会被PyTorch损失函数自动忽略。
data_collator = DataCollatorForSeq2Seq(tokenizer)接下来,我们使用datasets库的load_metric函数下载ROUGE代码,从而实例化一个度量对象。然后,可以使用该对象使用预测和参考标签来计算其度量指标。
metric = load_metric("rouge")然后,必须在compute_metrics函数中调用度量对象,该函数以预测和参考标签的元组作为输入,并输出在输入上计算的度量指标的字典。具体而言,compute_metrics函数执行以下操作:
1. 解码预测(即将token id转换为单词)。
2. 在将标签解码之前,将-100的令牌id替换为[PAD]的令牌id。
3. 使用解码后的预测和标签计算ROUGE分数,并仅选择其中的一小部分指标。
4. 计算一个新的度量指标,即预测的平均长度。
5. 返回一个字典,其中键是度量指标的名称,值是度量指标的值。
import numpy as np
def compute_metrics(eval_pred):
    predictions, labels = eval_pred
    decoded_preds = tokenizer.batch_decode(predictions, skip_special_tokens=True)

    # Replace -100 in the labels as we can't decode them.
    labels = np.where(labels != -100, labels, tokenizer.pad_token_id)
    decoded_labels = tokenizer.batch_decode(labels, skip_special_tokens=True)

    # Rouge expects a newline after each sentence
    decoded_preds = ["\n".join(nltk.sent_tokenize(pred.strip()))
                      for pred in decoded_preds]
    decoded_labels = ["\n".join(nltk.sent_tokenize(label.strip()))
                      for label in decoded_labels]

    # Compute ROUGE scores
    result = metric.compute(predictions=decoded_preds, references=decoded_labels,
                            use_stemmer=True)
    # Extract ROUGE f1 scores
    result = {key: value.mid.fmeasure * 100 for key, value in result.items()}

    # Add mean generated length to metrics
    prediction_lens = [np.count_nonzero(pred != tokenizer.pad_token_id)
                      for pred in predictions]
    result["gen_len"] = np.mean(prediction_lens)

    return {k: round(v, 4) for k, v in result.items()}
我们快要完成了!现在, 我们需要创建一个Seq2SeqTrainer,传递我们刚刚定义的所有对象:训练参数、训练和评估数据、数据收集器、分词器、compute_metrics函数和model_init函数。model_init函数必须返回一个全新的预训练模型实例用于微调,确保训练始终从同一个模型开始,并不是从笔记本中部分微调的模型开始。
# Function that returns an untrained model to be trained
def model_init():
    return AutoModelForSeq2SeqLM.from_pretrained(model_checkpoint)
trainer = Seq2SeqTrainer(
    model_init=model_init,
    args=args,
    train_dataset=tokenized_datasets["train"],
    eval_dataset=tokenized_datasets["validation"],
    data_collator=data_collator,
    tokenizer=tokenizer,
    compute_metrics=compute_metrics
)
启动TensorBoard
在开始训练之前,让我们在笔记本中启动TensorBoard。
# Start TensorBoard before training to monitor it in progress
%load_ext tensorboard
%tensorboard --logdir '{model_dir}'/runs
执行此代码后,笔记本应该在单元格的正下方显示TensorBoard。
微调T5
最后,我们开始用训练方法进行微调。
trainer.train()启动后,单元格将输出一个进度条,指示已处理的批的数量。此外,在每个评估周期中,我们还将看到验证集上的度量值,你可以在下图中看到。
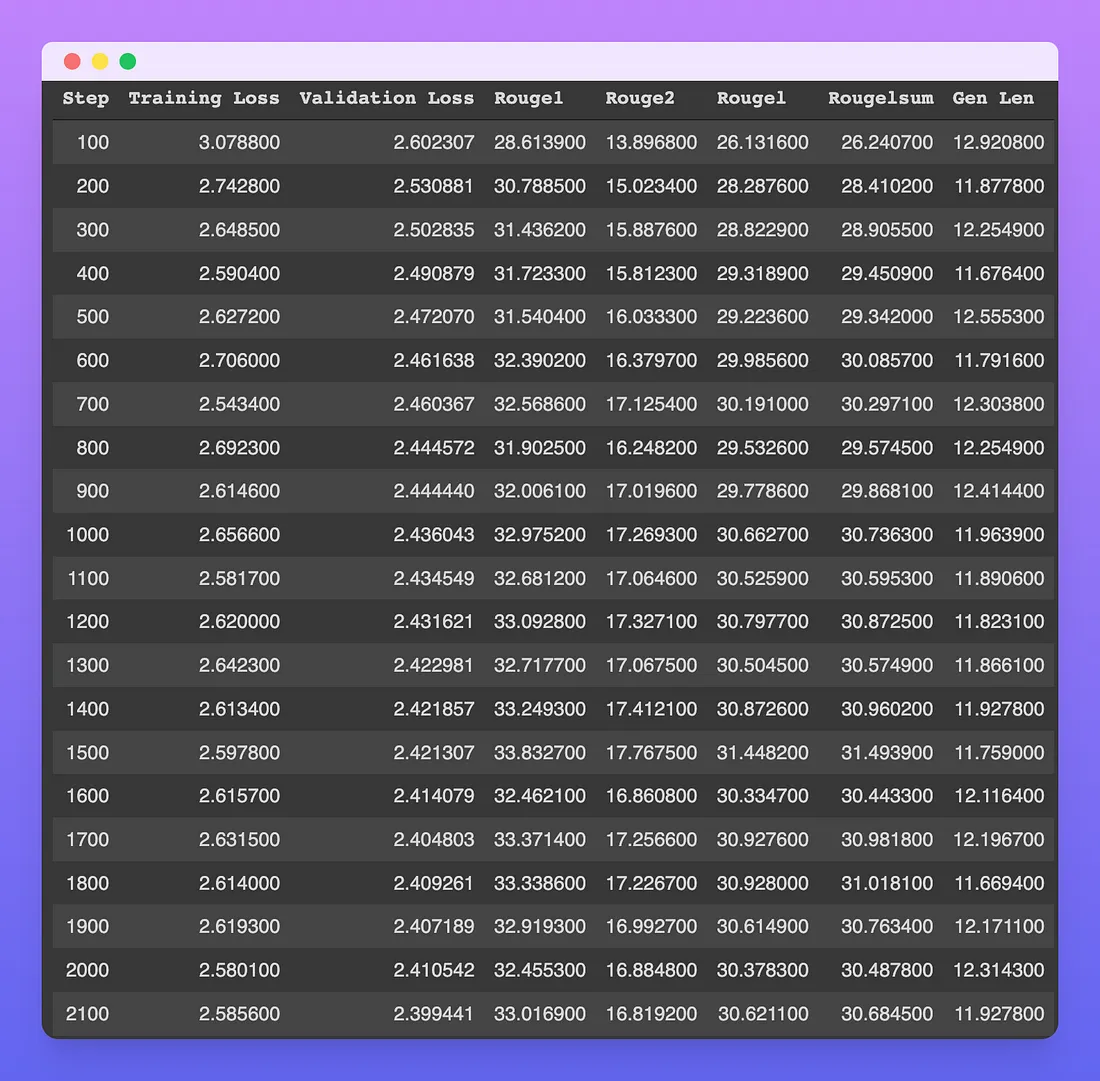
每个步骤的数量表示处理的批次数。例如,在第100步,模型已经在100 * batch_sizesamples(在这种情况下是100 * 8 = 800)上进行了训练。
无论是训练损失还是评估损失,都在逐步减小,直到第2100步。然而,所有的ROUGE指标似乎在第1500步左右达到峰值,之后略微下降。由于训练已经进行了大约三个小时,我决定停止训练并测试结果,但不排除ROUGE分数可能在一些步骤后再次升高,从而让我错过了一个更好的模型。
生成的标题的平均长度始终保持在大约12个令牌左右。由于使用子词分词器的每个令牌大约相当于0.75个英文单词,我们可以快速估计生成的文章的平均长度约为9个单词。
以下是从TensorBoard中提取的一些图表。
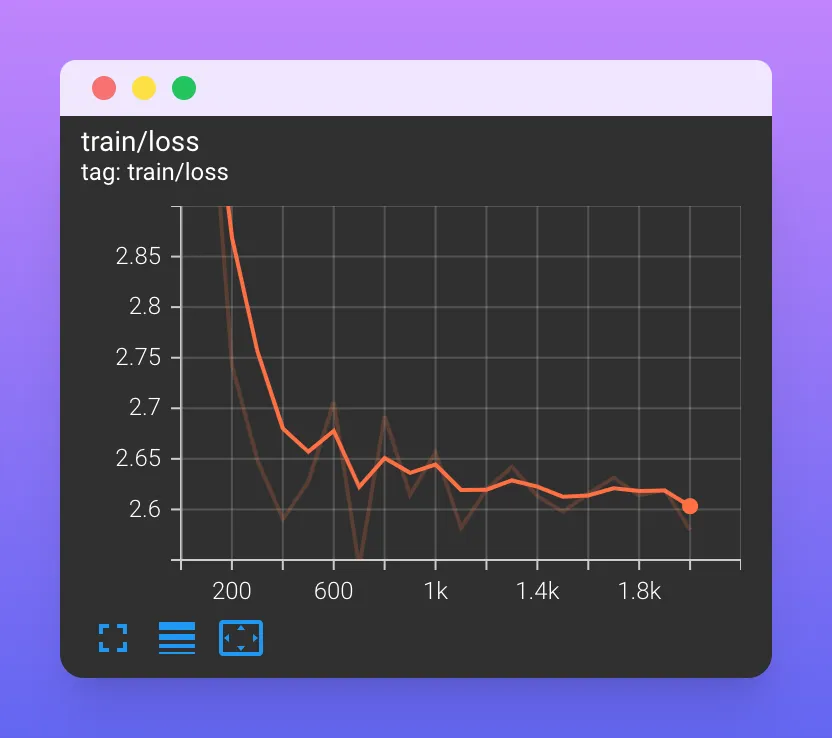
训练损失似乎稳定在1700步左右,缓慢下降。
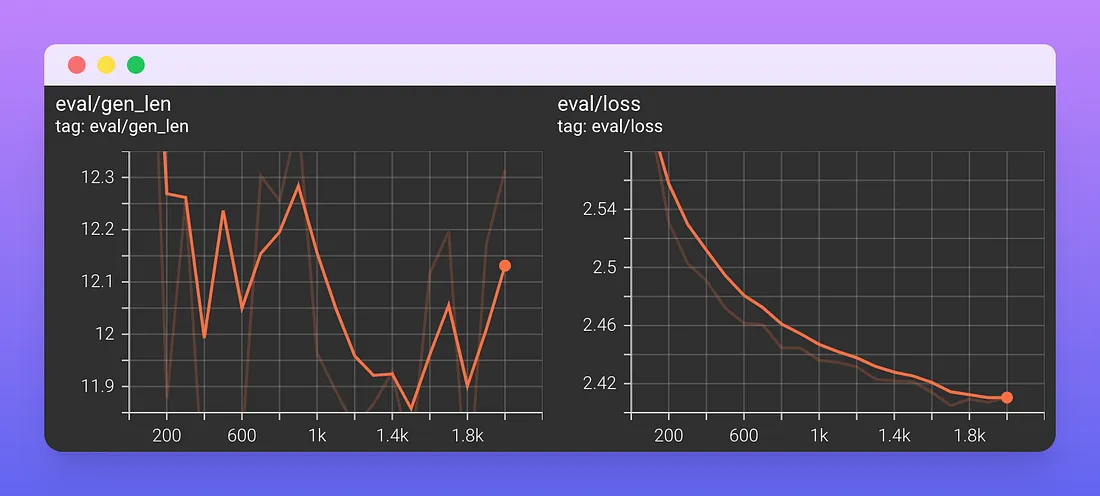
在第2000步,评价损失仍在减少。在训练期间,生成的标题的平均长度保持稳定在12个标记。
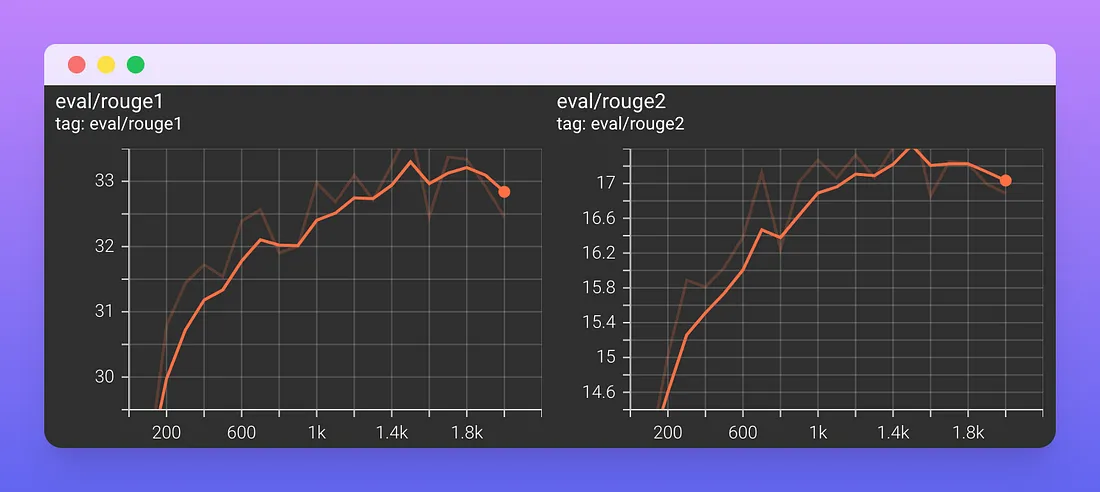
ROUGE-1在1800步稳定在33%,而ROUGE-2在1500步稳定在17.5%。
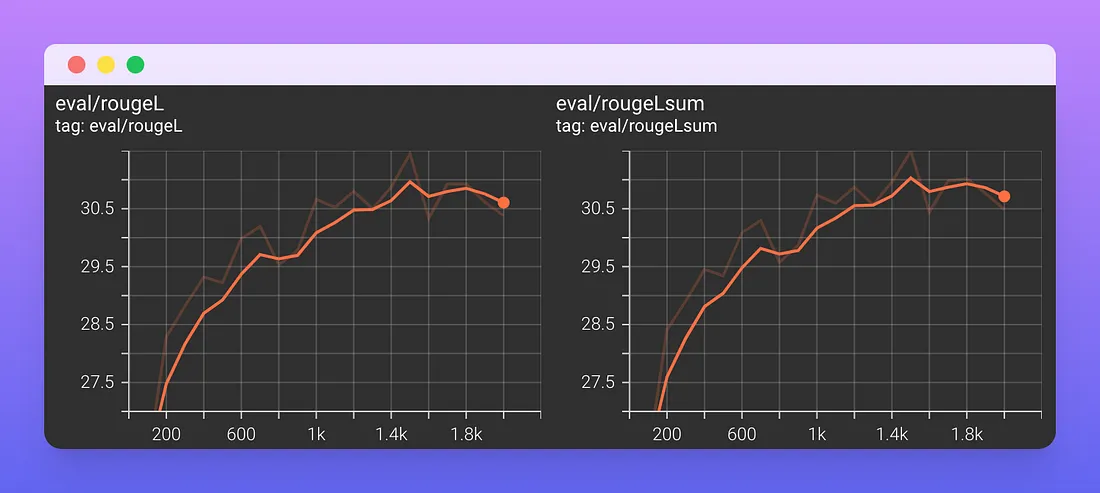
ROUGE-L和ROUGE-L-sum在1500步时稳定在30.7%。ROUGE-L计算生成文本和参考文本之间的最长公共子序列(LCS),忽略换行,而ROUGE-L-sum将换行作为句子边界进行相同的计算。
尝试模型
现在我们可以测试我们的模型了!首先,让我们加载它。
model_name = "t5-base-medium-title-generation/checkpoint-2000"
model_dir = f"drive/MyDrive/Models/{model_name}"
tokenizer = AutoTokenizer.from_pretrained(model_dir)
model = AutoModelForSeq2SeqLM.from_pretrained(model_dir)
max_input_length = 512
让我们在Streamlit文档的网页“Add statfulness to apps”中尝试一下。
text = """
We define access to a Streamlit app in a browser tab as a session.
For each browser tab that connects to the Streamlit server, a new session is created.
Streamlit reruns your script from top to bottom every time you interact with your app.
Each reruns takes place in a blank slate: no variables are shared between runs.
Session State is a way to share variables between reruns, for each user session.
In addition to the ability to store and persist state, Streamlit also exposes the
ability to manipulate state using Callbacks. In this guide, we will illustrate the
usage of Session State and Callbacks as we build a stateful Counter app.
For details on the Session State and Callbacks API, please refer to our Session
State API Reference Guide. Also, check out this Session State basics tutorial
video by Streamlit Developer Advocate Dr. Marisa Smith to get started:
"""
inputs = ["summarize: " + text]
inputs = tokenizer(inputs, max_length=max_input_length, truncation=True, return_tensors="pt")
output = model.generate(**inputs, num_beams=8, do_sample=True, min_length=10, max_length=64)
decoded_output = tokenizer.batch_decode(output, skip_special_tokens=True)[0]
predicted_title = nltk.sent_tokenize(decoded_output.strip())[0]
print(predicted_title)
# Session State and Callbacks in Streamlit
我们的模型预测标题为“Streamli中的会话状态和回调”。看起来不错!
我们以Medium文章“Banking on Bots”作为第二个例子进行测试。
text = """
Many financial institutions started building conversational AI, prior to the Covid19
pandemic, as part of a digital transformation initiative. These initial solutions
were high profile, highly personalized virtual assistants — like the Erica chatbot
from Bank of America. As the pandemic hit, the need changed as contact centers were
under increased pressures. As Cathal McGloin of ServisBOT explains in “how it started,
and how it is going,” financial institutions were looking for ways to automate
solutions to help get back to “normal” levels of customer service. This resulted
in a change from the “future of conversational AI” to a real tactical assistant
that can help in customer service. Haritha Dev of Wells Fargo, saw a similar trend.
Banks were originally looking to conversational AI as part of digital transformation
to keep up with the times. However, with the pandemic, it has been more about
customer retention and customer satisfaction. In addition, new use cases came about
as a result of Covid-19 that accelerated adoption of conversational AI. As Vinita
Kumar of Deloitte points out, banks were dealing with an influx of calls about new
concerns, like questions around the Paycheck Protection Program (PPP) loans. This
resulted in an increase in volume, without enough agents to assist customers, and
tipped the scale to incorporate conversational AI. When choosing initial use cases
to support, financial institutions often start with high volume, low complexity
tasks. For example, password resets, checking account balances, or checking the
status of a transaction, as Vinita points out. From there, the use cases can evolve
as the banks get more mature in developing conversational AI, and as the customers
become more engaged with the solutions. Cathal indicates another good way for banks
to start is looking at use cases that are a pain point, and also do not require a
lot of IT support. Some financial institutions may have a multi-year technology
roadmap, which can make it harder to get a new service started. A simple chatbot
for document collection in an onboarding process can result in high engagement,
and a high return on investment. For example, Cathal has a banking customer that
implemented a chatbot to capture a driver’s license to be used in the verification
process of adding an additional user to an account — it has over 85% engagement
with high satisfaction. An interesting use case Haritha discovered involved
educating customers on financial matters. People feel more comfortable asking a
chatbot what might be considered a “dumb” question, as the chatbot is less judgmental.
Users can be more ambiguous with their questions as well, not knowing the right
words to use, as chatbot can help narrow things down.
"""
inputs = ["summarize: " + text]
inputs = tokenizer(inputs, max_length=max_input_length, truncation=True, return_tensors="pt")
output = model.generate(**inputs, num_beams=8, do_sample=True, min_length=10, max_length=64)
decoded_output = tokenizer.batch_decode(output, skip_special_tokens=True)[0]
predicted_title = nltk.sent_tokenize(decoded_output.strip())[0]
print(predicted_title)
# Conversational AI: The Future of Customer Service
该模型预测的标题为“Conversational AI: The Future of Customer Service”,与文章内容一致,大写也合适。这个模型看起来像预期的那样工作。
在测试集上评估模型
最后,让我们用新模型计算测试集上的指标,以检查训练是否正确完成,并且我们可以期望在新的未见过的数据上取得良好的性能。
我们需要:
1. 将文章文本填充到相同的长度。
2. 将样本分组成批(使用PyTorch数据加载器)。
3. 为每个示例生成一个标题。
4. 使用前面定义的compute_metrics函数将生成的标题与参考标题进行比较。
import torch
# get test split
test_tokenized_dataset = tokenized_datasets["test"]
# pad texts to the same length
def preprocess_test(examples):
  inputs = [prefix + text for text in examples["text"]]
  model_inputs = tokenizer(inputs, max_length=max_input_length, truncation=True,
                           padding="max_length")
  return model_inputs
test_tokenized_dataset = test_tokenized_dataset.map(preprocess_test, batched=True)
# prepare dataloader
test_tokenized_dataset.set_format(type='torch', columns=['input_ids', 'attention_mask'])
dataloader = torch.utils.data.DataLoader(test_tokenized_dataset, batch_size=32)
# generate text for each batch
all_predictions = []
for i,batch in enumerate(dataloader):
  predictions = model.generate(**batch)
  all_predictions.append(predictions)
# flatten predictions
all_predictions_flattened = [pred for preds in all_predictions for pred in preds]
# tokenize and pad titles
all_titles = tokenizer(test_tokenized_dataset["title"], max_length=max_target_length,
                       truncation=True, padding="max_length")["input_ids"]
# compute metrics
predictions_labels = [all_predictions_flattened, all_titles]
compute_metrics(predictions_labels)
# {'gen_len': 13.0259,
# 'rouge1': 37.9268,
# 'rouge2': 24.4912,
# 'rougeL': 35.9087,
# 'rougeLsum': 35.9278}
这些度量指标比验证集上的度量指标要好。我们可能需要增加验证集和测试集的大小,以减少结果的变化,但目前来说,这些结果是令人满意的。
将模型上传到Hugging Face Hub
从Google Drive加载模型很麻烦,因为我们需要每次都将其挂载到Colab文件系统中。让我们看看如何将我们的模型上传到Hugging Face Hub。
当将模型上传到Hugging Face Hub时,最好的做法是将它与Hugging Face管理的三个主要深度学习框架一起上传:PyTorch、TensorFlow和JAX。因此,我们需要安装JAX来转换我们的模型,因为在Colab中默认情况下没有安装JAX。
pip install --upgrade jax jaxlib # CPU-only
pip install flax
然后,我们需要认证到我们的账号,因为上传的模型会链接到这个账号。
from huggingface_hub import notebook_login
notebook_login()
最后,我们以三种格式上传模型。记住也要上传标记器!
from transformers import T5ForConditionalGeneration,
   TFT5ForConditionalGeneration, FlaxT5ForConditionalGeneration

model_name = "t5-base-medium-title-generation"
model_dir = f"drive/MyDrive/Models/{model_name}"
tokenizer = AutoTokenizer.from_pretrained(model_dir)
pt_model = T5ForConditionalGeneration.from_pretrained(model_dir)
tf_model = TFT5ForConditionalGeneration.from_pretrained(model_dir, from_pt=True)
flax_model = FlaxT5ForConditionalGeneration.from_pretrained(model_dir, from_pt=True)
tokenizer.push_to_hub(model_name)
pt_model.push_to_hub(model_name)
tf_model.push_to_hub(model_name)
flax_model.push_to_hub(model_name)
完成后,我们就可以从集线器加载模型和标记器了。请注意,模型的名称前面是链接到它的帐户的名称。
tokenizer = AutoTokenizer.from_pretrained("fabiochiu/t5-small-medium-title-generation")
model = AutoModelForSeq2SeqLM.from_pretrained("fabiochiu/t5-small-medium-title-generation")
记得更新你上传模型的模型卡。这一步包括更新模型存储库中的README。看看我们的模型的最终模型卡!
用Streamlit构建一个交互式演示,并将其部署到hugs Face Spaces
让我们再次查看用于为文章生成候选标题的代码行。
output = model.generate(**inputs, num_beams=8, do_sample=True,
                        min_length=10, max_length=64)
如你所见,我们在生成方法中使用了几个参数来调整结果。在生成文本时,一个常用的参数是温度(temperature),它控制着在每次运行函数时获取确定性最可能的结果和获取不同但可能性稍低的结果之间的平衡。实际上,我们可能希望生成10个候选标题而不只是一个。
此外,我们的模型在生成候选标题时只考虑了文章文本的前512个令牌。如果我们想要生成多个标题,其中每个标题都是根据文章的不同部分的512个令牌生成的,我们将需要向模型添加自定义的预测逻辑,而这通常无法直接从Hugging Face Hub进行测试。
然而,有一种方法可以让用户尝试不同的设置:我们可以使用Streamlit构建一个具有自定义逻辑的小型演示!
Streamlit应用程序的完整代码。有两个主要组成部分:
1. app.py文件:包含应用程序的Streamlit代码。在这里,我们从Hugging Face Hub加载模型,创建一些交互式组件,并编写一些逻辑以将两者连接起来。
2. requirements.py 文件:包含app.py文件中使用的所有Python库(如transformers库)。这里不需要将Streamlit库添加到此文件中。
一旦我们在本地测试了Streamlit应用程序,并确保一切正常工作,我们就需要将其上传到新的Hugging Face Space中。这一步只是将Streamlit应用程序的文件复制到你在Hugging Face账户上创建的新存储库中。
这个生成的Hugging Face Space将在后台使用我们的标题生成模型,并允许生成多个标题(考虑到文章文本的不同部分)并更改温度参数。
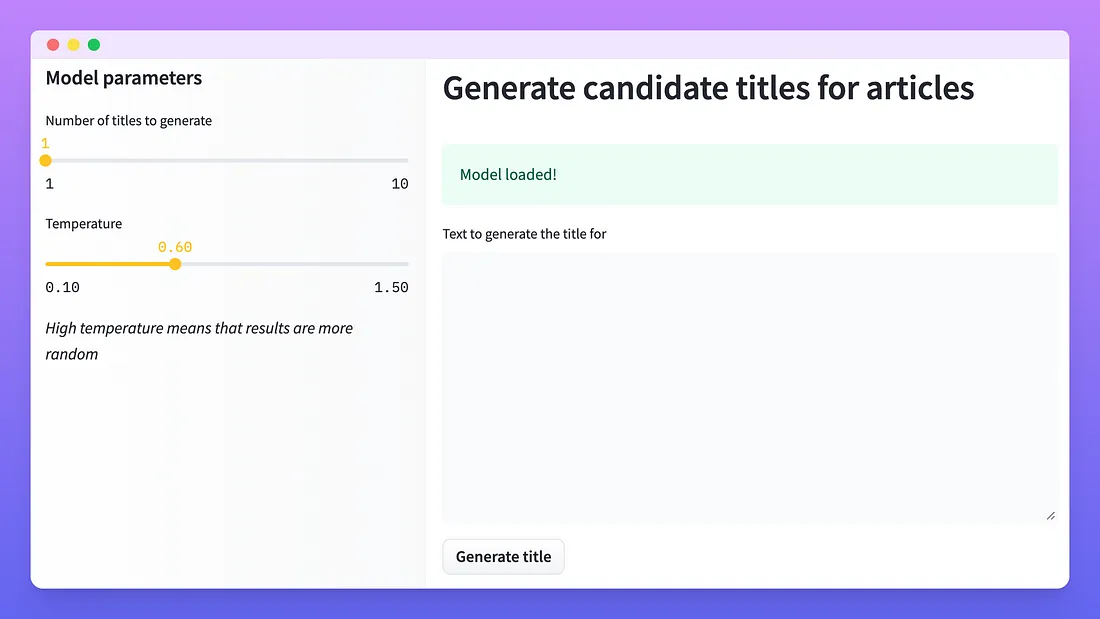
让我们尝试为“Banking on Bots”Medium文章生成5个候选标题,温度为0.6。
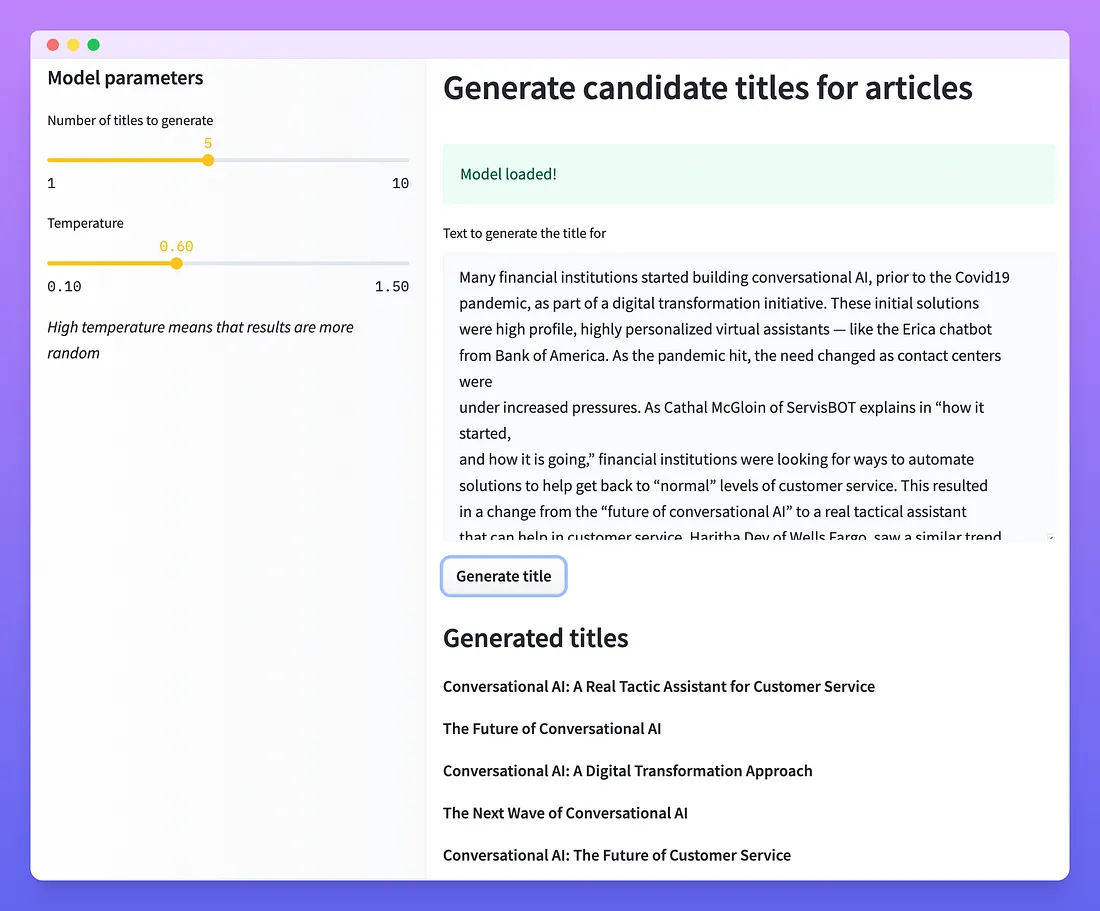
生成的标题是:
1. 会话式人工智能:客户服务的真正策略助手
2. 对话式人工智能的未来
3. 对话式人工智能:数字化转型方法
4. 会话人工智能的下一波浪潮
5. 对话式人工智能:客户服务的未来
用Streamlit构建一个小演示非常容易,并且与Hugging Face Spaces或Streamlit云结合,允许其他人测试你的工作,而无需了解如何运行Jupyter笔记本。
结论
在本文中,我们为标题生成任务选择了一个合适的数据集和指标,并使用hug Face库编写了一些代码,为我们的任务微调预训练的T5模型。然后我们把我们的新模型上传到Hugging Face Hub,这样每个人都可以使用它,我们用Streamlit做了一个演示应用程序,现在它被托管为Hugging Face Spaces。
我相信Hugging Face Spaces是一种构建NLP应用程序组合的轻松方式,人们或组织可以在其中展示他们的机器学习技能。


